Moze (Gunner) Boss Killer Build Guide
Welcome to our Boss Killer guide for Moze the Gunner in Borderlands 3. Featuring several damage multipliers and the ability to extend the firepower of already powerful guns like Lyuda and Cutsman, this build sports the fastest boss kill times. Here, you will learn everything you need to know to gear yourself up and play this build at the highest level.
Boss Killer Moze
By heavily investing in the Bottomless Mags tree, this build coupled with specific Vladof and Maliwan weapons provide the fastest boss killing potential since Porcelain Pipe Bomb nerf. Embracing the adage "the best defense is a good offense" the following build offers little in terms of survivability, in exchange for the ability to melt bosses in a handful of seconds, at worst.
Skill Tree
Strengths
- Extremely fast at killing bosses.
- Good enough survivability.
- Requires only a primary weapon and a secondary of your choice.
Weaknesses
- Iron Bear used only to enable some Anointed Traits (if you have any)
- Weapon dependent.
Playstyle
Boss Killer Moze playstyle is extremely simple and it is meant to be as quick
and effective as possible. Start the boss encounter in Iron Bear, pop out to
proc any anointment effects you may have and to enable ![]() Some for the Road.
Delete Boss with the appropriate elemental weapon; rinse and repeat.
Some for the Road.
Delete Boss with the appropriate elemental weapon; rinse and repeat.
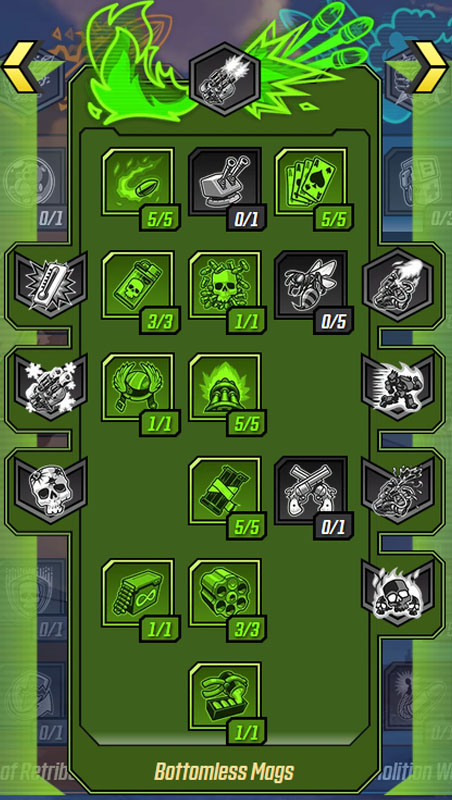
Boss Killer Moze Skills
Skills Breakdown
 Cloud of Lead improves our ammo efficiency while
 Redistribution and
  Forge provide continuous
ammo regeneration for the active weapon.
Forge provide continuous
ammo regeneration for the active weapon. Scorching RPM's together with
  “Click, Click...”
provide increase gun damage.
“Click, Click...”
provide increase gun damage. Matched Set and
  The Iron Bank combined almost
double the baseline magazine size of any weapon, which in turn also double the
ammo regen from Forge and Redistribution.
The Iron Bank combined almost
double the baseline magazine size of any weapon, which in turn also double the
ammo regen from Forge and Redistribution. Some for the Road allows us to burst down targets and bosses in
1 Cutsman or Lyuda clip.
Some for the Road allows us to burst down targets and bosses in
1 Cutsman or Lyuda clip. Rushin’ Offensive is a quality of life change, mostly to speed
up even further our farming. Gotta go fast!
Rushin’ Offensive is a quality of life change, mostly to speed
up even further our farming. Gotta go fast!
 Thin Red Line and
  Vladof Ingenuity are used to
increase the shield pool and increase our survivability.
Vladof Ingenuity are used to
increase the shield pool and increase our survivability. Experimental Munitions adds some extra Incendiary
damage everytime we score a Critical hit.
Experimental Munitions adds some extra Incendiary
damage everytime we score a Critical hit. Desperate Measures increase weapon damage by a noticeable
amount.
Desperate Measures increase weapon damage by a noticeable
amount.
Action Skill, Augments, and Elements
Iron Bear is mostly used to proc ![]() Some for the Road and anointed effects, thus its
loadout is more of a personal choice. I like to run with double
Some for the Road and anointed effects, thus its
loadout is more of a personal choice. I like to run with double
![]() Salamander, augmented with both
Salamander, augmented with both ![]() Fuel Economy and
Fuel Economy and
![]() Molten Roar for the extra mobility.
Molten Roar for the extra mobility.
Alternative Skill choices
The 1 point in ![]() Rushin’ Offensive can be reallocated into
Rushin’ Offensive can be reallocated into ![]() Scrappy
for faster weapon swap.
Scrappy
for faster weapon swap.
Boss Killer Moze Gearing
Best in Slot
While maximizing ![]() Matched Set is not as important as in Maliwan Moze, it is advisable to
get at least 2 matching weapons and a grenade mod of the same manufacturer to
be able to dispatch a boss within the 5 seconds of
Matched Set is not as important as in Maliwan Moze, it is advisable to
get at least 2 matching weapons and a grenade mod of the same manufacturer to
be able to dispatch a boss within the 5 seconds of ![]() Some for the Road
and the remaining clip under negative mayhem 3 affixes.
Some for the Road
and the remaining clip under negative mayhem 3 affixes.
For the primary weapon, there are 2 main boss killers:
- Lyuda is the first choice. A Sniper Rifle with the rate of fire of
an Assault Rifle, the gun is only limited by its magazine size and reload time.
Fortunately with this particular setup we can double the starting capacity
which coupled with Some for the Road and any eventual anointment effect
allows us to fire continuously till the boss is dead (provided it doesnt have
immunity phases). Ideally found with the Annexed affix, it is recommended to
have an Incendiary version, and a shock one as backup for high Shield
bosses.
- Cutsman is the other obvious option. Try again to have multiple guns with Incendiary/Corrosive/Shock damage to deal with the corresponding health bar.
Last weapon slot is for the Sellout in case we want to hunt red health bosses, and it is best paired with an Elemental Projector artifact.
Regarding Class mods, Bloodletter synergizes with the build, but it is not mandatory. There are simply no other options that stand out for the time being.
When choosing the Artifact, Deathless offers the highest damage
increase unless you have a class mod that gives you at least 2 extra points in
![]() Thin Red Line; if that is the case, then using a Grave offers
even more damage at the expense of further lowering our shields.
Thin Red Line; if that is the case, then using a Grave offers
even more damage at the expense of further lowering our shields.
The Re-Router Shield is the offensive choice, providing even more damage on our first shot. Ward can be a good alternative, although somewhat risky. If you prefer instead a safer approach, your best options are The Transformer, Re-Charger, and Stop-Gap.
Grenades mods are mostly used to extend primary weapon magazine size through ![]() Matched Set;
pick any Vladof mod if you run with Lyuda, or a Tran-fusion for
added sustain if you run with Cutsman since there are no Maliwan
Grenade mods yet.
Matched Set;
pick any Vladof mod if you run with Lyuda, or a Tran-fusion for
added sustain if you run with Cutsman since there are no Maliwan
Grenade mods yet.
Anointed Rolls
Anointed rolls are special additional effects that can appear on weapons and shields at higher levels. The special effects relate to the use of action skills and provide powerful temporary buffs.
Boss Killer Moze build greatly benefits from Action Skill End rolls such as:
- 'On Action Skill End, the next 2 magazines will have 50% additional bonus Element Damage' works extremely well as we basically never reload, making that an almost always active bonus on a given weapon.
- 'After exiting Iron Bear, the next 2 magazines will have 40% bonus Incendiary damage', is numerically a worse roll than the generic one, but it always comes with Incendiary Damage as the upside.
- 'After exiting Iron Bear, gain 75% increased shields and health for 25 seconds.' offers the best defensive capabilities, and can be used to complement an extremely glass-cannon loadout.
Alternative Gear from Missions
The build relies on a tight combination of specific legendary items, thus there is no viable alternatives from missions.
Best-in-slot Gear and Stat Priority List
| Slot | Item | Special Effect | Secondary Stat/Effect Priority |
|---|---|---|---|
| Weapon 1 | Lyuda |
|
|
| Weapon 2 | Cutsman |
|
|
| Weapon 3 | Any Vladof or Maliwan weapon depending on your first weapon choice. | ||
| Weapon 4 | Sellout when fighting against Red Bar bosses, else use a matching Vladof or Maliwan weapon | ||
| Shield | The Transformer | When full, drain 50% of shield to amplify next weapon shot by an additional 120%. Damage dealt that way is returned as Health Points. | 25% max capacity |
| Class Mod | Bloodletter |
|
|
| Artifact | Elemental Projector | While suffering an elemental effect, increase your damage with that same element. |
|
| Artifact alternative | Deathless | Reserves all but 1 health point. 100% shield Increase. -20% Shield recharge delay. |
|
| Grenade Mod | It's Piss | Removes negative status effect on friendlies and debuff enemy targets for 20% increase received damage. | |
| Grenade Mod Alternative | Tran-fusion | Heals for 120% of the damage dealt on health bars, and for 60% of the damage dealt to shield bars. |
Changelog
- 13 Nov. 2019: Guide added.
This guide has been written by Motoko, Warlock main since The Burning Crusade, co-admin in the Warlock Discord, and theorycrafter and contributor for LockOneStopShop.
- Icy Veins Seeking Writers for Zenless Zone Zero: Apply Today!
- Icy Veins Launches Genshin Impact Guides Section
- Icy Veins Podcast About Path of Exile
- ARPG Vault Discord Giveaway
- Icy Veins is Getting a New Look
- Join Us Live on Twitch for the Icy Veins Podcast
- Icy Veins Black Friday Giveaway Ends Today!
- Icy Veins Black Friday Giveaway!