Moze (Gunner) Bulletstorm Build Guide
Welcome to our Bulletstorm guide for Moze the Gunner in Borderlands 3. Combining precise weapons with high DPS and rate of fire with mini grenades on crit, this build allows to relentlessly focus-fire targets to death from a safe position and before they can become a threat. Here, you will learn everything you need to know to gear yourself up and play this build at the highest level.
BulletStorm Moze build overview
Bulletstorm Moze is an evolution of the standard Bottomless Mags build that
rose in popularity after ![]() Means of Destruction nerf. Leveraging the ammo
regeneration/capacity found in the Bottomless Mags tree, this Vladof-branded build aims to unleash a
tremendous amount of firepower at your enemies by combining fast and precise
weapons with the Mind Sweeper class mod.
Means of Destruction nerf. Leveraging the ammo
regeneration/capacity found in the Bottomless Mags tree, this Vladof-branded build aims to unleash a
tremendous amount of firepower at your enemies by combining fast and precise
weapons with the Mind Sweeper class mod.
Skill Tree
Strengths
- High sustained elemental damage.
- Good survivability.
- Generally defensive playstyle but weapon choices allow for a more offensive and rush playstyle.
- Suited for long-range combat.
Weaknesses
- Iron Bear used only to enable some Anointed Traits (if you have any) and to provide an escape or recharge shields.
- Weapon dependent.
- Requires some precision in order to consistently hit weak points.
- Actively dodging enemy fire is mandatory, as your shield regen options are tied to critical hits (and kills if you have the guardian perk).
Playstyle
Bulletstorm Moze is primarily a defensive build suited for long-range engagements. By making extensive use of the bipod attachment, the extremely high damage output of this build allows to delete targets from safe range. The goal is to focus fire individual targets with a Shredifier and get as many critical hits as possible in order to trigger multiple Mind Sweeper mini grenades which contribute to both single target and splash damage (especially deadly in chokepoints like stairs in Slaugtherstar 3000 where enemies like to clump up). That said, the playstyle is not necessarily rigid and if the situation arises, it can be adapted by swapping to a more mobile mid-range approach by using the likes of Lucian's Call, The Dictator, or even Faisor.
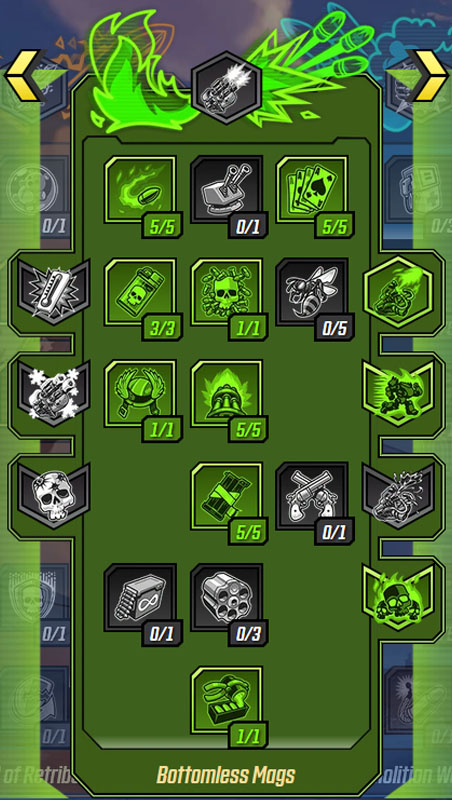
Bulletstorm Moze Skills
Skills Breakdown
 Cloud of Lead improves our ammo efficiency while
 Redistribution and
  Forge provide continuous
ammo regeneration for the active weapon.
Forge provide continuous
ammo regeneration for the active weapon. Scorching RPM's is the only direct damage increase
trait in the whole tree.
Scorching RPM's is the only direct damage increase
trait in the whole tree. Matched Set and
  The Iron Bank combined almost
double the baseline magazine size of any weapon, which in turn also double the
ammo regen from Forge and Redistribution.
The Iron Bank combined almost
double the baseline magazine size of any weapon, which in turn also double the
ammo regen from Forge and Redistribution. Rushin’ Offensive increases our mobility and allows for a
faster repositioning.
Rushin’ Offensive increases our mobility and allows for a
faster repositioning.
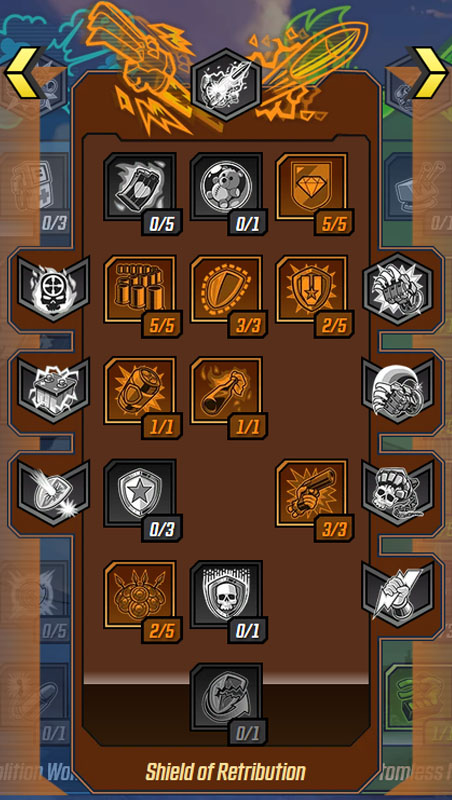
 Thin Red Line and
  Vladof Ingenuity are used to
increase the shield pool and increase our survivability.
Vladof Ingenuity are used to
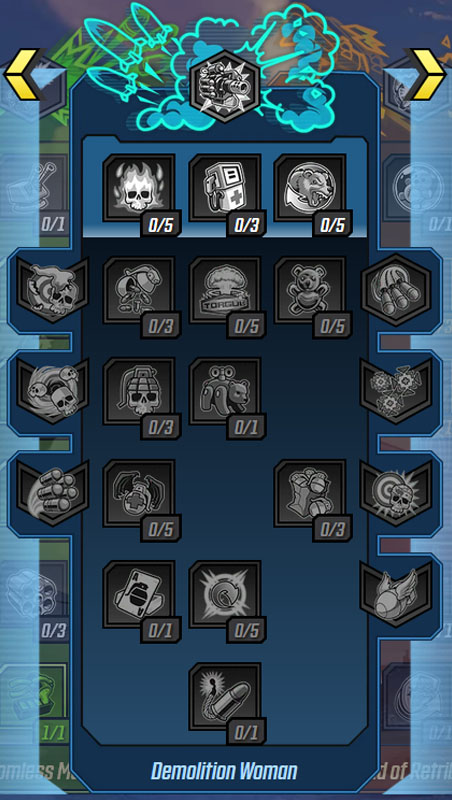
increase the shield pool and increase our survivability. Experimental Munitions adds some extra Incendiary
damage everytime we score a Critical hit.
Experimental Munitions adds some extra Incendiary
damage everytime we score a Critical hit. Drowning in Brass and
  Desperate Measures both
increase weapon damage by a noticeable amount.
Desperate Measures both
increase weapon damage by a noticeable amount. Phalanx Doctrine is a non-capped scaling buff that increases
our shield and gun damage for each foe we kill.
Phalanx Doctrine is a non-capped scaling buff that increases
our shield and gun damage for each foe we kill. Full Can of Whoop-Ass is by default our main option of recovering shields
if the situation gets ugly.
Full Can of Whoop-Ass is by default our main option of recovering shields
if the situation gets ugly.
Action Skill, Augments, and Elements
Iron Bear is mostly used as an escape or to proc anointed effects, thus its
loadout is more of a personal choice. I like to run with double
![]() Salamander, augmented with both
Salamander, augmented with both ![]() Fuel Economy and
Fuel Economy and
![]() Molten Roar for the extra mobility.
Molten Roar for the extra mobility.
Alternative Skill choices
The 2 points in ![]() Phalanx Doctrine and 1 point in
Phalanx Doctrine and 1 point in
![]() Full Can of Whoop-Ass can be used to max
Full Can of Whoop-Ass can be used to max ![]() Vladof Ingenuity if more
survivability is needed (or when not running The Transformer).
Vladof Ingenuity if more
survivability is needed (or when not running The Transformer).
Bulletstorm Moze Gearing
Best in Slot
In order to make the most out of ![]() Matched Set, it is paramount to have
4 Vladof weapons in the loadout,
as the resulted magazine increase will allow us to
never reload, thus benefit all the time from specific anointed effects that would
otherwise last only 2 magazines.
Matched Set, it is paramount to have
4 Vladof weapons in the loadout,
as the resulted magazine increase will allow us to
never reload, thus benefit all the time from specific anointed effects that would
otherwise last only 2 magazines.
Shredifier is the star of the build: offering an extremely high rate of fire, good damage and long range precision even in hipfire with the bipod equipped, allows to consistently get critical hits from afar, and to trigger dozen of grenades on beefy targets. Oftentimes, when dealing with multi-bar enemies, you will notice their last bar instantly evaporate as a result. The negative aspect of a deployed bipod is generally mitigated by the ability to delete targets way past the range in which they can become a danger. A Cryo or Incendiary variant are the best options, especially if paired with an anointed effect that grants additional elemental damage for the next 2 magazines.
Lucian's Call is the backup weapon for whenever there are multiple enemies and you want to stay mobile. It offers much less focused damage potential than the Shredifier, but whenever there are multiple enemies, ricochet bullets can also hit a critical point and proc grenades on secondary targets. Best found in Cryo version, especially if the other weapon is Incendiary, to help deal with yellow bars (armor), while providing consistent crowd control through freeze.
Our third weapon choice is for even closer range engagements, and that is The Dictator. With bipod deployed, this gun shoots 7 bullets at a time, making it especially desirable for when an anointed enemy teleports in front of you. Downsides? Due to the bullet spread, the effective range is rather short, but can be extended by aiming down sight (and reducing the horizontal spread).
Last weapon slot is usually a flex choice: if your loadout lacks Cryo
or Corrosive weapons, you may want to use a spare Shredifier,
Lucian's Call, The Dictator, or Faisor with a matching
element. Another option is to run a Jericho, to use at the beginning of
a fight against hordes of enemies, as it will blanket the whole area with
radioactive explosions and can help softening multiple targets before the actual
engagement starts. We have enough ammo regeneration skill perks to sustain the
ammo expenditure, especially when using Mind Sweeper mod which allows
for a second point(!) in ![]() Redistribution and multiple points in
Redistribution and multiple points in
![]() Fire in the Skag Den and
Fire in the Skag Den and ![]() Torgue Cross-Promotion, further increasing
the launcher's effectiveness.
Torgue Cross-Promotion, further increasing
the launcher's effectiveness.
Mind Sweeper is a welcome change in the build, and works the best with fast firing/precise weapons such as Vladof guns. The rolls it comes with also increase the damage of the mini grenade triggered, which is a welcomed bonus.
When choosing the Artifact, Deathless offers the highest damage with
its synergy with ![]() Desperate Measures. If you have yet to find it, another
temporary options is Victory Rush for added mobility and damage. Overall
the artifact itself is not that important, as much as the rolls it comes with: %
Assault Rifle Damage and % Magazine Size are incredibly desiderable, and so is %
Vladof weapon damage.
Desperate Measures. If you have yet to find it, another
temporary options is Victory Rush for added mobility and damage. Overall
the artifact itself is not that important, as much as the rolls it comes with: %
Assault Rifle Damage and % Magazine Size are incredibly desiderable, and so is %
Vladof weapon damage.
The Transformer is the preferred shield mod choice, providing Shock damage immunity and a high chance to absorb incoming bullets, and synergizes well with Shock Grenades (or Barrels) for additional sustain in a pinch.
Grenades are mostly used for utility, thus the likes of Quasar and Storm Front provide both crowd control and survivability.
Anointed Rolls
Anointed rolls are special additional effects that can appear on weapons and shields at higher levels. The special effects relate to the use of action skills and provide powerful temporary buffs.
Bulletstorm Moze build greatly benefits from 2 rolls on Weapons, the first generic and the second class specific:
- 'On Action Skill End, the next 2 magazines will have 50% additional bonus Element Damage' works extremely well as we basically never reload, making that an almost always active bonus on a given weapon.
- 'After exiting Iron Bear, the next 2 magazines will have 40% bonus Incendiary damage', is numerically a worse roll than the generic one, but it always comes with Incendiary Damage as the upside.
'After exiting Iron Bear, gain 75% increased shields and health for 25 seconds.' offers the best defensive capabilities, but requires some degree of micromanagement
For the seasonal Terror anointments, the most impactful is a generic one that says 'While Terrified, deal 50% bonus cryo damage.' and is best paired with the Gunner specific 'After Reloading, consume all Terror and create a nova that deals cryo damage.' in the situation where we reach too many stacks making our aim unsteady beyond control.
Alternative Gear from Missions
The build relies on a tight combination of specific legendary items, thus there is no viable alternatives from missions.
Best-in-slot Gear and Stat Priority List
| Slot | Item | Special Effect | Secondary Stat/Effect Priority |
|---|---|---|---|
| Weapon 1 | Shredifier |
|
|
| Weapon 2 | Lucian's Call |
|
|
| Weapon 3 | The Dictator |
|
|
| Weapon 4 | Jericho |
|
|
| Shield | The Transformer | 100% Shock resistance. 40% chance to absorb projectiles. | 25% max capacity |
| Class Mod | Mind Sweeper |
|
|
| Artifact | Deathless | Reserves all but 1 health point. 100% shield Increase. -20% Shield recharge delay. |
|
| Grenade Mod | Quasar | Vortex grenade that bounces and hovers, sucking enemies in while constantly dealing shock damage. | |
| Grenade Mod Alternative | Storm Front | Splits into 4 grenades that deal continuous shock to nearby enemies. |
Changelog
- 13 Nov. 2019: Guide added.
This guide has been written by Motoko, Warlock main since The Burning Crusade, co-admin in the Warlock Discord, and theorycrafter and contributor for LockOneStopShop.
- Icy Veins Seeking Writers for Zenless Zone Zero: Apply Today!
- Icy Veins Launches Genshin Impact Guides Section
- Icy Veins Podcast About Path of Exile
- ARPG Vault Discord Giveaway
- Icy Veins is Getting a New Look
- Join Us Live on Twitch for the Icy Veins Podcast
- Icy Veins Black Friday Giveaway Ends Today!
- Icy Veins Black Friday Giveaway!