Warhead Junction Map Guide
Welcome to our strategy guide for Warhead Junction, a Map in Heroes of the Storm. On this page, you will find everything required to understand how it is designed and how to play it.

Introduction
Warhead Junction is a 3-lane Map belonging to the Starcraft universe. The signature Objective of this Map are Warheads. They can be collected and launched on a target location, usually to damage enemy Structures. On this Map, you can also find the Slime Boss, a unique Mercenary Camp that deals a huge amount of damage to enemy Heroes and Structures.
Draft Strategy
- Anchor
- Gankers
- Global presence
- Point control for Boss Camp
- Poke tools for Objective
- Self-sustain
- Split-push
- Quests to stack on Heroes
Lane Assignments
Here you can find one or more formations that are viable on this Map. Keep in mind that positions in lane are not strict and will often change based on the situation.
Formation 3-1-1
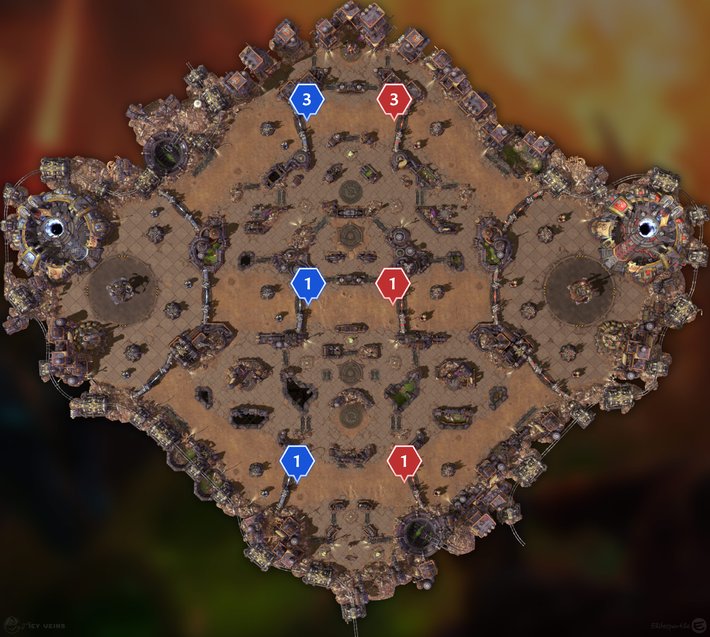
The go-to formation for Warhead Junction is 3-1-1:
- 3 Heroes cover the top lane and push as much as possible;
- 1 Hero, the Offlaner, covers the middle lane;
- 1 Hero, the Anchor, covers the bottom lane.

Map Strategy
- At 0:30 minutes or whenever available, start clearing the allied Bruiser Camp and capture it as soon as possible. To make this Mercenary Camp join the lane behind allied Minions, capture it at 0:45 minutes or 15 seconds after a wave of Minions spawned.
- At 2:30 minutes or 30-40 seconds before the next Objective phase, start clearing the allied Siege Camp in the bottom lane and capture it slightly before the Warheads spawn. To make this Mercenary Camp join the lane in front of allied Minions, capture it at 2:35 minutes or 5 seconds after a wave of Minions spawned.
- During the Objective phase, get at least half the Warheads and use them to open the battlefield at your advantage. If possible, poke enemy Heroes who are trying to collect a Warhead and interrupt enemy Heroes who are trying to launch them on your Structures.
- After about 10:00 minutes, whenever your team has an advantage, regardless if there is an Objective to contest or not, you can capture the Boss Camp and push with it. Avoid doing it earlier if you do not have a dedicated team composition.
Mercenary Camps
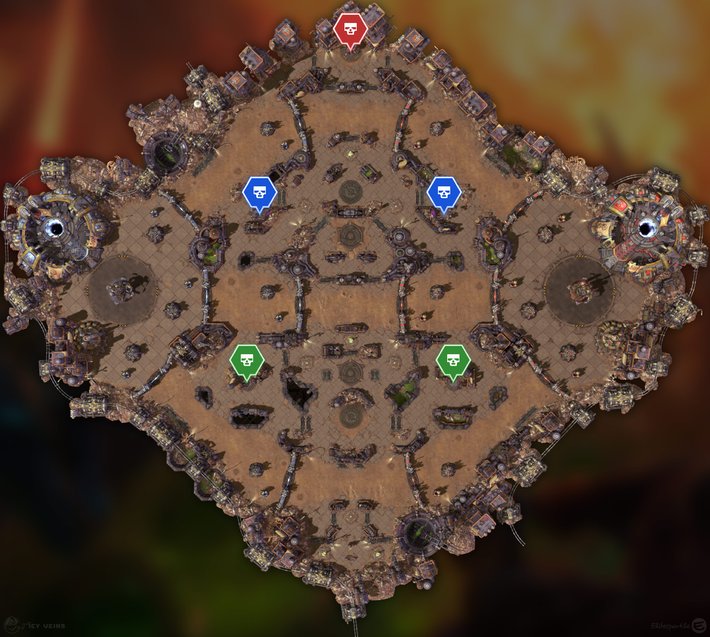
As shown in the image below, Warhead Junction has a total of 5 Mercenary Camps:
- 1 Boss Camp (red icon) in the top lane;
- 2 Bruiser Camps (blue icon) in the top lane;
- 2 Siege Camps (green icon) in the bottom lane.
Mercenary Camps on Warhead Junction are always active, even when Warheads are available on the battlefield.

Mercenary Camps indicated with a red icon are immune to Bribe effects.
Siege Camp
This type of Mercenary Camp features 2 Hellbats. Once captured, it spawns the same units fighting for your team in the corresponding lane. When possible, push with them to get more value.
| Spawn | Respawn |
|---|---|
| 0:30 minutes | 3:00 minutes after its last capture |
Hellbats reduce the Armor of enemy Structures and Heroes hit by their cleaving Basic Attacks for 3 seconds by 4 Armor per Basic Attack, stacking 5 times, for a maximum of 20 Armor reduction.
Bruiser Camp
This type of Mercenary Camp features 3 Goliaths and 1 Raven. Once captured, it spawns the same units fighting for your team in the corresponding lane. When possible, push with them to get more value.
| Spawn | Respawn |
|---|---|
| 0:30 minutes | 4:00 minutes after its last capture |
Ravens do not use Basic Attacks. Instead, they fire a Seeker Missile (5-second cooldown) which Reveals the targeted Hero and damages them upon impact. Ravens deal only 20 (not scaling) damage per second whereas Goliaths deal 40 (+1 per minute) damage per second.
Boss Camp
This type of Mercenary Camp features 1 Slime Boss. Once captured, it spawns the same unit fighting for your team in the corresponding lane. When possible, push with it to get more value.
| Spawn | Respawn |
|---|---|
| 5:00 minutes | 5:00 minutes after its last capture |
While in combat, the Slime Boss will use Slime Spit (14-second cooldown) to create a damaging pool on the ground, so be ready to avoid it. About 6 seconds after that, the boss will cast Spawn Pods (14-second cooldown) to launch multiple slime pods around him.
Due to being Elite, this Mercenary Camp is immune to Bribe
effects (such as ![]() Covert Mission by Nova).
Covert Mission by Nova).
Map Objective
The signature Objective of Warhead Junction are Warheads (also called Nukes). To pick them up, Heroes have to channel for 5 seconds. Warheads also spawn a Regeneration Globe when collected from their spawn location. Collecting a Warhead will allow Heroes to nuke a given area and damage all enemy units within it. Due to their relatively long cast time and huge delay, Warheads are best used for damaging enemy Structures.
| Spawn | Respawn |
|---|---|
| 3:00 minutes | 2:55 minutes after collecting all Warheads |


Warhead Deployment
Multiple Warheads will spawn periodically across the battleground.
|

Collect Warheads
Pick up a Warhead to activate your Nuke. Use it or you will drop it when you die!
|

Call Down the Thunder
Launch Nukes to burn enemy team's fortifications. Attack their structures to extend the burn!
|
Warheads
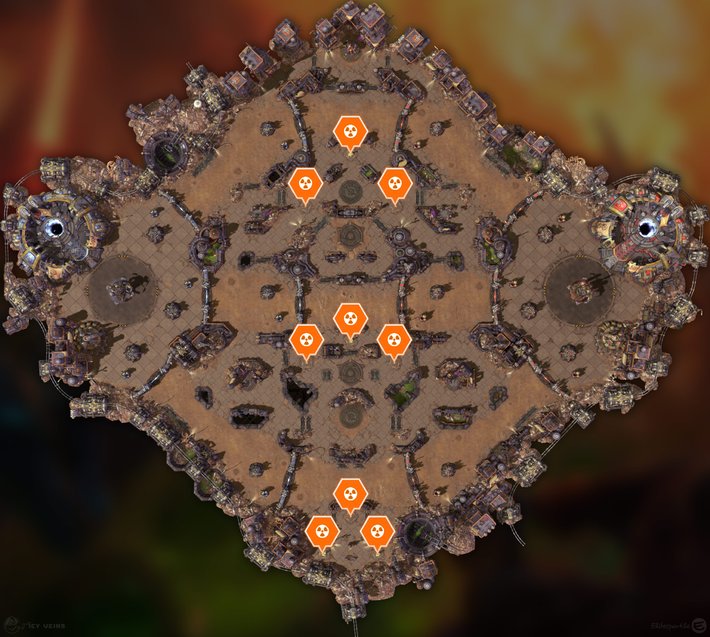
Warheads can spawn in 9 possible locations over 3 rows (top, middle, and bottom). Warhead will be distributed evenly in each lane: if there is only 1 Warhead, it will be at the center; if there are 2 Warheads, they will be on the sides.
Every spawn will feature from 2 to 4 Warheads. Spawns with 2 Warheads will have them on separate lanes. Spawns with 3 Warheads or more will always have exactly one lane with 2 Warheads.
The number of Warheads depends on the Objective phase's number:
- the 1st Objective phase can have from 2 to 3 Warheads;
- the 4th Objective phase can have from 3 to 4 Warheads;
- any other Objective phase can only have exactly 2 Warheads.
The 1st spawn has two additional rules:
- when there are 2 Warheads, they will be both middle;
- when there are 3 Warheads, they will be 1 middle, 2 in a side lane, and 0 in the other.
The 4th spawn has an additional rule:
- when there are 3 Warheads, they will be 2 in a lane and 1 in another;
- when there are 4 Warheads, they will be 1 top, 2 middle, and 1 bottom.
After collecting a Warhead, it will be on cooldown for 5 seconds. If you do not pay attention to this characteristic, you may end up walking within range of enemy Structures by mistake, taking unnecessary damage or even dying in the process. Also, Warheads deal damage after 4 seconds, so you will rarely hit enemy Heroes.

- Item
After a 2.5 second channel and a 4 second delay, launch a Warhead dealing 1750 (+70 every minute for 25 minutes) to enemy non-Heroes and 30% of their maximum Health to enemy Heroes. Structures are also ignited for 10 seconds, taking 60 damage per second (+2.375 every minute for 25 minutes). Heroic Basic Attacks pause the burning's duration for 3 seconds. Forts, Keeps, and Core take 100% more damage.
Try to hit multiple Structures at the same time to maximize their value. Using 1 Warhead on each Fort (while also hitting nearby Towers) is more efficient than using 3 Warheads on the same Fort (while also hitting nearby Towers). That said, considering that Forts, Keeps, and Core take 100% more damage from Warheads, you should not hesitate to use a Warhead for damaging a Fort without Towers nearby or a Keep without Towers nearby.
Due to their cast time and delay, you will rarely hit enemy Heroes with them. The only situation in which it makes sense to use a Warhead not to hit enemy Structures is when trying to secure a Boss Camp because it will help you kill the Boss faster and, more importantly, will zone enemy Heroes because they will not want to take a lot of damage from its impact.
You can use the Warhead timings provided below to launch a Warhead when the Game Time shows the corresponding amount of seconds. This way you can instantly kill a wave of enemy Minions for free when using a Warhead to hit a Fort or Keep and its nearby Towers at the same time.
When targeting a Fort and its nearby Towers, the Warhead timings are:
- Top: 16 seconds, 46 seconds;
- Middle: 9 seconds, 39 seconds;
- Bottom: 17 seconds, 57 seconds.
When targeting a Keep and its nearby Towers, the Warhead timings are:
- Top: 29 seconds, 59 seconds;
- Middle: 28 seconds; 58 seconds;
- Bottom: 29 seconds, 59 seconds.
Heroes trying to use a Warhead can be interrupted with crowd-control Abilities, putting the Warhead on a 10-second cooldown. To defend from Warheads, stay near your Structures to constantly stop enemy Heroes for nuking them. At the same time, though, enemy Heroes will try to use Warheads from the sides, behind the impassable terrain surrounding your Forts.
Do not bother trying to reduce the damage done by enemy Heroes
who are launching a Warhead. Their damage cannot be affected by damage reduction effects
(such as ![]() Defense Matrix by D.Va). Once a Warhead goes off,
the only way to protect your Structures from its damage is putting them in
Time Stop (only possible with
Defense Matrix by D.Va). Once a Warhead goes off,
the only way to protect your Structures from its damage is putting them in
Time Stop (only possible with ![]() Void Prison
by Zeratul) right before the damage happens.
Void Prison
by Zeratul) right before the damage happens.
Whenever a Hero having a Warhead dies, that Warhead will drop on the ground, ready to be collected by another allied or enemy Hero. If you predict that you are going to die for sure in the next 3 seconds, you can use it on the spot so that the enemy team will not be able to get value from it. Note that this move is impossible to pull off against enemy Heroes who can quickly burst you down or have interrupts.
Warheads stop scaling when picked up. For example, a Warhead picked up at 3:05 minutes will do about 700 less damage than a Warhead picked up at 13:05 minutes. This difference may occasionally be relevant when trying to take down a Keep in the late game or when going for the enemy Core.
Store some Warheads for when you will try to end the game because they can deal a lot of damage to the enemy Core. When using Warheads to end the game, aim the Warheads more towards your team, so that they will not only hit the enemy Core but also zone enemy Heroes away from you.
Assuming the enemy Core has 20-minute scaling (maximum possible) and Warheads have about 15-minute scaling (realistic scenario), each Warhead will deal damage on impact equal to about 25% of the enemy Core's maximum Health (stacking) and damage over time equal to about 5% of the enemy Core's maximum Health (not stacking).
| Warheads | Impact Damage | Damage Over Time | Total Damage |
|---|---|---|---|
| 1 | 25% | 5% | 30% |
| 2 | 50% | 5% | 55% |
| 3 | 75% | 5% | 80% |
| 4 | 100% | 5% | 105% |
| 5 | 125% | 5% | 130% |
Note that Cores have a Shield equal to 50% of their maximum Health. As a consequence, if you want to destroy the enemy Core to win the game, you need to deal damage equal to 150% of the enemy Core's maximum Health.
Sewage Tunnel
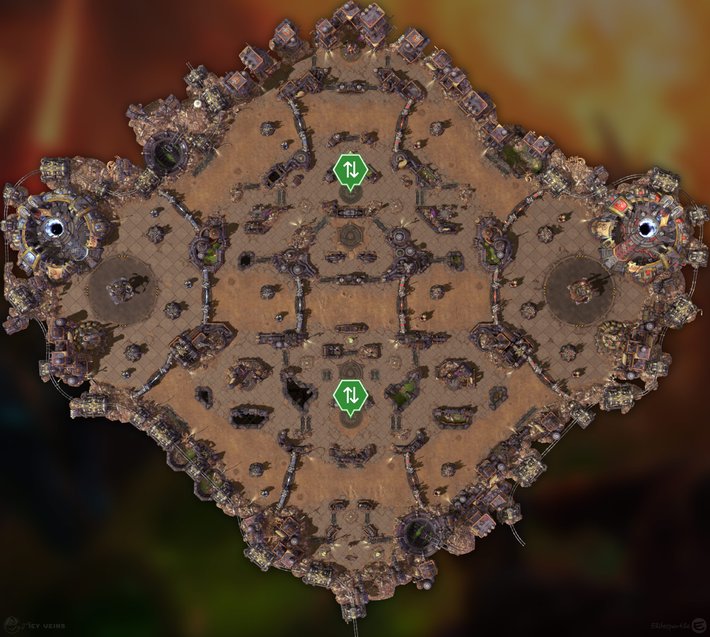
Even if Warhead Junction is a big Map, it is relatively fast to travel between the bottom and the top lane thanks to the Sewage Tunnel connecting them. When clicking on it, after channeling for 2 seconds, you will be teleported to the other side of the tunnel. You cannot use the Sewage Tunnel while directly taking damage from enemies.

You can use the Sewage Tunnel for various things, such as:
- when you are in the top lane but the enemy team is trying to siege your Structures in the bottom lane;
- to surprise enemy Heroes with a gank;
- as a valuable shortcut when traveling from a Mercenary Camp to the furthest lane, or in the opposite direction.
All that said, avoid using them if your team is not controlling at least one of the Watch Towers because, thanks to them, the enemy team will see all your movements between the bottom and top lane on the Minimap, indirectly gaining a tactical advantage by knowing your approximate position in the next few seconds and because, due to not having them, you will risk meeting enemy Heroes at the exit of the Sewage Tunnel.
Watch Towers
Warhead Junction features 2 Watch Towers: one right above the middle lane and another slightly below it, each of them giving vision on one of the entrances of the Sewage Tunnel.

Securing a Watch Tower provides your team with greater vision, allowing you to keep an eye on enemy movements in that part of the battlefield. Watch Towers can be captured by standing in the area until your team gains control. After 45 seconds of not being occupied, they become neutral again. Because of this, they should only be captured when you are playing in that area for other reasons (either to capture Mercenary Camps or for contesting the Objective).
Watch Towers controlled by the enemy team are extremely dangerous, especially when there are bushes nearby, therefore you should think twice before contesting them. If you do not have mobility tools at your disposal and your teammates are not nearby to help you, you should definitely not try to capture a Watch Tower as you will only risk dying for no reason. Staying alive is more important than getting vision.
Core Ability
Every 18 seconds, the Core launches a Warhead at a nearby enemy Hero, dealing 30% maximum Health as damage to enemy Heroes hit.
Win Conditions
To win the game on Warhead Junction, you should count on any of the following win conditions:
- Boss Camp,
- Split-push,
- storing Warheads for hitting Core.
Tips and Tricks
- Use the first Healing Fountain (2-minute cooldown) before 1:00 minute because the first Objective on this Map activates at 3:00 minutes, so you will have it back in time for that.
- Warheads do NOT deal bonus damage in the center area. In order to maximize their damage, Warheads should ideally be used to hit as many Structures as possible at the same time. Note that Forts, Keeps, and Core take double damage from them.
- Warheads make enemy Structures hit take damage over time. Heroic Basic Attacks can make the damage over time last longer. To get value from this, use Warheads when accompanied by allied Heroes to help you and allied Minion to tank enemy Structures for you.
- Watch Towers controlled by the enemy team are extremely dangerous, especially when there are bushes nearby, therefore you should think twice before contesting them.
- Before using the Sewage Tunnel for rotating between top lane and bottom lane, it is important to look at the Minimap and be aware of where enemy Heroes could be.
Changelog
- 14 Feb. 2026: Guide updated for the latest Map Updates.
- Watch Towers section updated.
- 16 Dec. 2025: Guide updated for the latest Map Updates.
- Map Objective section updated.
- 01 Dec. 2025: Guide updated for the latest Map Updates.
- Map Objective section updated.
- Tips and Tricks section updated.
- 30 Sep. 2025: Guide updated for the latest Map Updates.
- Map Strategy Section updated.
- Mercenary Camps section updated.
- Map Objective section updated.
- 23 Aug. 2024: Guide reworked.
- 14 Jun. 2021: Guide created.

Elitesparkle has been hooked on Heroes of the Storm since day one in 2015. Over the years, he has consistently competed at Master level across multiple Seasons and has even climbed into Grand Master a couple of times. Known for his logical mindset and love for theorycrafting, he thrives on breaking down the game's mechanics and engaging in high-level strategy discussions with the community.
- Heroes of the Storm PTR Patch Notes: March 30
- Heroes of the Storm Balance Patch Notes: February 19
- Heroes of the Storm Live Patch Notes: February 10
- Heroes of the Storm PTR Update: January 21
- Heroes of the Storm PTR Update: January 16
- Heroes of the Storm PTR Patch Notes: January 14
- Heroes of the Storm Balance Patch Notes: December 12
- Heroes of the Storm Live Patch Notes: December 1
 Free Hero Rotation


