Barbarian Raekor Set Dungeon Guide
Welcome to our guide to complete the Raekor set dungeon for Barbarians, a required step to complete the Masters of the Universe Conquest.
Overview of the Raekor Set Dungeon
The Raekor Set Dungeon is located in Act V, the Overgrown Ruins. Teleport to Act V's town, The Survivors' Enclave. Head upwards and then to the right from the junction near the healer Anselm, and then past the merchant Powell. You will reach the entrance of the Overgrown Ruins — enter and head through the marshlands beyond. Nearing the entry to the next zone, the Blood Marshes, are two ancient pillars — the Raekor Set Dungeon's entrance will appear to their left if you have the 6-piece bonus active.
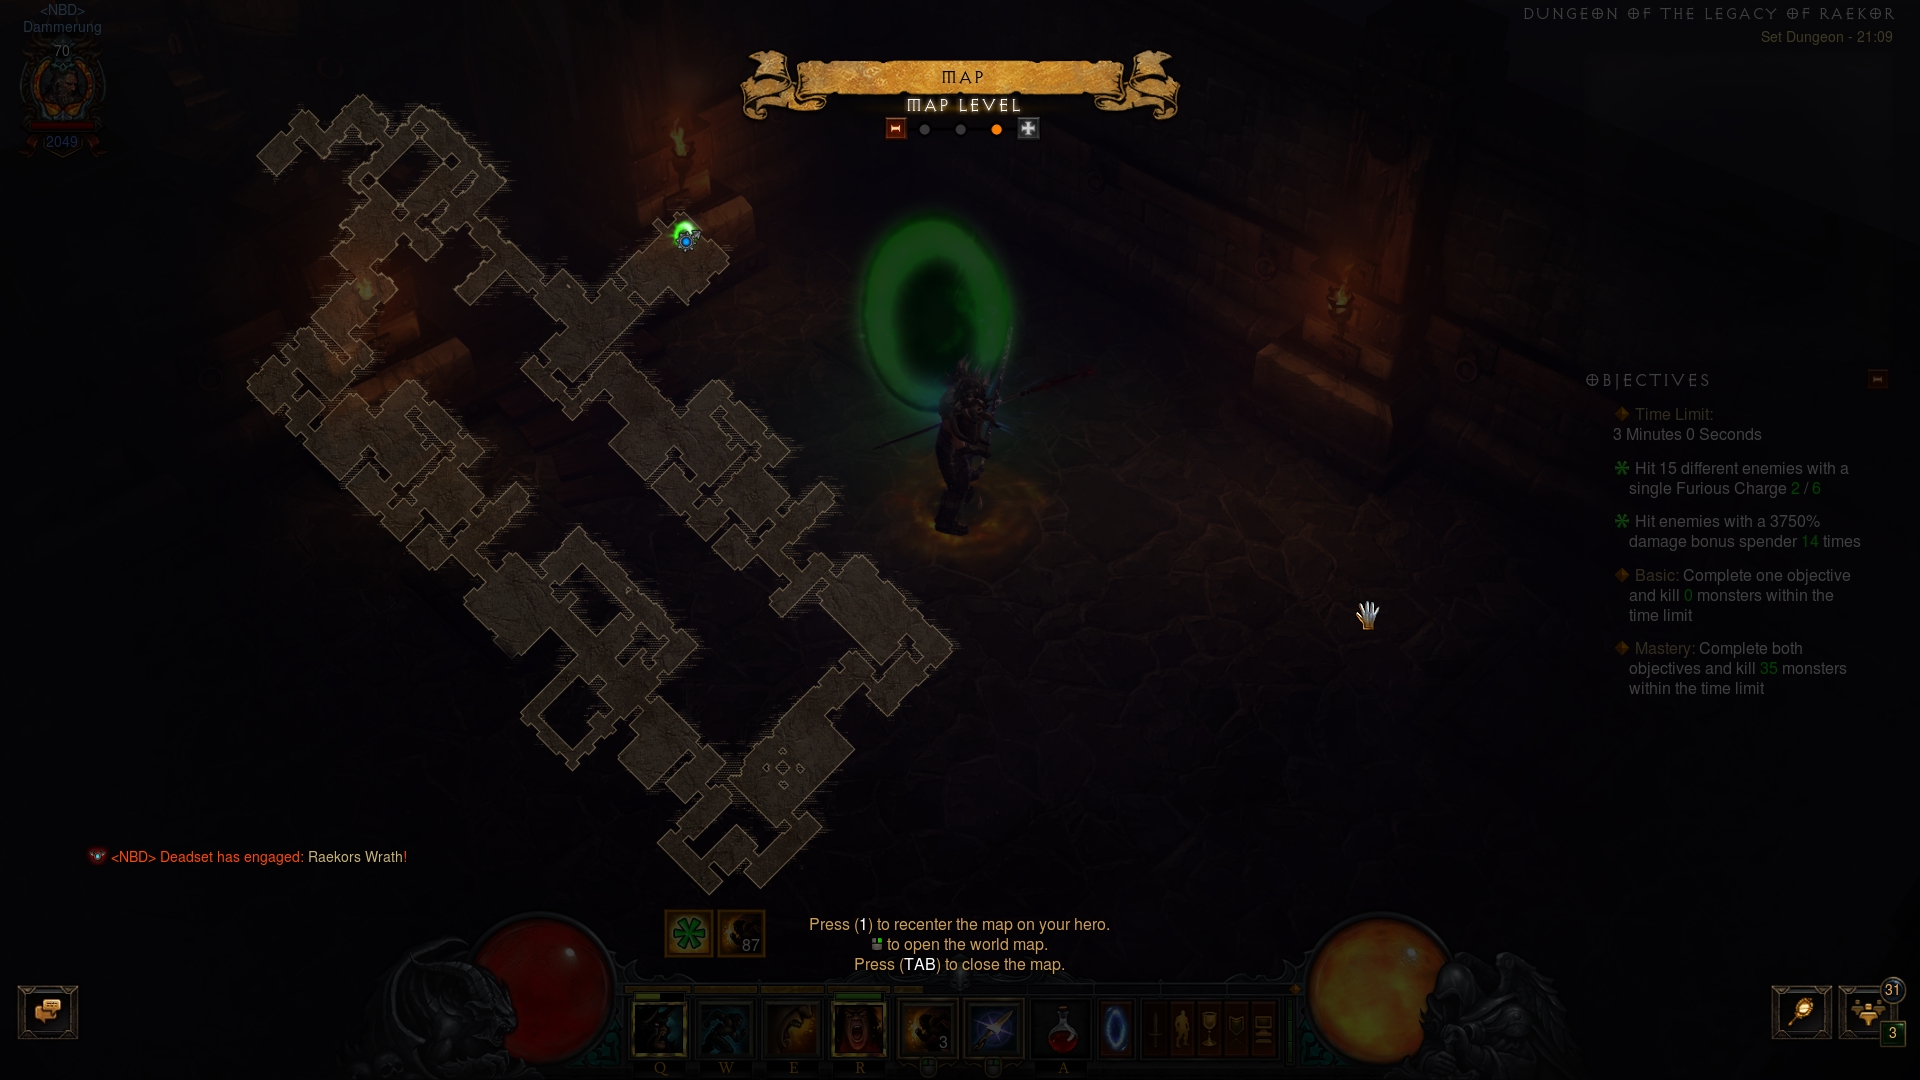
The Raekor Set Dungeon's two unique Primary Objectives are to: 1) Hit 15
different enemies with a single ![]() Furious Charge 6 times; and 2) Hit 15
enemies with a 3750% damage bonus spender.
Furious Charge 6 times; and 2) Hit 15
enemies with a 3750% damage bonus spender.
The Raekor Set Dungeon is a sprawling Keep Depths tileset dungeon, with numerous dead ends and side rooms. In spite of that, your attempt paths are fairly straightforward, since the dungeon forms a large rectangular path. You can clear it counter- or clockwise without meaningful impact on your success.
The Raekor Set Dungeon is populated by four kinds of enemies:
- Fallen and Bile Crawlers — these two kinds of minor trash enemies are spread in generous packs across the map, helping with the first Primary Objective of the dungeon, and will make the bulk of the "kill all enemies" objective.
- Harvesters and Grotesques — these "exploding fatty" type of undead
are fewer in number and appear either on their own, or near larger trash packs
of smaller enemies. The extra adds that spawn from their death can add some
extra numbers for your
 Furious Charge counter, but should not count towards
the final enemy tally.
Furious Charge counter, but should not count towards
the final enemy tally. - Raekor's Wraths — the unique enemies of the map. They resemble Act 2's Fallen Shaman, but also have a Molten affix. Unlike many Set Dungeons, the elites of this map are not tied to objectives, so you can kill them on sight. Beware their on-death explosion.
Tips for the Raekor Set Dungeon
As with most Set Dungeons, a follower is not necessary and might get in the way more than help the situation. Do not be afraid to dismiss your companion.
Similarly to the ![]() Furious Charge playstyle it is tied to, the Raekor Set
Dungeon is all about movement speed. Insert as many speed-buffing skills and gear
as you can, while still being reasonable (i.e.
Furious Charge playstyle it is tied to, the Raekor Set
Dungeon is all about movement speed. Insert as many speed-buffing skills and gear
as you can, while still being reasonable (i.e. ![]() Wreath of Lightning provides
a movespeed buff, but has a damage proc that might kill off stragglers and
jeopardize a carefully aimed charge).
Wreath of Lightning provides
a movespeed buff, but has a damage proc that might kill off stragglers and
jeopardize a carefully aimed charge).
Since its more fiddly than the other objective, try to complete the 6
![]() Furious Charges on 15 enemies first. Generally, once you spot a large
trash pack, do not Charge them immediately, but try to form a good pull (ideally
with our recommended
Furious Charges on 15 enemies first. Generally, once you spot a large
trash pack, do not Charge them immediately, but try to form a good pull (ideally
with our recommended ![]() Threatening Shout
Threatening Shout ![]() Demoralize) and pass directly
through the pack. When played out correctly, they will follow you in a convenient
string, ideal for a 15+ enemies
Demoralize) and pass directly
through the pack. When played out correctly, they will follow you in a convenient
string, ideal for a 15+ enemies ![]() Furious Charge. This tactic will net you
completion of the first Objective by the first third of the map, allowing you
to focus on the second and killing all enemies.
Furious Charge. This tactic will net you
completion of the first Objective by the first third of the map, allowing you
to focus on the second and killing all enemies.
If you adopt the standard ![]() Furious Charge build spender,
Furious Charge build spender,
![]() Ancient Spear
Ancient Spear ![]() Boulder Toss, you will fulfill the 3750% damage bonus spender
requirement at 5 stacks of Raekor's Charge (note the set mechanics). This means
that every 5
Boulder Toss, you will fulfill the 3750% damage bonus spender
requirement at 5 stacks of Raekor's Charge (note the set mechanics). This means
that every 5 ![]() Furious Charges (or more), you can do a
Furious Charges (or more), you can do a ![]() Boulder Toss
and expect progress on the Objective. Since there's plenty of enemies on the map
to snipe with powered up
Boulder Toss
and expect progress on the Objective. Since there's plenty of enemies on the map
to snipe with powered up ![]() Ancient Spears, worry about that objective after
the first (but do not pass a good opportunity to dump Fury if you spot one).
Ancient Spears, worry about that objective after
the first (but do not pass a good opportunity to dump Fury if you spot one).
While this applies to all Set Dungeons, do your best to kill all enemies in the areas you pass through. This Set Dungeon specifically is so lengthy that even going for a second run through is not recommended.
Build for the Raekor Set Dungeon
| Active Skills |
|---|


|
| Passive Skills |
| Slot | Pieces | Stat Priority |
|---|---|---|
| Head |
|
|
| Shoulders |
|
|
| Torso |
|
|
| Wrists |
|
|
| Hands |
|
|
| Waist |
|
|
| Legs |
|
|
| Feet |
|
|
| Amulet |
|
|
| Ring #1 |
|
|
| Ring #2 |
|
|
| Weapon |
|
To help you with farming the gear you need for your builds, we have two very useful guides that you can access by clicking the links below: a Salvage Guide to help you quickly check whether or not you can safely salvage a piece of gear and a Legendary Farming Guide to help you efficiently farm legendaries and set items.
| Slot | Gems |
|---|---|
| Jewelry | |
| Helm | |
| Torso and Pants |
|
| Weapon |
Kanai's Cube
- Weapon Slot:
 In-geom
 - Armor Slot:
 Illusory Boots
 - Jewelry Slot:
 Band of Might
Changelog
- 01 Mar. 2018: Added guide.
This build is presented to you by Deadset, one of the very few professional Diablo 3 players. Deadset regularly publishes video guides on Youtube and streams on Twitch, where you can see how this and other builds play out in practice.
- Diablo 3 Season 38 Preview
- Diablo 3 Season 37 (Official Preview)
- What's Coming in Diablo 3 Season 36?
- Diablo 3 Season 35: Official Preview
- All Diablo 3 Season 34 Class Guides and Compendium
- Diablo 3 Season 34 Delayed a Week
- Season 34 Official Preview
- Diablo 3 Season 33 Unintentionally Prematurely Ended