Hearthstone Mercenaries Gameplay Guide
This guide will provide you with all of the information required in order to play the Hearthstone Mercenaries game mode. Each part of the guide will cover the various mechanics required to succeed and understand basic battles in addition to covering the various parts of the town.
This guide is part of our larger Mercenaries Guide.
Starting a Battle
When starting any battle within Mercenaries, the first thing you will be required to do is place your mercenaries. You will be presented with a selection of all the mercenaries in your current team that are still alive. Mercenaries can be dragged onto the board from your hand, similarly to playing a card in Hearthstone. You will be able to place mercenaries onto the board until you have 3 in play, any remaining mercenaries will be placed onto your bench, which functions similar to a deck in Hearthstone. Once a mercenary is placed onto the board, it cannot be removed until it is either killed or you win the battle, so choose carefully.
While placing your mercenaries, you can freely drag your mercenaries in play to position them in the order you desire, however, this cannot be changed after you have finished placing your mercenaries and confirmed the end of your placement phase. Once you have confirmed your mercenary placement, you will move onto the command phase.
Command Phase
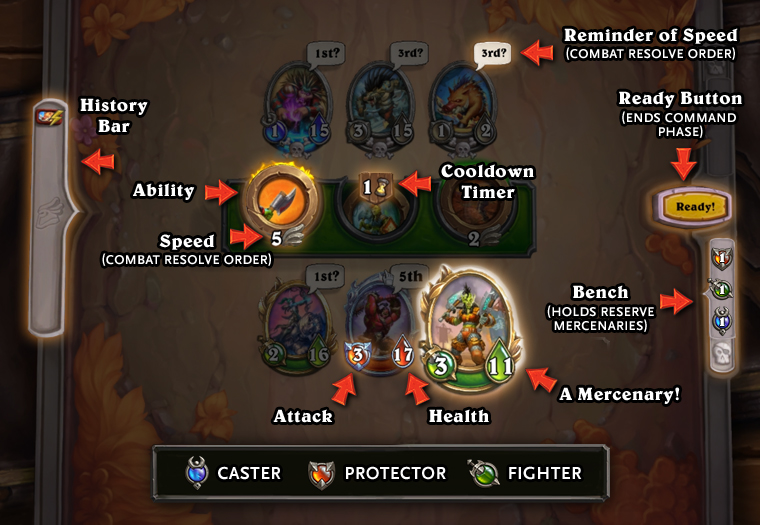
Combat takes place in a sychronous manner. For each of your mercenaries in play, you will have a selection of upto 3 abilities for each mercenary that you will be able to use. To use an ability, simply click on one of your mercenaries, click on a usable ability and then select a target for the ability if applicable. During this phase, actions are not immediately performed, so you can go back to one of your mercenaries and select a different ability or target as many times as you wish, should you change your mind.
Some abilities may not be immediately usable due to having a cooldown, which can be seen by an hourglass above an ability and a number showing the number of turns until it is available for use. Abilities that have cooldowns start on cooldown at the beginning of the game and each time the ability is used, the cooldown period must be waited until the ability can be used again.
Each ability you choose will have a speed value shown under it. When the command phase neds, the speed values of all of the abilities queued by both sides will be considered and abilities will begin to resolve one-by-one in ascending order of speed value. In the cases of ties, the order of tied abilities will be randomised.
If you are facing an AI opponent, such as when doing PvE bounties, you will have prior knowledge of the abilities each of their mercenaries will use but not the target they will choose. This additional knowledge will allow you to more carefully plan your turn to counter what they will do. Conversely, when playing against other players, you will not have access to this information, requiring you to use your game knowledge to try and figure out which abilities your opponent may use.
When you are happy with your ability choices for the turn, you can press the ready button to end the phase. Any mercenaries who do not have an ability queued will simply skip their turn in the combat phase, which may be strategically beneficial in some cases. After both players confirm their command phases choices, the combat phase will begin.
Combat Phase
During the combat phase, all of the mercenaries on the board will resolve their abilities queued up in the command phase in order of speed. Due to the nature of how combat is queued, certain abilities may change how combat plays out.
The damaging abilities are split into two main types of abilities: those with the Attack keyword and those without. Abilities without the keyword will simply do the damage as stated, much like a spell in Hearthstone. Conversely those with the keyword will perform a very specific action. The Attack action is very similar to attacking with a minion in Hearthstone, in that when a minion attacks it will do damage equal to Attack value to the target while receiving damage equal to the defending mercenary's Attack value in the process.
Some abilities may adjust the speed of other mercenaries, adjusting the speed of their abilities. For example, Staggering Slam 1 hitting a mercenary will slow down their next ability, dyamically adjusting their place in the ability queue if they havent acted yet.
Within combat it is also common for a mercenary to take lethal damage and be eliminated. If this happens, they will not get to use their queued ability if they have not acted yet. Any abilities that are still queued to target the mercenary that is eliminated will be direct towards a random legal target. Similarly, if a mercenary becomes Immune in the middle of combat, any damaging abilities targetting them will be redirected in a similar manner.
Some abilities may also contain the Combo keyword as part of their text. These abilities will gain additional effects if one of your mercenaries uses one of their abilities earlier in the combat. As an extension of this, many Combos will specificall be Elemental Combos, such as Arcane Fling 1, which would explicitly require you have used an ability with the Arcane tag at the bottom of it in order to get its bonus effect.
In a PvP battle, if any mercenaries are eliminated in combat, the Recruit phases will begin after combat. If you are in a PvE encounter, you will only enter the Recruit phase if one of your own mercenaries has been eliminated. If no mercenaries have been eliminated, another Command Phase will begin.
Recruit Phase
The Recruit Phase is very similar to the start of the game, allowing a player to bring mercenaries from the bench and put them into play. You can play mercenaries from the bench until you are back up to 3 mercenaries or have no more mercenaries on your bench. During this time, may not return mercenaries from the board to your hand or bench, but you can reorder them on the board to make their positions more favourable for combat.
If only your opponent lost mercenaries during the combat phase, you may not bring out any more mercenaries from your bench, however, you are still free to adjust the position of your mercenaries during this phase.
After the Recruit Phase ends, the Command Phase will begin once again and this cycle will continue until one side had no mercenaries remaining.
The Combat Triangle
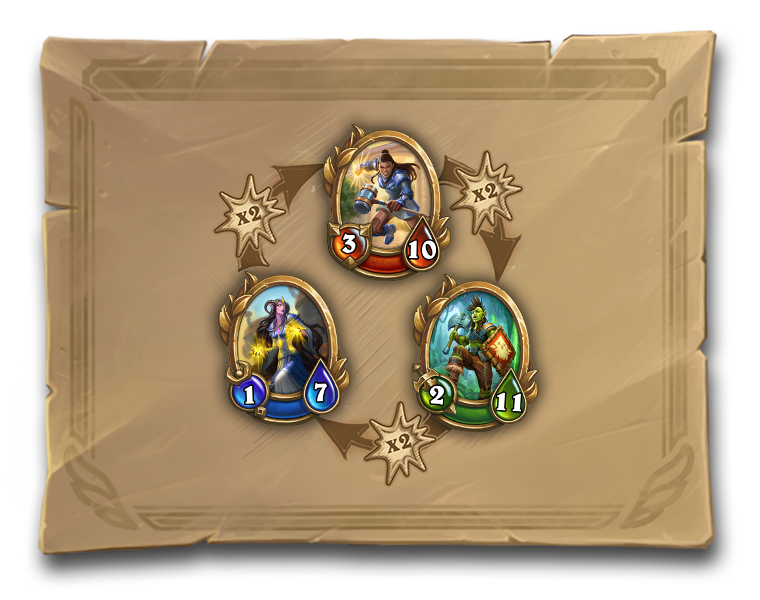
While planning the actions of your mercenaries, you should take note of the colours found underneath them. They will be either red, green, or blue, representing the roles of Protectors, Fighters, or Casters respectively.
Once you are more comfortable with the game, these colours play an important strategic role. These 3 roles form a combat triangle, with each one favouring dealing damage to another. This means that, as indicated by the picture above, using a mercenary to deal damage to the correct role will result in double damage being dealt, for example when using a Protector (Red) to damage a Fighter (Green). This damage bonus only applies when using the abilities of the favourable role, for example, if a Fighter attacks a Protector, the fighter will not receive double damage back towards it in the process.
Changelog
- 17 Oct. 2021: Guide added.
This guide is presented to you by Kat, a professional Hearthstone player competing at the highest level since closed beta. She is a consistent legend player in both Wild and Standard with multiple high-rank finishes.
- Hearthstone Brings StarCraft and Major Updates in 2025
- Blizzard at Gamescom 2024
- Icy Veins Seeking Writers for Zenless Zone Zero: Apply Today!
- No BlizzCon in 2024
- Blizzard Games Return to China: New Agreement Signed With NetEase
- Blizzard Reportedly Reuniting with NetEase to Bring Back WoW in China
- Ex-Activision Blizzard CEO Bobby Kotick Shows Interest in Buying TikTok
- Timeline of Blizzard Presidents