

Mythic+ Affixes
When you reach level 4 in your Mythic+ dungeons, you will start to see affixes attached to the keystone which add additional effects to enemies within the dungeon. Each tier (4, 7, and 10) cannot be duplicated within one keystone, so you will have one of each at higher levels and they will cycle each week. Combinations can vary in difficulty and how much they synergise with each other and the instance in question, but all of them have an impact and have to be dealt with in different ways.
Tier 1 Affixes (Active at 4+ Keystones)
Raging. When targets reach 30% health, they Enrage, and deal 100% bonus damage. This encourages burning enemies down individually when they reach this point, or saving hard crowd control like stuns for when they reach this point during AoE.
Bolstering. Whenever an enemy dies, it buffs other enemies in combat with an additional 20% health and damage, which heavily encourages killing them at the same time, or within a small window of each other. In larger groups, this can be deadly if mis-managed. Note this does not, however, interact with adds summoned via boss mechanics.
Sanguine. When enemies die, they leave a small pool on the ground which deals damage to players and heals enemies standing within them. This increases the awareness requirement, and means you need to reposition groups quickly around them.
Teeming. The dungeon itself will generate additional lesser adds, which increases the number of targets in pulls. This mostly increases the difficulty of pulls as additional enemies will be active in each pack.
Bursting. When minions die within the dungeon, all party members inside will receive a stacking debuff that deals 5% of their maximum health every 2 seconds for 4 seconds. This requires the party to kill targets in a staggered fashion to prevent it stacking too high and killing off players, and for the healer to be acutely aware of the state of the party health when it is applied.
Tier 2 Affixes (Active at 7+ Keystones)
Volcanic. This causes random patches on the ground to spawn that will deal high pulsing damage if standing within them. Managing this is mostly on players avoiding them whenever they appear, and will by extension result in reduced DPS due to players avoiding them.
Necrotic. All enemies will apply a stacking debuff that deals flat ticking damage, and reduces healing/absorption received by 3%, stacking up to 10 with additional hits. This increases the intensity of tank healing and adds an additional component to the damage they receive.
Skittish. Enemies will randomly drop all threat on their current target. This makes it significantly more dangerous for DPS and adds an extra factor for tanks to account for, as dangerous mobs will require additional attention to keep in check.
Explosive. Enemies will occasionally spawn Explosive Orbs nearby with a small amount of health. These will will detonate after 6 seconds if not killed, dealing 50% of the all party members' maximum health. These orbs are immune to AoE and crowd control, so need to be switched to and killed quickly throughout the dungeon.
Quaking. All players will periodically cause a Shockwave 8 yards around their character, dealing 20% of players' maximum health to any players standing inside it after 3 seconds and interrupting casts. Players should remain spread to avoid taking more than one hit.
Grievous. Any players that falls below 90% health will be afflicted by a Grievous Wound, dealing a percentage of the player's maximum health every 3 seconds, stacking up to 5 times. This is permanent throughout the dungeon, so the healer needs to be aware of the stacks and heal players back above 90% to remove the debuff.
Tier 3 Affixes (Active at 10+ Keystones)
Tyrannical. Increases the health of boss targets by 40%, and their damage by 20%. This intensifies bosses significantly and must be noted when dealing with some of the more dangerous ones, as it also affects abilities alongside extending the duration of the fights in question.
Fortified. Increases the health of minions within the dungeon by 20%, and the damage they deal by 40%. This intensifies the trash pulls significantly and in some cases can limit how many extra you can pull at once, which will slow your pace between bosses.
Neltharion's Lair Timer: 35 Minutes
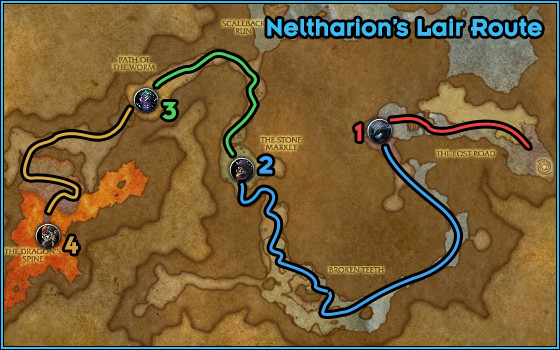
Neltharion's Lair is a fairly linear dungeon that provides a lot of opportunities to both combine trash pulls, and also skip them. You should path out your route based on your composition, but be wary to not skip too many and not meet the enemy forces requirement.
The general route will look like this moving through:
Rokmora
Important Trash to Note
There is a short series of pulls after entering the dungeon that is littered with a number of different enemies, and there are a number of paths you can take. We would advise going through the Embershard Scorpion pack with Vileshard Crawlers, and then the Tarspitter Lurkers, then and veering to the left into the water with the Rockback Gnasher Basilisks. From there, move up finally to the Understone Drudge Drogbar pack before jumping down to the boss. Note there will also be a Vileshard Hulk you can opt to pull here, but we will explain that further on when they are unavoidable.
Embershard Scorpion/Vileshard Crawler
The first pack you will encounter will be a single large mob, an
Embershard Scorpion, and a group of 10 spread out
Vileshard Crawlers. These should ideally all be pulled together, and
the Scorpion should be focused down as it deals moderate damage to the tank
through ![]() Impaling Shard, leaving a minor DoT.
Vileshard Crawlers will leave a void zone on death in
Impaling Shard, leaving a minor DoT.
Vileshard Crawlers will leave a void zone on death in
![]() Acid Splatter, so you should move the group of enemies around when they
are killed to minimise the damage.
Acid Splatter, so you should move the group of enemies around when they
are killed to minimise the damage.
Tarspitter Lurkers
A group of two Tarspitter Lurkers will follow (with a few additional
Vileshard Crawlers in the area, which can be pulled with them). They
will cast ![]() Submerge shortly after being pulled,
re-emerging underneath a random player in the group. This encourages the group
to stack up until after this is cast. Once they re-emerge, ranged players
should move away to reduce the damage from the
Submerge shortly after being pulled,
re-emerging underneath a random player in the group. This encourages the group
to stack up until after this is cast. Once they re-emerge, ranged players
should move away to reduce the damage from the ![]() Viscid Bile cast, which
is a frontal cone. Focus these down before another
Viscid Bile cast, which
is a frontal cone. Focus these down before another
![]() Submerge occurs, and when they die they will leave a
pool of
Submerge occurs, and when they die they will leave a
pool of ![]() Rancid Ooze which should be quickly moved out of.
Rancid Ooze which should be quickly moved out of.
Rockback Gnasher/Understone Drudges
There will be two Rockback Gnashers in the water at the entrance which
should be pulled with the Embershard Scorpion, and then one on the way
to the Understone Drudges, and this should be pulled to them. Tanks
will take moderate damage from ![]() Bone Chomp, and
Bone Chomp, and
![]() Stone Gaze is a high priority to interrupt due to its
long stun effect. The three Understone Drudges on the platform will only deal
melee damage, so there is nothing else to worry about with them.
Stone Gaze is a high priority to interrupt due to its
long stun effect. The three Understone Drudges on the platform will only deal
melee damage, so there is nothing else to worry about with them.
Rokmora Encounter
Quick TL;DR
DPS should cleave down Blightshard Skitter to minimise
![]() Rupturing Skitter damage. Avoid
Rupturing Skitter damage. Avoid ![]() Choking Dust left behind, but
minimise movement during
Choking Dust left behind, but
minimise movement during ![]() Crystalline Ground. The tank should face the
boss away due to
Crystalline Ground. The tank should face the
boss away due to ![]() Razor Shards, and use cooldowns to reduce damage
taken.
Razor Shards, and use cooldowns to reduce damage
taken.
Overview
Neltharion's Lair is a high damage fight that will put a large amount of
strain on your healer. Most importantly, tanks should face the boss away from
the group at all times to prevent ![]() Razor Shards from hitting other
players in the group, as it is the most deadly mechanic in the fight.
Razor Shards from hitting other
players in the group, as it is the most deadly mechanic in the fight.
Periodically, a Blightshard Skitter will spawn that must be cleaved
down as efficiently as possible. Upon death, they will leave behind a green
patch on the ground, ![]() Choking Dust, that will deal high Nature damage
every second to players who remain in it.
Choking Dust, that will deal high Nature damage
every second to players who remain in it.
Whenever Neltharion's Lair's Energy bar fills up, there will be a
![]() Shatter cast, dealing high Physical damage to the group
and knocking them back a short distance. This cast will also detonate all
remaining Skitters in the room, killing them and dealing high Nature damage to
the group. This damage is, however, reduced by the remaining health of each
Shatter cast, dealing high Physical damage to the group
and knocking them back a short distance. This cast will also detonate all
remaining Skitters in the room, killing them and dealing high Nature damage to
the group. This damage is, however, reduced by the remaining health of each
![]() Rupturing Skitter that is killed this way. This is best dealt with
through cleave damage on the adds to manage them. If you have melee DPS players,
when the amount of
Rupturing Skitter that is killed this way. This is best dealt with
through cleave damage on the adds to manage them. If you have melee DPS players,
when the amount of ![]() Choking Dust patches start to overwhelm the group in the area
you are tanking the boss, you should move it elsewhere on the platform and
repeat this until the boss is dead.
Choking Dust patches start to overwhelm the group in the area
you are tanking the boss, you should move it elsewhere on the platform and
repeat this until the boss is dead.
![]() Shatter will also create a large patch of slowly
diminishing blue crystals in the room, that will deal light Nature damage every
half-second to players moving within the area. This patch will shrink each
second and be completely removed within 10 seconds. You should try to limit
movement during this period, but still make sure to move out of
Shatter will also create a large patch of slowly
diminishing blue crystals in the room, that will deal light Nature damage every
half-second to players moving within the area. This patch will shrink each
second and be completely removed within 10 seconds. You should try to limit
movement during this period, but still make sure to move out of
![]() Choking Dust as a priority, as that is much more dangerous.
Choking Dust as a priority, as that is much more dangerous.
Ularogg Cragshaper
Important Trash to Note
A large amount of the trash in the main room when you land can be skipped if you lean hard to the right. Doing this however will likely punish your mob counter, so pulling some of the patrolling Drogbar groups together in the pools is ideal. Pulling the extra group on the right (with the Vileshard Hulk) before the ramp up to Ularogg Cragshaper will also make the mob requirement more comfortable. In the boss room, there will be a variety of trash packs that will all need to be pulled before the boss to avoid them entering the encounter, as they can be quite dangerous.
Understone Drummer
There are two Understone Drummers that can potentially be pulled on
your way through the first room, the first right after you land and the second
just before the ramp up to the boss room. When pulled, they will run to a
nearby Drums of War and begin to cast ![]() War Drums, which if not
stopped will summon additional nearby Drogbar into the fight. The Understone
Drummer should be stunned and either they, or their drums should be killed to
prevent it re-casting.
War Drums, which if not
stopped will summon additional nearby Drogbar into the fight. The Understone
Drummer should be stunned and either they, or their drums should be killed to
prevent it re-casting.
Mightstone Breaker/Rockbound Pelter
These present the most common type of enemy in this area.
Mightstone Breakers will deal high tank damage and cast
![]() Avalanche, which is a frontal cone that then deals
additional Physical damage to party members in range, so they should be faced
away. Rockbound Pelters will fixate on a random group member and
repeatedly cast
Avalanche, which is a frontal cone that then deals
additional Physical damage to party members in range, so they should be faced
away. Rockbound Pelters will fixate on a random group member and
repeatedly cast ![]() Jagged Disc which cannot be interrupted, and cast
Jagged Disc which cannot be interrupted, and cast
![]() Retreat shortly after being engaged, separating the group as they
cannot be controlled. You should try to layer crowd control to delay this jump,
and ideally keep the mobs clumped to cleave them down. Just be careful not to
move into another enemy aggro radius whilst doing so.
Retreat shortly after being engaged, separating the group as they
cannot be controlled. You should try to layer crowd control to delay this jump,
and ideally keep the mobs clumped to cleave them down. Just be careful not to
move into another enemy aggro radius whilst doing so.
Stoneclaw Hunter
One Stoneclaw Hunter will be patrolling with a
Rockback Gnasher pet (which also casts ![]() Bone Chomp and
Bone Chomp and
![]() Stone Gaze which should be interrupted, like the
Basilisks at the start) around an Understone Drummer. The Hunter will cast
Stone Gaze which should be interrupted, like the
Basilisks at the start) around an Understone Drummer. The Hunter will cast
![]() Stone Shatter, which will deal moderate Physical damage to all players
in range. The Hunter and its pet should ideally be killed at the same time,
with the Hunter dying slightly before to prevent it re-summoning its pet.
Stone Shatter, which will deal moderate Physical damage to all players
in range. The Hunter and its pet should ideally be killed at the same time,
with the Hunter dying slightly before to prevent it re-summoning its pet.
Vileshard Hulk
Two separate Vileshard Hulks are present on the way up to the boss,
the first in front of the ramp and the second patrolling the boss area. These
present a high threat to the entire group and must be positioned correctly. It
will regularly cast ![]() Piercing Shards, which deals high up front Nature
damage and leaves a massive DoT on any player hit by this, so it must always be
faced away from the group as the highest priority. Tanks should be aware of
this and any other group members who are accidentally hit should focus on
surviving the DoT, as it is particularly lethal. The tank must also be wary of
Piercing Shards, which deals high up front Nature
damage and leaves a massive DoT on any player hit by this, so it must always be
faced away from the group as the highest priority. Tanks should be aware of
this and any other group members who are accidentally hit should focus on
surviving the DoT, as it is particularly lethal. The tank must also be wary of
![]() Fracture, which will deal moderate Physical damage to targets in front
of the Hulk, and knock any players hit backward. This is particularly dangerous
if it knocks you back and out of position.
Fracture, which will deal moderate Physical damage to targets in front
of the Hulk, and knock any players hit backward. This is particularly dangerous
if it knocks you back and out of position.
Blightshard Shapers
Blightshard Shapers are caster enemies that will repeatedly use
![]() Stone Bolt, which deals moderate Nature damage to a random targeted
player, but can and should be interrupted. They will also summon a
Petrifying Totem at a random non-tank player, which after 3 seconds
will be surrounded by a circle that will apply
Stone Bolt, which deals moderate Nature damage to a random targeted
player, but can and should be interrupted. They will also summon a
Petrifying Totem at a random non-tank player, which after 3 seconds
will be surrounded by a circle that will apply ![]() Petrifying Cloud to
anyone in range. This deals light Nature damage each second, and after 10
seconds will change to
Petrifying Cloud to
anyone in range. This deals light Nature damage each second, and after 10
seconds will change to ![]() Petrified unless dispelled. This will form a
crystal that should quickly be killed to free the player. Given how little
health a Petrifying Totem has, though, killing it before it becomes active is
the best option. Shapers will also spawn with low health adds called
Burning Geodes, which will fire
Petrified unless dispelled. This will form a
crystal that should quickly be killed to free the player. Given how little
health a Petrifying Totem has, though, killing it before it becomes active is
the best option. Shapers will also spawn with low health adds called
Burning Geodes, which will fire ![]() Scorch, a red
telegraph. This will land after 1-2 seconds depending on range and deal high
Fire damage to those who do not move out of it.
Scorch, a red
telegraph. This will land after 1-2 seconds depending on range and deal high
Fire damage to those who do not move out of it.
Ularogg Cragshaper Encounter
Quick TL;DR
Focus idols created by ![]() Bellow of the Deeps, and ranged DPS/healers
avoid
Bellow of the Deeps, and ranged DPS/healers
avoid ![]() Strike of the Mountain when cast. Follow the boss idol during
Strike of the Mountain when cast. Follow the boss idol during
![]() Stance of the Mountain and kill it to reveal the boss, and heal through
Stance of the Mountain and kill it to reveal the boss, and heal through
![]() Falling Debris.
Falling Debris.
Overview
For Ularogg Cragshaper, firstly tanks should be aware of
![]() Sunder casts. This is the only major damage spike to deal with for
them, and other than this, the mechanics largely fall on DPS.
Sunder casts. This is the only major damage spike to deal with for
them, and other than this, the mechanics largely fall on DPS.
Ranged and healers should avoid ![]() Strike of the Mountain, which will
spawn 4 hands in each corner around a random player, preferring ranged, and
then slap together. This will deal massive Physical damage, but can be easily
avoided by moving outside of the centre of the telegraph. DPS should also watch
out for
Strike of the Mountain, which will
spawn 4 hands in each corner around a random player, preferring ranged, and
then slap together. This will deal massive Physical damage, but can be easily
avoided by moving outside of the centre of the telegraph. DPS should also watch
out for ![]() Bellow of the Deeps, which will spawn two
Bellowing Idols. These should be cleaved down quickly to reduce the
damage received by
Bellow of the Deeps, which will spawn two
Bellowing Idols. These should be cleaved down quickly to reduce the
damage received by ![]() Falling Debris casts they do.
Falling Debris casts they do.
Finally, ![]() Stance of the Mountain will be cast roughly roughly 40
seconds into the fight, and then every minute thereafter. This will cause
Ularogg to jump to the middle of the room and create 4 surrounding Burrowing
Idols with him in the centre of the room. Players must track the idol at the
center (which is the one in which the boss is hiding) as these Idols shift
around the area, and then kill the boss's Idol in its final resting place to
reveal Ularogg, whilst avoiding
Stance of the Mountain will be cast roughly roughly 40
seconds into the fight, and then every minute thereafter. This will cause
Ularogg to jump to the middle of the room and create 4 surrounding Burrowing
Idols with him in the centre of the room. Players must track the idol at the
center (which is the one in which the boss is hiding) as these Idols shift
around the area, and then kill the boss's Idol in its final resting place to
reveal Ularogg, whilst avoiding ![]() Falling Debris in the
process. Any damage dealt to other idols is wasted so they should be
ignored.
Falling Debris in the
process. Any damage dealt to other idols is wasted so they should be
ignored.
Naraxas
Important Trash to Note
Following Ularogg Cragshaper, there are a trio of Drogbar racing snails that can be avoided if you hang to the left against the wall, and move on into the Naraxas chamber. Here there are a number of Stoneclaw Grubmasters alongside a variety of Worms, which can all be pulled together, or in 3 separate groups depending on your comfort. Usually, doing the first two groups and then the final two pulls in the area is safer.
Stoneclaw Grubmaster/Tarspitter Lurker
There are two back to back pulls of comprised of one
Stoneclaw Grubmaster accompanied by a Tarspitter Lurker (the
latter encountered at the start of the instance). Grubmasters will cast
![]() Leech on random players in the group, dealing light
Physical damage when it hits and applying a light DoT. They will also
regularly cast
Leech on random players in the group, dealing light
Physical damage when it hits and applying a light DoT. They will also
regularly cast ![]() Stone Shatter, much like the Stoneclaw Hunters
from earlier, so the entire group will be taking regular moderate Physical
damage hits whilst these are engaged.
Stone Shatter, much like the Stoneclaw Hunters
from earlier, so the entire group will be taking regular moderate Physical
damage hits whilst these are engaged.
The Grubmaster will also cast ![]() Worm Call, which will spawn a
Tarspitter Grub in a random location between the party and the
Grubmaster, which must be focused down quickly to avoid it completing its
Worm Call, which will spawn a
Tarspitter Grub in a random location between the party and the
Grubmaster, which must be focused down quickly to avoid it completing its
![]() Metamorphosis cast. Note that this can be stunned. If
this completes, a dangerous Rotdrool Grabber will spawn, which will
create a number of
Metamorphosis cast. Note that this can be stunned. If
this completes, a dangerous Rotdrool Grabber will spawn, which will
create a number of ![]() Rancid Pools around it that deal moderate Nature
damage every half second to those standing within, and cast
Rancid Pools around it that deal moderate Nature
damage every half second to those standing within, and cast
![]() Barbed Tongue on ranged DPS/healers, pulling them into the pools.
Barbed Tongue on ranged DPS/healers, pulling them into the pools.
Tarspitter Slug
A large group of 8 Tarspitter Slugs will be present in the area before Naraxas, which simply present a threat to the tanks with their melee damage, and which outside of their high numbers are otherwise unimportant.
Naraxas Encounter
Quick TL;DR
Try to kill Drogbar adds quickly to avoid ![]() Ravenous stacks. Avoid
Ravenous stacks. Avoid
![]() Toxic Retch pools, and spread out for
Toxic Retch pools, and spread out for ![]() Rancid Maw to avoid
splash. The tank should move out during
Rancid Maw to avoid
splash. The tank should move out during ![]() Spiked Tongue and push against
it to avoid damage, and move back in quickly after.
Spiked Tongue and push against
it to avoid damage, and move back in quickly after.
Overview
Naraxas' routine mechanics start with ![]() Rancid Maw, which
will launch a green pool at a random party member. This will detonate after 2
seconds and leave a pool of Toxic Bile, which will debuff any player caught
within with a 50% slow. These should be positioned between the group and
Naraxas to deal with
Rancid Maw, which
will launch a green pool at a random party member. This will detonate after 2
seconds and leave a pool of Toxic Bile, which will debuff any player caught
within with a 50% slow. These should be positioned between the group and
Naraxas to deal with ![]() Spiked Tongue later in the fight. To compliment
this, Naraxas will cast
Spiked Tongue later in the fight. To compliment
this, Naraxas will cast ![]() Toxic Retch, which will spawn 8 pools of poison
on the ground, which after 1 second will begin to deal damage to players
remaining in the area and leave a dispellable Poison debuff on anyone hit.
These should be moved out of quickly, and you should avoid moving back into
them.
Toxic Retch, which will spawn 8 pools of poison
on the ground, which after 1 second will begin to deal damage to players
remaining in the area and leave a dispellable Poison debuff on anyone hit.
These should be moved out of quickly, and you should avoid moving back into
them.
Throughout the encounter, the Drogbar in the stands will continuously pelt
the group with ![]() Hurling Rocks, dealing light Physical damage to those
players targeted every 5 seconds. This will amplify in frequency as the fight
goes on.
Hurling Rocks, dealing light Physical damage to those
players targeted every 5 seconds. This will amplify in frequency as the fight
goes on.
Roughly 15 seconds into the fight, two Wormspeaker Devouts will be
summoned on the left and right of the room. If these are not killed,
Naraxas will consume them and gain ![]() Ravenous, increasing all
damage by 50% and significantly increasing the danger of all mechanics. These
should quickly be burst down when they spawn to prevent this.
Ravenous, increasing all
damage by 50% and significantly increasing the danger of all mechanics. These
should quickly be burst down when they spawn to prevent this.
Tanks should always make sure to be in range outside of
![]() Spiked Tongue, as
Spiked Tongue, as ![]() Putrid Skies will quickly kill the party,
so bear this in mind. Roughly every minute, Naraxas will cast
Putrid Skies will quickly kill the party,
so bear this in mind. Roughly every minute, Naraxas will cast
![]() Spiked Tongue upon the tank, who should immediately put distance
between themselves and the boss. When the initial cast completes,
Naraxas will attempt to drag the tank back to her at high speed and
deal high Physical damage each second for 5 seconds. Pools from
Toxic Bile can help to reduce the speed the boss will pull the player
in, but if you are not able to keep distance from the boss, extreme damage via
Spiked Tongue upon the tank, who should immediately put distance
between themselves and the boss. When the initial cast completes,
Naraxas will attempt to drag the tank back to her at high speed and
deal high Physical damage each second for 5 seconds. Pools from
Toxic Bile can help to reduce the speed the boss will pull the player
in, but if you are not able to keep distance from the boss, extreme damage via
![]() Devouring will be inflicted to the targeted player.
Devouring will be inflicted to the targeted player.
Finally, at 20% health Naraxas will
![]() Frenzy, increasing damage significantly. In
conjunction with potential
Frenzy, increasing damage significantly. In
conjunction with potential ![]() Ravenous stacks, this can be very lethal to
the tank, so cooldowns should be used on this.
Ravenous stacks, this can be very lethal to
the tank, so cooldowns should be used on this.
Dargrul the Underking
Important Trash to Note
After defeating Naraxas, you will jump down to the final room of the instance, which culminates in the pit surrounding Dargrul. After you reach the area, you should make a hard right and move through the group of cleared out Drogbar, and engage the group of three on the platform blocking the ramp. After this, you should pull the two Rockbound Trapper and Emberhusk Dominator combos on both sides before pulling the final boss, as they will engage when you pull him.
Emberhusk Dominator/Rockbound Trapper
Emberhusk Dominator will ride an Embershard Scorpion (from
the start of the instance), that will frequently cast ![]() Crystal Spike on
3 random players in the group. This deals moderate damage to those hit, and
will prioritise players at range; if there are not at least 3 of them, then it
will hit melee instead. Scorpions will also regularly cast a frontal cone,
Crystal Spike on
3 random players in the group. This deals moderate damage to those hit, and
will prioritise players at range; if there are not at least 3 of them, then it
will hit melee instead. Scorpions will also regularly cast a frontal cone,
![]() Ember Swipe, and due to this should be tanked facing away from the
group to reduce cleave damage. Finally, the scorpions will cast
Ember Swipe, and due to this should be tanked facing away from the
group to reduce cleave damage. Finally, the scorpions will cast
![]() Frenzy frequently, increasing its attack speed
by 30% and damage by 50%, so tanks should be very aware of this and use
cooldowns accordingly. Rockbound Trappers will seem similar to Pelters
from earlier, which will repeatedly cast
Frenzy frequently, increasing its attack speed
by 30% and damage by 50%, so tanks should be very aware of this and use
cooldowns accordingly. Rockbound Trappers will seem similar to Pelters
from earlier, which will repeatedly cast ![]() Jagged Disc on
a random player in the group, though they will not cast
Jagged Disc on
a random player in the group, though they will not cast ![]() Retreat. They
will attempt to cast
Retreat. They
will attempt to cast ![]() Bound on the tank, which will stun them for 4
seconds, and should be interrupted whenever cast.
Bound on the tank, which will stun them for 4
seconds, and should be interrupted whenever cast.
Emberhusk Demolisher
These are not normally pulled, but if you are struggling for mob count, can
be considered. They will immediately cast ![]() Charskin after being
engaged, which will transform them into a Colossal Charskin (appearing
similar to a Molten Giant). They will then fixate on a random non-tank player,
and deal massive melee damage if it ever connects on their target. This should
be slowed, stunned and kited, and is a high priority target after it
transforms.
Charskin after being
engaged, which will transform them into a Colossal Charskin (appearing
similar to a Molten Giant). They will then fixate on a random non-tank player,
and deal massive melee damage if it ever connects on their target. This should
be slowed, stunned and kited, and is a high priority target after it
transforms.
Dargrul the Underking Encounter
Quick TL;DR
Kite the Molten Charskin if fixated on, stun it and focus it down.
Tank should avoid kiting the boss into ![]() Crystal Spikes and use defensive
cooldowns on
Crystal Spikes and use defensive
cooldowns on ![]() Molten Crash. Hide behind Crystal Spikes during
Molten Crash. Hide behind Crystal Spikes during
![]() Magma Wave, and move the boss quickly out of
Magma Wave, and move the boss quickly out of ![]() Lava Geyser.
Lava Geyser.
Overview
Dargrul has some interlacing mechanics, but generally
it is a case of surviving against the high damage that will be put out during
the encounter. Throughout the fight, the ![]() Magma Breaker aura will be
active, triggering whenever the boss is moved. Counteracting this revolves
around trying to keep the boss in position once he is in a stable place.
Magma Breaker aura will be
active, triggering whenever the boss is moved. Counteracting this revolves
around trying to keep the boss in position once he is in a stable place.
5 seconds into the encounter, and 5 seconds after each ![]() Magma Wave
cast, Dargrul will summon a Molten Charskin through
Magma Wave
cast, Dargrul will summon a Molten Charskin through
![]() Magma Sculptor. These adds will fixate on a
player with
Magma Sculptor. These adds will fixate on a
player with ![]() Burning Hatred, and will deal massive damage if they strike
the fixated player. They will also gain increased damage and movement speed
each second they are alive, thanks to
Burning Hatred, and will deal massive damage if they strike
the fixated player. They will also gain increased damage and movement speed
each second they are alive, thanks to ![]() Rising Inferno. These are a
priority to burn down immediately.
Rising Inferno. These are a
priority to burn down immediately.
Every 20 seconds, Dargrul will also cast a ![]() Crystal Spike on a ranged
player in the group, which after 2 seconds will erupt in a wall of spikes. This
deals high Physical damage and forms a wall that is needed for future
abilities. Players should move out of this telegraph quickly, and be aware of
where they have spawned for
Crystal Spike on a ranged
player in the group, which after 2 seconds will erupt in a wall of spikes. This
deals high Physical damage and forms a wall that is needed for future
abilities. Players should move out of this telegraph quickly, and be aware of
where they have spawned for ![]() Magma Wave casts.
Magma Wave casts.
Tanks should take note of the two knockback mechanics in
![]() Landslide and
Landslide and ![]() Molten Crash, which will come in
this sequence in order. Landslide deals moderate Nature damage to the tank and
targets in a line in front of him, knocking them back a large distance. Molten
Crash comes immediately after erupting the ground underneath, dealing high Fire
damage and knocking them back even further. Movement skills must be used to
mitigate extra ticks of
Molten Crash, which will come in
this sequence in order. Landslide deals moderate Nature damage to the tank and
targets in a line in front of him, knocking them back a large distance. Molten
Crash comes immediately after erupting the ground underneath, dealing high Fire
damage and knocking them back even further. Movement skills must be used to
mitigate extra ticks of ![]() Magma Breaker caused by the boss chasing the
tank, so you should try to keep him in position.
Magma Breaker caused by the boss chasing the
tank, so you should try to keep him in position.
Finally, every minute Dargrul will charge up and cast ![]() Magma Wave,
which will deal high damage each second for 3 seconds, culminating in a lethal
blast to all players not in cover behind a
Magma Wave,
which will deal high damage each second for 3 seconds, culminating in a lethal
blast to all players not in cover behind a ![]() Crystal Spike. Move behind a
nearby Crystal Spike to hide from this, and when the cast completes these will
be destroyed. When the cast is completed, a large
Crystal Spike. Move behind a
nearby Crystal Spike to hide from this, and when the cast completes these will
be destroyed. When the cast is completed, a large ![]() Lava Geyser patch
will be created under Dargrul, which deals high Fire damage to any player
remaining within it. This will also spew random Fire damage to players via
Lava Geyser patch
will be created under Dargrul, which deals high Fire damage to any player
remaining within it. This will also spew random Fire damage to players via
![]() Flame Gout. The boss must be moved out of this quickly to continue
with the encounter.
Flame Gout. The boss must be moved out of this quickly to continue
with the encounter.
It is interesting to note, regarding the Molten Charskins, that
these can be kited into ![]() Crystal Spikes, which will stun them and cause
them to take double damage. This, however, is very dangerous if you are not
comfortable with positioning, as if there are no Crystal Spikes available
during
Crystal Spikes, which will stun them and cause
them to take double damage. This, however, is very dangerous if you are not
comfortable with positioning, as if there are no Crystal Spikes available
during ![]() Magma Wave it will guarantee a wipe for the group as no cover is
available. Be careful if using this tactic, but in higher Mythic+ levels this
can be very useful to increase output.
Magma Wave it will guarantee a wipe for the group as no cover is
available. Be careful if using this tactic, but in higher Mythic+ levels this
can be very useful to increase output.