


Introduction
This guide is intended to provide a comprehensive description of the encounter with Warmaster Blackhorn in Dragon Soul. It is mostly targeted to healers who desire to have a short but detailed overview of what is expected of them during that fight.
This guide is updated for World of Warcraft WoD 6.1.2.
The Warmaster Blackhorn encounter is a two-phase fight during which you will have to deal with many types of adds, before finally performing a DPS burn against Backhorn himself. The encounter is very reminiscent of the Gunship Battle from Icecrown Citadel, although much more difficult.
Healers have the most stressful task on this fight, where in addition to reacting to a few mechanics, they must heal a rather large and unpredictable amount of damage.
Overview of the Fight
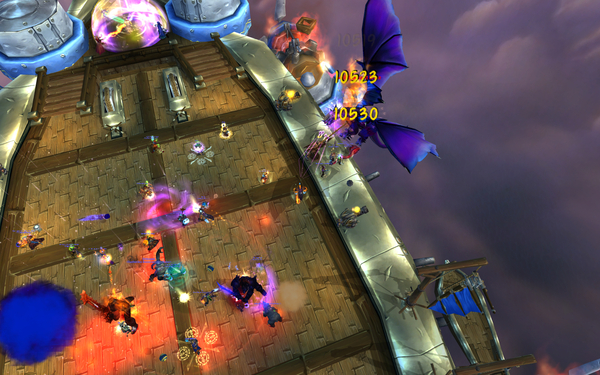
The Warmaster Blackhorn encounter takes place on a flying gunship. The ship has a health pool and can be damaged by various abilities during the encounter. Aside from defeating Warmaster Blackhorn, you will also have to ensure the survival of your ship, if you wish to succeed in this encounter.
The encounter is a two phase fight. During the first phase, your raid will mainly have to deal with 4 different types of adds (3 types of adds in LFR). You will also have to watch out for many void zones in which you must stand in order to protect the gunship. If 3 waves of adds are dealt with successfully, the second phase will begin. During this phase, your raid will have to deal with Warmaster Blackhorn himself.
| Phase One | Phase Two |
|---|---|
|

|
Phase One
During Phase one, you will have to perform a few simple tasks and heal a rather brutal and unpredictable amount of raid damage.
General Strategy
Your raid will be spread out all over the ship. You must perform the following tasks, in order of priority:
-
 Move into the large swirling void zones created by
  Twilight Onslaught, in
order to soak the damage from the impact. Move out immediately afterwards.
Twilight Onslaught, in
order to soak the damage from the impact. Move out immediately afterwards. - Move into the small swirling void zones created by
 Twilight Barrage, in order
to soak the damage from the impact. Keep in mind that there should be at least
two people in each Twilight Barrage void zone for the damage not to be
fatal.
Twilight Barrage, in order
to soak the damage from the impact. Keep in mind that there should be at least
two people in each Twilight Barrage void zone for the damage not to be
fatal.

Sources of Damage
During Phase One, there will be rather chaotic raid and tank damage, from the following sources:
- Tank damage from the Twilight Elite Slayers and Twilight Elite Dreadblades (these adds melee and stack a DoT on the tanks).
- Raid-wide damage from soaking Twilight Onslaught.
- Random raid damage from players soaking individual
Twilight Barrages.
- Random raid damage from the Slayers and Dreadblades'
 Blade Rush
attack.
Blade Rush
attack.
The ideal time for using defensive cooldowns is when the raid is stacked inside a Twilight Onslaught.
Phase Two
Phase Two begins as soon as all the Twilight Assault Drakes have been killed. During this phase, you will have to avoid a few mechanics and heal damage from various sources.
General Strategy
-
 Avoid the large purple void zones that Goriona places on the ground.
At a certain point, she will leave the fight, and will cease placing new void
zones.
Avoid the large purple void zones that Goriona places on the ground.
At a certain point, she will leave the fight, and will cease placing new void
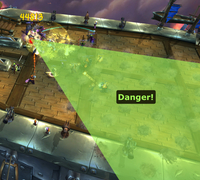
zones. - Avoid Warmaster Blackhorn's frontal cone attack,
 Shockwave. The boss will face a random player before casting
this, so you may often have to move in order to avoid it. The area where he
will cast Shockwave is clearly marked by a visible graphical effect.
Shockwave. The boss will face a random player before casting
this, so you may often have to move in order to avoid it. The area where he
will cast Shockwave is clearly marked by a visible graphical effect. - Stand at least 10 yards away from the boss, to avoid a silence and interrupt effect.

Moving out of the Shockwave area is easier the closer you are to the boss, so attempt to stay as close to him as possible. There is no requirement to be spread out during this phase.
Sources of Damage
You will have to heal damage from the following sources during this phase:
- Moderate, yet increasing tank damage. The tanks will swap the boss between themselves, so be prepared for when a new tank starts taking damage.
- Moderate damage from Goriona's void zones (until players move out of them). After a short while, Goriona will leave the fight and this will no longer be an issue.
- Moderate raid-wide damage from
 Disrupting Roar (cast every 20
seconds).
Disrupting Roar (cast every 20
seconds). - Massive (usually fatal, although not always) damage to players failing to
avoid the boss' Shockwave. These players will need immediate
healing, as the next source of damage will almost surely kill them.
Heroic Mode
As a healer, the heroic mode of Warmaster Blackhorn is very similar to the normal mode, with only a few relevant changes.
Differences from Normal Mode
In addition to increased health and damage, the following changes are of importance to you:
- During Phase One, parts of the ship's deck will be randomly covered in fire. Simply move out of the fire. The fires will progressively be put out by NPCs, freeing up space.
- Taking damage from a Twilight Barrage (small void zone) will leave a
debuff on you for 15 seconds, that increases the Shadow damage you take by
50%.
- During Phase Two, when Goriona reaches 80% health she lands and must be
tanked and DPSed down. At 20% health, she flies away.
- During this time, she
casts a new ability,
 Consuming Shroud. This is a debuff that Goriona
regularly places on a random (non-tank) raid member. The debuff absorbs a
moderate amount of healing (100,000 in 10-man and 150,000 in 25-man). Any
healing done to players affected by the debuff is also mirrored as damage to
the entire raid (except for the player affected by the debuff, who does not
get damaged). For example, a 5,000 heal on the player will deal 5,000 damage
to each raid member.
Consuming Shroud. This is a debuff that Goriona
regularly places on a random (non-tank) raid member. The debuff absorbs a
moderate amount of healing (100,000 in 10-man and 150,000 in 25-man). Any
healing done to players affected by the debuff is also mirrored as damage to
the entire raid (except for the player affected by the debuff, who does not
get damaged). For example, a 5,000 heal on the player will deal 5,000 damage
to each raid member.
- During this time, she
casts a new ability,
Strategy
Phase One
During Phase One, you only have two added concerns:
- Stay out of the fires on the deck of the ship;
- Make sure that, while soaking damage from Twilight Barrage, you do
not have the Shadow damage increasing debuff.
Phase Two
In Phase Two, you will have to heal both tanks as long as Goriona is on the ground. She regularly performs a frontal cone breath attack that will severely damage her tank.
Additionally, whenever a raid member is afflicted by
![]() Consuming Shroud, you will have to slowly heal them up. The reason for
this is that any healing done them while the debuff is active will be turned
into damage dealt to the raid, so you do not want to heal them too quickly.
Consuming Shroud, you will have to slowly heal them up. The reason for
this is that any healing done them while the debuff is active will be turned
into damage dealt to the raid, so you do not want to heal them too quickly.
It is best to have the entire raid stacked up and to make use of AoE healing, as this will provide a steady amount of healing on the debuffed player while also ensuring that the raid damage is covered.