

Lord Rhyolith Detailed Strategy Guide (Heroic Mode included)

Introduction
This guide is intended to provide a comprehensive description of the encounter with Lord Rhyolith in Firelands. It is targeted at anyone who desires to understand the fight mechanics.
This guide is updated for World of Warcraft WoD 6.1.2.
The encounter against Lord Rhyolith, one of the first five bosses of Firelands, is an interesting fight with a few unique mechanics that require you need to move him to specific locations to remove the armor that protects him, while dealing with his abilities.
DPS players have, by far, the most complicated task of the encounter as they are responsible for controlling Rhyolith's movements and dealing with his most important abilities.
General Information
Health Pools
Rhyolith has the following health pool:
- in 10-man normal difficulty: 12.7M;
- in 10-man heroic difficulty: 19.5M;
- in 25-man normal difficulty: 39.1M;
- in 25-man heroic difficulty: 59.5M.
Rhyolith will occasionally spawn 2 types of adds. Their health pools are as follows:
- On normal difficulty, Fragments of Rhyolith have 99k health in 10-man difficulty and 395k health in 25-man difficulty.
- On heroic difficulty, Fragments of Rhyolith have 197k health in 10-man difficulty and 652k health in 25-man difficulty.
- On normal difficulty, Spark of Rhyolith have 1.4M health in 10-man difficulty and 4.8M health in 25-man difficulty;
- On heroic difficulty, Spark of Rhyolith have 2.1M health in 10-man difficulty and 7.1M health in 25-man difficulty.
On heroic difficulty, a new type of add spawns: Liquid Obsidian. They have 210k health in 10-man difficulty and 458k health in 25-man difficulty.
Enrage Timer
Lord Rhyolith has no hard enrage timer, but the last phase presents a soft enrage timer through the means of a raid-wide AoE damaging ability with which the healers will only manage to cope for a given amount of time before running out of mana.
On heroic difficulty, an additional, more powerful, soft enrage mechanics occurs 5 minutes after the start of the encounter (and will thus most likely cover Phase Two). Coupled with the normal mode soft enrage mechanics, it will prove very difficult for your raid to survive longer than 40 seconds.
Raid Composition
The following raid compositions are advised:
- in 10-man normal difficulty: 1/2 tanks, 3/4 healers and 5 DPS;
- in 10-man heroic difficulty: 1 tank, 2/3 healers, 6/7 DPS;
- in 25-man normal difficulty: 1/2 tanks, 6/7 healers, 17 DPS;
- in 25-man heroic difficulty: 1/2 tanks, 5/6 healers, 17-19 DPS.
Loot
 Flickering Cowl (heroic: Flickering Cowl), Random Cloth Head
 Incendic Chestguard (heroic: Incendic Chestguard), Balance/Restoration Druid Chest
 Hood of Rampant Disdain (heroic: Hood of Rampant Disdain), Leather Agility Head
 Lava Line Wristbands (heroic: Lava Line Wristbands), Elemental/Restoration Shaman Wrists
 Flaming Core Chestguard (heroic: Flaming Core Chestguard), Mail Agility Chest
 Grips of the Raging Giant (heroic: Grips of the Raging Giant), Holy Paladin Hands
 Cracked Obsidian Stompers (heroic: Cracked Obsidian Stompers), Tanking Feet
 Earthcrack Bracers (heroic: Earthcrack Bracers), Plate Wrists
 Fireskin Gauntlets (heroic: Fireskin Gauntlets), Plate Hands
 Heartstone of Rhyolith (heroic: Heartstone of Rhyolith), Healing Neck
 Dreadfire Drape (heroic: Dreadfire Drape), Agility Back
 Volcanospike (heroic: Volcanospike), Caster Sword (Hit)
 Arbalest of Erupting Fury (heroic: Arbalest of Erupting Fury), Agility Crossbow
- Rare Boss Drops:
 Eye of Purification (heroic: Eye of Purification), Healing Axe
 Smoldering Censer of Purity (heroic: Smoldering Censer of Purity), Healing Staff
 Firethorn Mindslicer (heroic: Firethorn Mindslicer), DPS Caster Sword
 Entrail Disgorger (heroic: Entrail Disgorger), 1.4 Speed Agility Dagger
 Avool's Incendiary Shanker (heroic: Avool's Incendiary Shanker), 1.8 Speed Agility Dagger
 Shatterskull Bonecrusher (heroic: Shatterskull Bonecrusher), Agility Mace
 Zoid's Firelit Greatsword (heroic: Zoid's Firelit Greatsword), Strength Two-handed Sword
Overview of the Fight
The encounter is made up of 2 phases. Phase One (from 100% to 25% health) requires the raid to move Rhyolith around the room to break his armor while Phase Two (from 25% health to the end) is a standard nuke phase.
Initially, Rhyolith is protected by an armor that your raid needs to remove progressively by making him step on the volcanoes that he regularly creates throughout the fight.
During Phase One, Rhyolith will ignore players (i.e., he does not melee and does not need to be tanked) and roam around the room. He is in constant motion and cannot be stopped. However, he can be steered left or right, according to which of his feet you deal damage to: attacking the left foot makes him go left while attacking the right foot makes him go right.
The idea here is to attack his feet in such a way that he keeps going from one volcano to another. At the same time, Rhyolith must be prevented from reaching the lava that surrounds the encounter area, as it will cause him to wipe the raid.
In addition to these particular mechanics, the raid will also need to kill adds and deal with various abilities that Rhyolith will use.
When Phase Two starts, Rhyolith's armor shatters. He then needs to be tanked and the fight turns into a regular nuke phase. The boss needs to die before he wipes the raid with a very damaging ability that eventually causes the healers to run out of mana.
Damaging Rhyolith
During Phase One, Rhyolith's left and right foot have their own unit frames and can be attacked. Rhyolith himself is, of course, also attackable. The protection provided by his armor also applies to his feet.
The damage done to a foot is divided equally between both feet. More precisely, every few seconds, the health of both feet is adjusted so that it becomes equal. For example, if one foot is at 48% health and the other is at 50% health, then both feet will be at 49% after the adjustment.
The health pool of each foot is always exactly half that of Rhyolith. Every time you damage a foot, Rhyolith is damaged for the same amount and inversely, each time you damage Rhyolith directly, the damage is also split evenly among his feet. This mechanics means that, during Phase One, the raid will do most of its damage on Rhyolith by attacking his feet to control him.
When Phase Two starts, his armor shatters, he needs to be tanked, and his feet are no longer attackable.
Moving Rhyolith
For this fight, your UI displays a Direction Gauge. The default UI shows a horizontal energy bar that fills and depletes. Some addons display it as a percentage bar. The value indicated/displayed by the bar shows where Rhyolith is currently steering:
- the closer to the left (or 0%), the more Rhyolith is steering left;
- the median value (or 50%) represents Rhyolith moving in a straight line;
- the closer to the right (or 100%), the more Rhyolith is steering right.
When attacking the left foot to make Rhyolith turn left, or the right foot to make him turn right, there seems to be a slight delay (about 1 second) before Rhyolith eventually starts changing direction. The raid will need some practice before finally being able to make Rhyolith change direction at will. Normally, half of the raid's DPS players should be on this task at all time (usually all the melee players), with sporadic help from the rest of the DPS players.
It looks as if Rhyolith has some inertia. When the damage done to both his feet is no longer unequal, the Direction Gauge will have a tendency to go back to the middle.
It is imperative to prevent Rhyolith from reaching the lava pool surrounding the fighting area because it empowers him with a powerful ability that will, in all likelihood, wipe the raid.
Phase One
This phase revolves around moving Rhyolith so that he steps on the volcanoes he creates, which causes his armor to lose efficiency.
The faster his armor is weakened, the faster your raid will be able to make it to Phase Two, which is triggered by Rhyolith's health reaching 25%.
We first present the many abilities Rhyolith uses during this phase before detailing how to effectively deal with them.
Abilities
In this section, we describe the various abilities used by Rhyolith, and the various entities he summons (volcanoes, craters, elementals).
Rhyolith
Rhyolith performs no melee attack during Phase One and has 4 abilities, including one that he should never be allowed to use:
- Obsidian Armor protects Rhyolith. Precisely, it is represented by a stacking buff. Each stack reduces the damage he takes by 1%. Initially, he has 80 stacks (amounting to a 80% damage reduction). Every time he steps on an active volcano (more on that in the next section), he loses 16 stacks of the buff (otherwise said, the damage protection the armor gives him is reduced by 16%).
- Molten Armor is a stacking buff of which Rhyolith gains between 2 and 4 stacks every time he steps on a dormant volcano (more on that in the next section). Rhyolith loses a stack of Molten Armor every time he casts Concussive Stomp or he spawns adds.
- Concussive Stomp deals unavoidable Fire damage to the entire raid. It also creates 2 or 3 volcanoes. This ability is cast every 30 seconds.
- Every 20-25 seconds, Rhyolith casts either Summon Fragments of Rhyolith
or Summon Spark of Rhyolith, which summon respectively 5
Fragments of Rhyolith or 1 Spark of Rhyolith, and deal 15,000 Fire
damage to players within 7 yards of Rhyolith.
- Fragments of Rhyolith have relatively low health (99k in 10-man difficulty and 395k in 25-man difficulty) and hit their tank every 2 seconds for 4k damage in 10-man difficulty and 10k damage in 25-man difficult. 30 seconds after they have spawned, they will perform Meltdown, if they are still alive, dealing 100% of their remaining health as damage to a random player before disappearing.
- Sparks of Rhyolith have relatively high health (1.4M in 10-man difficulty and 4.8M in 25-man difficulty) and hit their tank every 2 seconds for 12-13kk damage in 10-man difficulty and 30-35k in 25-man difficulty. Every second, sparks cast Immolation, dealing 7,000 Fire damage to all players within 12 yards. Every 5 seconds, sparks gain a stack of Infernal Rage, increasing their damage done and taken by 10%.
- Drink Magma is cast by Rhyolith only when he reaches the edge of his plateau, something which your raid should prevent him from doing at all cost. This ability deals 30,000 Fire damage to all raid members every second for 4 seconds.
Volcanoes and Craters
Rhyolith creates 2 or 3 volcanoes every time he uses Concussive Stomp. Once created, a volcano remains dormant until Rhyolith randomly awakens it, at which point the volcano becomes active. Active volcanoes erupt (Eruption) for 20 seconds. During this time, 3 players in 10-man difficulty, 6 in 25-man, are randomly selected every 2 seconds to receive 10,000 Fire damage. Eruption also stacks a debuff on players every time they are hit, increasing their Fire damage taken by 5% for 14 seconds and stacking a maximum of 20 times.
When Rhyolith steps on a volcano, it destroys it. Additionally, if the volcano was dormant, Rhyolith gains stacks of Molten Armor, and if the volcano was active (i.e., erupting), Rhyolith loses 16% of his armor. 10 seconds after a volcano is destroyed, a crater appears at its location.
As soon as it is up, a crater triggers Magma Flow, releasing 4 to 6 lava streams that move outwards from it, in various directions, dealing 65,000 Fire damage to anyone standing in their path. After 10 seconds, the lava streams explode, dealing 130,000 Fire damage to anyone standing on them.
After Magma Flow, the crater disappears and leaves a damaging lava pool on the ground.
Strategy
In this fight, tanks and healers have the easier role as their task is rather simple. DPS need to properly distribute their damage among Rhyolith's feet to make sure that he steps on as many active volcanoes as possible, while taking down the adds.
Positioning
The fight requires no specific positioning. All the ranged players should be stacked up at range to make AoE healing more efficient. Melee players will almost exclusively be on Rhyolith. Most of the damage is unavoidable, which leaves only 2 things to watch out for:
- Spark of Rhyolith should be tanked away from the raid (12 yards at least), so that they do not debuff anyone else than their tank. A great location to tank them is on the edge of the plateau, as it gives more room for maneuvering Rhyolith.
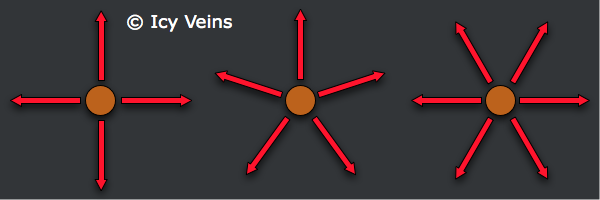
- When craters trigger Magma Flow and release lava streams, everyone
needs to move out of their path. So far,
we have only seen 3 patterns for the directions of the streams:

Tanking Assignments
During Phase One, only the Fragments of Rhyolith and the Spark of Rhyolith, which are spawned by every 20-25 seconds, will require tanking. Most guilds will prefer to use only one tank. A 2-tank strategy should only be employed if these two conditions are met:
- the DPS cannot kill a wave of adds before the next one spawns;
- the healers cannot keep up with the damage done on a single tank by 2 waves of adds.
Sparks of Rhyolith should be tanked out of the raid because they do proximity damage. There is no constraint regarding the positioning of Fragments of Rhyolith.
Healing Duties
If the raid performs properly, the only sources of damage are the following:
- Concussive Stomp: moderate raid damage every 30 seconds;
- 8,500 Fire damage every second on a Spark of Rhyolith's tank;
- Eruption: moderate (but increasing over time) raid damage for 20 seconds every 40 seconds. The more volcanoes are up, the more often Eruption will happen, to the point where (during the last minute of Phase One) everyone will have high stacks (possibly 20, the maximum) and will therefore take very increased Fire damage.
Surely, the healers will also need to contend with melee DPS hit by Summon Fragments of Rhyolith or Summon Spark of Rhyolith, and players who failed to move away from a Spark of Rhyolith or from the lava streams of a crater.
Target Priorities
For once, DPS are required to perform the complicated task. They need to control Rhyolith's movement and properly focus down the adds at the same time.
The only assignment of melee DPS is to attack Rhyolith's feet to turn him around. Handling the adds is a ranged DPS duty. However, If both Fragments of Rhyolith and a Spark of Rhyolith are up at the same time, one melee DPS in 10-man difficulty, 3 or 4 in 25-man difficulty can help out on the Fragments so that the ranged DPS can focus on the Spark.
Ranged DPS should give a high priority to the Sparks of Rhyolith. Early on, they can wait for maybe 10-15 seconds before attacking one, so that it takes increased damage (only if the tank can handle the increased damage the Spark also deals). Towards the end of Phase One, Sparks of Rhyolith should be killed as fast as possible because of the high stacks of Eruption everyone will have.
Fragments of Rhyolith should be killed within 30 seconds to prevent them from dealing damage equal to their remaining health when the time is up. Whenever ranged DPS are not busy with adds, they should focus on Rhyolith.
Handling Rhyolith
Making Rhyolith step on active volcanoes would normally not require the attention of all the DPS players, as the damage necessary on one foot to make him change direction is not very high (2 DPS in 10-man would do just fine).
Unfortunately, ranged DPS will be busy with adds for a large part of the phase while melee DPS will sometimes need to move away from the boss to help with the Fragments or to avoid Summon Fragments of Rhyolith or Summon Spark of Rhyolith Therefore, every DPS needs to help out with attacking the feet, whenever they can. Eventually, players will find the right balance between attacking the feet and doing their other tasks. They can also attack Rhyolith's chest if they simply want to damage the boss without interfering with his current direction.
A player, possibly a tank, since the fight is rather easy for them, should be designated to pilot Rhyolith, i.e. choose the next active volcano to be stepped on and give orders (attack left foot, attack right foot, etc.) so that Rhyolith reaches that volcano. That player also needs to make sure that Rhyolith is never moved close to the edge of his plateau. This would allow him to empower himself with Drink Magma, effectively wiping the raid (or at least killing most of it). Finally, the pilot needs to prevent Rhyolith from stepping on dormant volcanoes, as it gives him stacks of Molten Armor.
Should the raid manage to remove all of Rhyolith's armor before he reaches 25% health, he should no longer be allowed to step on volcanoes. This will prevent craters from spawning, removing the need of moving out of lava streams.
Phase Two
At 25% health, the armor that was protecting Rhyolith shatters and you get to see his true self. At that point, Phase Two begins. It is a burn phase during which Rhyolith must die before he wipes the raid.
We first present the abilities he uses during Phase Two before explaining the strategy.
Abilities
From Phase One, Rhyolith only retains Concussive Stomp, which still creates volcanoes that can erupt. The volcanoes will still turn into craters if Rhyolith steps on them. The craters will still form lava streams flowing outwards from them.
In addition, he melees the tank every 2 seconds for 25-30k damage (in both 10-man and 25-man difficulties) and deals 7,000 Fire damage to the raid every second through Immolation.
6 minutes after the start of the encounter, Lord Rhyolith becomes Superheated. This is a stacking buff which increases his damage dealt by 10% per stack, and stacks once every 10 seconds.
Strategy
Rhyolith needs to be killed before he wipes the raid, as Immolation,
especially when coupled with Superheated will deal heavy damage
to your raid. Concussive Stomps, while Rhyolith is Superheated, are also
devastating. Obviously, ![]() Bloodlust,
Bloodlust,
![]() Heroism, or
Heroism, or ![]() Time Warp should be used during this phase.
Time Warp should be used during this phase.
Overall it is a very easy and short phase but for completeness, we give below all the relevant details.
If your raid used 2 tanks in Phase One, one of them will have to tank Rhyolith while the other one will DPS him.
DPS and healers should remain stacked up at range to improve the efficiency
of AoE healing and abilities like ![]() Spirit Link Totem, if the raid has
a Restoration Shaman.
Spirit Link Totem, if the raid has
a Restoration Shaman.
Volcanoes will continue erupting (Eruption) just like they did in
Phase One. Note that the stacks of the Eruption debuff will be reset upon
entering Phase Two. Mages,
Paladins, and Rogues can remove their stack of the debuff given by the
ignited volcanoes (increased Fire damage taken) with
![]() Ice Block,
Ice Block, ![]() Divine Shield, and
Divine Shield, and ![]() Cloak of Shadows
respectively.
Cloak of Shadows
respectively.
Healers need to use all their cooldowns to keep the raid alive until Rhyolith is killed. They need to be especially on their toes for players with high stacks of the increased Fire damage taken debuff.
Achievement: Not an Ambi-Turner
The achievement Not an Ambi-Turner is part of the Glory of the Firelands Raider meta-achievement and is a requirement for obtaining the Corrupted Egg of Millagazor mount.
Introduction
The achievement is extremely straightforward. It requires your raid to defeat Lord Rhyolith while never having him turn to the left. Essentially, you will want to complete the encounter (having him step on volcanoes and not reach the lava at the edges of the platform) by only turning right or walking in a straight path.
The achievement, as you may have guessed, only involves Phase One of the encounter. Therefore, you must not allow him to turn left until the boss enters Phase Two, after which point your raid is free to do anything, as long as the boss dies.
Execution
For most players in the raid, the fight will be identical to doing it normally. Tanks, healers and most DPS players will simply mind their own, usual jobs. The only players noticing any differences will be the pilot of Lord Rhyolith, and DPS players assigned to his feet.
The idea is simple: have Rhyolith turn right all the time. This will essentially have him continually move in a circle. In order to give him the desired route, you will have to adjust the wideness of the circle (so that you can, for instance, have him step on a volcano). Do this by applying some DPS to the left leg, but do so moderately and be mindful to never have the Direction Gauge at 50%, as that puts you dangerously close to him moving left.
Your pilot and assigned DPS may need a few attempts to properly calibrate the DPS needed, but overall, the achievement is very simple.
Heroic Mode
The heroic version of the Lord Rhyolith encounter presents increased health and damage, a new type of add (Liquid Obsidian) and an additional soft enrage mechanics (Superheated). Overall, the fight is very challenging and will most likely require extensive practice from your raid.
This second soft enrage mechanics will be the driving force between the way your raid executes the encounter on heroic. While it will not wipe your raid immediately, it will not be possible for your raid to survive for very long once it has come into effect (especially as it will almost certainly overlap with Immolation during Phase Two).
Differences from Normal Mode
The fight against Lord Rhyolith, on heroic mode, gains a few extra elements compared to the normal mode version, but remains largely unchanged in its overall execution. The changes brought on by heroic mode are:
- Lord Rhyolith, Fragments of Rhyolith and Spark of Rhyolith all have increased health values, as well as increased damage output from melee attacks.
- Each time Lord Rhyolith steps on an active volcano, a group of adds, called Liquid Obsidian, spawns from the magma surrounding his platform. These adds head for the boss (very slowly) and, if they reach him, regenerate one stack of Obsidian Armor each.
- Each stack of Molten Armor now causes Rhyolith to do 5% increased damage (up from 2%).
- Superheated occurs 5 minutes after the start of the encounter (as opposed to 6 in normal mode). As a reminder, this is a stacking buff, which increases his damage dealt by 10% per stack, and stacks every 10 seconds. It acts as a very powerful soft enrage mechanics.
- During Phase Two, Lord Rhyolith uses three mobile eye beams to damage the platform. These beams do not chase players, but players will most likely need to move to avoid them (and should do so as they are very damaging).
A few mentions need to be made regarding Liquid Obsidian adds. They are extremely slow, and can be slowed further. They have no aggro tables, and head for the boss at all times. They deal no damage whatsoever. They are susceptible not only to slows, but also to roots, stuns and knockbacks.
Strategy Changes
The changes from normal mode turn the fight into a rather punishing DPS race. The various adds must all die quickly enough so as not to overwhelm the tank(s) (and of course, Fragments must die before they kill people through Meltdown). Lord Rhyolith himself must die very shortly after becoming Superheated, or the damage he does will quickly overwhelm the healers and wipe your raid.
Notes on Composition
In essence, the heroic mode strategy will require your raid to use few tanks and healers, and bring as many DPS players as possible. Ideally, you will want to use a single tank and 2 (10-man) or 5-6 (25-man) healers. This may not always be possible, so and if your tank is becoming overwhelmed, you can use two.The rest of your raid should be made up of a predominantly ranged DPS setup.
The reason for this is that, as mentioned, the fight is a massive DPS race. With proper DPS, Spark of Rhyolith and Fragments of Rhyolith will die fast enough that the single tank won't become overwhelmed. Ranged DPS are preferred as they can damage the Sparks without being affected by their AoE damage, as well as switch between targets while avoiding ground effects much more easily.
Having a few melee players (2 in 10-man, 6 or so in 25-man) is acceptable, and they should be assigned to Rhyolith's Feet. Having a higher percentage of melee players, however, will severely diminish your raid's chances to defeat the boss.
Positioning
The fight has no specific positional requirements. When tanking Spark of Rhyolith, the tank should make sure that they are brought outside of the raid so that their AoE does not damage them.
Fragments of Rhyolith should be tanked either on top of Liquid Obsidians or in melee range, close to Lord Rhyolith's Feet (depending on which area your raid lacks DPS in), thus granting the raid DPS more benefit out of the AoE damage.
Melee players should be in melee range of Rhyolith at all times and DPS their assigned Feet, while also AoEing fragments or Liquid Obsidians.
Target Priorities
As opposed to normal mode, where the DPS requirements are rather lax, on heroic mode you should assign players to specific tasks. The exact assignments will differ based on your DPS composition as well as your raiders' ability. We propose the following guidelines for assignments:
- Assign specific melee players for each of Rhyolith's Feet (1 per foot in 10-man and 3 per foot in 25-man).
- Assign everyone to DPS Fragments of Rhyolith (all ranged DPS, as well as melee DPS provided that the Fragments are brought into melee range).
- Assign specific ranged DPS to Sparks of Rhyolith.
As mentioned, the assignments will vary based on your raid's particular setting, but your aim is to get as much damage as possible on the Feet, while killing Fragments before Meltdown and killing Sparks before new Fragments spawn (and before they kill the tank). Simply re-balance your DPS by assigning more (or fewer) ranged DPS to attack the Sparks, depending on how much more damage is needed on the Fragments.
Whenever a DPS player is free (ie. their assigned target is dead) they should help on Rhyolith's Feet, as the encounter is made considerably easier if the boss reaches 25% early.
Liquid Obsidian can be almost ignored. Balance Druids and Elemental Shamans can and should knock them away from the boss in case they come too close, and Ice Traps can also be used to further control them. These adds do not have a lot of health and will eventually die in the AoE damage going around (though, there will be a great many of them).
A few Liquid Obsidians reaching the boss is not a problem, but any more than that will likely set your DPS back too much, causing you to wipe to the soft enrage.
Handling Rhyolith
The way to handle, or pilot, Lord Rhyolith remains largely unchanged from normal mode. You still want to keep him out of the magma at the sides of his plateau, and you still want to make sure that he steps on active volcanoes as quickly after they have spawned as possible.
The biggest piloting challenge on heroic mode will come from the fact that there is heavy DPS being done on both of Rhyolith's Feet. This makes the direction gauge a lot more unstable, and makes Lord Rhyolith very reactive to turning. For these reasons, your pilot will have to be very active and vocal during this fight.
Because of the change in Molten Armor, letting Rhyolith step on a dormant volcano is now more punishing.
Transitioning to Phase Two
Because Superheated will wipe your raid quite quickly, it is
crucial to push the boss to Phase Two as soon as possible. When the boss is
down to roughly 40% health, and has around 30 stacks of armor, it may prove
worthwhile to simply have everyone nuke one of his Feet (turning him on the
spot) and simply push him into Phase Two that way. You can even use
![]() Heroism,
Heroism, ![]() Bloodlust or
Bloodlust or ![]() Time Warp to facilitate this.
Time Warp to facilitate this.
When entering Phase Two, all existing adds will despawn, so they are of no further concern to your raid.
Phase Two
Phase Two remains largely unchanged from a tactical perspective, but the damage your raid takes is increased massively, especially after the boss becomes Superheated. It will require high DPS and healing cooldowns (which should be used to cover each of the Concussive Stomps after the boss becomes Superheated).
Because of the high (and ever-increasing) damage of this phase, every raid member should use personal defensive and survival cooldowns (during Concussive Stomps) as well as healthstones.
While Superheated will not wipe your raid immediately in and of itself, the damage from Immolation, together with the massive damage from Concussive Stomps, will likely restrict the amount of time before you wipe to under one minute.
Tank damage (especially when coupled with a Concussive Stomp) will be extremely high during Phase Two, and healers should be prepared for this.
Finally, Phase Two will require your raid members to properly move from the eye beams, and continue to avoid the lava streams generated by Magma Flow. Your raid should be spread out.
Learning the Fight
Normal Mode
If you do not bother attacking the first set of adds, the raid will have approximately a minute to practice moving Rhyolith around. Other than that, the encounter leaves little room for targeted practice as the raid needs to properly deal with all the abilities to progress through the fight.
Heroic Mode
The same applies to heroic mode, where the adds will quickly overwhelm and wipe your raid if they are not killed hastily. As the steering of Rhyolith is unchanged from normal mode, this should already be something your raiders are familiar with.
Final Considerations
This concludes the Rhyolith strategy guide. As you can see, the fight has unique mechanics but is not overly complex. We believe that raids will have a lot of fun progressing on this encounter.