

Baleroc Detailed Strategy Guide (Heroic Mode included)

Introduction
This guide is intended to provide a comprehensive description of the encounter with Baleroc in Firelands. It is targeted at anyone who desires to understand the fight mechanics.
This guide is updated for World of Warcraft WoD 6.1.2.
Baleroc, the Gatekeeper, is one the first five bosses of the Firelands raid instance.
Baleroc is a very different fight from most other encounters, and will present your healers and tanks with some very innovative mechanics. Overall, it is one of the easiest encounters within the Firelands, but it is also one of the most entertaining!
General Information
Health Pool
Baleroc has the following health pool:
- in 10-man normal difficulty: 31.5M;
- in 10-man heroic difficulty: 52.5M;
- in 25-man normal difficulty: 113M;
- in 25-man heroic difficulty: 165.75M.
Enrage Timer
Baleroc has a 6 minute enrage timer.
Raid Composition
The following raid compositions are advised:
- in 10-man normal difficulty: 1/2 tanks, 3 healers, 5/6 DPS;
- in 10-man heroic difficulty: 1 tank, 2 healers and 7 DPS;
- in 25-man normal difficulty: 1/2 tanks, 5/6 healers, 15-17 DPS;
- in 25-man heroic difficulty: 1/2 tanks, 4/5 healers, 18-20 DPS.
Loot
 Mantle of Closed Doors (heroic: Mantle of Closed Doors), Cloth Shoulders
 Glowing Wing Bracers (heroic: Glowing Wing Bracers), Balance/Restoration Druid Wrists
 Shoulderpads of the Forgotten Gate (heroic: Shoulderpads of the Forgotten Gate), Leather Agility Shoulders
 Breastplate of the Incendiary Soul (heroic: Breastplate of the Incendiary Soul), Leather Agility Chest
 Gatekeeper's Embrace (heroic: Gatekeeper's Embrace), Elemental/Restoration Shaman
 Decimation Treads (heroic: Decimation Treads), Mail Agility Feet
 Casque of Flame (heroic: Casque of Flame), Holy Paladin Head
 Helm of Blazing Glory (heroic: Helm of Blazing Glory), Tanking Head
 Flickering Handguards (heroic: Flickering Handguards), Tanking Random Hands
 Necromantic Focus (heroic: Necromantic Focus), DPS Caster Trinket
 Gatecrasher (heroic: Gatecrasher), Agility One-handed Axe
 Shard of Torment (heroic: Shard of Torment), Tanking Shield
 Molten Scream (heroic: Molten Scream), Off-hand Frill
 Gauntlets of the Fiery Conqueror, Gauntlets of the Fiery Protector, and
Gauntlets of the Fiery Vanquisher in heroic difficulty (Tier 12 Heroic Hands)
Gauntlets of the Fiery Conqueror, Gauntlets of the Fiery Protector, and
Gauntlets of the Fiery Vanquisher in heroic difficulty (Tier 12 Heroic Hands)- Rare Boss Drops:
 Eye of Purification (heroic: Eye of Purification), Healing Axe
 Smoldering Censer of Purity (heroic: Smoldering Censer of Purity), Healing Staff
 Firethorn Mindslicer (heroic: Firethorn Mindslicer), DPS Caster Sword
 Entrail Disgorger (heroic: Entrail Disgorger), 1.4 Speed Agility Dagger
 Avool's Incendiary Shanker (heroic: Avool's Incendiary Shanker), 1.8 Speed Agility Dagger
 Shatterskull Bonecrusher (heroic: Shatterskull Bonecrusher), Agility Mace
 Zoid's Firelit Greatsword (heroic: Zoid's Firelit Greatsword), Strength Two-handed Sword
Overview of the Fight
Baleroc is a single phase fight, where you will not have to deal with any types of adds.
The boss will constantly increase the health of his main aggro target, while also increasing his own damage dealt, to a point where a 5M health pool on your tank will not be uncommon. There are some interesting mechanics which enable your healers to have the required output to heal the tank, and the DPS will have to perform some tasks to enable the healers to do this.
Abilities and Explanation
Baleroc has two categories of abilities. One category of abilities causes Baleroc to do massive amounts of damage and provides the tank with sufficient health to survive, while the other provides healers with the necessary tools to heal the tank.
Abilities
First category:
- Blaze of Glory: roughly every 10 seconds, Baleroc will increase the tank's maximum health by 20% as well as their physical damage taken by 20%. This is a stacking debuff on the tank, which cannot be dispelled and does not have a duration. While the fight is in progress, the debuff persists through death, so that a tank who gets resurrected during combat will not lose their stacks.
- Incendiary Soul: each time Baleroc casts Blaze of Glory, he also applies Incendiary Soul to himself, increasing his own Fire damage done by 20%. It is a stacking buff on the boss.
- Inferno Blade: every 60 seconds, Baleroc will infuse his weapon with Fire for 15 seconds. He no longer performs melee attacks, but instead uses Inferno Strike, causing roughly 75,000 Fire damage. This damage is increased by Incendiary Soul.
- Decimation Blade: every 60 seconds, Baleroc will infuse his weapon with Shadow for 15 seconds. He no longer performs melee attacks, but instead uses Decimating Strike, dealing 90% of the tank's health as Shadow damage. This damage will be at least 190,000, it cannot be resisted or mitigated. While Decimation Blade is active, Baleroc's attack speed is reduced by 50%. In addition to this, Decimating Strike also reduces the healing done by the target by 90% for 4 seconds.
Second category:
- Shards of Torment: roughly every 30 seconds, Baleroc will summon a Shard of Torment in 10-man difficulty and two Shards of Torment in 25-man difficulty; existing Shards despawn about 5 seconds before new Shards are cast. Shards of Torment are stationary and unattackable. They cast Torment on the player nearest to them within 15 yards, which inflicts 3000 Shadow damage per second to them, and stacks each second. The Torment debuff is undispellable and lasts 2 seconds.
- Tormented: a debuff applied to a player whose stacks of Torment wore off. It increases Shadow damage taken by 250% and reduces healing done by 50%, for 40 seconds in 10-man difficulty and 60 seconds in 25-man difficulty.
- Wave of Torment: a raid wide Shadow damage ability caused if no player is within 15 yards of a Shard of Torment. It will essentially wipe your raid.
- Vital Spark: each time a healer heals a raid member affected by Torment, the respective healer will gain a stack of Vital Spark. Healers gain one stack of Vital Spark for every 3 stacks of Torment on their target (so, healing a player with 3 stacks of Torment will grant one stack of Vital Spark, and healing a player with 9 stacks of Torment will grant 3 stacks of Vital Spark). This buff has a 60 second duration, and is refreshed each time a new stack is gained.
 Vital Flame: when a healer with stacks of Vital Spark heals a player
affected by Blaze of Glory (so, the tank), their stacks of Vital Spark will
be consumed, and turned into Vital Flame. Vital Flame is a buff which lasts
for 15 seconds and increases the player's healing done, on targets affected by
Blaze of Glory, by 5% for each stack of Vital Spark consumed. When the effect
ends, the Vital Spark stacks are restored.
Vital Flame: when a healer with stacks of Vital Spark heals a player
affected by Blaze of Glory (so, the tank), their stacks of Vital Spark will
be consumed, and turned into Vital Flame. Vital Flame is a buff which lasts
for 15 seconds and increases the player's healing done, on targets affected by
Blaze of Glory, by 5% for each stack of Vital Spark consumed. When the effect
ends, the Vital Spark stacks are restored.
Strategy
Strategy Overview
Essentially, for the entire duration of the fight, Baleroc will continuously increase the maximum health and physical damage taken of the tank (through Blaze of Glory), while increasing his own Fire damage done (through Incendiary Soul).
You can opt to use one or two tanks. We will detail both of these possibilities below.
To keep up with the high health pool of the tanks, healers will need to stack Vital Spark, by healing players affected by Torment (so, the players standing closest to a Shard of Torment). Keep in mind that someone must always be within 15 yards of a Shard of Torment, or else the raid will wipe due to Wave of Torment.
Healers will need to take turns healing players affected with Torment in
order to build stacks of Vital Spark, and then switch to healing the tank (thus
benefiting from ![]() Vital Flame and the increased healing that it provides).
The rotation should be such that a healer with higher Vital Spark stacks will
always replace a tank healer, so that they can be properly healed through
the increasing damage.
Vital Flame and the increased healing that it provides).
The rotation should be such that a healer with higher Vital Spark stacks will
always replace a tank healer, so that they can be properly healed through
the increasing damage.
Because of the negative effects of Tormented (increased Shadow damage taken and reduced healing done), neither healers nor tanks will ever want to be targeted by a Shard of Torment. Indeed, it is only the DPS players who should be taking the damage caused by Shards of Torment.
This encounter does not really have a strategy. Instead, each of the three roles that your raiders are filling has some specific duties that they need to properly perform in order to be successful.
Tank Duties
Raids can use a single tank on this encounter, though using two tanks may make dealing with some mechanics easier. We will explain both strategies.
In the case of a single tank, the fight is rather simple. The tank will simply hold on to Baleroc for the entire duration of the encounter and must be healed through all damage that he receives.
We advise less experienced or less geared raids to use two tanks. The idea is to have one tank receive only enough stacks of Blaze of Glory to be able to survive Decimation Blade (so, enough stacks to have more than 190,000 health, which is around 2-3 stacks), while the other tank should take all the remaining stacks. This will require much less healing, overall, and will make the fight easier for your healers.
The strategy resulting from this is that the Decimation Blade tank will taunt the boss as Decimation Blade is cast, and will only take 250,000 damage, or slightly more, each swing. The rest of the time, the other tank will take the boss, increasing his stacks of Blaze of Glory and having the required health to survive the boss' Inferno Blade damage.
The only issue here is that, sometimes, Baleroc will apply stacks of Blaze of Glory to the Decimation Blade tank, and thus, gradually, the damage taken by that tank will increase. This will, additionally, cause the issue that the other tank will have fewer overall stacks of Blaze of Glory, meaning that the Inferno Blade damage will make up a greater percentage of their health. This was not problematic on the PTR, but live server tuning may prove to be different.
In both cases, the tank which is currently tanking Baleroc will need to ensure that he does not come in contact with a Shard of Torment.
When Baleroc casts Inferno Blade and Decimation Blade, the tank should simply be healed. The fire damage from Inferno Blade can be mitigated, so the tank should use some personal defensive cooldowns at this point. As Inferno Blade is cast once a minute, cooldown alternation should not be problematic.
Healer Duties
Healers will want to make sure that they are never targeted by Torment, as otherwise the 50% healing reduction will prove disastrous.
As you know by now, the tank's health pool and damage taken is in constant
increase throughout the fight. To counteract this damage, healers will also
need to build Vital Spark stacks continuously. However, because one cannot
gain new stacks of Vital Spark while ![]() Vital Flame is active (so, for
15 seconds after having healed the tank), healers will need to rotate who is
healing the tank and who is building stacks of Vital Spark.
Vital Flame is active (so, for
15 seconds after having healed the tank), healers will need to rotate who is
healing the tank and who is building stacks of Vital Spark.
Therefore, you will always want to have one (or two, in 25-man) healer on the tank and the rest of the healers on players affected by Torment. The tank healer(s) will have the Vital Flame effect and will be healing the tank, while all the other healers will be building their stacks of Vital Spark.
A tank healer can only keep up with the increasing tank damage for a certain time, as they are not able to gain new stacks Vital Spark while tank healing (because of Vital Flame). At some point, this tank healer will have to be replaced by one of the healers who has, up to this point, been stacking Vital Spark. Ideally, the healer with the highest number of Vital Spark stacks should switch to tank healing.
When this switch happens, the previous tank healer should (once their Vital Flame buff has dropped off) heal players affected by Torment, so that he may gain more stacks of Vital Spark.
This type of rotation among your healers will continue until the end of the encounter.
DPS Duties
DPS players have a rather simple job, but precision is required sometimes, in their movement. They will simply DPS Baleroc for the entire duration of the fight. In addition to this, it is their duty to soak the damage from Shards of Torment. To be targeted by a Shard of Torment, a player must simply be the closest player to that shard.
All DPS players in both 10-man and 25-man difficulty will need to engage in this rotation. Remember, that the duration of Tormented is extended to 1 minute in 25-man difficulty (as opposed to 40 seconds in 10-man) and that there are 2 shards in 25-man (as opposed to only 1 in 10-man). The easiest way to perform the rotation is simply to have a player, with raid frames properly configured to show the Tormented debuff on raid members, tell who is next to soak a given shard.
Once a player is being damaged by Torment, the debuff will stack on them at a rate of 1 stack per second. This will increase their damage taken, to the point where they will become unhealable. Before this happens, the affected player should be replaced by having them move away, while another player moves in.
The idea is to set up a rotation, where the affected player always gets replaced by someone without stacks of Torment, or the Tormented debuff, all the while ensuring that someone is within 15 yards of a Shard of Torment, so that the raid does not wipe from Wave of Torment.
Players who know they are about to take over in the rotation should already be in place, close enough to the Shard (within 15 yards) and ready to move in when needed.
DPS players should aim to reach 12 stacks of Torment before moving away
from a Shard. If low on health, the targeted player should move away sooner.
Similarly, a player can remain under the effects of Torment for longer if they
have a lot of health or can use a damage reducing cooldown
like ![]() Anti-Magic Shell,
Anti-Magic Shell, ![]() Dispersion or
Dispersion or ![]() Barkskin. The more stacks
of Torment that
a player has, the more stacks of Vital Sparks the healers will gain from
healing them.
Barkskin. The more stacks
of Torment that
a player has, the more stacks of Vital Sparks the healers will gain from
healing them.
There are a few things to watch out for, when soaking Torment:
- You should never allow a Shard of Torment to have no one within 15 yards of it (or Wave of Torment will wipe your raid).
- You should never allow a tank or a healer to be the closest player to a Shard of Torment (the Tormented debuff is detrimental for them).
- You should never get stacks of Torment while your Tormented debuff persists (the Shadow damage taken increase will kill you).
Achievement: Share the Pain
The Share the Pain achievement is a part of the Glory of the Firelands Raider meta-achievement and is a requirement for obtaining the Corrupted Egg of Millagazor mount.
Introduction
The achievement, which is in effect a DPS check, requires that your raid defeats Baleroc without any single raid member receiving more than three applications of Torment.
The wording of this achievement is misleading, however, as Torment can easily be confused with Tormented, and one can easily assume that the applications of Torment refer to stacks (which is incorrect).
In reality, this achievement requires that no one in your raid be affected by Torment (totally regardless of the amount of stacks it reaches on a single application) more than three times. Thus, a raid member who takes 12 stacks of Torment and then moving away from a shard will have received one application of Torment.
Execution
Under normal circumstances, with a proper rotation of players to deal with the Torment debuff, your raid should complete the achievement simply by virtue of having high enough DPS. Alternatively, your raid can make use of additional players in the shard rotation to ensure that someone who has already received Torment thrice does not become affected again (such as having a healer soak a shard at the end of the fight, or one of the DPS players which somehow did not become involved in the rotation.
It is possible for certain classes, such as Shadow Priests, to soak a
shard all by themselves, especially if they also receive external cooldowns
such as ![]() Guardian Spirit. In case your raid uses two tanks, the tank not
tanking Decimation Blade can also participate in soaking a shard, though
particular care should be paid to his health.
Guardian Spirit. In case your raid uses two tanks, the tank not
tanking Decimation Blade can also participate in soaking a shard, though
particular care should be paid to his health.
All in all, the achievement is one which your raid will struggle to get with low DPS (kills lasting around 6 minutes), but will find easy to complete with high DPS and proper shard management.
Heroic Mode
The heroic mode of Baleroc is a true test of your raid's DPS. It is a brutal gear check, during which you will most likely reach the hard enrage timer. However, from a strategy point of view, the fight remains very similar to normal mode and is as close to a "tank and spank" fight as you will find in the Firelands.
Differences from Normal Mode
There are two main differences from normal mode which cause this encounter to have slightly altered strategy and positioning, but in essence, the fight does not change drastically.
- If a player affected by Tormented comes in melee contact with another player, the debuff will spread (with a full duration).
- Baleroc gains a new ability, called Countdown. This links two random (non tank) raid members together, and if after 8 seconds the two players have not come within 4 yards of each other (dispelling the link), they will explode for over 85,000 Fire damage each to everyone within 100 yards, essentially wiping the raid.
In addition to this, the following things are also different from normal mode:
- Baleroc has very high health, but retains the 6 minute enrage timer, leading to a very high DPS requirement.
- The Tormented debuff now increases shadow damage taken by 500%.
- In 25-man difficulty, a stack of Vital Spark is gained for every 5 stacks of Torment on the target, up from 3 on normal mode.
Strategy Changes
Because this fight is tuned so tightly in terms of beating the enrage timer, raids will find that every single advantage that they can gain will have to be employed. We will detail all the relevant aspects below.
Notes on Composition
Because the encounter is a massive DPS race, you will want to drop down to a single tank, for both 10 and 25-man difficulty. Additionally, you should reduce the amount of healers to 2 in 10-man and 4 or, at most, 5 in 25-man difficulty.
Employing these raid compositions will lessen the DPS requirements considerably.
Positioning and Movement
The fact that Tormented spreads to other players means your raid will have to be extremely careful with movement. While this would, perhaps, not be that problematic in itself, your raid will have to contend with Countdown. If one of the two players linked by Countdown is Tormented, it will be very difficult to avoid spreading Tormented to the other player, although it is possible with excellent coordination and latency.
For this reason, your positioning will have to be more carefully planned out than in normal mode. We have prepared an image illustrating positioning for 25-man raids. 10-man raids have much less demanding requirements (not only in terms of positioning, but also DPS), and a strategy can be constructed on the spot.
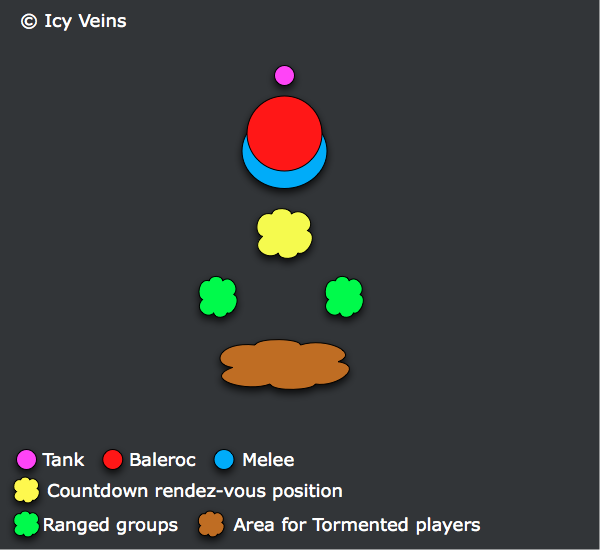
As you can see in the image, your aim is to have a few specifically designated areas, as follows:
- A designated area for ranged DPS players and healers affected by Tormented. This should be wide enough, and placed at the back of the raid group, allowing them to enter it freely or to rejoin the raid group without coming in contact with other players.
- A designated area for where players linked by Countdown should meet. This area should be located between the ranged group(s) and the melee group, and should be free of other players (so that if one of the linked players is Tormented, the debuff does not spread needlessly.
- Two ranged groups (including healers). These should be located between the Countdown area and the Tormented area. The Shards of Torment which spawn at range will spawn on one of these two groups, allowing the players in the other group to remain still and continue DPSing.
Melee players (who will also be soaking the melee Shard) should be located behind the boss, and should spread out accordingly so as not to transmit the Tormented debuff among themselves.
Execution
The only differences concern the movement and positioning requirements, as well as the high DPS requirements. Tanking and healing remain unchanged.
The fight will play very similarly to its normal mode counterpart. Player rotations for soaking Shards of Torment should be used. Whenever a ranged player receives the Tormented debuff, he or she should move to the Tormented area, and make sure to be away from any other players (including while moving to the Tormented area).
When someone's Tormented debuff runs out, they should return to one of the ranged groups.
Players linked by Countdown should come together before the 8 second duration wears out, and should do so without coming in contact with Tormented players, or with any players should they themselves be Tormented.
The start of the fight is the ideal time for ![]() Heroism,
Heroism, ![]() Bloodlust
or
Bloodlust
or ![]() Time Warp, as this is a time where everyone is guaranteed to be
alive and have all their DPS cooldowns available.
Time Warp, as this is a time where everyone is guaranteed to be
alive and have all their DPS cooldowns available.
In order to maximise healer stacks of Vital Spark, players should
attempt to survive as many stacks of Torment as possible. Many DPS classes have
damage reduction cooldowns which they should use during this time. Through
combinations of personal cooldowns and external cooldowns like
![]() Guardian Spirit or
Guardian Spirit or ![]() Pain Suppression, the following specs can survive
all 25 stacks of a Shard of Torment:
Pain Suppression, the following specs can survive
all 25 stacks of a Shard of Torment:
- Shadow Priests through
 Dispersion;
 - Fury/Arms Warriors through
 Shield Wall;
 - Feral Druids through
 Barkskin and
  Survival Instincts.
Surviving After the Enrage
Because of the boss' very large health pool, coupled with the low enrage timer, it is very likely that the boss will become enraged before dying (especially on your first kill). Do not worry, however, as the enrage will not instantly wipe your raid.
Instead, Baleroc's damage done will be buffed significantly, to the point where he will be one shotting everyone he attacks. Fortunately, as he is running from player to player, this will allow you quite a lot of time to finish him off.
Hunters are of particular value here, as they can tank the boss for 5
seconds thanks to Deterrence before using ![]() Feign Death and
continuing to DPS.
Feign Death and
continuing to DPS.
It is up to you to set up a positioning strategy for when the enrage happens, such that your two hunters (for example) are on opposite sides of the arena, meaning that the boss will have to travel a great distance from one to the other.
Keep in mind, however, that Wave of Torment will very promptly wipe your raid, so even after the boss becomes enraged, you must make sure that there is always someone within 15 yards of Shards of Torment.
Learning the Fight
While Baleroc does have an enrage timer, which will require reasonable DPS to meet, when learning the fight we advise you to ignore DPSing the boss while making sure that a proper rotation of players taking Torment is established, and healers become accustomed to healing the tank.
Final Considerations
Baleroc is an extremely interesting healing encounter, and while it may take your raid several attempts to distill a proper strategy for your own raid, we have no doubt that your healers (and tanks) will have a great deal of fun in doing so.