

Kil'jaeden Strategy/Tactics for Normal/Heroic

General Information
On this page, you will find a working strategy to defeat Kil'jaeden in Tomb of Sargeras for both Normal and Heroic modes, which usually only differ by the tuning of the boss.
Here, we assume that you have read our descriptions of the abilities for this encounter.
The other pages of our Kil'jaeden guide can be accessed from the table of contents on the right.
Positioning
This positioning is assumes the raid is attempting the boss on at least Heroic difficulty. If you are raiding on a lower difficulty there is no downside to following this strategy, however, certain mechanics only present on Heroic and higher require adjustments to positioning that would otherwise result in wipes on these difficulties.
Phase One
The raid should prepare for the encounter by placing raid markers in the
4 corners of the arena. The raid leaders should distribute assignments to
the raid so that an equal portion of the group will be responsible for
these corners. These assignments will persist throughout the first 3 phases
of the fight; these are the phases in which ![]() Armageddon occurs. It is
preferable to have at least one or two immunities in each group to remove the
Fire debuffs that will be applied, which will greatly assist with group
healing.
Armageddon occurs. It is
preferable to have at least one or two immunities in each group to remove the
Fire debuffs that will be applied, which will greatly assist with group
healing.
The tanks should position the boss so that it is slightly ahead of the
center circle, in any direction (it does not make a difference). The rest of the raid
group should settle in behind the boss, favoring the side they will soak during
![]() Armageddon. See the image below.
Armageddon. See the image below.

The tanks will perform a taunt swap at 5+ stacks of ![]() Felclaws.
Kil'jaeden will deal serious damage to the current tank while this
ability is stacking, so be liberal with active mitigation and/or defensive
cooldowns. The raid should take care to avoid being in front of the boss
during this time (Heroic only); anyone caught will be killed by the conal
AoE during this time.
Felclaws.
Kil'jaeden will deal serious damage to the current tank while this
ability is stacking, so be liberal with active mitigation and/or defensive
cooldowns. The raid should take care to avoid being in front of the boss
during this time (Heroic only); anyone caught will be killed by the conal
AoE during this time.
When ![]() Rupturing Singularity spawns, everyone in the raid must
gather close to the singularity zone. It is very important that no one
is inside the zone, as it will instantly kill any player, regardless of role,
if it connects. Any players too far away from the singularity will be
knocked off the edge of the platform when the sphere lands. Mobility
cooldowns such as
Rupturing Singularity spawns, everyone in the raid must
gather close to the singularity zone. It is very important that no one
is inside the zone, as it will instantly kill any player, regardless of role,
if it connects. Any players too far away from the singularity will be
knocked off the edge of the platform when the sphere lands. Mobility
cooldowns such as ![]() Shadowstep and
Shadowstep and ![]() Transcendence: Transfer
allow for a little more lax positioning, however, it is better to be safe
than sorry in this case, as anyone knocked off will not be able to receive a
combat resurrection.
Transcendence: Transfer
allow for a little more lax positioning, however, it is better to be safe
than sorry in this case, as anyone knocked off will not be able to receive a
combat resurrection.
![]() Armageddon occurs periodically throughout the phase. The raid
has 7 seconds to soak all meteors; if an
Armageddon occurs periodically throughout the phase. The raid
has 7 seconds to soak all meteors; if an ![]() Armageddon Blast occurs,
a wipe is very likely. The current inactive tank should soak the
Armageddon Blast occurs,
a wipe is very likely. The current inactive tank should soak the
![]() Armageddon Hail, which will appear as a larger circle than the rest of
the meteors.
Armageddon Hail, which will appear as a larger circle than the rest of
the meteors. ![]() Armageddon Rain will appear as many smaller circles
around the platform, and the rest of the raid should fan out to their assigned
corners and soak them. This applies a heavy Fire DoT effect to the soaking
players, so take care not to double soak the same meteor by accident.
Armageddon occurs faster than the DoT expires, meaning if you soak 2 Armageddons
in a row you will have 2 stacks of the debuff. This puts a lot of undue strain
on the healers and may result in fatalities. Players should rotate soaking to
avoid this, or use immunities such as
Armageddon Rain will appear as many smaller circles
around the platform, and the rest of the raid should fan out to their assigned
corners and soak them. This applies a heavy Fire DoT effect to the soaking
players, so take care not to double soak the same meteor by accident.
Armageddon occurs faster than the DoT expires, meaning if you soak 2 Armageddons
in a row you will have 2 stacks of the debuff. This puts a lot of undue strain
on the healers and may result in fatalities. Players should rotate soaking to
avoid this, or use immunities such as ![]() Cloak of Shadows to clear the DoT.
The currently active tank should also soak one of the smaller meteors. It is
important it is the furthest meteor from the center on his/her assigned corner,
ensuring no one will be hit by
Cloak of Shadows to clear the DoT.
The currently active tank should also soak one of the smaller meteors. It is
important it is the furthest meteor from the center on his/her assigned corner,
ensuring no one will be hit by ![]() Felclaws while soaking.
Felclaws while soaking.
Healer proximity is also important during ![]() Armageddon. The tanks will
be taking heavy damage during this time, so it is important that they receive
proper attention. The raid will also take heavy damage along upon impact along
with heavy ticking damage, so a throughput cooldown might be useful during this
time, such as
Armageddon. The tanks will
be taking heavy damage during this time, so it is important that they receive
proper attention. The raid will also take heavy damage along upon impact along
with heavy ticking damage, so a throughput cooldown might be useful during this
time, such as ![]() Tranquility.
Tranquility.
An alternative strategy, which is especially effective on higher
difficulties, is to have a player with a Physical damage immunity (for example,
![]() Ice Block) soak the Armageddon Hail, as this allows the other tank
to soak an additional
Ice Block) soak the Armageddon Hail, as this allows the other tank
to soak an additional ![]() Armageddon Rain. This puts the Fire DoT on a
beefier target and avoids the heaviest damage meteor entirely. If you choose
to do this, you should set up a soaking rotation in advance so nothing goes
awry.
Armageddon Rain. This puts the Fire DoT on a
beefier target and avoids the heaviest damage meteor entirely. If you choose
to do this, you should set up a soaking rotation in advance so nothing goes
awry.
Erupting Reflections are the final mechanic in this phase. Groups with
very high DPS, or groups on normal and LFR, should stack right behind the boss
with the debuffs so that they can be immediately cleaved down. On Heroic and
above the afflicted players should form a triangle around the boss, at least
20 yards apart, taking care not to be in the ![]() Felclaws cone. Once they
spawn they are highest priority and should be eliminated before they can get
more than one or two casts of
Felclaws cone. Once they
spawn they are highest priority and should be eliminated before they can get
more than one or two casts of ![]() Erupting Dreadflame off. Note that it is
possible to stack and cleave them down on Heroic, however, if they get their
casts off and stack Eruption then the second cast will likely result
in the raid getting flattened.
Erupting Dreadflame off. Note that it is
possible to stack and cleave them down on Heroic, however, if they get their
casts off and stack Eruption then the second cast will likely result
in the raid getting flattened.
Phase Two
Phase Two begins at 80%. Kil'jaeden will wing away into the air
and shield himself with ![]() Nether Gale. The phase lasts 60 seconds.
Nether Gale. The phase lasts 60 seconds.
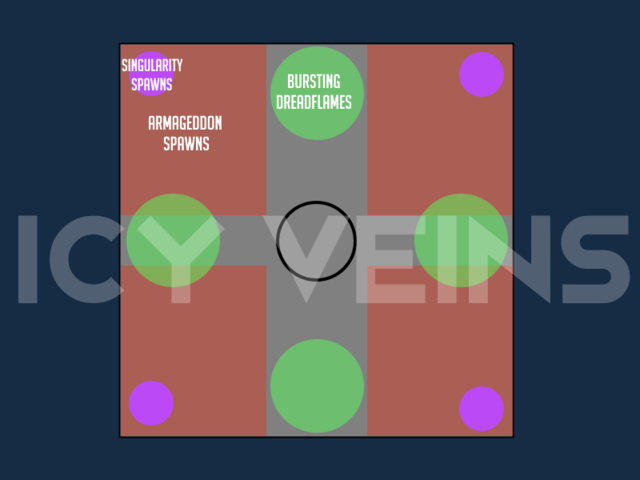
When ![]() Bursting Dreadflame is applied, the afflicted players should
spread spread to the edges of the platform, ensuring no other players are
within the blast radius. This will often overlap with
Bursting Dreadflame is applied, the afflicted players should
spread spread to the edges of the platform, ensuring no other players are
within the blast radius. This will often overlap with ![]() Armageddon in
this phase, further complicating positioning as you do not want to explode
on players that are soaking. Ideally, the Bursting Dreadflames will be taken
to the middle of each edge where Armageddon is least likely to spawn, however,
the raid must be ready to quickly adjust in the event that meteors do spawn
there. See the image below for example positioning.
Armageddon in
this phase, further complicating positioning as you do not want to explode
on players that are soaking. Ideally, the Bursting Dreadflames will be taken
to the middle of each edge where Armageddon is least likely to spawn, however,
the raid must be ready to quickly adjust in the event that meteors do spawn
there. See the image below for example positioning.
![]() Focused Dreadflame will target a single player. This player should
not move laterally along their line between them and the boss, but they should
move away from the boss' current position to give the rest of the raid more
space to soak along their line. On Heroic difficulty, everyone splitting the
damage will also trigger a
Focused Dreadflame will target a single player. This player should
not move laterally along their line between them and the boss, but they should
move away from the boss' current position to give the rest of the raid more
space to soak along their line. On Heroic difficulty, everyone splitting the
damage will also trigger a ![]() Focused Dreadburst. If anyone is caught
within 5 yards of the other players soaking, they will likely kill each
other, so it is imperative to spread out along the line. You will want at least
5-6 players soaking Focused Dreadflame or casualties may ensue. If the targeted
player has an immunity available, it is safest for everyone to get out of the
line and have the targetd player immune the damage.
Focused Dreadburst. If anyone is caught
within 5 yards of the other players soaking, they will likely kill each
other, so it is imperative to spread out along the line. You will want at least
5-6 players soaking Focused Dreadflame or casualties may ensue. If the targeted
player has an immunity available, it is safest for everyone to get out of the
line and have the targetd player immune the damage.
![]() Armageddon should be handled the same way in this phase, though
everyone must be conscious of the additional mechanics explained above.
Armageddon should be handled the same way in this phase, though
everyone must be conscious of the additional mechanics explained above.
Finally, ![]() Rupturing Singularity will also make a return in this
phase. This time, it will spawn in the corners of the room. Once the spawn
is detected, the entire raid must get to that corner as fast as possible to
avoid a lethal knockback.
Rupturing Singularity will also make a return in this
phase. This time, it will spawn in the corners of the room. Once the spawn
is detected, the entire raid must get to that corner as fast as possible to
avoid a lethal knockback.
Phase Three
This phase is a combination of the previous two phases. All the mechanics
from Phase One return, and are dealt with in identical fashion to the first
phase. In addition to this, ![]() Focused Dreadflame and
Focused Dreadflame and ![]() Bursting Dreadflame
are both present in this phase.
Bursting Dreadflame
are both present in this phase.
There is no special trick to this phase. Immunities are of paramount
importance as they allow you to effectively eliminate mechanics such as
![]() Focused Dreadflame from the fight, removing the threat from the raid.
Focused Dreadflame from the fight, removing the threat from the raid.
![]() Rupturing Singularity returns to the center of the room.
Rupturing Singularity returns to the center of the room.
Phase Four
This phase begins when Kil'jaeden reaches 40% health.
Phase Four is extremely unique. The entire raid will be shrouded in the
shadow of ![]() Deceiver's Veil. No one will be able to target any foes or
allies within 8 yards. Additionally all spells and abilities will miss,
and healing is reduced by 100%. The entire raid will be affected by
Deceiver's Veil. No one will be able to target any foes or
allies within 8 yards. Additionally all spells and abilities will miss,
and healing is reduced by 100%. The entire raid will be affected by
![]() Choking Shadow, which continually reduces the healing received
by players within range throughout the phase.
Choking Shadow, which continually reduces the healing received
by players within range throughout the phase.
Shadowsouls will spawn throughout the platform at the start of
the intermission. The raid will continually take damage from their casts of
![]() Destabilized Shadowsoul throughout the phase.
Destabilized Shadowsoul throughout the phase.
The raid should group up in the center of the platform so that everyone
can receive healing. During this time, the healers will want to ensure that
no one dies but conserve Mana by not overhealing, as the healing is continually
reduced. For this reason, alacrity in this phase is very important.
Lord Illidan Stormrage will fly to the platform. The raid must find him
in the fog to receive ![]() Illidan's Sightless Gaze; the raid will be granted
vision within a 40 yard radius, the ability to heal allies and damage foes,
but at at cost. The raid will take ticking Fire damage for 20 seconds in addition
to the constant damage from
Illidan's Sightless Gaze; the raid will be granted
vision within a 40 yard radius, the ability to heal allies and damage foes,
but at at cost. The raid will take ticking Fire damage for 20 seconds in addition
to the constant damage from ![]() Destabilized Shadowsoul.
Destabilized Shadowsoul.
Once ![]() Illidan's Sightless Gaze is obtained, the raid should eliminate
the Shadowsouls as quickly as possible. Once they are all dead the
phase ends and the fight against Kil'jaeden resumes.
Illidan's Sightless Gaze is obtained, the raid should eliminate
the Shadowsouls as quickly as possible. Once they are all dead the
phase ends and the fight against Kil'jaeden resumes.
Phase Five
Kil'jaeden re-enters the fight, bringing his full power to bear.
The only returning mechanics from previous phases are ![]() Felclaws,
Felclaws,
![]() Bursting Dreadflame, and
Bursting Dreadflame, and ![]() Focused Dreadflame, and they are
all dealt with in the same fashion as before.
Focused Dreadflame, and they are
all dealt with in the same fashion as before.
The key mechanic in this phase is ![]() Tear Rift. These will be
periodically spawned by Kil'jaeden, and draw in nearby players.
These can be used to avoid
Tear Rift. These will be
periodically spawned by Kil'jaeden, and draw in nearby players.
These can be used to avoid ![]() Darkness of a Thousand Souls and the
Darkness of a Thousand Souls and the
![]() Burning pools from
Burning pools from ![]() Flaming Orb. When Darkness of a
Thousand Souls is cast, all players must gather inside the rift to avoid
the damage. Anyone not inside the rift is guaranteed to die eventually as
they will take heavy ticking damage for the rest of the encounter.
Flaming Orb. When Darkness of a
Thousand Souls is cast, all players must gather inside the rift to avoid
the damage. Anyone not inside the rift is guaranteed to die eventually as
they will take heavy ticking damage for the rest of the encounter.
The caveat to ![]() Tear Rift is that anyone inside the rift will
take very heavy Shadow damage from
Tear Rift is that anyone inside the rift will
take very heavy Shadow damage from ![]() Gravity Squeeze. The damage
occurs every second and increases with each tick, meaning the group will
have to time their rift entry carefully (as late as possible) and get out
immediately after the
Gravity Squeeze. The damage
occurs every second and increases with each tick, meaning the group will
have to time their rift entry carefully (as late as possible) and get out
immediately after the ![]() Darkness of a Thousand Souls cast concludes.
At least one raid cooldown will also be necessary to ensure no fatalities.
Darkness of a Thousand Souls cast concludes.
At least one raid cooldown will also be necessary to ensure no fatalities.
![]() Flaming Orbs will also spawn throughout the phase and chase
players. The targeted players should take them to the corners of the room
before letting them impact, as they deal damage to everyone nearby when
they cause a
Flaming Orbs will also spawn throughout the phase and chase
players. The targeted players should take them to the corners of the room
before letting them impact, as they deal damage to everyone nearby when
they cause a ![]() Flaming Detonation upon impact. They also leave behind
a pool of
Flaming Detonation upon impact. They also leave behind
a pool of ![]() Burning fire, which can be sucked up by nearby
Burning fire, which can be sucked up by nearby
![]() Tear Rifts. The size of the flame pool is reduced based on the
duration of time the orb chased the player.
Tear Rifts. The size of the flame pool is reduced based on the
duration of time the orb chased the player.
Bloodlust/Heroism/Time Warp
We advise you to use ![]() Bloodlust/
Bloodlust/![]() Heroism/
Heroism/![]() Time Warp
in the final phase, as this is the longest and most punishing part of the
fight. Raid damage throughout this phase is also quite high, giving the
cooldown dual benefit as a damage and healing cooldown.
Time Warp
in the final phase, as this is the longest and most punishing part of the
fight. Raid damage throughout this phase is also quite high, giving the
cooldown dual benefit as a damage and healing cooldown.