

Mythic+ Affixes
When you reach level 4 in your Mythic+ dungeons, you will start to see affixes attached to the keystone which add additional effects to enemies within the dungeon. Each tier (4, 7, and 10) cannot be duplicated within one keystone, so you will have one of each at higher levels and they will cycle each week. Combinations can vary in difficulty and how much they synergise with each other and the instance in question, but all of them have an impact and have to be dealt with in different ways.
Tier 1 Affixes (Active at 4+ Keystones)
Raging. When targets reach 30% health, they Enrage, and deal 100% bonus damage. This encourages burning enemies down individually when they reach this point, or saving hard crowd control like stuns for when they reach this point during AoE.
Bolstering. Whenever an enemy dies, it buffs other enemies in combat with an additional 20% health and damage, which heavily encourages killing them at the same time, or within a small window of each other. In larger groups, this can be deadly if mis-managed. Note this does not, however, interact with adds summoned via boss mechanics.
Sanguine. When enemies die, they leave a small pool on the ground which deals damage to players and heals enemies standing within them. This increases the awareness requirement, and means you need to reposition groups quickly around them.
Teeming. The dungeon itself will generate additional lesser adds, which increases the number of targets in pulls. This mostly increases the difficulty of pulls as additional enemies will be active in each pack.
Bursting. When minions die within the dungeon, all party members inside will receive a stacking debuff that deals 5% of their maximum health every 2 seconds for 4 seconds. This requires the party to kill targets in a staggered fashion to prevent it stacking too high and killing off players, and for the healer to be acutely aware of the state of the party health when it is applied.
Tier 2 Affixes (Active at 7+ Keystones)
Volcanic. This causes random patches on the ground to spawn that will deal high pulsing damage if standing within them. Managing this is mostly on players avoiding them whenever they appear, and will by extension result in reduced DPS due to players avoiding them.
Necrotic. All enemies will apply a stacking debuff that deals flat ticking damage, and reduces healing/absorption received by 3%, stacking up to 10 with additional hits. This increases the intensity of tank healing and adds an additional component to the damage they receive.
Skittish. Enemies will randomly drop all threat on their current target. This makes it significantly more dangerous for DPS and adds an extra factor for tanks to account for, as dangerous mobs will require additional attention to keep in check.
Explosive. Enemies will occasionally spawn Explosive Orbs nearby with a small amount of health. These will will detonate after 6 seconds if not killed, dealing 50% of the all party members' maximum health. These orbs are immune to AoE and crowd control, so need to be switched to and killed quickly throughout the dungeon.
Quaking. All players will periodically cause a Shockwave 8 yards around their character, dealing 20% of players' maximum health to any players standing inside it after 3 seconds and interrupting casts. Players should remain spread to avoid taking more than one hit.
Grievous. Any players that falls below 90% health will be afflicted by a Grievous Wound, dealing a percentage of the player's maximum health every 3 seconds, stacking up to 5 times. This is permanent throughout the dungeon, so the healer needs to be aware of the stacks and heal players back above 90% to remove the debuff.
Tier 3 Affixes (Active at 10+ Keystones)
Tyrannical. Increases the health of boss targets by 40%, and their damage by 20%. This intensifies bosses significantly and must be noted when dealing with some of the more dangerous ones, as it also affects abilities alongside extending the duration of the fights in question.
Fortified. Increases the health of minions within the dungeon by 20%, and the damage they deal by 40%. This intensifies the trash pulls significantly and in some cases can limit how many extra you can pull at once, which will slow your pace between bosses.
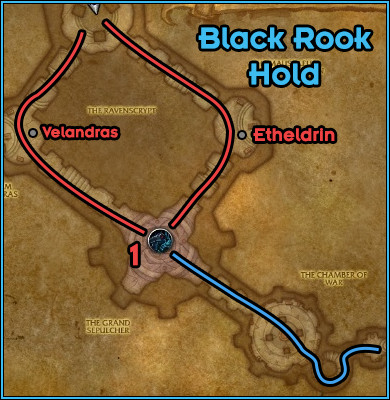
Black Rook Hold Timer: 35 Minutes
Black Rook Hold is very linear with very few skippable trash groups, so making the mob counter is relatively easy. There are a number of very punishing groups, however, that should be handled with care, so over-pulling can be dangerous.
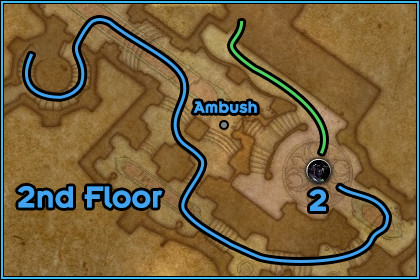
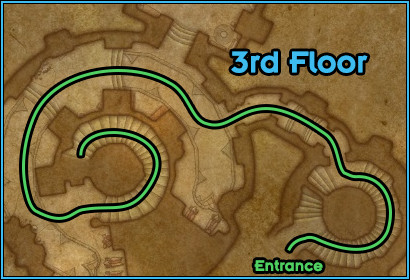
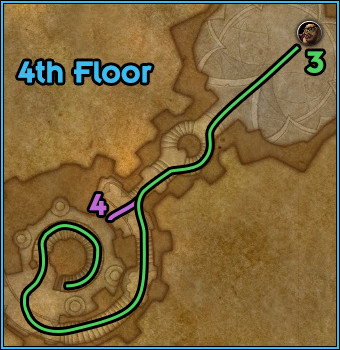
Whilst there is very little you can avoid, here is the general path you will take through each floor:
The Amalgam of Souls
Important Trash to Note
Shortly after entering you will be presented with a path to the left or right, that will determine your route to the first boss. There are two groups accompanied by a patrol as you enter, and a larger more dangerous group at the top of the stairs. When these are defeated the first boss is accessible.
Ghostly Protector
Ghostly Protectors will only deal tank damage, but will begin to cast
![]() Sacrifice Soul roughly 25 seconds after engaging them. This will reduce
damage taken by all other enemies by 75%, but increase the damage the Ghostly
Protectors take by 200%. This can be both stunned and interrupted, and your
choice should generally depend on affixes, as killing this mob early could
trigger Bolstering. If that is not present, take advantage of Sacrifice
Soul to burn down the target, unless your group is heavy on AoE, in which case
it should be interrupted to capitalise upon that.
Sacrifice Soul roughly 25 seconds after engaging them. This will reduce
damage taken by all other enemies by 75%, but increase the damage the Ghostly
Protectors take by 200%. This can be both stunned and interrupted, and your
choice should generally depend on affixes, as killing this mob early could
trigger Bolstering. If that is not present, take advantage of Sacrifice
Soul to burn down the target, unless your group is heavy on AoE, in which case
it should be interrupted to capitalise upon that.
Ghostly Councilor
Ghostly Councilors are caster mobs that should ideally have their
![]() Soul Blast cast
interrupted quickly to group them up, and otherwise this cast is relatively
unimportant as it deals light Shadow damage on a random player. They will also
cast
Soul Blast cast
interrupted quickly to group them up, and otherwise this cast is relatively
unimportant as it deals light Shadow damage on a random player. They will also
cast ![]() Dark Mending, however, which is of the highest priority to
interrupt, as it will heal all nearby targets for 15% of their health every
second for 5 seconds, which will effectively reset damage on a pack.
Dark Mending, however, which is of the highest priority to
interrupt, as it will heal all nearby targets for 15% of their health every
second for 5 seconds, which will effectively reset damage on a pack.
Ghostly Retainer
Ghostly Retainers are the final mob in these groups; they will cast
![]() Soul Blade on random targets, dealing a light amount of Shadow damage
and leaving a punishing Shadow damage DoT on players for 30 seconds, that can
also be dispelled. Players can also receive multiple debuffs, so those who are
affected by that should quickly be healed up or dispelled to prevent it getting
out of hand.
Soul Blade on random targets, dealing a light amount of Shadow damage
and leaving a punishing Shadow damage DoT on players for 30 seconds, that can
also be dispelled. Players can also receive multiple debuffs, so those who are
affected by that should quickly be healed up or dispelled to prevent it getting
out of hand.
Lord Etheldrin Ravencrest
On the left, Lord Etheldrin Ravencrest will come accompanied by two
Ghostly Retainers and a Ghostly Councilor, and will attack
random targets with ![]() Spirit Blast. This can and should be interrupted,
but not over
Spirit Blast. This can and should be interrupted,
but not over ![]() Dark Mending from the Councilors, to reduce the damage
coming into the group. It will also apply
Dark Mending from the Councilors, to reduce the damage
coming into the group. It will also apply ![]() Soul Echoes, which lasts for
10 seconds and drop an Echo every second, creating a telegraph area that will
deal high Shadow damage after 4 seconds, so the player affected should stutter
step across the room to avoid stacking danger zones.
Soul Echoes, which lasts for
10 seconds and drop an Echo every second, creating a telegraph area that will
deal high Shadow damage after 4 seconds, so the player affected should stutter
step across the room to avoid stacking danger zones.
Lady Velandras Ravencrest
Lady Velandras Ravencrest will be on the right, and will have one of
each previously mentioned enemies, a Ghostly Councilor,
Ghostly Retainer, and Ghostly Protector. There are two
additional casts to look out for, though neither are interruptible. The first
is ![]() Strike Down, which deals high Physical damage to the tank and
increases damage taken, intensifying the pull. Next is
Strike Down, which deals high Physical damage to the tank and
increases damage taken, intensifying the pull. Next is ![]() Glaive Toss,
that will deal high Physical damage to a player and bounce to others nearby,
meaning the group should try to remain spread.
Glaive Toss,
that will deal high Physical damage to a player and bounce to others nearby,
meaning the group should try to remain spread.
The Amalgam of Souls Encounter
Quick TL;DR
DPS and Healers spread behind the boss, and move 10 yards or more when
![]() Swirling Scythe is cast on you. Move out with
Swirling Scythe is cast on you. Move out with ![]() Soul Echoes and
drop patches, and avoid frontal cone
Soul Echoes and
drop patches, and avoid frontal cone ![]() Reap Soul (tank included). Kill
souls to avoid
Reap Soul (tank included). Kill
souls to avoid ![]() Soul Burst in Phase Two.
Soul Burst in Phase Two.
Overview
Amalgam of Souls is an encounter that demands correct positioning, but
otherwise is quite simple to execute. All players should pay particular
attention to ![]() Reap Soul which will be cast roughly every 15 seconds.
This is a 180 arc in front of the boss when cast, dealing massive Shadow damage
to those in the telegraph. No one should be in front when it completes,
including tanks, as it does not track its target (so tanks can move away
without moving the boss).
Reap Soul which will be cast roughly every 15 seconds.
This is a 180 arc in front of the boss when cast, dealing massive Shadow damage
to those in the telegraph. No one should be in front when it completes,
including tanks, as it does not track its target (so tanks can move away
without moving the boss).
![]() Swirling Scythe will be cast upon a random non-tank player, and
leave a zone on the ground that will deal moderate Physical damage and knock
any players who come into contact with it. The targeted player should move
away, and everyone should take note and avoid it when moving around the arena.
Swirling Scythe will be cast upon a random non-tank player, and
leave a zone on the ground that will deal moderate Physical damage and knock
any players who come into contact with it. The targeted player should move
away, and everyone should take note and avoid it when moving around the arena.
![]() Soul Echoes will be cast on any non-tank player, which will leave
behind void zones that will detonate after 4 seconds for high Shadow damage,
and fearing anyone hit for 4 seconds. If targeted by this you should move to
the edge of the room (but avoiding other dangerous areas of the room) and
dropping them in a line.
Soul Echoes will be cast on any non-tank player, which will leave
behind void zones that will detonate after 4 seconds for high Shadow damage,
and fearing anyone hit for 4 seconds. If targeted by this you should move to
the edge of the room (but avoiding other dangerous areas of the room) and
dropping them in a line.
At 50% health, the boss will cast ![]() Call Souls, spawning 7 Restless
Souls at the edge of the room which will become attackable after roughly 5
seconds. These will move slowly toward the boss and if they reach it, will
grant a stack of
Call Souls, spawning 7 Restless
Souls at the edge of the room which will become attackable after roughly 5
seconds. These will move slowly toward the boss and if they reach it, will
grant a stack of ![]() Soulgorge. After the cast completes, the boss will
follow up
Soulgorge. After the cast completes, the boss will
follow up ![]() Soul Burst will deal massive Shadow damage, increasing by 50%
for each Soulgorge stack.
Soul Burst will deal massive Shadow damage, increasing by 50%
for each Soulgorge stack.
These adds can be stunned and rooted, and any adds left out of range of the
boss when the cast completes will be killed, but not count toward
![]() Soulgorge. Use this to your advantage to reduce the number of adds
required to kill.
Soulgorge. Use this to your advantage to reduce the number of adds
required to kill.
Illysanna Ravencrest
Important Trash to Note
Leading up to Illysanna Ravencrest will be a number of high volume pulls, with a spider gauntlet up the stairs leading into a number of pulls with a variety of different Black Rook Guards. These can be quite dangerous so be careful and alert when pulling these groups. After the large 5-target pull in the main chamber, an ambush will appear with Commander Shemdah'sohn, and after this encounter a small 3-mob pack on the stairs leading up to Illysanna.
Rook Spinner/Rook Spiderling
Leading up the stairs after the first boss, there is a large cluster of
Spiderlings followed by a smaller group that will have a Spinner join them.
Spiderlings can be very dangerous due to the ![]() Soul Venom they apply to
any target they hit stacking up infinitely, which deals an increasingly high
amount of Shadow damage. This can be dispelled and healers should prioritise
players who have had a particularly high number of stacks applied. The Spinner,
however, has no additional mechanics, and is more of a threat to the tank when
coupled with the debuff from Spiderlings.
Soul Venom they apply to
any target they hit stacking up infinitely, which deals an increasingly high
amount of Shadow damage. This can be dispelled and healers should prioritise
players who have had a particularly high number of stacks applied. The Spinner,
however, has no additional mechanics, and is more of a threat to the tank when
coupled with the debuff from Spiderlings.
Soul-Torn Champion
Soul-Torn Champions are particularly dangerous tank adds that will
deal high melee damage to their target. They will also periodically wind up a
cast of ![]() Bonebreaking Strike, that will stun all targets in a short
distance in front of the caster for 4 seconds and deal heavy Physical damage.
This will not track the target, so the tank should be sure to move behind as
well to prevent taking massive damage from other trash.
Bonebreaking Strike, that will stun all targets in a short
distance in front of the caster for 4 seconds and deal heavy Physical damage.
This will not track the target, so the tank should be sure to move behind as
well to prevent taking massive damage from other trash.
Risen Scout/Risen Companion
Risen Scouts deal moderate tank damage, and come with one
non-interruptible cast in ![]() Knife Dance. This will deal high Physical
damage to the group every second for 5 seconds, which is particularly dangerous
when coupled with other enemies. This should be stunned if possible, and if
not, then high defensive cooldowns should be used if they are stacked up at the
same time. The patrol Scout will be accompanied by a Risen Companion
that will cast
Knife Dance. This will deal high Physical
damage to the group every second for 5 seconds, which is particularly dangerous
when coupled with other enemies. This should be stunned if possible, and if
not, then high defensive cooldowns should be used if they are stacked up at the
same time. The patrol Scout will be accompanied by a Risen Companion
that will cast ![]() Bloodthirsty Leap at a random ranged player, dealing
high Physical damage and leaving a massive DoT on the player afterwards, which
will stack. This means that when this is pulled the group should spread, and
this target should be prioritised.
Bloodthirsty Leap at a random ranged player, dealing
high Physical damage and leaving a massive DoT on the player afterwards, which
will stack. This means that when this is pulled the group should spread, and
this target should be prioritised.
Risen Archer
Risen Archers are not tankable, and will cast ![]() Shoot at
random targets dealing high Physical damage that must be healed up.
Periodically, they will begin an
Shoot at
random targets dealing high Physical damage that must be healed up.
Periodically, they will begin an ![]() Arrow Barrage, that will deal massive
damage to players who remain in the cone (especially when coupled with other
enemies in the pack) and should be stunned or avoided as a high priority.
Arrow Barrage, that will deal massive
damage to players who remain in the cone (especially when coupled with other
enemies in the pack) and should be stunned or avoided as a high priority.
Commander Shemdah'sohn
When the room is cleared, Commander Shemdah'sohn will jump down
accompanied by two Risen Scouts and two Risen Archers. It is
possible to line of sight these behind a pillar on the right to stack them up,
and from there you should treat the Commander as a Soul-Torn Champion (as he
will cast the same abilities) and burn down the more dangerous Archers and
Scouts. AoE stuns are key here to break out the stacked ![]() Knife Dance and
Knife Dance and
![]() Arrow Barrage.
Arrow Barrage.
Illysanna Ravencrest Encounter
Quick TL;DR
The tank should use active mitigation for ![]() Vengeful Shear. Spread out
to avoid
Vengeful Shear. Spread out
to avoid ![]() Brutal Glaive bounces, but stack closer for
Brutal Glaive bounces, but stack closer for ![]() Dark Rush
casts. In Phase Two, kill adds (caster priority) and kite
Dark Rush
casts. In Phase Two, kill adds (caster priority) and kite ![]() Eye Beam away
from the group.
Eye Beam away
from the group.
Overview
Illysanna is a two-phase fight that has a large amount of unavoidable damage
that must be kept up with. Tanks are required to pass a mitigation check
through ![]() Vengeful Shear. This deals massive Physical damage and requires
the respective defensive tools to be active when the cast completes (such as
Vengeful Shear. This deals massive Physical damage and requires
the respective defensive tools to be active when the cast completes (such as
![]() Shield Block or
Shield Block or ![]() Ironfur), or they will receive a stacking 100%
damage taken increase for 30 seconds.
Ironfur), or they will receive a stacking 100%
damage taken increase for 30 seconds.
Non-tank players should remain spread to avoid bounces from
![]() Brutal Glaive, which deals low Physical damage and applies a 30-second
debuff that repeats this damage every 2 seconds. This will jump between any
other players within 8 yards. She will also cast
Brutal Glaive, which deals low Physical damage and applies a 30-second
debuff that repeats this damage every 2 seconds. This will jump between any
other players within 8 yards. She will also cast ![]() Dark Rush, which will
cause her to jump between marked players for moderate Physical damage and leave
a
Dark Rush, which will
cause her to jump between marked players for moderate Physical damage and leave
a ![]() Blazing Trail in her wake that deals high Fire damage every 2 seconds
to players remaining in it. Players marked should try to loosely stack up to
limit her movement and reduce the area covered by the Trail.
Blazing Trail in her wake that deals high Fire damage every 2 seconds
to players remaining in it. Players marked should try to loosely stack up to
limit her movement and reduce the area covered by the Trail.
When Illysanna reaches maximum Energy, she will leap to the balcony and begin
Phase Two. She will begin channelling ![]() Eye Beam on a target, following
the player and leaving a patch of
Eye Beam on a target, following
the player and leaving a patch of ![]() Felblazed Ground in the area it moves
along, which deals high Fire damage every second to players within it. If
targeted, you should try to track this along the edge of the room and avoid
covering the area in front, and around the adds that will spawn.
Felblazed Ground in the area it moves
along, which deals high Fire damage every second to players within it. If
targeted, you should try to track this along the edge of the room and avoid
covering the area in front, and around the adds that will spawn.
Two adds will also spawn, a Soul-torn Vanguard (which works the same as
a Soul-Torn Champion) and a Risen Arcanist. They should be
grouped and burned down quickly, ideally in range to also cleave onto the boss
at the edge. ![]() Arcane Blitz from the Arcanist should be regularly
interrupted, and burning him down is the priority. The Vanguard will routinely
cast
Arcane Blitz from the Arcanist should be regularly
interrupted, and burning him down is the priority. The Vanguard will routinely
cast ![]() Bonecrushing Strike in front of him, stunning targets for 4
seconds. This can be avoided by all including the tanks, so he should be faced
away from the group and players should move behind when it begins.
Bonecrushing Strike in front of him, stunning targets for 4
seconds. This can be avoided by all including the tanks, so he should be faced
away from the group and players should move behind when it begins.
Smashspite the Hateful
Important Trash to Note
Smashspite the Hateful has a massive amount of trash following
Illysanna, spreading two floors and two staircases including a gauntlet. You
will first encounter falling rocks on the staircase that will either come on
the left or right (and if you are hit, will deal massive Physical damage with
![]() Boulder Crush). When any player reaches the top, these will stop.
Following that is a number of brutal Demon groups, and another staircase with
the same mechanics. Finally comes a gauntlet with Felguards and Felbats, which
when completed will lead you to Smashspite. This final gauntlet is of
particular danger during a Bolstering fixate, so be very careful when
managing these pulls not to chain the buff too much.
Boulder Crush). When any player reaches the top, these will stop.
Following that is a number of brutal Demon groups, and another staircase with
the same mechanics. Finally comes a gauntlet with Felguards and Felbats, which
when completed will lead you to Smashspite. This final gauntlet is of
particular danger during a Bolstering fixate, so be very careful when
managing these pulls not to chain the buff too much.
Wrathgurad Bladelord/Bloodscent Felhound
The Wrathguard Bladelords will both patrol with
Bloodscent Felhounds, and be present at the base of the second floor
staircase. They present a massive threat to tanks, not only through their
regular attacks but also through the ![]() Brutal Assault cast. This will
repeatedly deal massive damage to the tank every half second for 2 seconds,
which can and should be stunned. In an emergency, the tank can kite the mob
away to prevent its damage, but be very wary of the channels particularly in
packs with multiple Bladelords. When it reaches 25%, it will
Brutal Assault cast. This will
repeatedly deal massive damage to the tank every half second for 2 seconds,
which can and should be stunned. In an emergency, the tank can kite the mob
away to prevent its damage, but be very wary of the channels particularly in
packs with multiple Bladelords. When it reaches 25%, it will ![]() Enrage,
dealing higher damage and increasing attack speed, making them even more
deadly. This encourages bringing them low together and killing them at the same
time to reduce risk. These will also patrol with Bloodscent Felhounds, which
will accompany the patrolling Bladelord, which will simply deal damage to the
tank.
Enrage,
dealing higher damage and increasing attack speed, making them even more
deadly. This encourages bringing them low together and killing them at the same
time to reduce risk. These will also patrol with Bloodscent Felhounds, which
will accompany the patrolling Bladelord, which will simply deal damage to the
tank.
Wyrmtongue Scavenger/Wyrmtongue Trickster
Wyrmtongue Tricksters fill up the room but are mostly just a trash
mob that deals additional tank damage. Wyrmtongue Scavengers, however,
present an increased threat that can be variable depending on the result of
![]() "Drink" Ancient Potion. This will usually be cast 10-15 seconds after
being engaged, and produce one of 3 different effects.
"Drink" Ancient Potion. This will usually be cast 10-15 seconds after
being engaged, and produce one of 3 different effects.
 Frenzy Potion will increase the size of the Wyrmtongue, and cause
it to gain 400% additional attack speed and 5% extra damage for each second
active. These are incredibly dangerous and should be actively stunned if they
spawn, as a tank will quickly melt underneath the damage they deal.
Frenzy Potion will increase the size of the Wyrmtongue, and cause
it to gain 400% additional attack speed and 5% extra damage for each second
active. These are incredibly dangerous and should be actively stunned if they
spawn, as a tank will quickly melt underneath the damage they deal. Hyperactive will cause the Wyrmtongue to spin around fixated on a
player, that will trigger Bowled Over! if they are hit. They should
ideally be stunned and kited around. When the effect ends after 10 seconds,
they will become
Hyperactive will cause the Wyrmtongue to spin around fixated on a
player, that will trigger Bowled Over! if they are hit. They should
ideally be stunned and kited around. When the effect ends after 10 seconds,
they will become  Dizzy and stunned for 3 seconds. After that, they
will resume spinning.
Dizzy and stunned for 3 seconds. After that, they
will resume spinning. Indigestion will cause the Wyrmtongue to breathe fire for moderate
Fire damage every second to players who remain in the area. If this cannot be
stunned, players should move behind, and the tank should face the mob away from
the party to reduce group damage.
Indigestion will cause the Wyrmtongue to breathe fire for moderate
Fire damage every second to players who remain in the area. If this cannot be
stunned, players should move behind, and the tank should face the mob away from
the party to reduce group damage.
Lastly, Scavengers will also cast ![]() Throw Priceless Artifact before
consuming their potion, which will create small telegraphs around players. If
you remain within the area it will deal light Physical damage, and should be
avoided.
Throw Priceless Artifact before
consuming their potion, which will create small telegraphs around players. If
you remain within the area it will deal light Physical damage, and should be
avoided.
Felspite Dominator/Fel Bat Pup
This will spawn as a gauntlet leading up the final encounter. There will be
one at the base, two on the first plateau, two at the top, and two in the final
room, and Fel Bat Pups will continue to spawn throughout your ascent.
The bats need to be controlled and AoEd down (though watch out for Bolstering),
especially to deal with ![]() Sic Bats! which will focus a player in the group
and deal massive damage to them; AoE stuns are especially useful here.
Felspite Dominators will routinely cast
Sic Bats! which will focus a player in the group
and deal massive damage to them; AoE stuns are especially useful here.
Felspite Dominators will routinely cast ![]() Felfrenzy, which can
be interrupted or dispelled, which will increase their damage dealt by 15%, and
size/attack speed by 25%. If this gets out of hand, the tank will be in extreme
danger, so make sure to stun this out or interrupt the casts.
Felfrenzy, which can
be interrupted or dispelled, which will increase their damage dealt by 15%, and
size/attack speed by 25%. If this gets out of hand, the tank will be in extreme
danger, so make sure to stun this out or interrupt the casts.
Smashspite the Hateful Encounter
Quick TL;DR
Position ![]() Fel Vomit across the edges of the room if targeted. Block
Fel Vomit across the edges of the room if targeted. Block
![]() Hateful Charge with a tank if possible, but avoid stacking debuff past
2, or soaking during
Hateful Charge with a tank if possible, but avoid stacking debuff past
2, or soaking during ![]() Brutal Haymaker.
Brutal Haymaker.
Overview
This is a high damage fight, but all mechanics are relatively simple.
Players should all be aware of when ![]() Hateful Gaze is cast, and block it
themselves to stop him moving too much. This should generally be rotated,
although tanks can soak additional hits with cooldowns. DPS and healers
should not soak more than one in a row, however, due to the massive 300%
increased damage taken debuff that will remain for 30 seconds, so a rotation
should be organised between the group.
Hateful Gaze is cast, and block it
themselves to stop him moving too much. This should generally be rotated,
although tanks can soak additional hits with cooldowns. DPS and healers
should not soak more than one in a row, however, due to the massive 300%
increased damage taken debuff that will remain for 30 seconds, so a rotation
should be organised between the group.
Tanks and healers should also be very aware of ![]() Brutal Haymaker casts,
which will be cast at 100 Energy, dealing massive Physical damage and leaving a
75% damage taken debuff. Due to this, tanks should avoid soaking
Brutal Haymaker casts,
which will be cast at 100 Energy, dealing massive Physical damage and leaving a
75% damage taken debuff. Due to this, tanks should avoid soaking
![]() Hateful Charge whilst this is active.
Hateful Charge whilst this is active.
Finally, every 30 seconds a non-tank player will be targeted by
![]() Fel Vomit, which after 5 seconds will spew
Fel Vomit, which after 5 seconds will spew ![]() Fel Vomitus in a line
between the player and the Felbat that casts it, which is indicated
by the line on the ground. This should ideally be positioned to fire along
the edge, to reduce areas on the platform that will be cut off due to the
high damage patch left on the ground.
Fel Vomitus in a line
between the player and the Felbat that casts it, which is indicated
by the line on the ground. This should ideally be positioned to fire along
the edge, to reduce areas on the platform that will be cut off due to the
high damage patch left on the ground.
While this should ideally be soaked one by one to mitigate the effect of the
debuff, note that guaranteed avoidance (such as ![]() Evasion or
Evasion or
![]() Riposte for Rogues) can block a hit regardless of stacks. Just be
careful when using this as the charge is lethal with a debuff present.
Riposte for Rogues) can block a hit regardless of stacks. Just be
careful when using this as the charge is lethal with a debuff present.
Lord Kur'talos Ravencrest
Important Trash to Note
Lord Kur'talos Ravencrest has a mercifully short trash run up the stairs through his Ravenguard, leading to the final encounter. You will only experience two different types of mobs here, and you can (if comfortable) pull groups together; just be wary of their mechanics.
Risen Lancer/Risen Swordsman
Risen Lancers will deal light tank damage, but regularly cast
![]() Raven's Dive. This will place a telegraph on a random player in the
group and after 2 seconds, deal high Physical damage and stun them for 5
seconds, so players should immediately move out of this to avoid getting
caught. Risen Swordsmen will deal high tank damage, and cast
Raven's Dive. This will place a telegraph on a random player in the
group and after 2 seconds, deal high Physical damage and stun them for 5
seconds, so players should immediately move out of this to avoid getting
caught. Risen Swordsmen will deal high tank damage, and cast
![]() Coup de Grace, which will deal massive damage to the target. Powerful
defensive cooldowns should be used to survive, alongside the healer being aware
and able to react to the damage.
Coup de Grace, which will deal massive damage to the target. Powerful
defensive cooldowns should be used to survive, alongside the healer being aware
and able to react to the damage.
Lord Kur'talos Ravencrest Encounter
Quick TL;DR
Avoid ![]() Whirling Blade and its bounce back, and
Whirling Blade and its bounce back, and ![]() Dark Blast in
Phase One. In Phase Two, use defensive/group cooldowns for the first
Dark Blast in
Phase One. In Phase Two, use defensive/group cooldowns for the first
![]() Shadow Bolt Volley, burn cooldowns when
Shadow Bolt Volley, burn cooldowns when ![]() Legacy of the Ravencrest
is applied. Avoid
Legacy of the Ravencrest
is applied. Avoid ![]() Cloud of Hypnosis, and move into melee with
Cloud of Hypnosis, and move into melee with
![]() Stinging Swarm to cleave down. Move anti-clockwise to avoid
Stinging Swarm to cleave down. Move anti-clockwise to avoid
![]() Dark Obliteration during
Dark Obliteration during ![]() Dreadlord's Guile.
Dreadlord's Guile.
Overview
Lord Kur'talos Ravencrest is a two-phase fight, the first of which is
quite brief. You will initially be attacking Kur'talos himself, who will deal
relatively high tank damage and apply ![]() Unerring Shear, dealing high
Physical damage and leaving a light DoT. DPS and healers should be aware of
Unerring Shear, dealing high
Physical damage and leaving a light DoT. DPS and healers should be aware of
![]() Whirling Blade casts, which will launch a Glaive out from the boss in a
line that will deal high Physical damage and knock targets hit back, travelling
out from the boss and then back in when it reaches the edge of the arena.
Lastly, the secondary untargetable enemy, Latosius, will routinely
fire out
Whirling Blade casts, which will launch a Glaive out from the boss in a
line that will deal high Physical damage and knock targets hit back, travelling
out from the boss and then back in when it reaches the edge of the arena.
Lastly, the secondary untargetable enemy, Latosius, will routinely
fire out ![]() Shadow Bolt dealing moderate Shadow damage to random group
targets that must be healed. He will also send out
Shadow Bolt dealing moderate Shadow damage to random group
targets that must be healed. He will also send out ![]() Dark Blast casts,
which will leave a large telegraph on the ground that will detonate after 1.5
seconds, dealing massive Shadow damage and knocking back affected players,
which must be avoided at all costs.
Dark Blast casts,
which will leave a large telegraph on the ground that will detonate after 1.5
seconds, dealing massive Shadow damage and knocking back affected players,
which must be avoided at all costs.
Phase Two begins when Kur'talos is defeated, spawning
Dantalionax. For the first 15 seconds you will be very
vulnerable as the buff from Kur'talos has a delayed effect, so defensive
cooldowns should aggressively be used here to survive. After 15 seconds,
![]() Legacy of the Ravencrest will be applied increasing the health, damage,
and healing done of the group by 300%, allowing you to stabilise against the
high damage from the boss. He will fill most of his time either hitting the
tank for extreme damage, or casting
Legacy of the Ravencrest will be applied increasing the health, damage,
and healing done of the group by 300%, allowing you to stabilise against the
high damage from the boss. He will fill most of his time either hitting the
tank for extreme damage, or casting ![]() Shadow Bolt Volley which will
also hit the entire group for high damage.
Shadow Bolt Volley which will
also hit the entire group for high damage.
He will routinely cast ![]() Stinging Swarm on a random player in the
group, which has a chance to stun players for 0.5 seconds when they deal damage
or heal, alongside dealing light Physical damage every second. When afflicted
by this, move to the melee and cleave it down quickly to remove the effect.
Stinging Swarm on a random player in the
group, which has a chance to stun players for 0.5 seconds when they deal damage
or heal, alongside dealing light Physical damage every second. When afflicted
by this, move to the melee and cleave it down quickly to remove the effect.
There will also be ![]() Cloud of Hypnosis casts from the boss, which will
spawn a slow-moving green cloud in the arena, that will persist for the
remainder of the fight. If you enter the cloud you will be put to sleep, and
though this effect is removed when taking damage and can be dispelled, players
should actively avoid this in particular during
Cloud of Hypnosis casts from the boss, which will
spawn a slow-moving green cloud in the arena, that will persist for the
remainder of the fight. If you enter the cloud you will be put to sleep, and
though this effect is removed when taking damage and can be dispelled, players
should actively avoid this in particular during ![]() Dreadlord's Guile.
Dreadlord's Guile.
Roughly every 45 seconds, he will cast ![]() Dreadlord's Guile,
disappearing for 15 seconds and beginning a chain of
Dreadlord's Guile,
disappearing for 15 seconds and beginning a chain of ![]() Dark Obliteration.
This will spawn a series of telegraphs similar to
Dark Obliteration.
This will spawn a series of telegraphs similar to ![]() Dark Blast from Phase
One that will detonate every 1.5 seconds, dealing massive Shadow damage in an
anti-clockwise direction. Players should stack and move quickly against this,
avoiding Hypnosis Clouds on the way round. This 1-minute cycle will repeat
until the boss is defeated.
Dark Blast from Phase
One that will detonate every 1.5 seconds, dealing massive Shadow damage in an
anti-clockwise direction. Players should stack and move quickly against this,
avoiding Hypnosis Clouds on the way round. This 1-minute cycle will repeat
until the boss is defeated.
You should always attempt to line up cooldowns with
![]() Legacy of the Ravencrest, so try to predict your timer between the first
Phase and this. Saving
Legacy of the Ravencrest, so try to predict your timer between the first
Phase and this. Saving ![]() Bloodlust until after the first
Bloodlust until after the first
![]() Dreadlord's Guile is complete is ideal, as you will burn a significant
amount of the uptime without a target if you use it immediately after Legacy is
applied, so save your own personal cooldowns for this accordingly.
Dreadlord's Guile is complete is ideal, as you will burn a significant
amount of the uptime without a target if you use it immediately after Legacy is
applied, so save your own personal cooldowns for this accordingly.