

Antoran High Command Strategy/Tactics for Normal/Heroic

General Information
On this page, you will find a working strategy to defeat Antoran High Command in Antorus, the Burning Throne for both Normal and Heroic modes, which usually only differ by the tuning of the boss.
Here, we assume that you have read our descriptions of the abilities for this encounter.
The other pages of our Antoran High Command guide can be accessed from the table of contents on the right.
Positioning and Strategy
All three bosses will cast ![]() Exploit Weakness while they are active,
which deals damage in a frontal cone, and therefore throughout the fight the
Tanks should ensure that the bosses are kept facing away from the raid.
Exploit Weakness while they are active,
which deals damage in a frontal cone, and therefore throughout the fight the
Tanks should ensure that the bosses are kept facing away from the raid.
![]() Chaos Pulse will occur constantly throughout the fight as well as a
source of sustained raid damage. The damage taken debuff can be dispelled,
however we advise against it, as the Mana spent dispelling is often greater
than the negligible extra damage from the debuff.
Chaos Pulse will occur constantly throughout the fight as well as a
source of sustained raid damage. The damage taken debuff can be dispelled,
however we advise against it, as the Mana spent dispelling is often greater
than the negligible extra damage from the debuff.
Phase One: Admiral Svirax
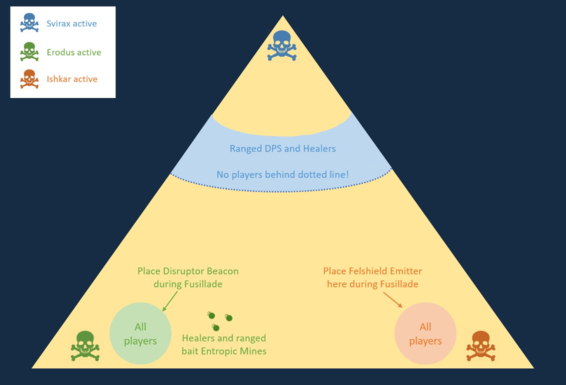
The encounter begins with Admiral Svirax active. As mentioned above, she should be faced away from the group at all times, but she can be tanked where she spawns. All Ranged DPS and Healers should spread out throughout Svirax's third of the room. It is very important that the Ranged DPS and Healers do not occupy the other corners of the room or position too far from Svirax.
A few players, over the course of the phase, will need to get inside
Admiral Svirax's vacant pod. Her pod is located directly behind her
spawn, and a player should immediately enter it as the fight commences.
While in the pod, the players should always spam ![]() Chaos Pulse on the
boss (the "1" button by default), keeping the damage-increasing effect
stacked to the maximum while dealing strong damage. Svirax's unique pod
ability,
Chaos Pulse on the
boss (the "1" button by default), keeping the damage-increasing effect
stacked to the maximum while dealing strong damage. Svirax's unique pod
ability, ![]() Withering Fire (the "2" button by default), can only affect
the summoned adds, and should be cast on cooldown. When the damage from the
pod is becoming too high to safely heal, the player should exit the pod
and have a new player take their place. Usually this is around 30-40 seconds
after entering the pod.
Withering Fire (the "2" button by default), can only affect
the summoned adds, and should be cast on cooldown. When the damage from the
pod is becoming too high to safely heal, the player should exit the pod
and have a new player take their place. Usually this is around 30-40 seconds
after entering the pod.
Adds will spawn every 30 seconds or so throughout this phase. They will
always appear in a group, with a single Fanatical Pyromancer and two
Felblade Shocktroopers portaling in to the fight. They should be picked
up immediately by the Tanks and cleaved down with the boss. The Pyromancer
should be interrupted whenever possible, as its ![]() Pyroblast deals
immense damage to a single target. The Shocktroopers'
Pyroblast deals
immense damage to a single target. The Shocktroopers' ![]() Bladestorm is
less threatening, but should still be avoided if possible. Your
highest-mobility Ranged DPS should always be the furthest players from the
boss, as the Felblades'
Bladestorm is
less threatening, but should still be avoided if possible. Your
highest-mobility Ranged DPS should always be the furthest players from the
boss, as the Felblades' ![]() Demonic Charge always targets one of the three
furthest players. We recommended Mages, Hunters, and Shadow Priests for this
duty (in that order of priority).
Demonic Charge always targets one of the three
furthest players. We recommended Mages, Hunters, and Shadow Priests for this
duty (in that order of priority).
Throughout the phase, Chief Engineer Ishkar will be laying
![]() Entropic Mines, targeted on random Ranged DPS and Healers. The Mines
are the primary reason why it is so important the Ranged DPS and Healers stay
within Svirax's third of the arena. The Mines persist forever unless they are
triggered, and therefore it is important to keep them out of undesirable areas
of the arena. The damage in this phase is not that high, and accidentally
triggering mines in this phase is not a disaster, but it is best to keep any
accidental detonations limited to this phase alone.
Entropic Mines, targeted on random Ranged DPS and Healers. The Mines
are the primary reason why it is so important the Ranged DPS and Healers stay
within Svirax's third of the arena. The Mines persist forever unless they are
triggered, and therefore it is important to keep them out of undesirable areas
of the arena. The damage in this phase is not that high, and accidentally
triggering mines in this phase is not a disaster, but it is best to keep any
accidental detonations limited to this phase alone.
Phase Two: Chief Engineer Ishkar
There will be no ![]() Entropic Mines laid in this phase, as
Chief Engineer Ishkar will leap from his pod and engage the raid
directly. Admiral Svirax will retreat to her pod, ejecting any players
within using
Entropic Mines laid in this phase, as
Chief Engineer Ishkar will leap from his pod and engage the raid
directly. Admiral Svirax will retreat to her pod, ejecting any players
within using ![]() Assume Command. The Tanks should hold the Chief Engineer
where he spawns, keeping him faced away from the group at all times.
Assume Command. The Tanks should hold the Chief Engineer
where he spawns, keeping him faced away from the group at all times.
The Fanatical Pyromancers and Felblade Shocktroopers will
persist throughout this phase, and should be dealt with in much the same way.
As with Svirax, a player should leap into Ishkar's pod immediately as the
phase begins. Just like in Phase One, the player(s) in the pod should spam
![]() Chaos Pulse on the boss at all times. Ishkar's unique pod ability,
Chaos Pulse on the boss at all times. Ishkar's unique pod ability,
![]() Felshield Emitter (the "2" button by default) should be used before
each
Felshield Emitter (the "2" button by default) should be used before
each ![]() Fusillade to mitigate some of the damage. Players will need to
rotate every ~35 seconds due to the damage from
Fusillade to mitigate some of the damage. Players will need to
rotate every ~35 seconds due to the damage from ![]() Psychic Assault.
Psychic Assault.
All players, including Ranged DPS and Healers, should form a loose stack
behind the boss during this phase, so that they will be inside the
![]() Felshield Emitter without having to move. This reduces movement in
the phase greatly, as the only mechanic to avoid is the Felblade Shocktroopers'
Felshield Emitter without having to move. This reduces movement in
the phase greatly, as the only mechanic to avoid is the Felblade Shocktroopers'
![]() Bladestorm.
Bladestorm.
Phase Three: General Erodus
This is the most dangerous phase by far, as the ![]() Entropic Mines
are back, as is
Entropic Mines
are back, as is ![]() Fusillade, but there is no longer an available
Fusillade, but there is no longer an available
![]() Felshield Emitter to mitigate the damage. As with the other bosses,
Erodus can be tanked where he spawns in his third of the room. Ranged can
use as much of the room as they like to bait the Entropic Mine spawns so
they do not interfere with the raid's remaining real estate.
Felshield Emitter to mitigate the damage. As with the other bosses,
Erodus can be tanked where he spawns in his third of the room. Ranged can
use as much of the room as they like to bait the Entropic Mine spawns so
they do not interfere with the raid's remaining real estate.
As with Phase One and Phase Two, a player should immediately enter
Erodus' pod and begin to spam ![]() Chaos Pulse on the boss. The unique
pod ability (the "2" button by default) is
Chaos Pulse on the boss. The unique
pod ability (the "2" button by default) is ![]() Summon Disruptor Beacon,
which should be used during each
Summon Disruptor Beacon,
which should be used during each ![]() Fusillade, targeted under the
boss. The group should stack inside the beacon as it is guaranteed to be
clear of mines and allows for better group healing.
Fusillade, targeted under the
boss. The group should stack inside the beacon as it is guaranteed to be
clear of mines and allows for better group healing.
Each ![]() Fusillade cast in this phase will deal immense damage, and
all of them should be paired with a healing cooldown, or personal cooldowns
and Healthstones.
Fusillade cast in this phase will deal immense damage, and
all of them should be paired with a healing cooldown, or personal cooldowns
and Healthstones.
Bloodlust/Heroism/Time Warp
We advise you to use ![]() Bloodlust/
Bloodlust/![]() Heroism/
Heroism/![]() Time Warp
when General Erodus is active ("Phase Three"). This is the highest
risk phase and damage taken will be at its zenith; Bloodlust/Heroism fulfills
a dual function here as both a means to finish the encounter as soon as
possible and as a much needed boost to healing.
Time Warp
when General Erodus is active ("Phase Three"). This is the highest
risk phase and damage taken will be at its zenith; Bloodlust/Heroism fulfills
a dual function here as both a means to finish the encounter as soon as
possible and as a much needed boost to healing.
![]() Bloodlust/
Bloodlust/![]() Heroism/
Heroism/![]() Time Warp can alternately
be used on the pull for a marginal boost in damage output effiency, allowing
your group to obliterate the first set of reinforcements and push to execute
phase a little faster.
Time Warp can alternately
be used on the pull for a marginal boost in damage output effiency, allowing
your group to obliterate the first set of reinforcements and push to execute
phase a little faster.
Changelog
- 11 Dec. 2017: Added positioning image and made slight changes to the strategy.