

General Information
On this page, you will find a working strategy to defeat Maiden of Vigilance in Tomb of Sargeras for both Normal and Heroic modes, which usually only differ by the tuning of the boss.
Here, we assume that you have read our descriptions of the abilities for this encounter.
The other pages of our Maiden of Vigilance guide can be accessed from the table of contents on the right.
Positioning
Phase One
Immaculate positioning and spatial awareness is required to triumph over the
Maiden of Vigilance, as any interaction with a player or mechanic of the
opposing element will trigger ![]() Unstable Soul detonations. This will cost
the raid precious damage and healing resources and can very easily spiral into
a full raid wipe.
Unstable Soul detonations. This will cost
the raid precious damage and healing resources and can very easily spiral into
a full raid wipe.
Before commencing the encounter, raid markers should be placed (recommended
to use the Triangle and Star raid markers) on either side of where the boss is
to be tanked. These markers designate the stack point for ![]() Hammer of Creation
and
Hammer of Creation
and ![]() Hammer of Obliteration in order for their damage to be correctly split and
avoid killing the tanks.
Hammer of Obliteration in order for their damage to be correctly split and
avoid killing the tanks.
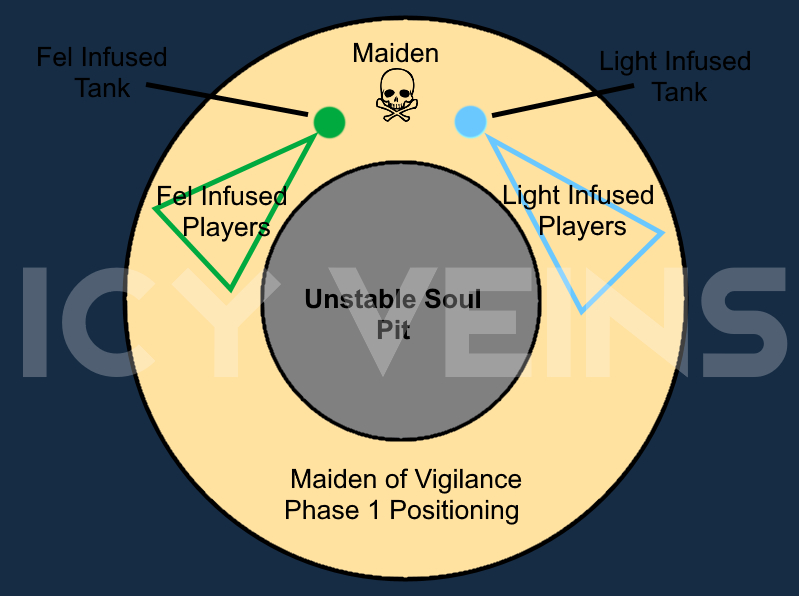
Once the Maiden is engaged, the raid should stand ready to move in
anticipation of ![]() Infusion being cast. Once debuffs have been assigned,
the group should quickly but carefully fan out into their positions for hammers.
Ideally, classes with very high mobility and "blink" style abilities should
occupy the area furthest from the pit, allowing the melee and less mobile
ranged and healers to maneuver. Additionally, this grants them secure
access to the pit, which reduces the risk of an
Infusion being cast. Once debuffs have been assigned,
the group should quickly but carefully fan out into their positions for hammers.
Ideally, classes with very high mobility and "blink" style abilities should
occupy the area furthest from the pit, allowing the melee and less mobile
ranged and healers to maneuver. Additionally, this grants them secure
access to the pit, which reduces the risk of an ![]() Unstable Soul going
off without the protection of
Unstable Soul going
off without the protection of ![]() Aegwynn's Ward.
Aegwynn's Ward.
Tanks will perform taunt swaps periodically, ensuring that the Maiden's
current hammer matches their debuff. For example, when ![]() Hammer of Obliteration
is active, the tank with
Hammer of Obliteration
is active, the tank with ![]() Fel Infusion will taunt the boss. If the
tank with
Fel Infusion will taunt the boss. If the
tank with ![]() Light Infusion was the previous target, this taunt swap
should cause the Maiden to pivot 180 degrees, facing the opposite direction.
All fel infused players should already be in position, fanned out behind the
tank to split the damage from
Light Infusion was the previous target, this taunt swap
should cause the Maiden to pivot 180 degrees, facing the opposite direction.
All fel infused players should already be in position, fanned out behind the
tank to split the damage from ![]() Hammer of Obliteration.
Hammer of Obliteration.
Be sure to immediately step out of ![]() Fel Remanence/
Fel Remanence/![]() Light Remanence
if you are caught in it. These zones will decay slowly over time, but as they
decay they emit
Light Remanence
if you are caught in it. These zones will decay slowly over time, but as they
decay they emit ![]() Fel Echoes and
Fel Echoes and ![]() Light Echoes respectively. The
range on this damage is limited (4 yards), so evasion is not difficult, but
getting hit will cause severe magic damage and can trigger
Light Echoes respectively. The
range on this damage is limited (4 yards), so evasion is not difficult, but
getting hit will cause severe magic damage and can trigger ![]() Unstable Soul.
Unstable Soul.
Anyone afflicted with ![]() Unstable Soul has 8 seconds to jump into the
pit in the center of the room. The affected players should stand near the edge
of the pit until ~2 seconds are left on the
Unstable Soul has 8 seconds to jump into the
pit in the center of the room. The affected players should stand near the edge
of the pit until ~2 seconds are left on the ![]() Unstable Soul debuff, then
jump into the pit. This will negate the raid damage due to
Unstable Soul debuff, then
jump into the pit. This will negate the raid damage due to ![]() Aegwynn's Ward,
and the players will be transported back into the fight after a few seconds.
Aegwynn's Ward,
and the players will be transported back into the fight after a few seconds.
![]() Mass Instability will occur periodically, and therefore it is important
to be ready with movement abilities and a path to the room's center planned in
advance, as collision with a player of the opposing
Mass Instability will occur periodically, and therefore it is important
to be ready with movement abilities and a path to the room's center planned in
advance, as collision with a player of the opposing ![]() Infusion could
trigger a chain reaction.
Infusion could
trigger a chain reaction.
Phase Two
Phase Two will commence with the Maiden incapacitating the raid for several
seconds with ![]() Blowback. The Maiden leaps away from the group and
cloaks herself in a
Blowback. The Maiden leaps away from the group and
cloaks herself in a ![]() Titanic Bulwark, beginning her channel of
Titanic Bulwark, beginning her channel of
![]() Wrath of the Creators.
Wrath of the Creators.
The group should re-engage Maiden immediately following the expiry of the
![]() Blowback debuff. Raid wide movement speed cooldowns can be a great
asset, such as
Blowback debuff. Raid wide movement speed cooldowns can be a great
asset, such as ![]() Wind Rush Totem or
Wind Rush Totem or ![]() Demonic Gateway.
Demonic Gateway.
![]() Essence Fragments will begin to circle the room (henceforth
referred to as "orbs") as the channel for
Essence Fragments will begin to circle the room (henceforth
referred to as "orbs") as the channel for ![]() Wrath of the Creators
commences. Collecting orbs matching your current
Wrath of the Creators
commences. Collecting orbs matching your current ![]() Infusion
is essential to success. The orbs:
Infusion
is essential to success. The orbs:
- spawn underneath the Maiden of Vigilance and travel outwards in both directions;
- grant stacking damage and healing for each orb collected, lasting 20s and refreshed by each new stack;
- do not travel indefinitely, rather, they despawn after traveling approximately two fifths of the platform's circuit;
- spawn in sets of 6 (3 traveling in each direction) and are finite in
number. The Maiden starts with 14
 Essence Fragments stacks at the
beginning of the phase and each set of orbs removes a stack. Usually, the
orbs are completely gone by the time
Essence Fragments stacks at the
beginning of the phase and each set of orbs removes a stack. Usually, the
orbs are completely gone by the time  Wrath of the Creators hits
~10 stacks.
Wrath of the Creators hits
~10 stacks.
DPS cooldowns should be prepared for Phase Two. It is prudent to hold any cooldowns lasting 20s or less until after the orbs have finished spawning, thereby maximizing their potency.
Once the ![]() Titanic Bulwark is broken, the
Titanic Bulwark is broken, the ![]() Wrath of the Creators
channel can be interrupted. Optionally, more organized and advanced groups
may choose to prolong Phase Two as long as sustainable. There are no mechanics
or movement to worry about in this phase after the
Wrath of the Creators
channel can be interrupted. Optionally, more organized and advanced groups
may choose to prolong Phase Two as long as sustainable. There are no mechanics
or movement to worry about in this phase after the ![]() Essence Fragments
have finished, allowing the group to pump out as much free DPS as they can.
Essence Fragments
have finished, allowing the group to pump out as much free DPS as they can.
![]() Wrath of the Creators must be interrupted before reaching 30 stacks,
however, or the Maiden will cast
Wrath of the Creators must be interrupted before reaching 30 stacks,
however, or the Maiden will cast ![]() Extinguish Life and wipe the raid.
Extinguish Life and wipe the raid.
Healing cooldowns should be organized to match ![]() Wrath of the Creators
when it reaches higher stacks. The reference point for this is obviously
contigent on the gear and experience level of your group, but a good number
to start overlapping cooldowns is around 14-15 stacks of Wrath. Throughput
cooldowns are highly effective as they benefit from the
Wrath of the Creators
when it reaches higher stacks. The reference point for this is obviously
contigent on the gear and experience level of your group, but a good number
to start overlapping cooldowns is around 14-15 stacks of Wrath. Throughput
cooldowns are highly effective as they benefit from the ![]() Demon's Vigor
and
Demon's Vigor
and ![]() Creator's Grace.
Creator's Grace.
Once ![]() Wrath of the Creators has been interrupted, the Maiden will
instantly resume Phase One, beginning with an
Wrath of the Creators has been interrupted, the Maiden will
instantly resume Phase One, beginning with an ![]() Infusion cast. The
group should be pre-spread and ready to re-lay new raid markers as the
Maiden will likely be on the opposite side of the room.
Infusion cast. The
group should be pre-spread and ready to re-lay new raid markers as the
Maiden will likely be on the opposite side of the room.
