

Mythic+ Affixes
When you reach level 4 in your Mythic+ dungeons, you will start to see affixes attached to the keystone which add additional effects to enemies within the dungeon. Each tier (4, 7, and 10) cannot be duplicated within one keystone, so you will have one of each at higher levels and they will cycle each week. Combinations can vary in difficulty and how much they synergise with each other and the instance in question, but all of them have an impact and have to be dealt with in different ways.
Tier 1 Affixes (Active at 4+ Keystones)
Raging. When targets reach 30% health, they Enrage, and deal 100% bonus damage. This encourages burning enemies down individually when they reach this point, or saving hard crowd control like stuns for when they reach this point during AoE.
Bolstering. Whenever an enemy dies, it buffs other enemies in combat with an additional 20% health and damage, which heavily encourages killing them at the same time, or within a small window of each other. In larger groups, this can be deadly if mis-managed. Note this does not, however, interact with adds summoned via boss mechanics.
Sanguine. When enemies die, they leave a small pool on the ground which deals damage to players and heals enemies standing within them. This increases the awareness requirement, and means you need to reposition groups quickly around them.
Teeming. The dungeon itself will generate additional lesser adds, which increases the number of targets in pulls. This mostly increases the difficulty of pulls as additional enemies will be active in each pack.
Bursting. When minions die within the dungeon, all party members inside will receive a stacking debuff that deals 5% of their maximum health every 2 seconds for 4 seconds. This requires the party to kill targets in a staggered fashion to prevent it stacking too high and killing off players, and for the healer to be acutely aware of the state of the party health when it is applied.
Tier 2 Affixes (Active at 7+ Keystones)
Volcanic. This causes random patches on the ground to spawn that will deal high pulsing damage if standing within them. Managing this is mostly on players avoiding them whenever they appear, and will by extension result in reduced DPS due to players avoiding them.
Necrotic. All enemies will apply a stacking debuff that deals flat ticking damage, and reduces healing/absorption received by 3%, stacking up to 10 with additional hits. This increases the intensity of tank healing and adds an additional component to the damage they receive.
Skittish. Enemies will randomly drop all threat on their current target. This makes it significantly more dangerous for DPS and adds an extra factor for tanks to account for, as dangerous mobs will require additional attention to keep in check.
Explosive. Enemies will occasionally spawn Explosive Orbs nearby with a small amount of health. These will will detonate after 6 seconds if not killed, dealing 50% of the all party members' maximum health. These orbs are immune to AoE and crowd control, so need to be switched to and killed quickly throughout the dungeon.
Quaking. All players will periodically cause a Shockwave 8 yards around their character, dealing 20% of players' maximum health to any players standing inside it after 3 seconds and interrupting casts. Players should remain spread to avoid taking more than one hit.
Grievous. Any players that falls below 90% health will be afflicted by a Grievous Wound, dealing a percentage of the player's maximum health every 3 seconds, stacking up to 5 times. This is permanent throughout the dungeon, so the healer needs to be aware of the stacks and heal players back above 90% to remove the debuff.
Tier 3 Affixes (Active at 10+ Keystones)
Tyrannical. Increases the health of boss targets by 40%, and their damage by 20%. This intensifies bosses significantly and must be noted when dealing with some of the more dangerous ones, as it also affects abilities alongside extending the duration of the fights in question.
Fortified. Increases the health of minions within the dungeon by 20%, and the damage they deal by 40%. This intensifies the trash pulls significantly and in some cases can limit how many extra you can pull at once, which will slow your pace between bosses.
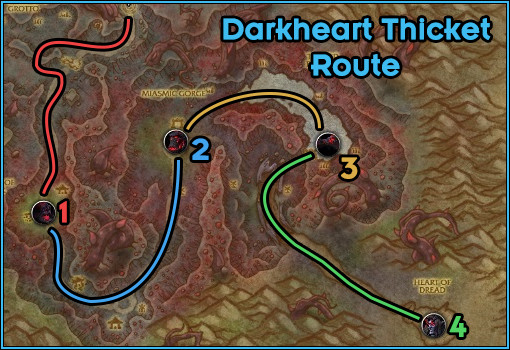
Darkheart Thicket Timer: 30 Minutes
Darkheart Thicket is a linear dungeon with some occasionally punishing trash packs that should be handled accordingly. The bosses are all relatively tame as long as mechanics are dealt with, but expect high tank damage throughout.
The route is all contained in one map. Note that you should try to slip through the gap in the wall on the way to the first boss, to avoid a large number of extra unpleasant packs.
Archdruid Glaidalis
Important Trash to Note
There is a large number of pulls leading up to the first boss, some of which can be skipped and others can be combined depending on your comfort together. The route you take and affixes present will dictate which is best, but be wary of the extra patrols, in particular in the caved area.
Frenzied Nightclaw/Dreadsoul Poisoner
The very first pull in the dungeon will consist of two
Frenzied Nightclaws and one Dreadsoul Poisoner, and cannot be
avoided. Nightclaws will deal moderate tank damage and occasionally leap to a
random player in the group and cast ![]() Grievous Rip to deal high Physical
damage and leave behind a powerful DoT. Both Nightclaws can choose the same
target, which is particularly dangerous so the healer must be ready for this
happening. The Grievous Rip DoT will remain until the player is healed past 90%
health, so the player affected must be immediately healed up. Poisoners will
turn into spiders when engaged, and will select a random player in the group to
cast
Grievous Rip to deal high Physical
damage and leave behind a powerful DoT. Both Nightclaws can choose the same
target, which is particularly dangerous so the healer must be ready for this
happening. The Grievous Rip DoT will remain until the player is healed past 90%
health, so the player affected must be immediately healed up. Poisoners will
turn into spiders when engaged, and will select a random player in the group to
cast ![]() Nightmare Toxin upon. This will deal light Nature damage as a DoT,
and after 6 seconds will detonate with
Nightmare Toxin upon. This will deal light Nature damage as a DoT,
and after 6 seconds will detonate with ![]() Nightmare Eruption, dealing high
Nature damage to the player and other allies within 8 yards. The afflicted
player should move out of the group before this happens.
Nightmare Eruption, dealing high
Nature damage to the player and other allies within 8 yards. The afflicted
player should move out of the group before this happens.
Dreadsoul Ruiner
Dreadsoul Ruiners will be present in a number of groups, and have
two separate schools of casts that need to be interrupted if they are to be
positioned. The first will be a repeated cast of ![]() Despair, which will
deal moderate Shadow damage to their current target and leave a debuff that
slightly reduces healing received. Second is
Despair, which will
deal moderate Shadow damage to their current target and leave a debuff that
slightly reduces healing received. Second is ![]() Star Shower, that will
create a large amount of red telegraphs on the ground around the Ruiner, that
will cause high Arcane damage to any player stood inside them when they land
after 2 seconds. This deals a very high amount of damage and being hit multiple
times is very likely to be lethal, so take care to avoid these. Both of these
casts can be interrupted, but make sure to save one for
Star Shower, that will
create a large amount of red telegraphs on the ground around the Ruiner, that
will cause high Arcane damage to any player stood inside them when they land
after 2 seconds. This deals a very high amount of damage and being hit multiple
times is very likely to be lethal, so take care to avoid these. Both of these
casts can be interrupted, but make sure to save one for ![]() Star Shower as
it is more dangerous.
Star Shower as
it is more dangerous.
Mindshattered Screecher
Mindshattered Screechers will appear on the path following the
entrance to the dungeon and will cast ![]() Unnerving Screech on a random
player that will disorient them for 4 seconds if successful. This should be
interrupted as a high priority as it can be very disruptive, but otherwise they
are not too dangerous.
Unnerving Screech on a random
player that will disorient them for 4 seconds if successful. This should be
interrupted as a high priority as it can be very disruptive, but otherwise they
are not too dangerous.
Crazed Razorbeaks
Two Crazed Razorbeaks will patrol in the cave alongside a single
Dreadsoul Ruiner. These present a high threat to the group, and will
rush directly ahead toward their current facing roughly every 20 seconds using
![]() Propelling Charge. This deals heavy Physical damage and stuns any
players hit for 2 seconds. To counteract this, face them away from the party,
ideally toward a wall.
Propelling Charge. This deals heavy Physical damage and stuns any
players hit for 2 seconds. To counteract this, face them away from the party,
ideally toward a wall.
Festerhide Grizzly
One Festerhide Grizzly will be waiting at the cave entrance, and a
pair further on will block the entrance to the first boss. They will cast
![]() Festering Swipe that deals moderate Nature damage to those in front of
the Grizzly, so they should always ideally be faced away. They will also
repeatedly attempt to cast
Festering Swipe that deals moderate Nature damage to those in front of
the Grizzly, so they should always ideally be faced away. They will also
repeatedly attempt to cast ![]() Maddening Roar, which will deal moderate
Shadow damage to the party and increase the damage taken by subsequent
Maddening Roar casts by 50%, and this effect can stack. This puts a timer on
killing them, and Healers should be wary of this if the encounter goes on for
too long. Finally, 3 Nightmare Abominations will be summoned by the
Grizzly via a
Maddening Roar, which will deal moderate
Shadow damage to the party and increase the damage taken by subsequent
Maddening Roar casts by 50%, and this effect can stack. This puts a timer on
killing them, and Healers should be wary of this if the encounter goes on for
too long. Finally, 3 Nightmare Abominations will be summoned by the
Grizzly via a ![]() Spew Corruption cast. These will
Spew Corruption cast. These will
![]() Fixate upon a random player, chasing them and dealing
high damage if they reach them. They also leave behind a
Fixate upon a random player, chasing them and dealing
high damage if they reach them. They also leave behind a
![]() Corruption Pool on the path they travel.
Corruption Pool on the path they travel.
Archdruid Glaidalis Encounter
Quick TL;DR
Ranged stand around 15 yards from the boss, and all spread for
![]() Nightfall casts, avoiding patches it leaves. Heal
Nightfall casts, avoiding patches it leaves. Heal
![]() Grievous Tear target, and crowd control/kill
Nightmare Abominations as soon as possible.
Grievous Tear target, and crowd control/kill
Nightmare Abominations as soon as possible.
Overview
Archdruid Glaidalis is a relatively simple encounter but each mechanics is very important to execute correctly, and the damage dealt by all of his abilities must be noted due to how dangerous multiple hits from different abilities can be.
To begin with, the boss will cast ![]() Nightfall that will deal moderate
damage to two non-tank players and create a patch of Nightmare on the ground
beneath them, appearing as red roots. All players should move out of these
patches immediately, and pay attention to patches spawned by other players
around them. The tank should also reposition the boss away from these when
they spawn to create room for the melee. Each Nightfall cast will also spawn a
Nightmare Abomination, that will
Nightfall that will deal moderate
damage to two non-tank players and create a patch of Nightmare on the ground
beneath them, appearing as red roots. All players should move out of these
patches immediately, and pay attention to patches spawned by other players
around them. The tank should also reposition the boss away from these when
they spawn to create room for the melee. Each Nightfall cast will also spawn a
Nightmare Abomination, that will ![]() Fixate a random non tank
player and leave pools of Nightfall behind them as they travel. These should be
stunned, slowed and kited in a small area to minimise the size of the pools.
Players should focus these down quickly to prevent it getting out of hand.
Kiting Nightmare Abominations into the melee to increase cleave and kill them
faster is a good idea, but make sure to kill them quickly inside stuns and
reposition the boss so that there are no dangerous stacks of Nightfall on the
ground.
Fixate a random non tank
player and leave pools of Nightfall behind them as they travel. These should be
stunned, slowed and kited in a small area to minimise the size of the pools.
Players should focus these down quickly to prevent it getting out of hand.
Kiting Nightmare Abominations into the melee to increase cleave and kill them
faster is a good idea, but make sure to kill them quickly inside stuns and
reposition the boss so that there are no dangerous stacks of Nightfall on the
ground.
The boss will also cycle between casting ![]() Grievous Leap and
Grievous Leap and
![]() Primal Rampage. The first will target a random ranged player, leaping
toward them for moderate Physical damage and leaving behind Grievous Tear, a
moderate DoT. This will only be removed from the target when they are healed
above 90% health, so the healer must pay close attention to whoever is targeted
and bring them above this threshold. Primal Rampage will knock all players in
front of Glaidalis back for high Physical damage, and he will then charge
forward for another high Physical damage attack. Tanks should position
themselves to not be knocked too far, and players should avoid moving in front
of him before he has completed the charge.
Primal Rampage. The first will target a random ranged player, leaping
toward them for moderate Physical damage and leaving behind Grievous Tear, a
moderate DoT. This will only be removed from the target when they are healed
above 90% health, so the healer must pay close attention to whoever is targeted
and bring them above this threshold. Primal Rampage will knock all players in
front of Glaidalis back for high Physical damage, and he will then charge
forward for another high Physical damage attack. Tanks should position
themselves to not be knocked too far, and players should avoid moving in front
of him before he has completed the charge.
Players who are likely to be targeted by ![]() Grievous Leap should try to
stand closer to the boss, to lower the distance he travels away from melee.
Make sure, however, to not be too close as to spawn additional dangerous
patches of
Grievous Leap should try to
stand closer to the boss, to lower the distance he travels away from melee.
Make sure, however, to not be too close as to spawn additional dangerous
patches of ![]() Nightfall.
Nightfall.
Oakheart
Important Trash to Note
This section has a dangerous run of trash that can have some deadly pulls, so be careful positioning them to avoid getting your group in trouble. The upper area contains a large number of Rotheart Keepers and Rotheart Dryads all accompanied by Vilethorn Blossoms, and the lower section contains 5 Nightmare Dwellers that must be killed to activate Oakheart.
Rotheart Dryad/Vilethorn Blossom
Rotheart Dryads and Vilethorn Blossoms will always spawn
together, and both contain notable mechanics for the entire group. Rotheart
Dryads will repeatedly attack the tank with
![]() Throw Spear, and leap backward from the group
continuing to cast this. Ideally you should try to keep the enemies grouped up
together by moving over to the Dryad when it does this. It will also target a
random player in the group with
Throw Spear, and leap backward from the group
continuing to cast this. Ideally you should try to keep the enemies grouped up
together by moving over to the Dryad when it does this. It will also target a
random player in the group with ![]() Poison Spear, that will leave a
moderate Nature DoT on the target and reduce healing taken, which can and
should be dispelled.
Poison Spear, that will leave a
moderate Nature DoT on the target and reduce healing taken, which can and
should be dispelled.
Vilethorn Blossoms have only one dangerous cast, ![]() Root Burst
will be cast beneath random players that after 2 seconds will detonate, dealing
high Physical damage and knocking players into the air. Move the Blossoms out of
this quickly, as multiple hits of this will cause a death, especially if
combined with a mushroom hit.
Root Burst
will be cast beneath random players that after 2 seconds will detonate, dealing
high Physical damage and knocking players into the air. Move the Blossoms out of
this quickly, as multiple hits of this will cause a death, especially if
combined with a mushroom hit.
Rotheart Keepers
Rotheart Keepers are not present in every pack, but in those that
they are, they become the highest priority. They will cast ![]() Vile Mushroom,
that will spawn 3 large mushrooms in a random position with a green telegraph
beneath, and after 3 seconds will deal massive Nature damage to any player
remaining in it. These mushrooms will also heal all nearby plant life (namely
Vilethorn Blossoms) 5% of their maximum health every 2 seconds if they
remain nearby, meaning that you must make sure to move any Vilethorn Blossoms
out of their area quickly.
Vile Mushroom,
that will spawn 3 large mushrooms in a random position with a green telegraph
beneath, and after 3 seconds will deal massive Nature damage to any player
remaining in it. These mushrooms will also heal all nearby plant life (namely
Vilethorn Blossoms) 5% of their maximum health every 2 seconds if they
remain nearby, meaning that you must make sure to move any Vilethorn Blossoms
out of their area quickly.
Nightmare Dweller
In Oakheart's room down the ramp, there will be 5
Nightmare Dwellers that can be pulled either individually or as a
group. These will all attempt to channel ![]() Tormenting Eye on a random
player, dealing high Shadow damage over the 5-second channel. Upon completion
this, they will also fear the targeted player for 4 seconds via
Tormenting Eye on a random
player, dealing high Shadow damage over the 5-second channel. Upon completion
this, they will also fear the targeted player for 4 seconds via
![]() Tormenting Fear, so they should be interrupted and stunned, ideally
through AoE effects. This Fear can also be dispelled, if an important player is
affected. After all the Nightmare Dwellers are all defeated, Oakheart will
become active.
Tormenting Fear, so they should be interrupted and stunned, ideally
through AoE effects. This Fear can also be dispelled, if an important player is
affected. After all the Nightmare Dwellers are all defeated, Oakheart will
become active.
Oakheart Encounter
Quick TL;DR
Tanks should use powerful cooldowns for ![]() Crushing Grip, and position
the boss to avoid hitting the group with
Crushing Grip, and position
the boss to avoid hitting the group with ![]() Nightmare Breath. Everyone
else should avoid
Nightmare Breath. Everyone
else should avoid ![]() Strangling Roots patches on the ground, and kill
Vilethorn Saplings after
Strangling Roots patches on the ground, and kill
Vilethorn Saplings after ![]() Uproot.
Uproot.
Overview
Oakheart is a high tank damage fight without too many overly dangerous
mechanics for the group to deal with. Primarily, ![]() Crushing Grip should
be prepared for by the tank and healer which will come roughly every 30
seconds, dealing massive tank damage. The tank will be out of melee range
during this cast when they are picked up, so resources and tools should be
saved up to survive it. He will also cast
Crushing Grip should
be prepared for by the tank and healer which will come roughly every 30
seconds, dealing massive tank damage. The tank will be out of melee range
during this cast when they are picked up, so resources and tools should be
saved up to survive it. He will also cast ![]() Nightmare Breath, dealing
high Fire damage and leaving behind a Fire DoT for 6 seconds after. This means
the boss should be faced away to prevent it hitting players other than the
tank.
Nightmare Breath, dealing
high Fire damage and leaving behind a Fire DoT for 6 seconds after. This means
the boss should be faced away to prevent it hitting players other than the
tank.
There will also be routine casts of ![]() Strangling Roots, which will
create patches of roots on the ground. These are immune to AoE, and if a player
steps into them, they will be rooted until the root is destroyed, and take
light Physical damage every second. These should simply be avoided by all
players to prevent this. Oakheart will also cast
Strangling Roots, which will
create patches of roots on the ground. These are immune to AoE, and if a player
steps into them, they will be rooted until the root is destroyed, and take
light Physical damage every second. These should simply be avoided by all
players to prevent this. Oakheart will also cast ![]() Uproot,
which will spawn Vilethorn Saplings out of 2 root patches, which should
simply be cleaved down.
Uproot,
which will spawn Vilethorn Saplings out of 2 root patches, which should
simply be cleaved down.
Lastly, ![]() Shattered Earth will come roughly every 15 seconds, dealing
moderate Physical damage to all players and knocking them back. Take care to
avoid being knocked into
Shattered Earth will come roughly every 15 seconds, dealing
moderate Physical damage to all players and knocking them back. Take care to
avoid being knocked into ![]() Strangling Roots, but otherwise this is
unavoidable and must be managed by the healer.
Strangling Roots, but otherwise this is
unavoidable and must be managed by the healer.
Dresaron
Important Trash to Note
Leading to Dresaron is a short trash run that can be made dangerous if players are unable to avoid knockbacks into the surrounding Corrupted Dragon Eggs. This will spawn Hatespawn Whelplings. This area is particularly dangerous with Bolstering active, so take special care if this is the case.
Corrupted Dragon Egg/Hatespawn Whelpling
If a player comes into contact with one of the Corrupted Dragon Eggs
on the edge of the path or is knocked into one, that will destroy it and spawn
a Hatespawn Whelpling. These will deal low damage to their target and
can be AoEd down, but be careful when doing this as upon death they will
explode via ![]() Hatespawn Detonation, dealing moderate Shadow damage to
nearby players.
Hatespawn Detonation, dealing moderate Shadow damage to
nearby players.
Hatespawn Slime
Two large groups of 10 Hatespawn Slime will be along the path.
These can be grouped up and AoEd down quickly, but be very careful of
![]() Dreadburst if you are a tank or melee player. This will trigger when
each slime is killed, causing a delayed 1 second explosion that will deal
moderate Shadow damage within 5 yards.
Dreadburst if you are a tank or melee player. This will trigger when
each slime is killed, causing a delayed 1 second explosion that will deal
moderate Shadow damage within 5 yards.
Bloodtainted Fury
Two Bloodtainted Fury Elementals will be staggered through the path.
Both of their main abilities will trigger a knockback on players hit, which can
not only bounce them into other groups, but also the surrounding
Corrupted Dragon Eggs, so be very careful. Shortly after being engaged,
they will cast ![]() Blood Bomb, which will spawn a slowly descending orb
from the sky that after 5 seconds will land and deal high damage to players.
This also heals the Fury for the damage dealt, and knocks anyone hit back so
should be avoided at all costs.
Blood Bomb, which will spawn a slowly descending orb
from the sky that after 5 seconds will land and deal high damage to players.
This also heals the Fury for the damage dealt, and knocks anyone hit back so
should be avoided at all costs. ![]() Blood Assault will also be cast
regularly, charging the Fury forward and dealing moderate damage to players
hit, also healing the Fury for damage dealt. Face it away from the group to
avoid this, and stay out of the path it travels. Finally, upon death it will
cast
Blood Assault will also be cast
regularly, charging the Fury forward and dealing moderate damage to players
hit, also healing the Fury for damage dealt. Face it away from the group to
avoid this, and stay out of the path it travels. Finally, upon death it will
cast ![]() Dispersion, creating 4
Bloodtainted Burster Elementals. These will attack random players in
the group with
Dispersion, creating 4
Bloodtainted Burster Elementals. These will attack random players in
the group with ![]() Bloodbolt, and should be AoEd down. If left alone, they
will attempt to reform and respawn the Bloodtainted Fury, so do not
ignore them.
Bloodbolt, and should be AoEd down. If left alone, they
will attempt to reform and respawn the Bloodtainted Fury, so do not
ignore them.
Dresaron Encounter
Quick TL;DR
Position to avoid eggs, and not be pushed back into them by
![]() Down Draft whilst pushing against it. Avoid
Down Draft whilst pushing against it. Avoid
![]() Falling Rocks caused by
Falling Rocks caused by ![]() Earthshaking Roar, and do not stand in
front of the boss during
Earthshaking Roar, and do not stand in
front of the boss during ![]() Breath of Corruption.
Breath of Corruption.
Overview
Dealing with this fight is largely based on positioning. First and foremost,
the boss should be dragged into the centre of the room, and kept roughly in
that area for the encounter. Periodically, casts of ![]() Earthshaking Roar
will happen, dealing moderate Nature damage to the group and creating a patch
of
Earthshaking Roar
will happen, dealing moderate Nature damage to the group and creating a patch
of ![]() Falling Rocks that will deal high damage every second to any player
remaining in the area. These should be moved out of quickly and if they become
too concentrated, the boss should be repositioned.
Falling Rocks that will deal high damage every second to any player
remaining in the area. These should be moved out of quickly and if they become
too concentrated, the boss should be repositioned.
![]() Breath of Corruption will be cast roughly every 20 seconds, dealing
massive damage in front of the boss every second for 3 seconds, and reducing
the armor of any player hit by 5%. This means the boss should always be facing
away from the group, and due to her remaining stationary during the cast, the
tank should side step to also avoid being hit.
Breath of Corruption will be cast roughly every 20 seconds, dealing
massive damage in front of the boss every second for 3 seconds, and reducing
the armor of any player hit by 5%. This means the boss should always be facing
away from the group, and due to her remaining stationary during the cast, the
tank should side step to also avoid being hit.
Next, ![]() Down Draft will be cast roughly every 30
seconds, dealing moderate Nature damage every 2 seconds to the entire group for
8 seconds, and pushing them backward for the duration of the cast. All players
should push against this to avoid spawning Hatespawn Whelplings from
the surrounding eggs, and so should prepare by positioning accordingly before
this cast begins. This will push back harder than you are able to run against it
the further away you are from the boss, so moving just underneath her before
the cast begins is advised.
Down Draft will be cast roughly every 30
seconds, dealing moderate Nature damage every 2 seconds to the entire group for
8 seconds, and pushing them backward for the duration of the cast. All players
should push against this to avoid spawning Hatespawn Whelplings from
the surrounding eggs, and so should prepare by positioning accordingly before
this cast begins. This will push back harder than you are able to run against it
the further away you are from the boss, so moving just underneath her before
the cast begins is advised.
Note that the room is surrounded by Corrupted Dragon Eggs, which if a
player comes into contact with one will spawn a Hatespawn Whelpling.
Whilst these are easy to cleave down, they provide an additional source of
danger and upon death will explode with ![]() Hatespawn Detonation dealing
light Shadow damage to players within 8 yards. Due to this, you should avoid
moving into eggs as much as possible.
Hatespawn Detonation dealing
light Shadow damage to players within 8 yards. Due to this, you should avoid
moving into eggs as much as possible.
Shade of Xavius
Important Trash to Note
After Dresaron, you will descend into the root of the tree and fight a number of nightmare creatures and Satyrs, leading up to the final encounter with the Shade of Xavius. Again, these can be pulled as groups depending on your comfort, but note that there are a large number of high danger mechanics in each of them.
Taintheart Stalker/Summoner
Taintheart Stalkers and Taintheart Summoners will spawn
together, and are accompanied by Dreadfire Imps that are explained
briefly below. Stalkers will deal high melee damage and also randomly jump
quickly between two random players with a cast of ![]() Dark Hunt. This deals
moderate Shadow damage that the healer should quickly react to. Summoners will
cast
Dark Hunt. This deals
moderate Shadow damage that the healer should quickly react to. Summoners will
cast ![]() Shadow Bolt on the tank as its main attack, and
occasionally apply
Shadow Bolt on the tank as its main attack, and
occasionally apply ![]() Curse of Isolation on a random group member. This
will slow them by 75% and cause them to erupt for light Shadow damage every 2
seconds for 12 seconds to allies within 6 yards, so the player should move
away. If possible, this should also be decursed.
Curse of Isolation on a random group member. This
will slow them by 75% and cause them to erupt for light Shadow damage every 2
seconds for 12 seconds to allies within 6 yards, so the player should move
away. If possible, this should also be decursed.
Dreadfire Imp
Two Dreadfire Imps will spawn with each Satyr pack, and are the most
dangerous in the group. These will cast ![]() Firebolt at
random players, dealing moderate Fire damage, but will also weave in
Firebolt at
random players, dealing moderate Fire damage, but will also weave in
![]() Dread Inferno casts creating a large red telegraph in the room. This
will detonate for high Fire damage to players who remain in it, and multiple
can be cast at once so this should be avoided by players. This can also be
interrupted and stunned, and Imps should be the high priority in these
pulls.
Dread Inferno casts creating a large red telegraph in the room. This
will detonate for high Fire damage to players who remain in it, and multiple
can be cast at once so this should be avoided by players. This can also be
interrupted and stunned, and Imps should be the high priority in these
pulls.
Taintheart Deadeye
Taintheart Deadeyes will attempt to remain at range, and fire at the
tank via ![]() Shoot for high Physical damage. The main
mechanics to watch out for is
Shoot for high Physical damage. The main
mechanics to watch out for is ![]() Shadow Decoy, which will spawn a
transparent Deadeye Decoy in the area. Usually these should be ignored
as they will despawn when the Deadeye is killed, but note that they will still
cast the same Shoot on the tank. Deadeyes will occasionally launch a
Shadow Decoy, which will spawn a
transparent Deadeye Decoy in the area. Usually these should be ignored
as they will despawn when the Deadeye is killed, but note that they will still
cast the same Shoot on the tank. Deadeyes will occasionally launch a
![]() Scorching Shot at a random player in the group, leaving a light Fire
DoT that can and should be dispelled.
Scorching Shot at a random player in the group, leaving a light Fire
DoT that can and should be dispelled.
Tormented Bloodseeker
A group of 4 Tormented Bloodseeker Bats will be between the Satyr
groups, and present a high threat to the tank due to their high damage. They
will constantly attack their primary target with ![]() Darksoul Bite, dealing
light Nature damage and healing the Bloodseeker for a small amount, then
leaving behind the
Darksoul Bite, dealing
light Nature damage and healing the Bloodseeker for a small amount, then
leaving behind the ![]() Darksoul Drain disease that can and should be
dispelled. Try to make sure that these are regularly stunned to limit the
applications of the disease and the healing the Bats will receive.
Darksoul Drain disease that can and should be
dispelled. Try to make sure that these are regularly stunned to limit the
applications of the disease and the healing the Bats will receive.
Shade of Xavius Encounter
Quick TL;DR
Group up to counteract ![]() Waking Nightmare, move out immediately with
Waking Nightmare, move out immediately with
![]() Growing Paranoia. Use defensives abilities/heal
Growing Paranoia. Use defensives abilities/heal ![]() Feed on the Weak
targets and dispel
Feed on the Weak
targets and dispel ![]() Festering Rip. Below 50% health, avoid
Festering Rip. Below 50% health, avoid
![]() Apocalyptic Fire and keep Xavius away from them.
Apocalyptic Fire and keep Xavius away from them.
Overview
The Shade of Xavius fight has two phases. The first phase lasts until
the boss reaches 50% health. He will cast ![]() Feed on the Weak on a random
player, dealing high Shadow damage to them every second for 6 seconds which
should be healed through to survive, though he will not melee the tank during
this cast. He will also apply
Feed on the Weak on a random
player, dealing high Shadow damage to them every second for 6 seconds which
should be healed through to survive, though he will not melee the tank during
this cast. He will also apply ![]() Festering Rip to the tank, which deals
moderate Nature damage every 2 seconds for 8 seconds and reduces healing taken
by 15%. Healers should watch for this cast and dispel it immediately.
Festering Rip to the tank, which deals
moderate Nature damage every 2 seconds for 8 seconds and reduces healing taken
by 15%. Healers should watch for this cast and dispel it immediately.
The major ability is ![]() Nightmare Bolt, which deals high Shadow damage
and applies
Nightmare Bolt, which deals high Shadow damage
and applies ![]() Waking Nightmare on the player hit, and can be aimed at
anyone in the group. This will then apply the
Waking Nightmare on the player hit, and can be aimed at
anyone in the group. This will then apply the ![]() Cowardice debuff to the
player, creating a circle around them that will pacify and silence them for 20
seconds unless another allied player is within it, which encourages you to
stack up to counteract this.
Cowardice debuff to the
player, creating a circle around them that will pacify and silence them for 20
seconds unless another allied player is within it, which encourages you to
stack up to counteract this.
He will also apply ![]() Induced Paranoia to a random player in the group,
and if targeted you should quickly move alway from other players. If it targets
the tank, however, this prompts the group to quickly move away from them,
usually together, and reposition behind the Xavius. If any other ally comes
into close range of the affected player, that will trigger
Induced Paranoia to a random player in the group,
and if targeted you should quickly move alway from other players. If it targets
the tank, however, this prompts the group to quickly move away from them,
usually together, and reposition behind the Xavius. If any other ally comes
into close range of the affected player, that will trigger
![]() Overwhelming Terror. This causes moderate Shadow damage and horrifies
you for 5 seconds which is extremely dangerous if this goes off on the tank.
This is even more dangerous after 50% health, so avoiding it early on is
crucial to optimising your damage and healing.
Overwhelming Terror. This causes moderate Shadow damage and horrifies
you for 5 seconds which is extremely dangerous if this goes off on the tank.
This is even more dangerous after 50% health, so avoiding it early on is
crucial to optimising your damage and healing.
After 50% health, Xavius will cast ![]() Apocalyptic Nightmare, dealing
high Fire damage to the entire group and causing a large amount of red circles
to appear in the room. These will detonate for moderate Fire damage when they
expire after 3 seconds, with
Apocalyptic Nightmare, dealing
high Fire damage to the entire group and causing a large amount of red circles
to appear in the room. These will detonate for moderate Fire damage when they
expire after 3 seconds, with ![]() Apocalyptic Fire. Not only should players
avoid this, but the tank must move the boss accordingly, due to Xavius gaining
5% increased damage through
Apocalyptic Fire. Not only should players
avoid this, but the tank must move the boss accordingly, due to Xavius gaining
5% increased damage through ![]() Apocalyptic Empowerment, stacking, if he
stands within a circle when it detonates.
Apocalyptic Empowerment, stacking, if he
stands within a circle when it detonates.