

Hagara the Stormbinder Detailed Strategy Guide (Heroic Mode included)

Introduction
This guide is intended to provide a comprehensive description of the encounter with Hagara the Stormbinder in Dragon Soul. It is targeted at anyone who desires to understand the fight mechanics.
This guide is updated for World of Warcraft WoD 6.1.2.
Hagara the Stormbinder is a Shaman located in the Eye of Eternity, the instance that used to house Malygos. You access this area by taking a portal from Wyrmrest Temple.
The fight against Hagara is all about proper positioning and coordinated movement. As such, most raids will find this fight to be a breath of fresh air before attempting the gear check that Ultraxion represents.
General Information
Health Pool
| Difficulty | Hagara | Ice Tomb | Binding Crystal | Bound Lightning Elemental |
|---|---|---|---|---|
| 10-man | 31M | 542k | 390k | 1.2M |
| 10-man Heroic | 52M | 697k | 2.5M | 1.5M |
| 25-man | 95M | 1.4M | 1.2M | 3.5M |
| 25-man Heroic | 155M | 1.9M | 6.97M | 3.9M |
| LFR | 70M | X | 872k | 2.6M |
Enrage Timer
The Hagara the Stormbinder encounter has an 8-minute hard enrage timer in both Normal and Heroic modes.
Raid Composition
| Difficulty | Tanks | Healers | DPS |
|---|---|---|---|
| 10-man (Normal & Heroic modes) | 1 | 3 | 6 |
| 25-man (Normal & Heroic modes) | 1 | 6-7 | 17-18 |
| LFR | 1 | 6-7 | 17-18 |
Loot
Tier 13 Tokens
| Item Name | Slot | Classes |
|---|---|---|
| Shoulders of the Corrupted Conqueror (LFR, Heroic) | Shoulders | Paladin, Priest, Warlock |
| Shoulders of the Corrupted Protector (LFR, Heroic) | Shoulders | Warrior, Hunter, Shaman |
| Shoulders of the Corrupted Vanquisher (LFR, Heroic) | Shoulders | Rogue, Death Knight, Mage, Druid |
Armor
| Item Name | Armor | Slot | Main Stats |
|---|---|---|---|
| Bracers of the Banished (LFR, Heroic) | Cloth | Wrists | Intellect |
| Girdle of the Grotesque (LFR, Heroic) | Leather | Waist | Intellect/Spirit |
| Treads of Dormant Dreams (LFR, Heroic) | Feet | Agility | |
| Runescriven Demon Collar (LFR, Heroic) | Plate | Waist | Strength/Mastery |
Weapons
| Item Name | Type | Main Stats |
|---|---|---|
| Electrowing Dagger (LFR, Heroic) | 1.40 One-Hand Dagger | Agility |
| Lightning Rod (LFR, Heroic) | Staff | Intellect/Hit |
Rings and Trinkets
| Item Name | Type | Main Stats/Effect |
|---|---|---|
| Signet of Suturing (LFR, Heroic) | Ring | Intellect/Spirit |
| Infinite Loop (LFR, Heroic) | Ring | Intellect/Hit |
| Ring of the Riven (LFR, Heroic) | Ring | Intellect |
| Seal of Primordial Shadow (LFR, Heroic) | Ring | Agility |
| Signet of Grasping Mouths (LFR, Heroic) | Ring | Agility |
| Breathstealer Band (LFR, Heroic) | Ring | Strength/Mastery |
| Hardheart Ring (LFR, Heroic) | Ring | Strength/Parry |
| Windward Heart (LFR, Heroic) | Trinket | Intellect/Additional Heal |
| Cunning of the Cruel (LFR, Heroic) | Trinket | Intellect/AoE Damage |
| Vial of Shadows (LFR, Heroic) | Trinket | Agility/Additional Damage |
| Bone-Link Fetish (LFR, Heroic) | Trinket | Strength/AoE Damage |
| Indomitable Pride (LFR, Heroic) | Trinket | Stamina/Shield |
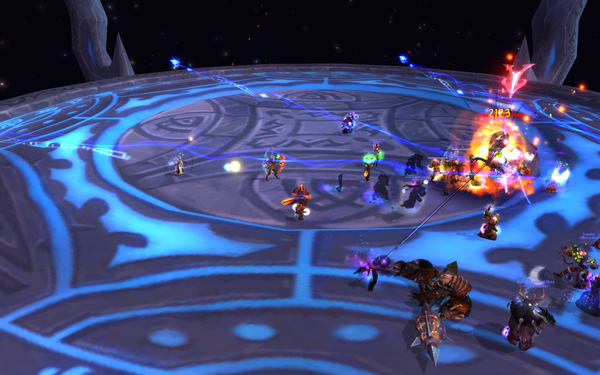
Overview of the Fight
The fight against Hagara is made up of 3 phases: Main Phase, Ice Phase, Lightning Phase. The Main Phase lasts 50 seconds and is followed by either the Ice Phase or the Lightning Phase. The fight goes back to the Main Phase as soon as your raid has finished dealing with the Ice Phase or the Lightning Phase. The Ice Phase and the Lightning Phase alternate in such a way that a fight will usually look like this:
- Main Phase with a shortened duration of approximately 30 seconds;
- Ice Phase or Lightning Phase (depending on the visual effect on Hagara's weapon before the pull);
- Main Phase;
- Lightning Phase or Ice Phase;
- Main Phase
- Ice Phase or Lightning Phase;
- Main Phase;
- Lightning Phase or Ice Phase;
- ...
To determine whether you will get an Ice Phase or a Lightning Phase first, simply look at the visual effect on Hagara's weapon before the pull (it will either be a frost effect or a lightning effect).
Each phase will require your raid to properly deal with positioning constraints or to move in a synchronised fashion:
- The Main Phase will require members of your ranged group to position themselves in such a way that they prevent missiles from reaching the melee group, all the while freeing players who get encased in Ice Tombs.
- The Ice Phase will require your raid to run in a clockwise fashion on the edge of the platform to keep damaging Ice Waves at a safe distance. Icicles falling on the platform also need to be avoided. At the same time, DPS players will need to destroy the crystals that protect the boss.
- The Lighting Phase will require your raid to create a chain of players to propagate lightning in order to disable several objects that protect the boss.
| Main Phase | Ice Phase | Lightning Phase |
|---|---|---|
|

|

|
Main Phase
The Main Phase is a tank and spank phase. The boss should be kept in the middle of the room and be damaged as much as possible. The ranged group must also deal with a few abilities that mostly require proper positioning and good reaction time.
After 50 seconds, the Main Phase ends and an Ice Phase or a Lightning Phase starts.
Abilities
During this phase, Hagara will use the following abilities.
- She has a melee attack that she uses every 2 seconds. Because she also spends a lot of time casting her various abilities, she ends up using her melee attack every 5-6 seconds in average. It deals moderate damage to the tank and should not pose any problem.
-
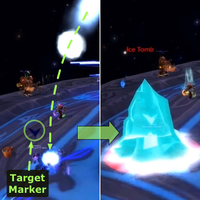
 Ice Tomb is cast once per Main Phase (usually 10 seconds into the
phase). This ability, which is absent in LFR difficulty, encases 2
random players (but never the tank) in 10-man difficulty and 5 in 25-man
difficulty in Ice Tombs. These tombs need to be destroyed before the encased players
can regain control of their characters. As soon as the ability is cast,
targeted players are marked with a blue arrow on top of their head and 7
seconds later, they are frozen. Ice Tomb deals approximately 7,000 damage
damage per second to encased players. The ability does not chain to nearby players.
Ice Tomb is cast once per Main Phase (usually 10 seconds into the
phase). This ability, which is absent in LFR difficulty, encases 2
random players (but never the tank) in 10-man difficulty and 5 in 25-man
difficulty in Ice Tombs. These tombs need to be destroyed before the encased players
can regain control of their characters. As soon as the ability is cast,
targeted players are marked with a blue arrow on top of their head and 7
seconds later, they are frozen. Ice Tomb deals approximately 7,000 damage
damage per second to encased players. The ability does not chain to nearby players.  Focused Assault is the same in all difficulties and is cast
every 15 seconds. This ability is channeled for 5 seconds and causes
Hagara to attack in front of her for 50% of her normal melee damage every
0.5 second. While she does this, Hagara remains stationary so the tank
can easily move away from her.
Focused Assault is the same in all difficulties and is cast
every 15 seconds. This ability is channeled for 5 seconds and causes
Hagara to attack in front of her for 50% of her normal melee damage every
0.5 second. While she does this, Hagara remains stationary so the tank
can easily move away from her. Shattered Ice is always cast either right before or right after
Focused Assault. This ability, which targets one random player, slows down
movement for 4 seconds and deals 78,000 Frost damage in 10-man difficulty,
100,000 in 25-man difficulty, and 65,000 in LFR difficulty.
Shattered Ice is always cast either right before or right after
Focused Assault. This ability, which targets one random player, slows down
movement for 4 seconds and deals 78,000 Frost damage in 10-man difficulty,
100,000 in 25-man difficulty, and 65,000 in LFR difficulty.-
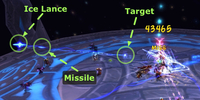
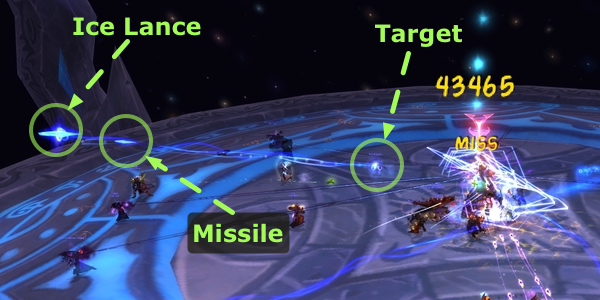
 Ice Lance is cast twice per Main Phase. Every time, it summons 3 crystals.
Each of these crystals fixates on a random player and for 15 seconds
send one missile per second towards this player (so 15 missiles in total).
When a missile reaches its target or another player on the path to its target,
it explodes and inflicts Frost damage to every player in a 3 yard radius
(15,000 in 10-man
difficulty, 20,000 in 25-man difficulty, and 13,000 in LFR). In 10-man and
25-man difficulty, it also reduces the attack speed (but not the
casting speed) of whoever gets damaged by 25%.
Ice Lance is cast twice per Main Phase. Every time, it summons 3 crystals.
Each of these crystals fixates on a random player and for 15 seconds
send one missile per second towards this player (so 15 missiles in total).
When a missile reaches its target or another player on the path to its target,
it explodes and inflicts Frost damage to every player in a 3 yard radius
(15,000 in 10-man
difficulty, 20,000 in 25-man difficulty, and 13,000 in LFR). In 10-man and
25-man difficulty, it also reduces the attack speed (but not the
casting speed) of whoever gets damaged by 25%.

Strategy
Once you understand precisely what the abilities do, the strategy is simple and can be summed up in the four following points:
- When Hagara is using Focused Assault, the tank should back away from
her (either by walking back, or strafing backwards). This will minimise the
damage that the tank takes, as the boss is slow to catch up and must break her
channel to do so. Make sure that the tank does not turn their back to Hagara,
however.
- Healers should be especially wary of the damage done by Shattered Ice
as it can easily one-shot someone who has previously been damaged by
Ice Lance.
- Shattered Ice can be warded with Dark Simulacrum, which gives
the Death Knight who casts it a nice amount of extra damage.
- DPS need to free players trapped by Ice Tomb. Note that this does
not apply to LFR difficulty, as Ice Tomb is absent from this level of
difficulty.
-
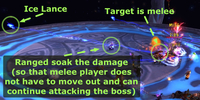 When a melee player is targeted by Ice Lance, a ranged DPS or a healer
needs to step in the path of the missiles so that they do not reach the
targeted player. The reason for doing this is two-fold. First, as the missiles
deal proximity damage (3 yard) upon reaching their target, letting them reach
a melee player will deal damage to the entire melee group. Second, in 10-man
and 25-man difficulties, if melee players are hit by the missiles, their DPS
will suffer from the attack speed reduction that they will receive. A targeted
melee player could move out of the melee group but they would be unable to
continue attacking the boss whereas the ranged player who soaks can continue
performing their duties.
When a melee player is targeted by Ice Lance, a ranged DPS or a healer
needs to step in the path of the missiles so that they do not reach the
targeted player. The reason for doing this is two-fold. First, as the missiles
deal proximity damage (3 yard) upon reaching their target, letting them reach
a melee player will deal damage to the entire melee group. Second, in 10-man
and 25-man difficulties, if melee players are hit by the missiles, their DPS
will suffer from the attack speed reduction that they will receive. A targeted
melee player could move out of the melee group but they would be unable to
continue attacking the boss whereas the ranged player who soaks can continue
performing their duties.

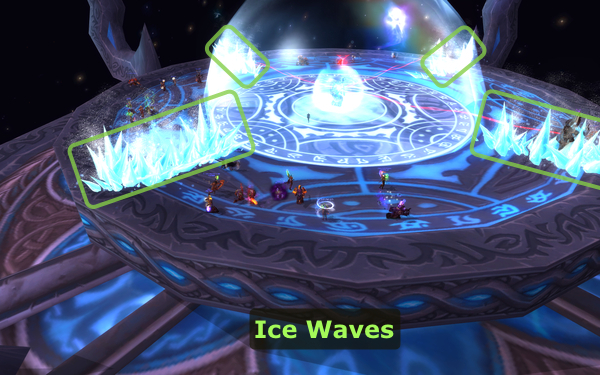
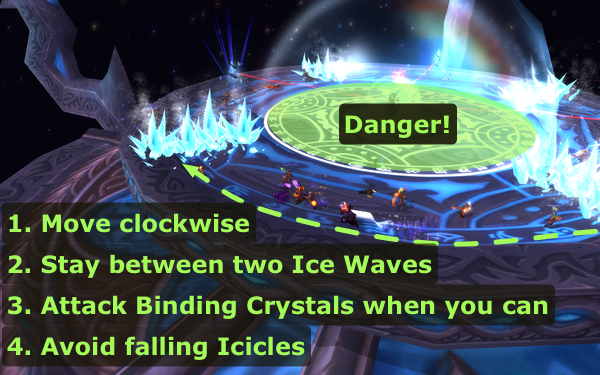
Ice Phase
50 seconds into a Main Phase (if this Main Phase was preceded by a Lightning
Phase), Hagara will enter an Ice Phase. Hagara casts ![]() Water Shield on
herself, which causes her to remain stationary and immune to all damage until
the raid has successfully completed the phase.
Water Shield on
herself, which causes her to remain stationary and immune to all damage until
the raid has successfully completed the phase.
 During the Ice Phase, the raid will be chased around the platform by very
deadly Ice Waves. While running to avoid the waves and the Icicles that fall
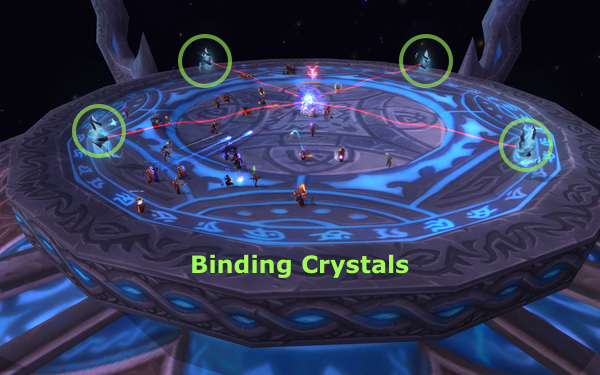
from the sky, the raid will need to destroy 4 Frozen Binding Crystals by attacking
them whenever possible.
During the Ice Phase, the raid will be chased around the platform by very
deadly Ice Waves. While running to avoid the waves and the Icicles that fall
from the sky, the raid will need to destroy 4 Frozen Binding Crystals by attacking
them whenever possible.
When all 4 crystals are destroyed, the Water Shield protecting Hagara is
removed and she is debuffed with ![]() Feedback, which, for 15 seconds,
causes her to be stunned and take 100% increased damage. The Main Phase restarts
when the debuff drops off Hagara.
Feedback, which, for 15 seconds,
causes her to be stunned and take 100% increased damage. The Main Phase restarts
when the debuff drops off Hagara.
Abilities
During the Ice Phase, your raid will be faced with the following abilities:
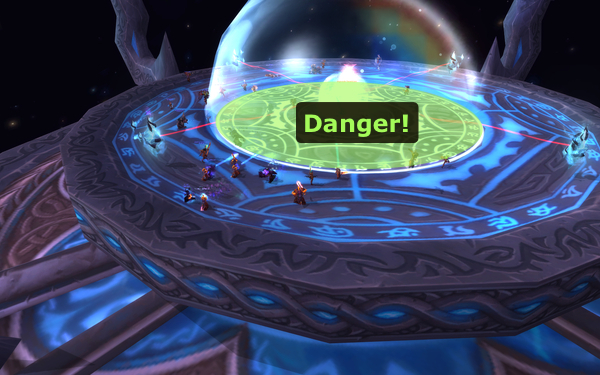
-
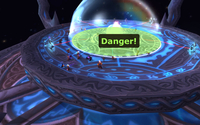
 Watery Entrenchment prevents players from entering the center of the
platform as doing so is very deadly (15% health lost every second and movement
speed reduced by 50%). This Watery Entrenchment is created a few seconds into
the Ice Phase, giving players time to move to the edge of the platform.
Watery Entrenchment prevents players from entering the center of the
platform as doing so is very deadly (15% health lost every second and movement
speed reduced by 50%). This Watery Entrenchment is created a few seconds into
the Ice Phase, giving players time to move to the edge of the platform. -
 Ice Wave summons 4 Ice Waves a few seconds after the entrenchment is
created. Each of these waves extends from the boss to the edge of the platform
and move in a clockwise manner around the platform at a speed slightly slower
than a player's base running speed. Being hit by a wave
is extremely deadly as it causes 200,000 Frost damage in both 10-man and
25-man difficulties and 130,000 Frost damage in LFR difficulty, in
addition to increasing Frost damage taken by 50% for 2.5 seconds.
Ice Wave summons 4 Ice Waves a few seconds after the entrenchment is
created. Each of these waves extends from the boss to the edge of the platform
and move in a clockwise manner around the platform at a speed slightly slower
than a player's base running speed. Being hit by a wave
is extremely deadly as it causes 200,000 Frost damage in both 10-man and
25-man difficulties and 130,000 Frost damage in LFR difficulty, in
addition to increasing Frost damage taken by 50% for 2.5 seconds. -

 Icicle causes Icicles to regularly fall from the sky
onto the outer part of the platform. Icicles come by waves, each wave consisting of
about 10 Icicles and coming 15-20 seconds after the previous wave. A visual
effect marks the location where an Icicle is
going to fall. After 4 seconds, the visual effect disappears and 1 second
later, the Icicle hits the ground, damaging everyone within a 7-yard radius
(the area previously marked with the visual effect) for 100,000 damage
in both 10-man and 25-man difficulty. In LFR difficulty, this ability is
absent.
Icicle causes Icicles to regularly fall from the sky
onto the outer part of the platform. Icicles come by waves, each wave consisting of
about 10 Icicles and coming 15-20 seconds after the previous wave. A visual
effect marks the location where an Icicle is
going to fall. After 4 seconds, the visual effect disappears and 1 second
later, the Icicle hits the ground, damaging everyone within a 7-yard radius
(the area previously marked with the visual effect) for 100,000 damage
in both 10-man and 25-man difficulty. In LFR difficulty, this ability is
absent.

Strategy
 Just like with the Main Phase, the strategy for the Ice Phase is simple,
once the abilities are properly understood. The simple tasks that raid members
will need to perform during this phase are the following (see the image on the
right for a visual overview):
Just like with the Main Phase, the strategy for the Ice Phase is simple,
once the abilities are properly understood. The simple tasks that raid members
will need to perform during this phase are the following (see the image on the
right for a visual overview):
- Move clockwise so that you stay between two Ice Waves. Getting hit by them is very deadly, so make sure to remain at a safe distance. The visual effect for the Ice Waves can be misleading, as you can be hit even if the visual effect does not reach you, so be careful.
- Whenever you can, attack the Frozen Binding Crystals. Always keep an eye on the Ice Wave chasing you when you attack a crystal, as it is easy to get carried away and lose track of their exact position.
- In 10-man and 25-man difficulties, you also need to keep an eye on the falling Icicles and move out of the areas where they are going to hit the ground.
To give you an idea, it should take no more than 2 turns around the platform to destroy all 4 Frozen Binding Crystals.
During this phase, healers should have only heal the occasional damage from falling Icicles. Should a player manage to survive being hit by an Ice Wave, they should be healed quickly before they take damage again.
Lightning Phase
50 seconds into a Main Phase (if this Main Phase was preceded by an Ice
Phase), Hagara will enter a Lightning Phase. When this happens, Hagara casts
![]() Water Shield on herself, which causes her to remain stationary and immune
to all damage until the raid has successfully completed the phase.
Water Shield on herself, which causes her to remain stationary and immune
to all damage until the raid has successfully completed the phase.
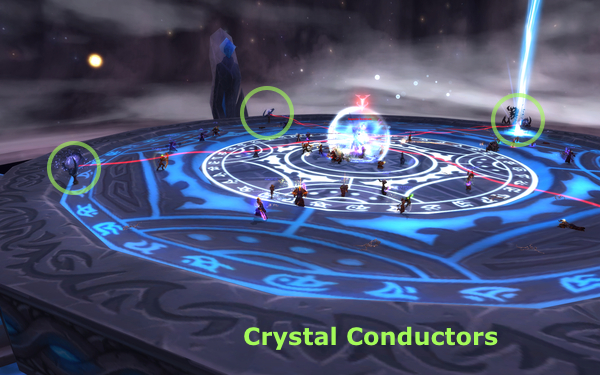 During the Lightning Phase, the raid will have to overload the 4
Crystal Conductors that protect Hagara. Players need to form
chains so that lightning propagates through them, eventually reaching
the conductors and overloading them.
During the Lightning Phase, the raid will have to overload the 4
Crystal Conductors that protect Hagara. Players need to form
chains so that lightning propagates through them, eventually reaching
the conductors and overloading them.
When all 4 conductors are overloaded, the Water Shield protecting Hagara is
removed and she is debuffed with ![]() Feedback, which, for 15 seconds,
causes her to be stunned and take 100% increased damage. The Main Phase restarts
when the debuff drops off Hagara.
Feedback, which, for 15 seconds,
causes her to be stunned and take 100% increased damage. The Main Phase restarts
when the debuff drops off Hagara.
Abilities
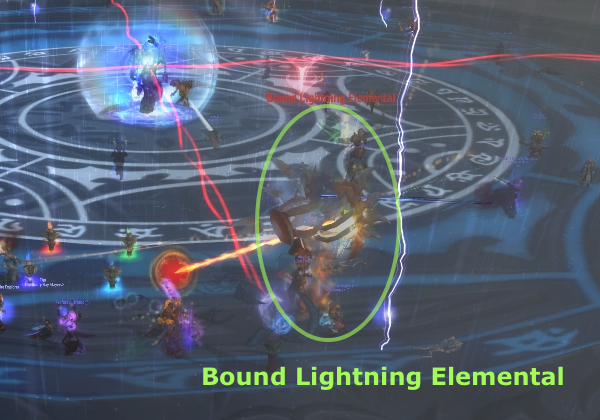 During the Lightning Phase, the raid will be faced with a
Bound Lightning Elemental, whose death causes the overload of a
nearby conductor, which the raid then uses as a source for propagating
lightning to the other conductors. There are three things to note about
this Elemental:
During the Lightning Phase, the raid will be faced with a
Bound Lightning Elemental, whose death causes the overload of a
nearby conductor, which the raid then uses as a source for propagating
lightning to the other conductors. There are three things to note about
this Elemental:
- it always spawns at the same place, near the entrance portal;
- it should be picked by the tank;
- it performs a weak melee on its current target every 2 seconds.
Also, the raid will take constant damage from ![]() Lightning Storm.
Every 2-3 seconds, this ability hits 3/4 random players in 10-man difficulty
and 7/8 players in 25-man and LFR difficulties. Each player takes 15,000
Nature damage in 10-man difficulty, 17,500 in 25-man difficulty, and
about 10,000 in LFR difficulty. Every time a player is hit by Lightning Storm,
they receive a stack of a debuff that increases Nature damage taken by
5% per stack.
Lightning Storm.
Every 2-3 seconds, this ability hits 3/4 random players in 10-man difficulty
and 7/8 players in 25-man and LFR difficulties. Each player takes 15,000
Nature damage in 10-man difficulty, 17,500 in 25-man difficulty, and
about 10,000 in LFR difficulty. Every time a player is hit by Lightning Storm,
they receive a stack of a debuff that increases Nature damage taken by
5% per stack.
Strategy
Just as with the other two phases, the main difficulty of this phase resides in understanding what the abilities do. Then, the strategy is simple.
As the phase begins, a Bound Lightning Elemental spawns and needs to be picked up by the tank. This add must then be brought next to 1 of the 4 Crystal Conductors and killed. This will cause the chosen Crystal Conductor to become overloaded.
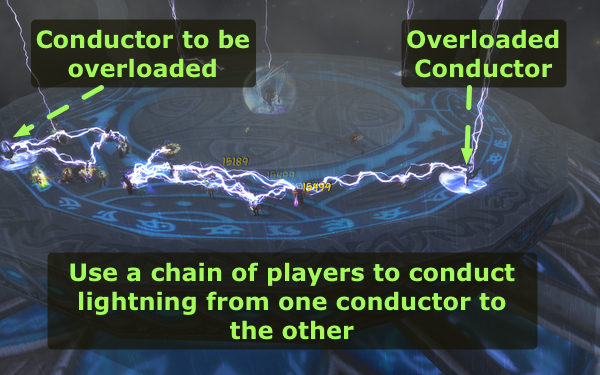 From this point on, your raid will propagate the lightning emitted by the
overloaded Crystal Conductor to another Crystal Conductor. This will cause the
other Crystal Conductor to also become overloaded. To do so, the players from
the raid need to create a chain to propagate lightning from the overloaded
Crystal Conductor to the other Crystal Conductor. Once this is done, the newly
overloaded Crystal Conductor can be used as the source of a new chain that will
overload one the remaining, non-overloaded Crystal Conductors.
From this point on, your raid will propagate the lightning emitted by the
overloaded Crystal Conductor to another Crystal Conductor. This will cause the
other Crystal Conductor to also become overloaded. To do so, the players from
the raid need to create a chain to propagate lightning from the overloaded
Crystal Conductor to the other Crystal Conductor. Once this is done, the newly
overloaded Crystal Conductor can be used as the source of a new chain that will
overload one the remaining, non-overloaded Crystal Conductors.
As you can see from the screenshots, the chain does not need to be perfect. The maximal range for lightning propagation seems to be around 10 yards. If, somewhere in the chain, the distance between two consecutive players go over the maximal range, a few seconds will elapse before the end of the chain loses the lightning, giving enough time for overloading the targeted Crystal Conductor before the lightning runs out.
Tips
Mages (![]() Ice Block), Paladins (
Ice Block), Paladins (![]() Divine Shield) and Rogues
(
Divine Shield) and Rogues
(![]() Cloak of Shadows) can and should remove their stacks of
Cloak of Shadows) can and should remove their stacks of ![]() Lightning Storm
when they start taking too much damage.
Lightning Storm
when they start taking too much damage.
With a bit of practice, you can divide your raid in 2 groups that will go overload the crystals around the platform in opposite directions. This allows the raid to spend less time in the Lightning Phase (and therefore take less damage from Lightning Storm).
When to Use Bloodlust, Heroism, or Time Warp?
![]() Bloodlust,
Bloodlust, ![]() Heroism, or
Heroism, or ![]() Time Warp should be used at the end
of an Ice Phase or a Lightning Phase, so as to benefit from the 100% increased
damage that the boss takes for 15 seconds.
Time Warp should be used at the end
of an Ice Phase or a Lightning Phase, so as to benefit from the 100% increased
damage that the boss takes for 15 seconds.
Learning the Fight
The execution of the fight does not require much practice as the raid is not faced with overly complex tasks. The only part that may pose problems is the overloading of the 4 Crystal Conductors in the Lightning Phase.
Regarding these Crystal Conductors, it is important to note that
![]() Water Shield has a duration of 300 seconds, which probably means that the
raid has 300 seconds to complete the Lightning Phase. So there is ample time to
practice overloading the Crystal Conductors, as long as the raid can
survive the increasing damage from
Water Shield has a duration of 300 seconds, which probably means that the
raid has 300 seconds to complete the Lightning Phase. So there is ample time to
practice overloading the Crystal Conductors, as long as the raid can
survive the increasing damage from ![]() Lightning Storm.
Lightning Storm.
Heroic Mode
The Heroic version of the fight with Hagara is extremely similar to the normal version of the fight. The differences between Normal and Heroic mode are the following:
- Main Phase: Focused Assault can no longer be avoided and each
missile of Ice Lance applies a stacking debuff that increases
Frost damage taken.
- Ice Phase: Hagara regularly applies a debuff on players that slows movement speed.
- Lightning Phase: Storm Pillars regularly appear on the platform
and explode after 3 seconds, dealing proximity damage.
- In 10-man Heroic difficulty, there are 8 Lightning Conductors (up from 4).
Main Phase
In the Main Phase, the missiles from ![]() Ice Lance now apply a
stacking debuff that increases Frost damage taken by 25%. The debuff lasts
3 seconds, so anyone stacking Ice Lance missiles will end up taking +375%
Frost damage.
Ice Lance now apply a
stacking debuff that increases Frost damage taken by 25%. The debuff lasts
3 seconds, so anyone stacking Ice Lance missiles will end up taking +375%
Frost damage.
By itself, this debuff does not prevent a player from soaking all 15 Ice Lance
missiles, as they only deal 15,000 damage each. The problem comes from a player
taking +375% increased Frost damage and being targeted by ![]() Shattered Ice, which
deals about 100,000 Frost damage in Heroic mode.
Shattered Ice, which
deals about 100,000 Frost damage in Heroic mode.
Therefore, you need to have two players on each Ice Lance. By alternating every 2 or 3 seconds, they enable to debuff to drop, thus making the damage from Shattered Ice manageable if they are targeted by it.
Also, ![]() Focused Assault can no longer be entirely avoided. Tanks still
have to move out of the attack, but Hagara will catch up much faster. To
survive, defensive cooldowns and healing cooldowns will be needed.
Focused Assault can no longer be entirely avoided. Tanks still
have to move out of the attack, but Hagara will catch up much faster. To
survive, defensive cooldowns and healing cooldowns will be needed.
10-man Specific Advice
In 10-man groups, ![]() Shattered Ice is a lot more likely to target
someone under the effect of the debuff from
Shattered Ice is a lot more likely to target
someone under the effect of the debuff from ![]() Ice Lance. To
prevent this, there are a few strategies that you can use:
Ice Lance. To
prevent this, there are a few strategies that you can use:
- Shattered Ice appears to only target players in front of Hagara. To
handle this, you can have the tank face her away from the raid and handle the
damage from Shattered Ice by themselves. Alternatively, if there is a player
other than the tank in front of her, they will be targeted instead, so you can
use a melee DPS to take the damage from Shattered Ice and reduced tank damage.
- A healer can use a defensive cooldown during the cast time of Shattered Ice to protect the player who is being targeted.
 Devotion Aura is very helpful here, unless you plan on using it during the
Ice Phase for stacking in the middle (note that Aura Mastery does not work during
the Lightning Phase, since the damage is Nature damage).
Devotion Aura is very helpful here, unless you plan on using it during the
Ice Phase for stacking in the middle (note that Aura Mastery does not work during
the Lightning Phase, since the damage is Nature damage).
Dealing with Frostflake in the Ice Phase
In the Ice Phase, Hagara will target a random player with
![]() Frostflake. This debuff does no damage but it slows down
the targeted player and stacks every seconds, meaning that the player will
eventually come to an almost complete stop. When dispelled, the debuff
leaves a
Frostflake. This debuff does no damage but it slows down
the targeted player and stacks every seconds, meaning that the player will
eventually come to an almost complete stop. When dispelled, the debuff
leaves a ![]() Frostflake Snare on the ground. Every player standing in this
10-yard radius frost area is slowed down by 50%. Exiting the frost area
removes the movement speed reduction.
Frostflake Snare on the ground. Every player standing in this
10-yard radius frost area is slowed down by 50%. Exiting the frost area
removes the movement speed reduction.
The problem with this debuff is that, during the Ice Phase, raid players
keep moving together to attack the Frozen Binding Crystals and avoid the
![]() Ice Waves. Therefore, dispelling the debuff immediately is not recommended,
as this runs the risk that players get slowed and subsequently caught by the Ice Wave.
Ice Waves. Therefore, dispelling the debuff immediately is not recommended,
as this runs the risk that players get slowed and subsequently caught by the Ice Wave.
One possible strategy is to have targeted players enter the
![]() Watery Entrenchment and be dispelled there. They will take a few ticks of
damage, but this should be manageable and the Frostflake Snare will be out
of everyone's way (currently, dispelling Frostflake inside the Watery Entrenchment
prevents the Frostflake Snare from being created). Another possible strategy is
that targeted players move to the
edges of the platform to be dispelled, though this means that other players need to
be careful and stay away from the edge.
Watery Entrenchment and be dispelled there. They will take a few ticks of
damage, but this should be manageable and the Frostflake Snare will be out
of everyone's way (currently, dispelling Frostflake inside the Watery Entrenchment
prevents the Frostflake Snare from being created). Another possible strategy is
that targeted players move to the
edges of the platform to be dispelled, though this means that other players need to
be careful and stay away from the edge.
Dealing with Storm Pillars in the Lightning Phase
In the Lightning Phase, Hagara will regularly summon ![]() Storm Pillars.
These pillars have a visual effect that looks like a ring. 3 seconds after
they have spawned, they explode and deal 35,000 Nature damage to all players
within 5 yards.
Storm Pillars.
These pillars have a visual effect that looks like a ring. 3 seconds after
they have spawned, they explode and deal 35,000 Nature damage to all players
within 5 yards.
The idea is to circumvent these pillars when making a lightning chain between
the conductors. It is also perfectly viable to ignore them, provided that you can
heal the damage, which increases as ![]() Lightning Storm stacks build up.
Lightning Storm stacks build up.
Beating the Enrage Timer
To beat the enrage timer, you will need to spend as little time as possible in the Ice Phase and the Lightning Phase, where the boss is immune to damage.
Ice Phase
Below, you will find a list of tips to shorten the duration of the Ice Phase.
- 2 or 3 seconds before the Ice Phase starts, have the tank bring Hagara to the location where a Crystal will spawn. This will save you precious seconds traveling from Hagara to the first Crystal when the Ice Phase begins
- Use movement speed buffs, such as Drums of Speed,
 Stampeding Roar,
so that your melee players can rapidly switch from one Crystal to the other.
Stampeding Roar,
so that your melee players can rapidly switch from one Crystal to the other. - If the melee DPS are at full health, they should keep attacking the Crystal, even if an Icicle is going to fall on them.
To destroy all the crystals, your raid will normally need to go around the platform twice (although you should manage to destroy the first crystal during the first pass). To speed up this process, you should do as much damage as possible on the 3rd and 4th crystal. Then, while the bulk of the raid goes for a second pass to finish off the 1st and 2nd crystal, a few DPS players should be left to finish off the 3rd and 4th crystal. The idea is the 3rd and the 4th crystals should be destroyed at around the same time as the 2nd crystal.
Several DPS classes can be left on the 3rd and 4th crystal, thanks to their
ability to avoid or reduce the damage from the Ice Waves and/or
![]() Watery Entrenchment, though any player can easily survive the 2 or 3 ticks
of Watery Entrenchment that it takes to avoid an Ice Wave:
Watery Entrenchment, though any player can easily survive the 2 or 3 ticks
of Watery Entrenchment that it takes to avoid an Ice Wave:
- Mages with
 Ice Block,
  Blink, and
  Cauterize;
 - Rogues with
 Sprint and
  Feint;
 - Paladins with
 Divine Shield;
 - Death Knights with
 Anti-Magic Shell;
 - Shadow Priests with
 Dispersion.
Alternative Ice Phase Strategy: Stacking in Watery Entrenchment
A totally different strategy is to have the entire raid, save the melee DPS and the tank, stack up on Hagara. This will enable the ranged DPS to have a 100% uptime on the crystals (making the phase shorter), at the cost of a much increased raid damage (which will require a good AoE healing setup).
This strategy changes nothing for melee DPS and the tank who will still have
to run around the platform and get their ![]() Frostflake debuff dispelled on
the edge or inside the Watery Entrenchment.
Frostflake debuff dispelled on
the edge or inside the Watery Entrenchment.
Note that the damage from ![]() Watery Entrenchment is based on players'
health, so it is advised to disable raid buffs such as
Power Word: Fortitude or Commanding Shout, and to avoid using
cooldowns such as Rallying Cry.
Watery Entrenchment is based on players'
health, so it is advised to disable raid buffs such as
Power Word: Fortitude or Commanding Shout, and to avoid using
cooldowns such as Rallying Cry.
Lightning Phase
During the Lightning Phase, you will want to overload all the Crystal Conductors within a few seconds of the death of the Bound Lightning Elemental. To achieve this, the chains of players from one Conductor to another will be pre-established and each player will have a pre-determined location to go to. The add will also always be killed on the same Conductor, so that you can assign melee players a position close to this Conductor, while DPS players will be assigned positions that are further away. Each player should try to reach their position at the moment the add dies (depending on how far it is, they might have to start moving long before the add dies).
In 25-man difficulty, 6 players are required to conductor lightning from one Conductor to the other and you only need to make 3 chains.
 In 10-man difficulty,
you need 2 players for each chain and you have to make 7 chains (there are 8
conductors in 10-man Heroic difficulty, up from 4 in 10-man Normal difficulty),
meaning that some players will need to participate in the overloading of more than
just one conductor. The diagram shows a possible strategy with 4 groups, one made
up of healers that will not move (so they can keep healing) and 3 others that will
have to move
In 10-man difficulty,
you need 2 players for each chain and you have to make 7 chains (there are 8
conductors in 10-man Heroic difficulty, up from 4 in 10-man Normal difficulty),
meaning that some players will need to participate in the overloading of more than
just one conductor. The diagram shows a possible strategy with 4 groups, one made
up of healers that will not move (so they can keep healing) and 3 others that will
have to move
Note that from a single Crystal Conductor, you can propagate lightning to several other Crystal Conductors.
Finally, you should ignore the ![]() Storm Pillars when they spawn in the path
of one of the chain of players and heal through the damage that they deal.
Storm Pillars when they spawn in the path
of one of the chain of players and heal through the damage that they deal.
Achievement: Holding Hands
The ![]() Holding Hands achievement is part of the
Holding Hands achievement is part of the
![]() Glory of the Dragon Soul Raider meta-achievement. The achievement is rather
straightforward and is linked to the Lightning Phase.
Glory of the Dragon Soul Raider meta-achievement. The achievement is rather
straightforward and is linked to the Lightning Phase.
What you need to do is overload the last Crystal Conductor by using a chain of players made up of the entire raid. You cannot have most of the raid stacked together somewhere in the chain, with a few players doing the actual lightning conduction part. You have to make a continuous chain of players. If players are too close, this runs the risk that the lightning will jump a player.
In 10-man difficulty, there is a lot of available room to make the chain, so obtaining the achievement should not be a problem.
In 25-man difficulty, however, you will need to create a sort of semi-circle from one overloaded conductor to the final conductor. To make it easier, you can make the chain start from the overloaded conductor that is diametrically opposed to the final conductor. This will give your raid ample room to maneuver.
The achievement triggers as soon as the final conductor is destroyed. You do not need to kill the boss, which is good news for raids who want to get the achievement but not kill the boss on Normal mode.
Concluding Remarks
This concludes the strategy guide for Hagara the Stormbinder. We think that many guilds will enjoy progressing on this fight as dealing with the various positioning challenges can be quite fun.
As always, we would be pleased to read any feedback that you have (typos, suggestions, praise, etc.) by e-mail or in a comment below.