

Hagara the Stormbinder DPS Strategy Guide (Heroic Mode included)

Introduction
This guide is intended to provide a comprehensive description of the encounter with Hagara the Stormbinder in Dragon Soul. It is mostly targeted to DPS who desire to have a short but detailed overview of what is expected of them during that fight.
This guide is updated for World of Warcraft WoD 6.1.2.
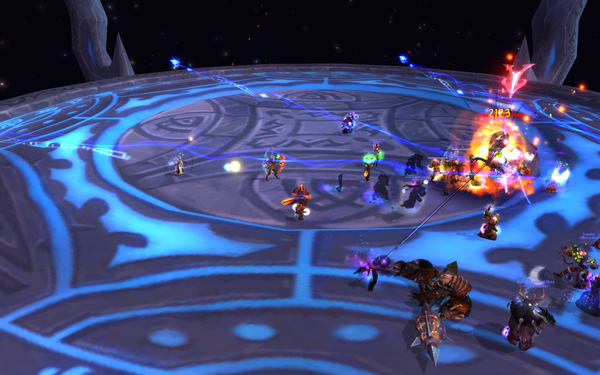
The Hagara encounter is composed of three phases, which alternate in a predictable fashion throughout the fight. The boss has a large number of abilities, as well as adds, that may make the encounter look complex and difficult to understand, but we assure you that it is quite simple.
As a DPS player, you will have to DPS the boss and a few adds that spawn at certain, predictable intervals. Additionally, you will have to handle a number of movement and positional challenges.
Overview of the Fight
The fight against Hagara is made up of 3 phases: Main Phase, Ice Phase, Lightning Phase. The Main Phase lasts 50 seconds and is followed by either the Ice Phase or the Lightning Phase. The fight goes back to the Main Phase as soon as your raid has finished dealing with the Ice Phase or the Lightning Phase.
The Ice Phase and the Lightning Phase alternate, such that you will always have a Main Phase - Lightning Phase - Main Phase - Ice Phase sequence. The fight randomly starts with a Main Phase followed by a Lightning Phase or a Main Phase followed by an Ice Phase.
For 15 seconds after each Ice Phase and Lightning Phase, Hagara takes increased damage. You should use your DPS cooldowns at this time.
| Main Phase | Ice Phase | Lightning Phase |
|---|---|---|
|

|

|
Main Phase
Melee DPS have the following tasks to perform:
- DPS Hagara the Stormbinder, without ever being in front of her, as she has a damaging frontal cone attack.
- When Hagara casts
 Ice Lance, it is possible that one of the
crystal that she creates starts sending missiles to you. In this case, and if
no Ranged DPS moves on the path of the missiles to intercept them, you will
need to move out of the melee group. Indeed, the missiles will deal AoE
damage to everyone around you if they reach you.
Ice Lance, it is possible that one of the
crystal that she creates starts sending missiles to you. In this case, and if
no Ranged DPS moves on the path of the missiles to intercept them, you will
need to move out of the melee group. Indeed, the missiles will deal AoE
damage to everyone around you if they reach you.
 Ranged DPS need to pay special attention to
 ![]() Ice Lance. Whenever
Hagara casts this ability, 3 crystals will appear and they will send
a series of missiles towards a random raid member. If melee players
are targeted by this ability, Ranged players need to move in the path
of the missiles to intercept them (this path is clearly visible as soon
as the crystals spawn). Letting a missile explode in the melee group should
be avoided as it deals AoE damage when it explodes.
Ice Lance. Whenever
Hagara casts this ability, 3 crystals will appear and they will send
a series of missiles towards a random raid member. If melee players
are targeted by this ability, Ranged players need to move in the path
of the missiles to intercept them (this path is clearly visible as soon
as the crystals spawn). Letting a missile explode in the melee group should
be avoided as it deals AoE damage when it explodes.
In addition, both Melee and Ranged DPS need to DPS the Ice Tombs in which Hagara will regularly entrap certain raid members. Destroying these tombs has a higher priority than attacking Hagara.
Death Knights can ward ![]() Shattered Ice (an ability of Hagara that is otherwise
of no concern to DPS players) using Dark Simulacrum. In addition to preventing
the targeted player from taking damage from it, it gives a nice DPS boost to
the Death Knight who casts Dark Simulacrum.
Shattered Ice (an ability of Hagara that is otherwise
of no concern to DPS players) using Dark Simulacrum. In addition to preventing
the targeted player from taking damage from it, it gives a nice DPS boost to
the Death Knight who casts Dark Simulacrum.
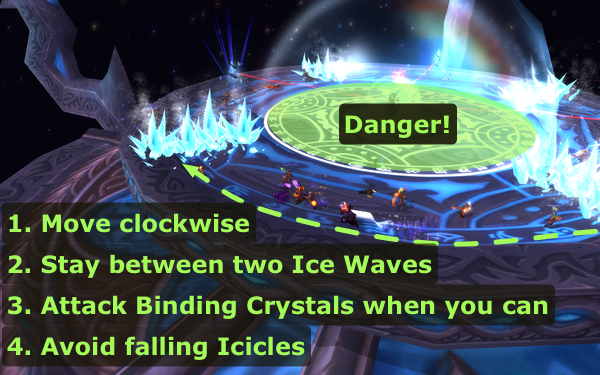
Ice Phase
 During the Ice Phase, Hagara cannot be attacked. You will have to stick
together with your raid. Your main goal is survival, but you will also have to
do damage the 4 crystals that spawned near the edge of the platform. Your
tasks during this phase can be summarised as follows:
During the Ice Phase, Hagara cannot be attacked. You will have to stick
together with your raid. Your main goal is survival, but you will also have to
do damage the 4 crystals that spawned near the edge of the platform. Your
tasks during this phase can be summarised as follows:
- Stay outside of the large bubble that covers the center of the platform.
- Move around the other edges of the platform, in a clockwise manner, while
avoiding:
- the falling Icicles, the impact location of which is clearly marked with void zones;
- the Ice Waves that travel in a clockwise manner around the platform (they are slightly slower than your normal run speed and they are very deadly);
- DPS the 4 Crystals that can be found around the edges of the platform (whenever you are not busy avoiding damage).
The Ice Phase ends when all 4 Crystals have been destroyed.
Lightning Phase
 During the Lightning Phase, Hagara cannot be attacked. You will have to do
the following things:
During the Lightning Phase, Hagara cannot be attacked. You will have to do
the following things:
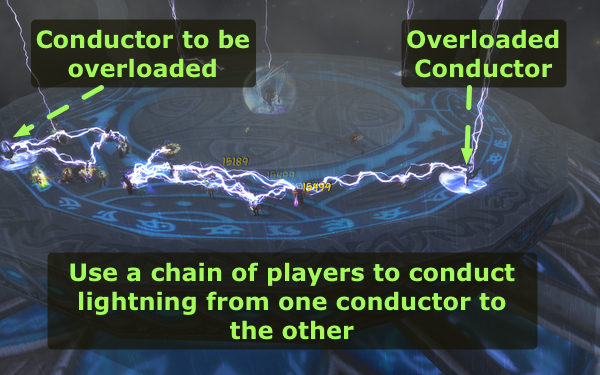
- DPS the only add, a Bound Lightning Elemental. Make sure that it dies when it is next to one of the 4 Crystal Conductors located around the platform (the tank should move it there).
- Once the Elemental is killed, you will have to assist your raid in forming a chain of players from the conductor (which is now overloaded) to the next one (which will become overloaded as a result), and so on until all 4 conductors have been overloaded. Your raid leader will direct your movement here.
Once all 4 conductors have been overloaded, the phase will end.
Heroic Mode
The Heroic version of the fight with Hagara is extremely similar to the normal version of the fight. Each of the 3 phases has exactly one difference with the Normal mode, in addition to all abilities doing more damage and all units having more health.
Dealing with Ice Lance in the Main Phase
In the Main Phase, the missiles from ![]() Ice Lance now apply a
stacking debuff that increases Frost damage taken by 25%. The debuff lasts
3 seconds, so anyone stacking Ice Lance missiles will end up taking +375%
Frost damage.
Ice Lance now apply a
stacking debuff that increases Frost damage taken by 25%. The debuff lasts
3 seconds, so anyone stacking Ice Lance missiles will end up taking +375%
Frost damage.
If you are assigned to soak Ice Lance, then you will soak alternatively with
another player, switching every 2 or 3 seconds. The idea is to let the debuff drops so
that ![]() Shattered Ice (one of Hagara's abilities that was of no concern to you
in Normal mode) do not one-shot you.
Shattered Ice (one of Hagara's abilities that was of no concern to you
in Normal mode) do not one-shot you.
Ice Phase
In the Ice Phase, Hagara will target a random player with
![]() Frostflake. This debuff does no damage but it slows down
the targeted player and stacks every seconds, meaning that the player will
eventually come to an almost complete stop. When dispelled, the debuff
leaves a
Frostflake. This debuff does no damage but it slows down
the targeted player and stacks every seconds, meaning that the player will
eventually come to an almost complete stop. When dispelled, the debuff
leaves a ![]() Frostflake Snare on the ground. Every player standing in this
10-yard radius frost area is slowed down by 50%. Exiting the frost area
removes the movement speed reduction.
Frostflake Snare on the ground. Every player standing in this
10-yard radius frost area is slowed down by 50%. Exiting the frost area
removes the movement speed reduction.
The raid leader should communicate a location where people should go
when targeted by Frostflake, usually inside the ![]() Watery Entrenchment
(the large bubble in the middle)
or on the edge of the platform. The idea is that other players do not get
stuck in the Frostflake Snare that will appear after Frostflake is dispelled.
Watery Entrenchment
(the large bubble in the middle)
or on the edge of the platform. The idea is that other players do not get
stuck in the Frostflake Snare that will appear after Frostflake is dispelled.
In addition, you will probably be asked to use ![]() Stampeding Roar
if you are a Feral Druid, in order to reduce the traveling time from one
Crystal to the other. Drums of Speed, if you are a Leatherworker, are
also very useful.
Stampeding Roar
if you are a Feral Druid, in order to reduce the traveling time from one
Crystal to the other. Drums of Speed, if you are a Leatherworker, are
also very useful.
If you are a melee DPS, you should keep attacking the Crystals even when an Icicle is going to fall on you, in order to maximise DPS. You should only do this if you have enough health to survive the 100,000 Frost damage.
Finally, your raid will normally need to go around the platform twice to destroy all the Crystals. To save a few seconds, your raid leader will probably ask a few DPS to stay and finish off the 3rd and 4th Crystals while the rest of the raid goes to finish off the 1st and 2nd Crystals.
Some classes are better for this assignment than others, because they
have immunities or damage reduction abilities to bypass the Ice Waves or
survive inside ![]() Watery Entrenchment (the large bubble in the middle).
Mages, Rogues, Shadow Priest, Paladins, and Death Knights are usually well
suited for the job.
Watery Entrenchment (the large bubble in the middle).
Mages, Rogues, Shadow Priest, Paladins, and Death Knights are usually well
suited for the job.
Alternative Strategy: Stacking in the Watery Entrenchment
Your raid may deal with the Ice Phase by stacking in the middle, with only the melee DPS and the tank running around the platform. This enables ranged DPS to maintain a 100% uptime on the Crystals (which shortens the phase) but put more stress on the healers.
Lightning Phase
During the Lightning Phase, you will still need to kill the add next to a Crystal Conductor. When it reaches low health, most of the raid (you included) will start positioning themselves around the platform. The idea is that, as soon as the first Crystal Conductor is overloaded, the raid should already be properly positioned to spread the lightning to all (almost all, in 10-man difficulty) the other Crystal Conductors.
Therefore, you will be assigned a location (or two in 10-man difficulty), and you should try to reach it as soon as the add dies.
Also, ![]() Storm Pillars will randomly appear on the platform. They
explode after 3 seconds, dealing 35,000 Nature damage to players close
to them. Normally, your raid will ignore them and heal through the damage,
as otherwise this will interfere with the raid positioning for spreading
the lightning.
Storm Pillars will randomly appear on the platform. They
explode after 3 seconds, dealing 35,000 Nature damage to players close
to them. Normally, your raid will ignore them and heal through the damage,
as otherwise this will interfere with the raid positioning for spreading
the lightning.