

Kin'garoth Guide for Antorus, the Burning Throne

General Information
Welcome to our World of Warcraft encounter guide for Kin'garoth in Antorus, the Burning Throne. We will teach you everything you need to know to defeat the boss in every difficulty.
On this particular page, we will give you a short overview of the fight as well as a list of things to watch out for (include LFR tips when applicable).
The other pages of our Kin'garoth guide can be accessed from the table of contents on the right.
Contents
To make it easy to navigate the guide, we have split it into 3 pages:
- Abilities: read about the encounter abilities;
- Normal/Heroic Strategy/Tactics: find out how to defeat the encounter in Normal and Heroic modes;
- Mythic Strategy: learn how to handle the new mechanics and increased difficulty of Mythic mode.
Lore
Kin'garoth is the seventh boss in Antorus, the Burning Throne. Imonar the Soulhunter must be defeated before he can accessed.
The design of every Legion war machine stems from the depraved mind of Kin'garoth. Obsessed with crafting implements of death, Kin'garoth infused his very body into the production machinery so he could more efficiently churn out a never-ending supply of destruction.
At the behest of the Legion's dark master, Kin'garoth's fevered brilliance has developed a new super-weapon which he plans to unleash upon the Army of the Light.
Outline
Kin'garoth is technically a two phase encounter, with an "up" phase where he engages the raid, and a "down" phase where he reduces all damage taken by 99% and begins construction of powerful adds. During the first Up Phase, he engages the raid alone, however, he will be accompanied by the aforementioned adds during all remaining Up Phases. Kin'garoth is an intense encounter with many environmental mechanics affecting a narrow ring upon which the raid must fight. Good spatial awareness will be required to take down the Legion's chief engineer and proceed to even greater threats.
TL;DR
Tanks
- Perform a taunt swap after taking a hit from
 Forging Strike. The
second tank should never be within 5 yards of the active tank due to the splash
damage of this ability.
Forging Strike. The
second tank should never be within 5 yards of the active tank due to the splash
damage of this ability. - Soak
 Diabolic Bombs when appropriate to help keep the arena
clear.
Diabolic Bombs when appropriate to help keep the arena
clear.
Healers
- Pay special attention to the raid when the Garothi Decimator's
 Decimation is active.
 - Pay special attention to the raid when the Garothi Demolisher's
 Demolish is active.
DPS
- Have cooldowns ready for the Down Phase to eliminate
or weaken the Garothi constructs before
 Initializing concludes.
All Players
- Avoid Diabolic Bombs as they move around the platform, unless you
are assigned to soak them.
- Avoid the
 Ruiner beam as it rotates around the platform.
 - Soak the Garothi Annihilator's
 Annihilation missiles
before they impact.
Annihilation missiles
before they impact. - Help soak raid members' Demolish.
- Spread out and avoid
 Apocalypse Blast during the Down Phase.
Positioning
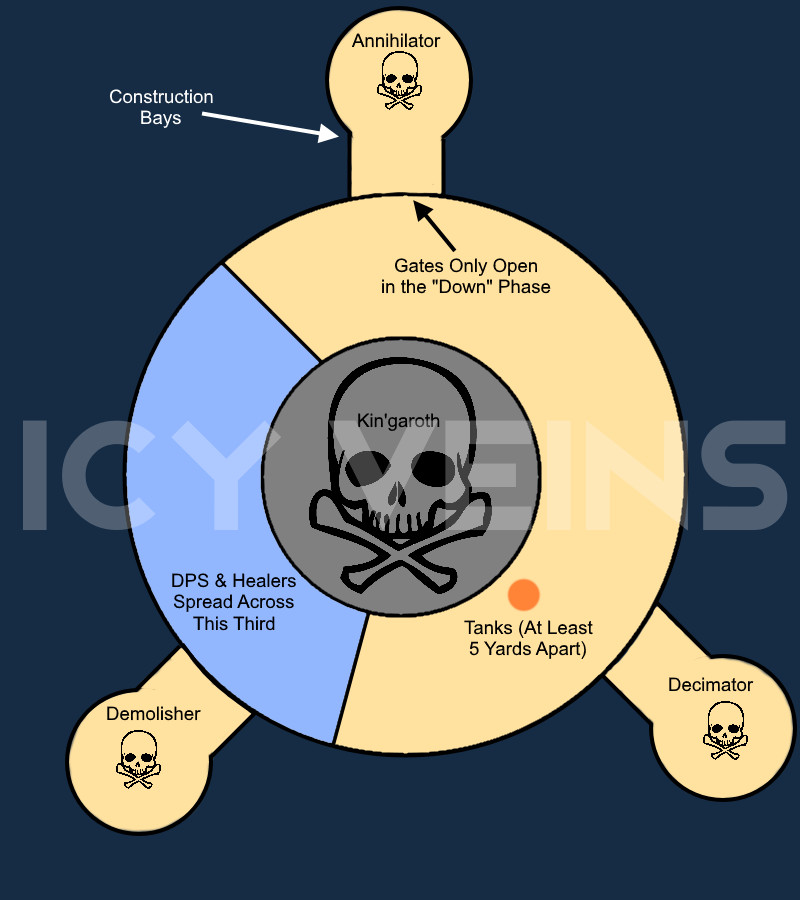
Up Phase
- The group should spread out on one side of the circle. The tanks should be
away from the group, but within range of healers, to avoid hit anyone with
Forging Strike while still allowing melee to be behind
Kin'garoth.
- Collapse on raid members afflicted with Demolish, but spread out
while Decimation is active. Be aware of both timers and prioritize
whichever will expire first.
- Standing on the very outside edge allows players to completely avoid all
Diabolic Bombs, however, be careful not to fall off.
Down Phase
- The raid should split into 2 sub-groups with an equal balance of damage and
healing to attack the constructs during Initializing. One construct
can be ignored and cleaved down during the Up Phase. The
Garothi Decimator is generally the least disruptive as the circular
arena has plenty of space to spread out.
- Ensure all players are out of the construction bays before the phase ends,
or they will be killed by
 Purging Protocol.
Bloodlust/Heroism/Time Warp
There are several effective ways to use
![]() Bloodlust/
Bloodlust/![]() Heroism/
Heroism/![]() Time Warp on Kin'garoth.
The level of difficulty your raid is attempting is the main dictator of usage.
On higher difficulties, or if your raid is struggling during the down phase, it
should be used to eliminate the constructs before the end of
Time Warp on Kin'garoth.
The level of difficulty your raid is attempting is the main dictator of usage.
On higher difficulties, or if your raid is struggling during the down phase, it
should be used to eliminate the constructs before the end of
![]() Initializing. If your group saves DPS cooldowns in combination with
Bloodlust, you can opt to split into 3 groups instead and attempt to eliminate
all 3 constructs before they can activate. Alternatively, stick to 2 groups and
cleanly eliminate both constructs.
Initializing. If your group saves DPS cooldowns in combination with
Bloodlust, you can opt to split into 3 groups instead and attempt to eliminate
all 3 constructs before they can activate. Alternatively, stick to 2 groups and
cleanly eliminate both constructs.
![]() Bloodlust/
Bloodlust/![]() Heroism/
Heroism/![]() Time Warp can also be used on
the pull to push the boss as low as possible before the first down phase. This
is a good strategy if you can cleanly eliminate 2 constructs without the use
of Bloodlust or DPS cooldowns.
Time Warp can also be used on
the pull to push the boss as low as possible before the first down phase. This
is a good strategy if you can cleanly eliminate 2 constructs without the use
of Bloodlust or DPS cooldowns.
Finally, ![]() Bloodlust/
Bloodlust/![]() Heroism/
Heroism/![]() Time Warp can be used
in the second Up Phase (or any subsequent Up Phases), as this should line up
well with DPS cooldowns (if they are used on the pull) and allow you to easily
cleave down any remaining constructs.
Time Warp can be used
in the second Up Phase (or any subsequent Up Phases), as this should line up
well with DPS cooldowns (if they are used on the pull) and allow you to easily
cleave down any remaining constructs.
Ultimately, the usage of DPS cooldowns and Bloodlust/Heroism/Time Warp on this encounter is very contextual and based solely on your group's damage and healing.
Changelog
- 11 Jan. 2018 (mythic page): Page added.
- 25 Oct. 2017 (strategy page): Page added.
- 25 Oct. 2017 (abilities page): Page added.
- 25 Oct. 2017 (this page): Page added.