

General Information
On this page, you will find a working strategy to defeat Kin'garoth in Antorus, the Burning Throne for both Normal and Heroic modes, which usually only differ by the tuning of the boss.
Here, we assume that you have read our descriptions of the abilities for this encounter.
The other pages of our Kin'garoth guide can be accessed from the table of contents on the right.
Positioning and Strategy
First Up Phase
In total, the very first up phase only lasts about 35 seconds from the
time Kin'garoth is engaged until the conclusion of the
![]() Apocalypse Protocol cast. Your raid should begin the fight as the
image below describes:
Apocalypse Protocol cast. Your raid should begin the fight as the
image below describes:
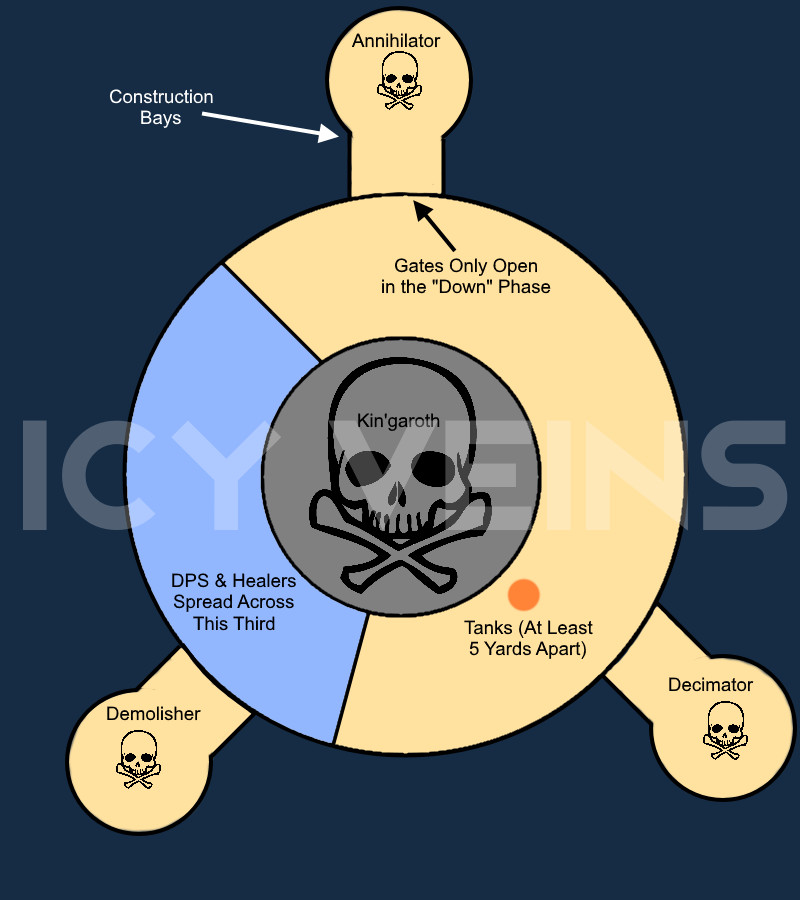
The raid should maintain at least a 5-yard spread at all times to avoid any
unnecessary damage from ![]() Reverberating Strike. Any time Reverberating
Strike is cast, the detonation zone should be avoided, when possible, for the
remainder of the encounter.
Reverberating Strike. Any time Reverberating
Strike is cast, the detonation zone should be avoided, when possible, for the
remainder of the encounter.
The tanks should always remain on the far side of the platform, while the healers should space themselves so that everyone in the raid will be able to receive healing. Generally speaking, healing requirements in the first Up Phase are negligible. Healers preferring to heal single targets should be closest to the tanks while healers with strong raid healing should be spaced throughout the middle of the raid.
The tanks must always be at least 5 yards apart to avoid splitting damage
and debuffs from ![]() Forging Strike. There is a dual reason for the tanks
being so far away; primarily, this is done so the melee can stay behind the
boss without losing damage. Another important reason, however, is so that the
tanks can occasionally soak
Forging Strike. There is a dual reason for the tanks
being so far away; primarily, this is done so the melee can stay behind the
boss without losing damage. Another important reason, however, is so that the
tanks can occasionally soak ![]() Diabolic Bombs as they travel around the
platform while the raid takes significantly reduced damage due to their
distance. This can be done very liberally in the first phase, as raid damage
is low enough that the additional raid damage will not cause any mortal threat.
This is magic damage and can therefore be easily mitigated with cooldowns such
as
Diabolic Bombs as they travel around the
platform while the raid takes significantly reduced damage due to their
distance. This can be done very liberally in the first phase, as raid damage
is low enough that the additional raid damage will not cause any mortal threat.
This is magic damage and can therefore be easily mitigated with cooldowns such
as ![]() Anti-Magic Shell. Diabolic Bombs should be soaked by the tank that
is not actively tanking the boss.
Anti-Magic Shell. Diabolic Bombs should be soaked by the tank that
is not actively tanking the boss.
![]() Ruiner will be cast once, right before the end of the first up
phase. Ruiner must be avoided by the raid at all costs, as it deals extremely
high damage and ticks very quickly. It is safe to pass through Ruiner by any
means of teleportation, for example,
Ruiner will be cast once, right before the end of the first up
phase. Ruiner must be avoided by the raid at all costs, as it deals extremely
high damage and ticks very quickly. It is safe to pass through Ruiner by any
means of teleportation, for example, ![]() Shimmer and
Shimmer and
![]() Demonic Circle. Once Ruiner concludes, Kin'garoth will
immediately begin casting
Demonic Circle. Once Ruiner concludes, Kin'garoth will
immediately begin casting ![]() Apocalypse Protocol and enter the Down
Phase.
Apocalypse Protocol and enter the Down
Phase.
Down Phases
The raid should split into 2 predetermined groups for each Down Phase. Unless your team grossly outgears the encounter, killing all 3 constructs before activation is not feasible. It is recommended you prioritize killing the Garothi Annihilator and the Garothi Demolisher, however, feel free to choose which abilities you wish to deal with from the remaining construct(s).
It is important the groups have a good balance of damage and healing, as
the raid damage in this phase is respectable. A mix of melee and ranged is
important due to ![]() Apocalypse Blast; too many ranged will cause a loss
of uptime due to movement. For progression kills, it is recommended you save
your DPS cooldowns for the beginning of this phase. Being in position before
the end of
Apocalypse Blast; too many ranged will cause a loss
of uptime due to movement. For progression kills, it is recommended you save
your DPS cooldowns for the beginning of this phase. Being in position before
the end of ![]() Apocalypse Protocol is very important, particularly if
you are saving damage cooldowns, as the constructs take maximum damage at
the start of the down phase due to
Apocalypse Protocol is very important, particularly if
you are saving damage cooldowns, as the constructs take maximum damage at
the start of the down phase due to ![]() Initializing. With each passing
second the damage buff decreases, adding additional emphasis to maximizing
your early damage in the phase.
Initializing. With each passing
second the damage buff decreases, adding additional emphasis to maximizing
your early damage in the phase.
If your group has a Warlock or two, it is recommended you place
![]() Demonic Gateways from the Annihilator and/or Demolisher Construct
Bays towards the Decimator. This can be helpful if you kill the other
constructs early, allowing the raid to instantly portal to the Decimator
and put some damage on it before the phase concludes.
Demonic Gateways from the Annihilator and/or Demolisher Construct
Bays towards the Decimator. This can be helpful if you kill the other
constructs early, allowing the raid to instantly portal to the Decimator
and put some damage on it before the phase concludes.
Each Down Phase lasts exactly 40 seconds, although ![]() Initializing
only lasts 30 seconds. The remaining time delta is allotted to a small grace
period at the beginning and end of the phase, allowing you to position around
the Construction Bays and get back in regular formation around
Kin'garoth as
Initializing
only lasts 30 seconds. The remaining time delta is allotted to a small grace
period at the beginning and end of the phase, allowing you to position around
the Construction Bays and get back in regular formation around
Kin'garoth as ![]() Apocalypse Protocol ends.
Apocalypse Protocol ends.
Subsequent Up Phases
All Up Phases following the very first will be slightly different.
Kin'garoth will engage the raid once more, however, he will be
accompanied by at least one of the constructs (providing they were not all
killed during the down phase). If you chose to leave the
Garothi Decimator alive, you will have to deal with ![]() Decimation
in addition to all of Kin'garoth's regular abilities. Decimation is relatively
easy to deal with, as the raid is already maintaining a loose spread. The
healers should pay special attention to the raid during the period the
construct is alive as raid damage will be high. If the raid is low the group
should avoid triggering
Decimation
in addition to all of Kin'garoth's regular abilities. Decimation is relatively
easy to deal with, as the raid is already maintaining a loose spread. The
healers should pay special attention to the raid during the period the
construct is alive as raid damage will be high. If the raid is low the group
should avoid triggering ![]() Diabolic Bombs until the raid team can be
stabilized.
Diabolic Bombs until the raid team can be
stabilized.
The construct should be prioritized over Kin'garoth, although the
raid should keep up efficient cleave. Killing the construct(s) promptly is
imperative, as dealing with their abilities during ![]() Ruiner or while
Ruiner or while
![]() Diabolic Bombs circle the arena can be very chaotic.
Diabolic Bombs circle the arena can be very chaotic.
If the Garothi Demolisher is left alive during the Up Phase, all
targets of ![]() Demolish must be quickly soaked by the raid. On Heroic
and lesser difficulties at least 2-3 additional raid members will be required
in order to survive safely, however, the more players available the better.
The
Demolish must be quickly soaked by the raid. On Heroic
and lesser difficulties at least 2-3 additional raid members will be required
in order to survive safely, however, the more players available the better.
The ![]() Demolish targets must be careful not to overlap with each other,
however, as the debuff also increases Shadow damage taken.
Demolish targets must be careful not to overlap with each other,
however, as the debuff also increases Shadow damage taken.
If the Garothi Annihilator is left alive during the Up Phase the
group must quickly soak all the ![]() Annihilation missiles before they
reach the ground. The damage is not split, and therefore only one player
per missile zone is necessary. Typically the missiles will spawn on the side
of the platform closest to the Annihilator.
Annihilation missiles before they
reach the ground. The damage is not split, and therefore only one player
per missile zone is necessary. Typically the missiles will spawn on the side
of the platform closest to the Annihilator.
Tank Concerns
This encounter is relatively straightforward for tank players.
Kin'garoth melees quite hard, and active mitigation will be necessary
for each cast of ![]() Forging Strike. Additionally, tanks should be
responsible for the majority of the
Forging Strike. Additionally, tanks should be
responsible for the majority of the ![]() Diabolic Bomb soaks. Light
cooldowns are advised, such as
Diabolic Bomb soaks. Light
cooldowns are advised, such as ![]() Anti-Magic Shell.
Anti-Magic Shell.
When you are tanking the construct(s), it is important to keep them
a little closer to the raid than you would normally stand. The active
Kin'garoth tank should stay in position, while the other tank
will hold the Garothi Construct closer to the raid. As Kin'garoth is
in the center of the room this only serves to improve cleave but has
no negative impact. When ![]() Forging Strike occurs the tanks can
trade targets and continue as normal.
Forging Strike occurs the tanks can
trade targets and continue as normal.
Healing Concerns
There is not a significant amount of premeditated burst damage affecting
the raid throughout the fight with Kin'garoth. There is a fair
amount of sustained damage to be healed, however, most of your cooldowns
will be used reactively. Large spikes of damage typically occur when DPS
or Healers are accidentally struck by orbiting ![]() Diabolic Bombs.
Other points of significant threat are during the Up Phases when the constructs
are active, and when their abilities (
Diabolic Bombs.
Other points of significant threat are during the Up Phases when the constructs
are active, and when their abilities (![]() Decimation/
Decimation/![]() Demolish/
Demolish/![]() Annihilation)
are active on the raid. Healers will have to be quick on their toes to stabilize
the raid in such situations.
Annihilation)
are active on the raid. Healers will have to be quick on their toes to stabilize
the raid in such situations.
Useful Tips
Pay special attention to:
- avoiding
 Diabolic Bombs as they orbit the arena;
 - the start point and directional rotation of
 Ruiner;
 - zones left behind by
 Reverberating Strike;
 - avoiding casts of
 Apocalypse Blast during the down phase;
 - quickly reacting to the abilities of the Garothi Constructs.
Bloodlust/Heroism/Time Warp
For progression kills, we recommend ![]() Bloodlust/
Bloodlust/![]() Heroism/
Heroism/![]() Time Warp
be used during the first Down Phase. Ambitious groups may choose to split
into 3 groups and attempt to neutralize all 3 constructs, however, this is not
necessary.
Time Warp
be used during the first Down Phase. Ambitious groups may choose to split
into 3 groups and attempt to neutralize all 3 constructs, however, this is not
necessary.

Changelog
- 25 Oct. 2017: Page added.