


General Information
On this page, you will find a working strategy to defeat Nythendra in The Emerald Nightmare for both Normal and Heroic modes, which usually only differ by the tuning of the boss.
Here, we assume that you have read our descriptions of the abilities for this encounter.
The other pages of our Nythendra guide can be accessed from the table of contents on the right.
About our Reviewer
This guide has been reviewed and approved by Pottm from Serenity.
Overview
Nythendra is a simple and straightfoward alternating two phase fight, with very few abilities to worry about. It is much like other first boss' in previous raid tiers, a short and sweet coordination check.
Phase One
Positioning
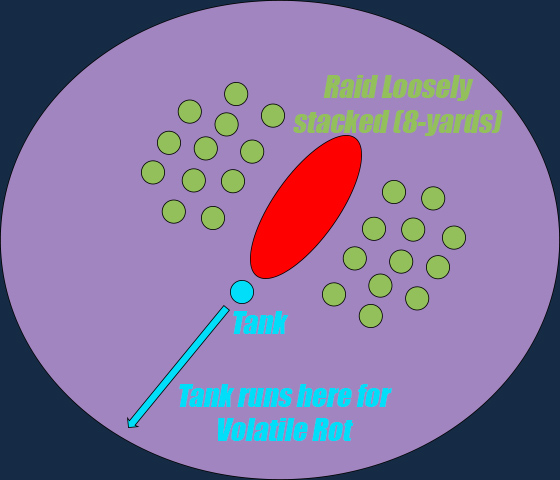
The positioning for Nythendra is quite simple: tank Nythendra in the center
of the encounter room. This allows the raid to have more than ample space to
spread out around either side of Nythendra for ![]() Rot, and
Rot, and
![]() Infested Ground. Additionally, on Heroic difficulty and higher,
Nythendra will apply
Infested Ground. Additionally, on Heroic difficulty and higher,
Nythendra will apply ![]() Infested to any player that takes Plague damage
during the fight, (which is every ability except for the boss' melee attacks.)
So, as is the case during any raid encounter, do your best to not get hit by
avoidable damage! Stay spread out 8 or more yards during Phase One.
Infested to any player that takes Plague damage
during the fight, (which is every ability except for the boss' melee attacks.)
So, as is the case during any raid encounter, do your best to not get hit by
avoidable damage! Stay spread out 8 or more yards during Phase One.
Strategy
Throughout the fight with Nythendra random raid members will be targeted
by the boss as spawn locations for ![]() Infested Ground; these players
will need to quickly move out of the green puddle that forms beneath them
as to not take unnecessary raid damage.
Infested Ground; these players
will need to quickly move out of the green puddle that forms beneath them
as to not take unnecessary raid damage.
Nythendra will occasionally cast ![]() Rot on random members of the
raid; this ability does AoE Plague damage and serves as a deterrent to
stacking tightly on top of the boss. It is important to remain 8 yards apart,
so that only the player targeted by Rot take damage from this ability.
As we explain in more details in our Infested Ground section,
targeted players have 9 seconds to move out of the raid and drop their
pool of
Rot on random members of the
raid; this ability does AoE Plague damage and serves as a deterrent to
stacking tightly on top of the boss. It is important to remain 8 yards apart,
so that only the player targeted by Rot take damage from this ability.
As we explain in more details in our Infested Ground section,
targeted players have 9 seconds to move out of the raid and drop their
pool of ![]() Infested Ground. During that time, Rot ticks damage
every 3 seconds, so it is important to maintain an 8-yard distance even
while moving away from the raid.
Infested Ground. During that time, Rot ticks damage
every 3 seconds, so it is important to maintain an 8-yard distance even
while moving away from the raid.
As Phase One progresses, you will slowly have to rotate the boss
around to maintain the proper amount of safe space for the raid to stand.
These small rotations take place after a large buildup of ![]() Infested Ground and
after a tank swap is forced by the application of
Infested Ground and
after a tank swap is forced by the application of ![]() Volatile Rot. These
movements are small in nature, and are just to ensure that your raid has ample
space to spread out for Rot and Infested Ground. Moving to an area free of
puddles of Infested Ground will also cut down on the potential for raid-wiping
damage in Phase Two.
Volatile Rot. These
movements are small in nature, and are just to ensure that your raid has ample
space to spread out for Rot and Infested Ground. Moving to an area free of
puddles of Infested Ground will also cut down on the potential for raid-wiping
damage in Phase Two.
While moving to avoid Infested Ground, your raid will also have to be aware
of Nythendra's ![]() Infested Breath this is a cone ability that will be cast
at a random member of the raid. This ability appears to be cast after being in
Phase One for about 45 seconds.
Infested Breath this is a cone ability that will be cast
at a random member of the raid. This ability appears to be cast after being in
Phase One for about 45 seconds.
Tanking
When tanks are afflicted by ![]() Volatile Rot in Phase One, they need to
run to the opposite side of the room, as far from the raid as possible to
reduce incoming damage and to drop the subsequent
Volatile Rot in Phase One, they need to
run to the opposite side of the room, as far from the raid as possible to
reduce incoming damage and to drop the subsequent ![]() Infested Ground
poison zones away from raid members.
Infested Ground
poison zones away from raid members.
Healing
Throughout Phase One, the raid will be taking constant damage from
![]() Rot, and on Heroic difficulty this is compounded by
Rot, and on Heroic difficulty this is compounded by ![]() Infested.
This damage will wear down your raid and eat through your Mana in such a way
that the more heavy hitting abilities (
Infested.
This damage will wear down your raid and eat through your Mana in such a way
that the more heavy hitting abilities (![]() Volatile Rot, in particular) can
easily kill raid members. Therefore, it is your responsibility as a healer to
keep damaged and/or debuffed players topped up so that Volatile Rot, which
happens 3 times per Phase One, will not kill any raid members.
Volatile Rot, in particular) can
easily kill raid members. Therefore, it is your responsibility as a healer to
keep damaged and/or debuffed players topped up so that Volatile Rot, which
happens 3 times per Phase One, will not kill any raid members.
Keep in mind that RoT seems to be cast at more and more raid members as the fight progresses, making damage ramp up even more.
On The Importance of Properly Dropping Infested Ground Void Zones
Properly dropping ![]() Infested Ground void zones, be it from
Infested Ground void zones, be it from
![]() Rot or
Rot or ![]() Volatile Rot is hugely important. Typically, you do not
want these void zones to be dropped randomly at the back of the room. You want
dropped towards the edge of the room, as close to each other as possible and in
a sort of line from the edge of the room to the boss. When a line is
full, make a new one next to it. The goal is to keep 1/4 of the room
free of poison zones. This way, when Nythendra enters Phase Two and starts
sucking them in, there will be a whole safe area for the raid to stand.
Volatile Rot is hugely important. Typically, you do not
want these void zones to be dropped randomly at the back of the room. You want
dropped towards the edge of the room, as close to each other as possible and in
a sort of line from the edge of the room to the boss. When a line is
full, make a new one next to it. The goal is to keep 1/4 of the room
free of poison zones. This way, when Nythendra enters Phase Two and starts
sucking them in, there will be a whole safe area for the raid to stand.
Phase Two
Positioning

Once Nythendra transitions into Phase Two, the raid should spread out. Ideally, you will
have managed to leave one quarter of the room free of ![]() Infested Ground
poison zones and this is where the raid should stand. This way players will not have
to move to avoid the poison zones when they get sucked in by Nythendra.
Infested Ground
poison zones and this is where the raid should stand. This way players will not have
to move to avoid the poison zones when they get sucked in by Nythendra.
Note that if your raid do not manage to keep a quarter of the room free of Infested Ground, then each raid member simply needs to do their best to find a safe spot, where very few poison zones will pass when Nythendra sucks them in.
In any case, it is important to be spread out 8 yards to make it easier for
the raid to dodge ![]() Burst of Corruption.
Burst of Corruption.
Strategy
Even though there are very few mechanics in Phase Two, your raid will still
need to be mindful of ![]() Burst of Corruption and remain 8 yards away from
fellow raid members. Being spread out like this will greatly reduce the raid's
damage taken during Phase Two.
Burst of Corruption and remain 8 yards away from
fellow raid members. Being spread out like this will greatly reduce the raid's
damage taken during Phase Two.
The insects spawned in Phase Two are non targetable mobs and seem to have no rhyme or reason. They will cast Burst of Corruption three times before they are rendered inert. These can be at any location in the boss' room.
Note that taking damage from Burst of Corruption, or the puddles of Infested
Ground that are being sucked inward by the boss, will apply
![]() Infested to members of your raid.
Infested to members of your raid.
It is perfectly safe to stand on insects that are not bursting. Raid members who stand on them simply need to remember to move away if the insect they are standing on is starting to burst.
Healing
During Phase Two, the potential for incoming raid damage is a lot higher.
This of course is based on the raids ability to dodge the pools of
![]() Infested Ground being sucked into Nythendra, and
Infested Ground being sucked into Nythendra, and
![]() Burst of Corruption that explodes from swollen insects. Healing
cooldowns should be saved for this, seeing as damage in this phase has the
potential to get out of hand quite quickly.
Burst of Corruption that explodes from swollen insects. Healing
cooldowns should be saved for this, seeing as damage in this phase has the
potential to get out of hand quite quickly.
Bloodlust/Heroism
We recommend post-potting and popping ![]() Bloodlust/
Bloodlust/![]() Heroism
on the pull to shorten the fight or during a late Phase One, to help with healing,
as damage can ramp up quite significantly due to
Heroism
on the pull to shorten the fight or during a late Phase One, to help with healing,
as damage can ramp up quite significantly due to ![]() Rot being applied to more
and more players.
Rot being applied to more
and more players.
Changelog
- 04 Oct. 2016: Added a tip about standing on non-bursting insects during Phase Two.
- 23 Sep. 2016: Removed mention about the last beta test behaviour for Rot (it does indeed instantly deal damage now) and slightly updated strategy in that regard.
- 15 Sep. 2016: Added more details following pottm's review.