

Garothi Worldbreaker Mythic Strategy/Tactics

General Information
On this page, you will find a list of changes between Normal/Heroic modes and Mythic mode, as well as a working strategy to defeat Garothi Worldbreaker in Antorus, the Burning Throne in Mythic mode.
The other pages of our Garothi Worldbreaker guide can be accessed from the table of contents on the right.
Mythic Mode Abilities
Haywire
On Mythic difficulty, the Garothi Worldbreaker's weapons will be
empowered after they are destroyed, rather than having their mechanics removed
from the encounter. Haywire affects each weapon differently:
![]() Haywire (Decimator) and
Haywire (Decimator) and ![]() Haywire (Annihilator).
Haywire (Annihilator).
Annihilator
When the Annihilator is destroyed, it will empower
![]() Annihilation to strike twice. The first set of
Annihilation to strike twice. The first set of ![]() Annihilation
zones will appear and trigger as normal, however, they will also knock players
a significant distance, with the directional control being based on the center
of the Annihilation zone. After the first set triggers, a second set of
Annihilation zones will appear in the same location (with a slightly different
visual effect) and detonate several seconds later. Just like lesser
difficulties, Annihilation inflicts heavy Fire damage split between all targets
in the blast zone. Any zones that are not soaked, however, will inflict heavy
raid wide damage instead.
Annihilation
zones will appear and trigger as normal, however, they will also knock players
a significant distance, with the directional control being based on the center
of the Annihilation zone. After the first set triggers, a second set of
Annihilation zones will appear in the same location (with a slightly different
visual effect) and detonate several seconds later. Just like lesser
difficulties, Annihilation inflicts heavy Fire damage split between all targets
in the blast zone. Any zones that are not soaked, however, will inflict heavy
raid wide damage instead.
Decimator
When the ![]() Decimator is destroyed, it will empower
Decimator is destroyed, it will empower
![]() Decimation to stun its targets for several seconds. Decimation itself
will still function in an identical fashion, however, due to the stun the
targets will not have time to move and properly place the Decimation targeting
zones.
Decimation to stun its targets for several seconds. Decimation itself
will still function in an identical fashion, however, due to the stun the
targets will not have time to move and properly place the Decimation targeting
zones.
Luring Destruction
![]() Luring Destruction occurs immediately prior to every
Luring Destruction occurs immediately prior to every
![]() Eradication on Mythic difficulty. The boss draws in the entire raid
towards himself over 3 seconds, inflicting moderate Fire damage every second
while doing so. He will immediately cast Eradication when Luring Destruction
ends. It should be noted that
Eradication on Mythic difficulty. The boss draws in the entire raid
towards himself over 3 seconds, inflicting moderate Fire damage every second
while doing so. He will immediately cast Eradication when Luring Destruction
ends. It should be noted that ![]() Surging Fel does not take place during
Luring Destruction.
Surging Fel does not take place during
Luring Destruction.
Strategy
On Mythic difficulty, the fight is identical until the first cast of
![]() Apocalypse Drive, at 65% health. During this "transition" style phase
the raid should destroy the
Apocalypse Drive, at 65% health. During this "transition" style phase
the raid should destroy the ![]() Decimator first.
Decimator first. ![]() Surging Fel
will be taking place throughout this time and should always be avoided. As
soon as the weapon is destroyed the Surging Fel will dissipate, and the boss
will cast
Surging Fel
will be taking place throughout this time and should always be avoided. As
soon as the weapon is destroyed the Surging Fel will dissipate, and the boss
will cast ![]() Luring Destruction. All raiders must immediately evacuate
to the back of the room, using movement cooldowns to counteract the suction
effect of Luring Destruction. Failure to escape to the back third of the room
in time will likely result in instant lethal damage from the follow-up
Luring Destruction. All raiders must immediately evacuate
to the back of the room, using movement cooldowns to counteract the suction
effect of Luring Destruction. Failure to escape to the back third of the room
in time will likely result in instant lethal damage from the follow-up
![]() Eradication. A
Eradication. A ![]() Demonic Gateway from the boss to the back of
the room is the easiest and most efficient way of dealing with Luring
Destruction.
Demonic Gateway from the boss to the back of
the room is the easiest and most efficient way of dealing with Luring
Destruction.
![]() Decimation will now be empowered to stun its targets when it is
applied. This is very easy to deal with; the raid should place two world
markers in melee and two in ranged, about 15 yards apart, as shown in the image
below:
Decimation will now be empowered to stun its targets when it is
applied. This is very easy to deal with; the raid should place two world
markers in melee and two in ranged, about 15 yards apart, as shown in the image
below:
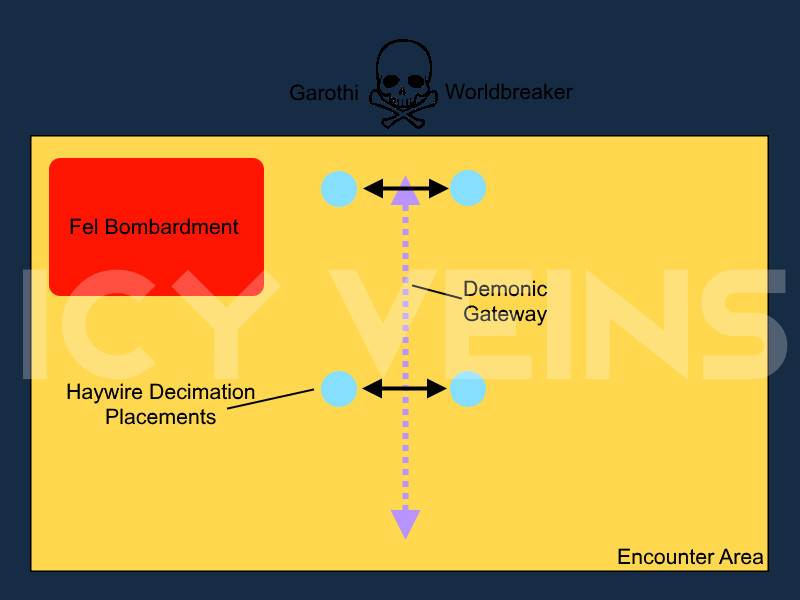
The melee and ranged will each stack on one of their markers. When
![]() Decimation is applied, all members will move immediately to their
opposite marker and re-stack. The targeted players that were stunned will have
a window to move before Decimation impacts.
Decimation is applied, all members will move immediately to their
opposite marker and re-stack. The targeted players that were stunned will have
a window to move before Decimation impacts. ![]() Annihilation is handled
normally in this phase, although the raid must be quick to restack on their
marker following soaks.
Annihilation is handled
normally in this phase, although the raid must be quick to restack on their
marker following soaks.
The second interval of ![]() Apocalypse Drive occurs at 25% health. When
the Annihilator is destroyed, all
Apocalypse Drive occurs at 25% health. When
the Annihilator is destroyed, all ![]() Annihilation zones must be
soaked twice, sequentially. Due to the addition of a knockback to the first
soak, the raid will only have a few seconds to soak the second set before they
detonate and wipe the raid. When soaking the first Annihilation casts, raiders
should position so that they are knocked towards other Annihilation zones that
they will be able to immediately soak upon landing. This final phase, from 25%
health to 0, is very hectic and personal cooldowns should be used liberally to
survive.
Annihilation zones must be
soaked twice, sequentially. Due to the addition of a knockback to the first
soak, the raid will only have a few seconds to soak the second set before they
detonate and wipe the raid. When soaking the first Annihilation casts, raiders
should position so that they are knocked towards other Annihilation zones that
they will be able to immediately soak upon landing. This final phase, from 25%
health to 0, is very hectic and personal cooldowns should be used liberally to
survive. ![]() Decimation is handled the same way as described above during
this final portion of the encounter.
Decimation is handled the same way as described above during
this final portion of the encounter.
Bloodlust/Heroism/Time Warp
For early kills, we recommend using ![]() Bloodlust/
Bloodlust/![]() Heroism
after the second cast of
Heroism
after the second cast of ![]() Eradication. The boss will be at 25% health,
and this represents the most chaotic and threatening portion of the encounter.
Adding the extra cooldown here will allow you to close out the fight as cleanly
and quickly as possible while bolstering healing to patch up any mistakes.
Eradication. The boss will be at 25% health,
and this represents the most chaotic and threatening portion of the encounter.
Adding the extra cooldown here will allow you to close out the fight as cleanly
and quickly as possible while bolstering healing to patch up any mistakes.
Changelog
- 18 Oct. 2017: Page added.