


Introduction
This guide is intended to provide a comprehensive description of the encounter with Spine of Deathwing in Dragon Soul. It is mostly targeted to DPS who desire to have a short but detailed overview of what is expected of them during that fight.
This guide is updated for World of Warcraft WoD 6.1.2.
The Spine of Deathwing encounter takes place on Deathwing's back, as he is flying through the air. During this fight, your raid will have to handle many types of adds, with the final goal being to remove three of Deathwing's armor plates.
For DPS players, the fight presents a higher degree of difficulty than for tanks or healers. DPS players will have to very precisely prioritise DPS on various types of adds, and execute a rather challenging DPS burn.
Overview of the Fight
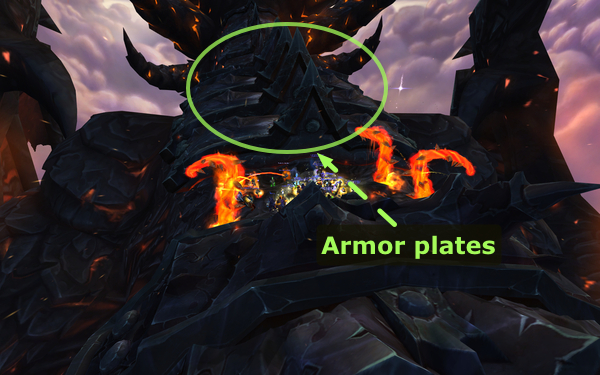 Spine of Deathwing is a single phase encounter that takes place on
Deathwing's back, as he is flying through the air. Your raid will need to
properly deal with several types of adds in order to pry up and remove
3 armor plates from Deathwing's back. The idea is to open a big enough
hole in Deathwing's armor, so as to give Thrall a clear shot with the Dragon
Soul.
Spine of Deathwing is a single phase encounter that takes place on
Deathwing's back, as he is flying through the air. Your raid will need to
properly deal with several types of adds in order to pry up and remove
3 armor plates from Deathwing's back. The idea is to open a big enough
hole in Deathwing's armor, so as to give Thrall a clear shot with the Dragon
Soul.
The armor plates can only be removed sequentially, as removing one enables the raid to reach the next one. This causes the fight to become increasingly harder, as the number of adds you need to deal with increases after an armor plate has been removed.
Adds
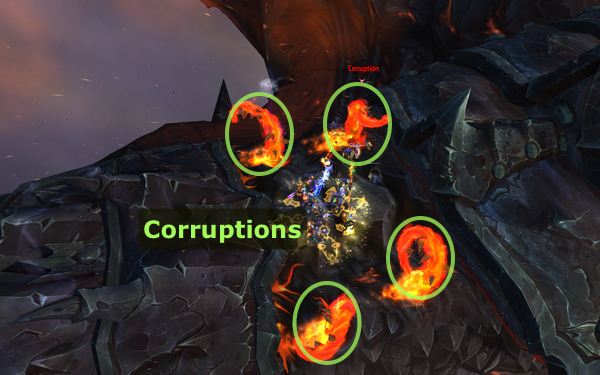
You will be faced with 4 types of adds.
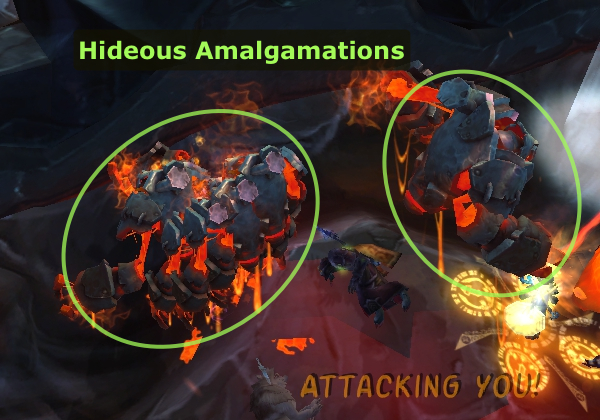
Initially, there are 4 Corruptions. Each armor plate that you remove gives room to 2 more Corruptions. There will always be at least one Corruption up: even if you kill them all, a new one will automatically respawn. When you kill a Corruption, it leaves a hole behind, out of which 1 Hideous Amalgamation and 1 Corrupted Blood appear.
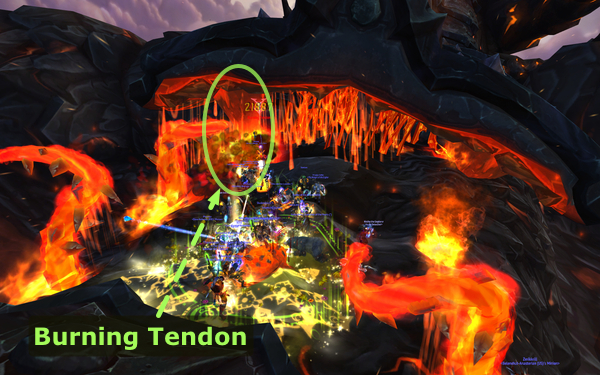
When you kill a Corrupted Blood, it respawns after a few seconds and it leaves a puddle on the ground that gives a buff to the Hideous Amalgamation. The idea is to stack this buff 9 times, at which point the Amalgamation should be killed. Doing so will cause the Amalgamation to pry up the closest armor plate, exposing a Burning Tendons.
If you successfully kill the Burning Tendon in the next 23 seconds, the armor plate will be successfully removed, otherwise you need to finish it off after prying up the armor plate again.

Strategy
For this encounter, you basically need to do whatever the raid leader asks you to.
LFR Strategy
In LFR difficulty, the Corruptions are harmless, so the fight will most likely be a repetition of these steps:
- Kill a Corruption.
- Stack Corrupted Blood 9 times on the Hideous Amalgamation.
- Kill the Amalgamation near the armor plate.
- Kill the Burning Tendons.
10-man/25-man Strategy
In 10-man and 25-man difficulties, the Corruptions are not harmless and your raid will need to dispose of them. Therefore, the fight will look like this:
- Kill all the Corruptions.
- Do a Barrel Roll to get rid of the Hideous Amalgamations.
- Kill the Corruption that respawned.
- Stack Corrupted Blood 9 times on the Hideous Amalgamation.
- Kill the Amalgamation near the armor plate.
- Kill the Burning Tendons.
Corruptions regularly grasp players and channel a damaging spell at them. To break the channel, a Corruption must be damaged for 20% of its life. Since there will always be at least one Corruption alive, a group of players will be designated to break the channel(s).
If you are assigned to this task,
you should have a means of checking when the Corruption channels this ability
(![]() Fiery Grip), either through boss mods, raid-frame debuffs or simply
looking at the Corruption.
Fiery Grip), either through boss mods, raid-frame debuffs or simply
looking at the Corruption.
Also, you will have to occasionally move into one of the void zones located on the sides of Deathwing's back. This causes Deathwing to perform a Barrel Roll, removing all the Hideous Amalgamations from his back. Your raid leader will instruct you when to do this, and which void zone to go to (simply follow the rest of the raid).
Superheated Nucleus and Nuclear Blast
Once the Amalgamation has 9 stacks of ![]() Absorbed Blood, it will start
pulsating
Absorbed Blood, it will start
pulsating ![]() Superheated Nucleus. When the Amalgamation
dies, it casts
Superheated Nucleus. When the Amalgamation
dies, it casts ![]() Nuclear Blast. Everyone has a few seconds to get away from
it. Failing to do so will result in certain death.
Nuclear Blast. Everyone has a few seconds to get away from
it. Failing to do so will result in certain death.
Cooldown Usage
In total, there are 3 Burning Tendons to kill and you want to kill
each of them on the first try. Therefore, you will need to wisely use your
cooldowns so that you can distribute your burst damage evenly among all
tendons. For example, if you have ![]() Bloodlust/
Bloodlust/![]() Heroism/
Heroism/![]() Time Warp
for the first tendon, you can save your main cooldowns for the second tendon
and your potion for the last tendon.
Time Warp
for the first tendon, you can save your main cooldowns for the second tendon
and your potion for the last tendon.
Heroic Mode
The Heroic mode of the Spine of Deathwing encounter will test your raid's burst DPS capabilities above all else. From a tactical point of view, the fight is not complicated and most of the differences from Normal mode are not relevant to your role.
Differences from Normal Mode
The health of all enemies in the encounter is increased. Additionally, all abilities deal more damage.
The most important health increase is that of the Burning Tendons. Their health is now so high that each Tendon will have to be exposed twice (at the expense of two Hideous Amalgamations) in order to be killed, and even this task will require a high amount of DPS.
Strategy
The strategy for the Heroic mode of the encounter does not change very much for you as a DPS player. The only thing that is important to understand is that there is a very brutal DPS check involved in killing the Burning Tendons. The Tendons are exposed for a total of 18 seconds each time, so you must make sure that you are able to maximise your DPS output over that short time-frame. Your goal is to deal more than 50% of the tendons' health over 18 seconds each time.
In order to fine-tune your burst DPS, you can use a training dummy in one of your capital cities and time yourself over repeated 18 second periods in order to see which spell rotation and cooldown usage is best. Keep in mind that for such a short amount of time, it may prove beneficial to stray from your usual rotation quite a lot.
Lastly, it is worth noting the value of the Valor Point trinkets (Bottled Wishes, Kiroptyric Sigil and Rotting Skull). These trinkets have very powerful on-use effects that are available for each exposed tendon phase.