


Introduction
This guide is intended to provide a comprehensive description of the encounter with Morchok in Dragon Soul. It is mostly targeted to DPS who desire to have a short but detailed overview of what is expected of them during that fight.
This guide is updated for World of Warcraft WoD 6.1.2.
The Morchok encounter is extremely simple and easy to understand for DPS players. The fight will only require them to, sometimes, move close to an object that the boss spawns, in order to soak the damage, and to take cover behind some pillars in order to avoid damage.
The fight does not require a high amount of DPS, and it is quite lenient overall.
Overview of the Fight
 Morchok is a relatively simple encounter made up of two alternating
phases.
Morchok is a relatively simple encounter made up of two alternating
phases.
The Crystal Phase, which lasts approximately 1 minute,
is a tank and spank phase during which a few DPS players or healers need to soak the
 proximity damage done by crystals that the boss summons.
The Black Blood Phase, which lasts approximately 30 seconds, requires everyone to hide behind pillars of stone (created during the encounter) to avoid being hit by the Black Blood flowing out from Morchok.
Crystal Phase
 The main difficulty of the Crystal Phase is to deal with
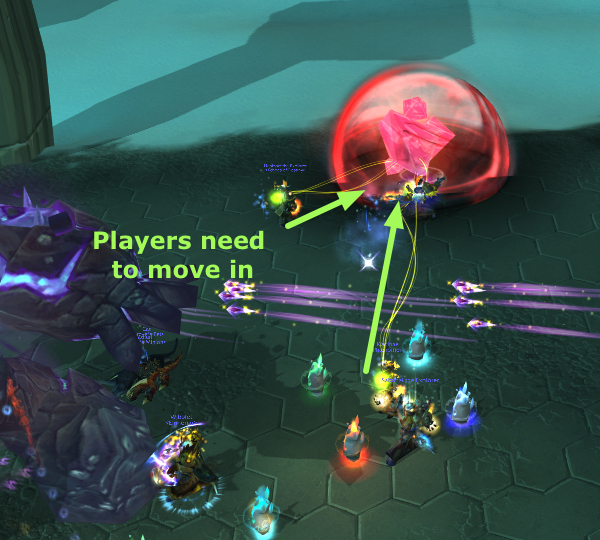
![]() Resonating Crystal. Every 15 seconds (3 times per Crystal Phase),
a number of players (DPS and healers alike) will be linked to a red
crystal. The crystal explodes after 12 seconds, dealing damage to these
players, depending on how close to the crystal they are.
Resonating Crystal. Every 15 seconds (3 times per Crystal Phase),
a number of players (DPS and healers alike) will be linked to a red
crystal. The crystal explodes after 12 seconds, dealing damage to these
players, depending on how close to the crystal they are.
When a new crystal spawns, if you are linked to it, simply stack on the crystal with the other linked players. Alternatively, another player can cover for you, as the links target the players closest to the crystal.
The second thing to keep in mind is to remain within 25 yards of Morchok,
as he deals split damage to the raid with ![]() Stomp.
Stomp.
Black Blood Phase
 During this entire phase, Morchok is immobile. After 30 seconds, the boss returns to the Crystal Phase.
 He will begin the phase by pulling the entire raid to him before channeling
![]() Black Blood of the Earth. This ability causes Black Blood to flow outwards
of him, dealing heavy damage to anyone standing in it.
Black Blood of the Earth. This ability causes Black Blood to flow outwards
of him, dealing heavy damage to anyone standing in it.
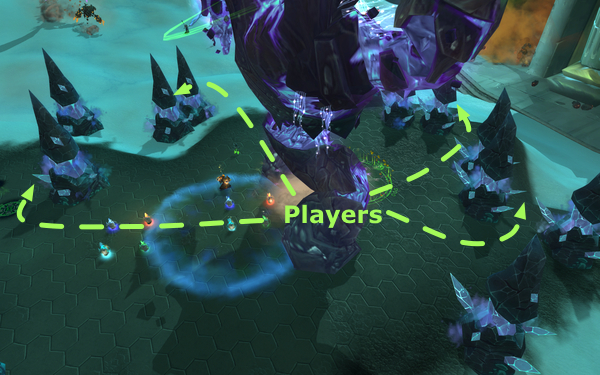
As soon as you are free to move (after being pulled by Morchok), hide behind one of the stone pillars that appeared when the phase started.
 Once behind a stone pillar, simply stay there until the end of the phase
(approximately 25 seconds). Note that ranged DPS should aim at hiding between
2 adjacent pillars as the boss is still in line of sight when players are
standing between the 2 pillars. This trick enables ranged DPS to continue
DPS-ing the boss during the entire phase.
Once behind a stone pillar, simply stay there until the end of the phase
(approximately 25 seconds). Note that ranged DPS should aim at hiding between
2 adjacent pillars as the boss is still in line of sight when players are
standing between the 2 pillars. This trick enables ranged DPS to continue
DPS-ing the boss during the entire phase.
Heroic Mode
As a DPS player, the encounter against heroic Morchok is quite stressful and requires not only good positioning (and movement), but also a high amount of DPS.
Differences from Normal Mode
The differences between normal and heroic Morchok are simple.
- At 90% health, Morchok splits himself in two, and your raid has to fight both Morchoks at the same time (the other boss is called Kohcrom).
- Both bosses use the same abilities as Morchok does in normal mode, with the same frequency and in the same way.
- Morchok and Kohcrom have separate health pools, but every time you deal damage to one of them, both bosses take an equal share of damage (as was the case with Rhyolith's legs in Firelands).
In addition to this, the bosses have more health, melee the tanks for more, and all of their abilities deal more damage.
Strategy
Until the boss reaches 90% health, you should be within 25 yards of him,
to soak the damage from ![]() Stomp and simply DPS him. At 90%, the
actual heroic mode begins.
Stomp and simply DPS him. At 90%, the
actual heroic mode begins.
Your raid leader will split the raid into two balanced groups, one for each of the two bosses (Morchok and Kohcrom). Once the boss reaches 90% health and splits in two, simply go to the side where you were assigned. The bosses will be tanked very far apart from one another, effectively meaning that the two groups of your raid will play independently from one another. After the split, Morchok will normally be on the right, and Kohcrom on the left.
Crystal Phase
The difficulty of the Heroic version of the fight lays in properly handling the Crystal Phase (as the Black Blood Phase remains the same). Your strategy in this phase will involve attacking your boss while performing the following tasks.
- Always be within 25 yards of your boss, in order to soak the damage from
 Stomp;
 - If you are assigned to soak the
 Resonating Crystal (you almost
certainly will be), move on top of it each time it spawns and wait until
it explodes.
Resonating Crystal (you almost
certainly will be), move on top of it each time it spawns and wait until
it explodes.
If you are a plate-wearing DPS player, a Rogue, a Balance Druid or a Fire Mage, you may be asked to perform the role of "Stomp soaker". The damage from Stomp damage is split between all players within 25 yards of the boss, but the tank and the player closest to the tank take a double share of damage. If you are assigned to being the closest player to the tank, then you need to make sure to survive the massive damage you will receive from Stomp each time.
As a plate DPS, your larger-than-average health pool will protect you,
but you can choose to also use other cooldowns occasionally, when your health
is low (![]() Icebound Fortitude for Death Knights,
Icebound Fortitude for Death Knights, ![]() Divine Protection for
Paladins and
Divine Protection for
Paladins and ![]() Shield Wall for Warriors). As a Rogue, you can use
Shield Wall for Warriors). As a Rogue, you can use
![]() Feint for each and every Stomp. As a Balance Druid, the damage you take
will be low thanks to the innate damage reduction and armor granted by
Feint for each and every Stomp. As a Balance Druid, the damage you take
will be low thanks to the innate damage reduction and armor granted by
![]() Moonkin Form, but you can also use
Moonkin Form, but you can also use ![]() Barkskin when needed. As a
Mage, you must rely on
Barkskin when needed. As a
Mage, you must rely on ![]() Cauterize (remember that it has a 2-minute
cooldown, so you cannot soak every Stomp).
Cauterize (remember that it has a 2-minute
cooldown, so you cannot soak every Stomp).
If you are one of the players designated to handle Resonating Crystal, there is one other exceptional situation that can occur and of which you need be aware. If, for any reason, the tank does not have the boss within 25 yards of the crystal, you will have to wait in range of the Stomp until it goes off, after which you must quickly rush over to the crystal to soak its damage (you will have about 5-6 seconds to do this).
Black Blood Phase
The Black Blood Phase is not changed at all from normal mode. Each of the two bosses will perform their own Black Blood Phase, summoning their own set of pillars and black blood. Simply treat as in normal mode.
Keep in mind that the DPS requirement for this fight is high, and as a result, if you are a ranged DPS player, it is very important to try to position yourself behind a pair of pillars so that you can continue attacking the boss during this phase.