

Halls of Valor Dungeon Guide: Location, Boss Strategies, Trash, and Loot
Welcome to our guide to the Halls of Valor dungeon in Season 1 of the Dragonflight World of Warcraft expansion. This guide will cover everything you need to know about the dungeon, including how to get to it, its layout, the trash and boss mechanics within, and its loot.
Getting into Halls of Valor
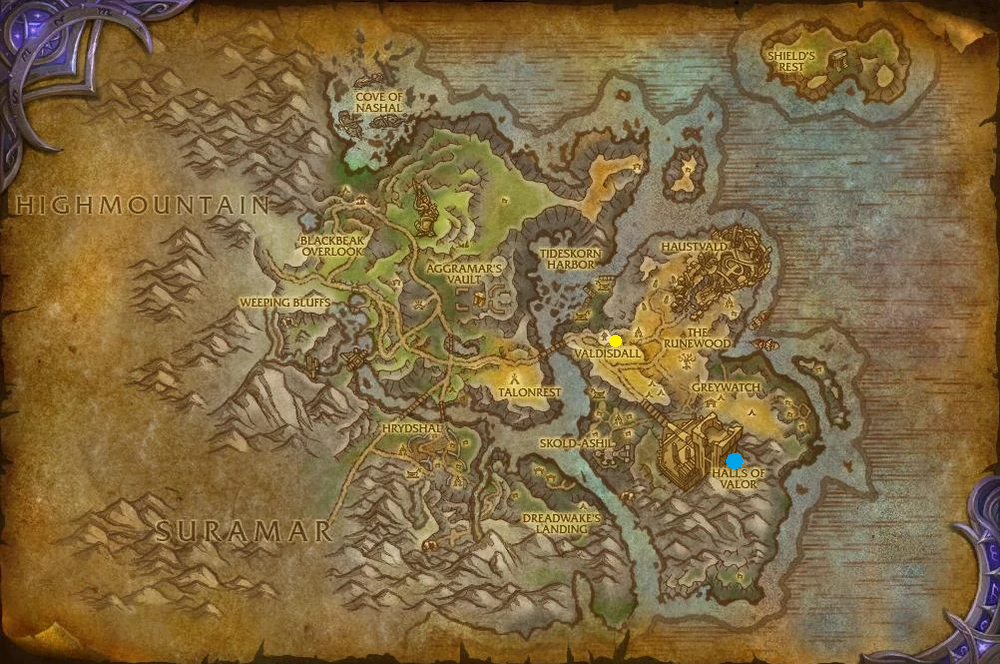
Halls of Valor is a level 70 dungeon located on the east coast of - Stormheim, Broken Isles. The nearest flight point for Alliance and Horde players is Valdisdall, Stormheim. Upon landing, head further to the east until you uncover the dungeon's entrance.
This guide will focus on an extensive overview of the dungeon, providing vital information
to complete it on ![]() Mythic and Mythic Keystone difficulty. We will cover all 5 boss
fights supported by the most notable trash enemies in the
dungeon and their important abilities. If you would like to learn about the other
Dragonflight Dungeons or the Mythic+ season instead; please see our
overviews linked below. Otherwise, without further ado, let us begin!
Mythic and Mythic Keystone difficulty. We will cover all 5 boss
fights supported by the most notable trash enemies in the
dungeon and their important abilities. If you would like to learn about the other
Dragonflight Dungeons or the Mythic+ season instead; please see our
overviews linked below. Otherwise, without further ado, let us begin!
Unlock Unique Bonuses in Halls of Valor
There are going to be 2 bonuses in this dungeon. The first being
![]() Odyn's Favor and the second one —
Odyn's Favor and the second one — ![]() Odyn's Blessing. You can find
more details on how to obtain them and what their effect is down below:
Odyn's Blessing. You can find
more details on how to obtain them and what their effect is down below:
 Odyn's Favor is the first buff you will automatically obtain
as soon as you defeat either Hyrja or Fenryr. It will grant
your group 75% movement speed for the remaining dungeon, both
in and outside of combat.
Odyn's Favor is the first buff you will automatically obtain
as soon as you defeat either Hyrja or Fenryr. It will grant
your group 75% movement speed for the remaining dungeon, both
in and outside of combat.- You will receive
 Odyn's Blessing after you have defeat Hyrja
and Fenryr. The buff will grant you 150% movement speed for the
remaining of the dungeon, replacing the Odyn's Favor.
Odyn's Blessing after you have defeat Hyrja
and Fenryr. The buff will grant you 150% movement speed for the
remaining of the dungeon, replacing the Odyn's Favor.
The High Gate and Hymdall
Notable Trash Before Hymdall
- Your tank must pay attention to Valarjar Champion's
 Power Attack;
several of those mobs can cause trouble. Once the mob drops under 30%
health, he will cast
Power Attack;
several of those mobs can cause trouble. Once the mob drops under 30%
health, he will cast  Enraged Regeneration (usable once per combat).
 - Focus on Valarjar Thundercaller, as he is the most dangerous mob
in this area because of his
 Thunderstrike cast (goes on a random player).
In addition, use your interrupt for
Thunderstrike cast (goes on a random player).
In addition, use your interrupt for  Thunderous Bolt.
 - Avoid the
 Crackling Storm ground animation from Stormdrake, as
well as, its frontal ability —
Crackling Storm ground animation from Stormdrake, as
well as, its frontal ability —  Lightning Breath.
Hymdall Boss Guide
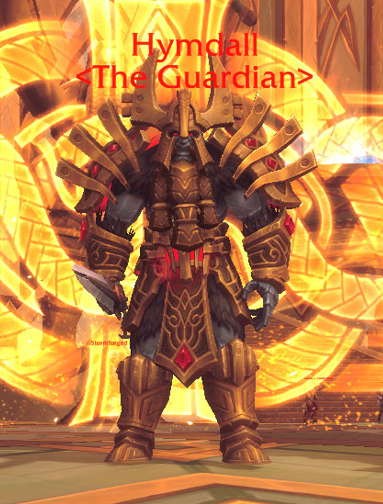
All Roles
- Avoid being hit by
 Dancing Blade.
 - Once
 Horn of Valor has been cast, look around for any
Storm Drake. Avoid the follow-up Static Field and the
newly spawned
Horn of Valor has been cast, look around for any
Storm Drake. Avoid the follow-up Static Field and the
newly spawned  Ball Lightning.
Tank
- Use active mitigation on Bloodletting Sweep cast, the follow up
 Bleed effect is tough.
 - Upon Hymdall casting Horn of Valor move the boss in
a safe zone.
Healer
- Spot-heal your tank as soon as they get hit by Bloodletting Sweep.
Seat of Ascension and Hyrja
Notable Trash Before Hyrja
Once you defeat Hymdall, you will have a choice between going to the left
(facing Hyrja) or going to the right side (facing Fenryr). We recommend you
go towards the left side first since you will be able to use the 2nd ![]() Bloodlust of the
dungeon on Fenryr.
Bloodlust of the
dungeon on Fenryr.
A quick heads up; you can also find Mug of Mead, located on several tables in the main hall. The mug of ale will distract the mobs, and you can bypass them without being in combat. This a good tip if you want to skip some extra trash mobs without using Invisibility Potions. Below you can find more information on the mobs in this area:
- Valarjar Runecarver is going to be one of the primary targets to interrupt,
especially its
 Etch cast. The mob will also cast
  Shattered Rune
to random targets, so it is essential to defeat them as quickly as possible.
Shattered Rune
to random targets, so it is essential to defeat them as quickly as possible. - Valarjar Mystic is the most important mob here because of its
healing ability
 Holy Radiance; stop this at all costs. In addition, he will
cast
Holy Radiance; stop this at all costs. In addition, he will
cast  Rune of Healing, do your best never to let the mobs stand in it
(the effect works for you too).
Rune of Healing, do your best never to let the mobs stand in it
(the effect works for you too). - Your tank must pay attention to Valarjar Shieldmaiden's
 Breach Armor
stacking debuff effect that reduces the armor. Make sure you do not stay in front of the mob
because of its
Breach Armor
stacking debuff effect that reduces the armor. Make sure you do not stay in front of the mob
because of its  Mortal Hew frontal cleave; it will also apply 10% reduced
healing debuff, further endangering your tank's life.
Mortal Hew frontal cleave; it will also apply 10% reduced
healing debuff, further endangering your tank's life. - Avoid Stormforged Sentinel's
 Charged Pulse, anyone within
15 yard of the cast will get damaged. Sidestep any incoming
Charged Pulse, anyone within
15 yard of the cast will get damaged. Sidestep any incoming  Crackles
and purge the
Crackles
and purge the  Protective Light once the mob drops below 30% health.
 - Valarjar Purifier is the least dangerous caster mob; either side step
the ground puddles from
 Cleansing Flames or interrupt it.
 - Avoid Valarjar Aspirant's
 Blast of Light; the frontal is likely to
one-shot you depending on the key level. In addition, the mob will occasionally cast
Blast of Light; the frontal is likely to
one-shot you depending on the key level. In addition, the mob will occasionally cast
 Valkyra's Advance, leaping to a random enemy, your healer must make sure each
of you is in a healthy condition!
Valkyra's Advance, leaping to a random enemy, your healer must make sure each
of you is in a healthy condition!
You need to defeat the 2 mini-bosses located in front of Hyrja, before she becomes available to be attacked. Here is what you should know about them:
- Solsten will test the limits of your healer because of
 Eye of the Storm
doing damage to everyone around. Stand within the lighting zone to reduce incoming
damage. In addition, Solsten will occasionally cast
Eye of the Storm
doing damage to everyone around. Stand within the lighting zone to reduce incoming
damage. In addition, Solsten will occasionally cast  Arcing Bolt, further
increasing the difficulty of the already tough encounter.
Arcing Bolt, further
increasing the difficulty of the already tough encounter. - Olmyr the Enlightened is the easier of the two mini-bosses; all you have to do
is make sure you stand outside of melee and avoid getting hit by the lighting
orbs —
 Sanctify while interrupting its
  Searing Light cast.
Hyrja Boss Guide
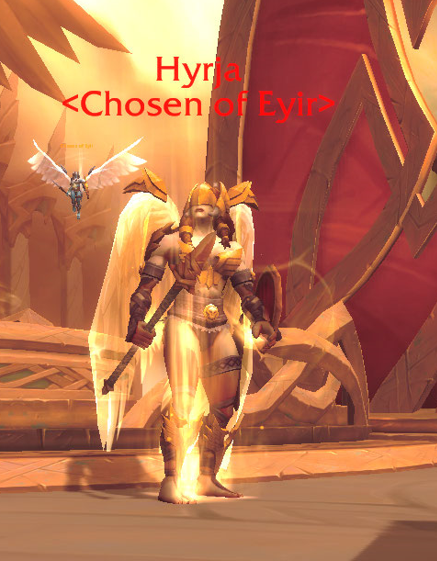
This will be one of the most HPS-intensive boss fights across all dungeons, so pay attention. The boss's abilities will vary depending on her " phase. " Hyrja has 2 phases: Mystic Empowerment: Thunder (same abilities like Solsten) and Mystic Empowerment: Holy (same abilities as Olmyr the Enlightened). How do you trigger them? If you stay more towards where previously Solsten was located, you will trigger the Mystic Empowerment: Thunder phase and if you stay more to where Olmyr the Enlightened was previously located, you will trigger Mystic Empowerment: Holy. In addition, the boss will gain stacks which will amplify the current Empowerment phase, hence why you want to avoid having back-to-back phases of the same Empowerment. Here is a more detailed breakdown of the fight:
All Roles
- Stay under the Lighting Shield once Hyrja in casting
Eye of the Storm during her Mystic Empowerment: Thunder phase.
- Avoid being stacked at all times due to Arcing Bolt, only stack
under the Lighting Shield for Eye of the Storm cast.
- Avoid being hit by the
 Shield of Light frontal.
 - Dodge the incoming Sanctify orbs when Hyrja is under
the Mystic Empowerment: Holy.
- Beware of
 Expel Light; it will always go on a random target,
followed by bouncing to the nearest target upon expiring. Swap
between each other when you have defensive cooldowns, and avoid
bouncing the debuff back to the original recipient.
Expel Light; it will always go on a random target,
followed by bouncing to the nearest target upon expiring. Swap
between each other when you have defensive cooldowns, and avoid
bouncing the debuff back to the original recipient.
Tank
- Never tank Hyrja in the middle since you will simultaneously get both Mystic Empowerment effects.
- You want to swap between Mystic Empowerments and rarely do the same one twice in a row unless your healer is confident they can handle it.
Healer
- Use healing cooldowns once Hyrja is casting Eye of the Storm
during her Mystic Empowerment: Thunder phase.
- Top up players that have Expel Light on them.
Field of the Eternal Hunt and Fenryr
Notable Trash Before Fenryr
Upon defeating Hyrja, head towards the right wing of The High Gate, where you will find Fenryr. There are several new mob types here that you should pay attention to:
- Valarjar Marksman is one of the static mobs in this dungeon,
they will keep casting
 Snap Shot to random targets, jump out of melee
with
Snap Shot to random targets, jump out of melee
with  Leap to Safety and having an extremely hard-hitting frontal cone
ability —
Leap to Safety and having an extremely hard-hitting frontal cone
ability —  Penetrating Shot (avoid it at all costs!). This is the mob
you want to focus on!
Penetrating Shot (avoid it at all costs!). This is the mob
you want to focus on! - Try to avoid pulling Angerhoof Bull, but if you do pull them, make sure
you step away from the
 Rumbling Stomp and dispel their
 Enrage ability.
 - Once you are in this area, you want to clear Steeljaw Grizzly; they are
quite easy to kill since the only dangerous ability they have is
 Crunch Armor.
They will occasionally cast
Crunch Armor.
They will occasionally cast  Rending Claws on the highest threat target and
  Charge
the first enemy they get threats on. It will mostly be tank damage, so always watch out for
your tank's health at all costs.
Charge
the first enemy they get threats on. It will mostly be tank damage, so always watch out for
your tank's health at all costs. - At last, the most dangerous mob in this area is Ebonclaw Worg because
of their
 Leap for the Throat, cast on random targets. Do your best to stack together
and use defensives if you are not at full health.
Leap for the Throat, cast on random targets. Do your best to stack together
and use defensives if you are not at full health.
Fenryr Boss Guide
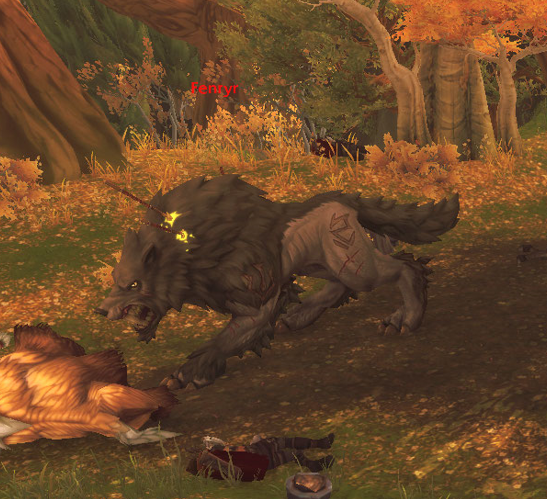
Fenryr is a 2 phases boss fight that will have flexible spawn each
time you enter the dungeon. There are two locations he can be: South, in a bear den, or West,
near the hunter's camp. You can quickly determine which location he is in by following the footprints
on the ground. Once you engage the boss, you can down him to 60%, upon which he will
retreat to his den and begin casting ![]() Licking Wounds, ending Phase One. One important note
is that the boss's abilities remain the same throughout both phases. Below you can find more
information about the fight:
Licking Wounds, ending Phase One. One important note
is that the boss's abilities remain the same throughout both phases. Below you can find more
information about the fight:
All Roles
- Be stacked at all times under the boss, in both phases, because of
 Claw Frenzy. The
ability does physical damage split between all enemies within 12 yards. The more target
it hits, the less damage each of you will take (because of damage distribution).
Claw Frenzy. The
ability does physical damage split between all enemies within 12 yards. The more target
it hits, the less damage each of you will take (because of damage distribution). - Watch out for
 Unnerving Howl, it will interrupt your cast.
 - Once Fenryr summons its 3 Ebonclaw Worg, quickly focus them to prevent further damage from them.
- Never let Fenryr catch you during his
 Scent of Blood chase.
Using your combat-resetting abilities will completely cancel the cast
(Example: Hunter's
Scent of Blood chase.
Using your combat-resetting abilities will completely cancel the cast
(Example: Hunter's  Feign Death).
 - Once you get targeted by the
 Ravenous Leap, get out of melee so you do not
cleave any nearby member of your team. Remember, once the boss leaps on you; he will leave
permanent Bleed effect that stacks every time he casts Ravenous Leap
on you.
Ravenous Leap, get out of melee so you do not
cleave any nearby member of your team. Remember, once the boss leaps on you; he will leave
permanent Bleed effect that stacks every time he casts Ravenous Leap
on you.
Tank
- Make sure you stack the Ebonclaw Worg on top of Fenryr to allow your DPS players to cleave all targets simultaneously.
Healer
- Top up players once they get hit by the Claw Frenzy ability.
- Use healing cooldowns once to out-heal the Bleed effect from
Ravenous Leap.
Halls of Valor and God-King Skovald
Notable Trash Before God-King Skovald
Once you defeat Fenryr, you will gain ![]() Odyn's Blessing buff,
which will allow you to move toward the final part of the dungeon quickly,
where you will face the second-to-last boss God-King Skovald.
However, before the boss becomes active, you must first face the 4 Kings:
King Tor, King Ranulf, King Bjorn and King Haldor.
You can activate them in whichever order you prefer; however, keep in mind that
after you defeat a king, the rest will inherit its unique ability.
When you slay 2 of them, the final 2 will be active, and you will fight them
simultaneously. We advise you to choose King Ranulf first, followed by King Haldor,
and at last, both King Bjorn and King Tor. Here is more information
about each of them:
Odyn's Blessing buff,
which will allow you to move toward the final part of the dungeon quickly,
where you will face the second-to-last boss God-King Skovald.
However, before the boss becomes active, you must first face the 4 Kings:
King Tor, King Ranulf, King Bjorn and King Haldor.
You can activate them in whichever order you prefer; however, keep in mind that
after you defeat a king, the rest will inherit its unique ability.
When you slay 2 of them, the final 2 will be active, and you will fight them
simultaneously. We advise you to choose King Ranulf first, followed by King Haldor,
and at last, both King Bjorn and King Tor. Here is more information
about each of them:
- Interrupt King Ranulf's signature ability —
 Unruly Yell. Other than that,
he will auto-attack your tank.
Unruly Yell. Other than that,
he will auto-attack your tank. - King Haldor signature ability is
 Sever, cast on the highest
threat target (your tank).
Sever, cast on the highest
threat target (your tank). - King Bjorn will throw its
 Wicked Dagger to a random target, dealing
initial damage and leaving a 50% reduced healing effect, leaving
him as the toughest King to deal with due to the unavoidable damage.
Wicked Dagger to a random target, dealing
initial damage and leaving a 50% reduced healing effect, leaving
him as the toughest King to deal with due to the unavoidable damage. - At last, you have King Tor; you always want to defeat this at the end.
Otherwise, you risk transferring its signature ability —
 Call Ancestor to
all of his pairs. Use crowd-control effects once he spawns the ancestor to prevent
him from healing.
Call Ancestor to
all of his pairs. Use crowd-control effects once he spawns the ancestor to prevent
him from healing.
God-King Skovald Boss Guide
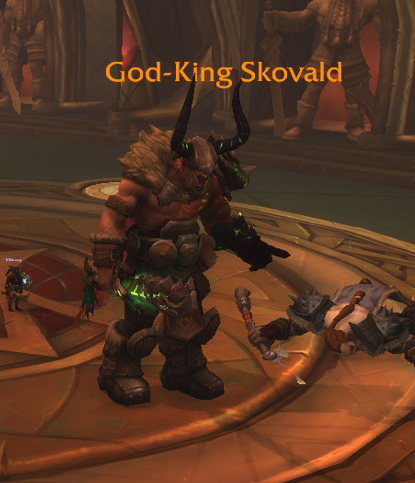
Once you have defeated the 4 Kings, Odyn will throw
![]() Aegis of Aggramar, when you pick it up, you will be using it during
God-King Skovald encounter. We recommend the tank to be the one
that has it since it helps with the team coordination and positioning better.
It is used when you interact with your extra action button (either keybind or click it).
Below you can find out how and when to use the Aegis of Aggramar, and what
are the specific details about the fight:
Aegis of Aggramar, when you pick it up, you will be using it during
God-King Skovald encounter. We recommend the tank to be the one
that has it since it helps with the team coordination and positioning better.
It is used when you interact with your extra action button (either keybind or click it).
Below you can find out how and when to use the Aegis of Aggramar, and what
are the specific details about the fight:
All Roles
- God-King Skovald will randomly target a player with
 Felblaze Rush,
the ability hits everyone within 6 yards of the impact, so make sure you do not
accidentally "clip" any allies if the charge is on you.
Felblaze Rush,
the ability hits everyone within 6 yards of the impact, so make sure you do not
accidentally "clip" any allies if the charge is on you. - During
 Ragnarok, stand behind the Aegis of Aggramar.
 - Kite away the Flame of Woe, as they will randomly fixate someone
from your party. Remember that they will eventually die due to
 Consuming Flame
and they leave a fire patch behind them —
Consuming Flame
and they leave a fire patch behind them —  Infernal Flames (step away from it!).
Tank
- When God-King Skovald is casting Ragnarok, use the
Aegis of Aggramar; it will absorb all the shield if players stand behind it.
- Using active mitigation when the boss is casting
 Savage Blade on you.
 - After Ragnarok, boss will pick up the Aegis of Aggramar and
use it himself, summoning Flame of Woe. It is important to tank the
boss closer to the Flame of Woe, so you enable your party to "cleave"
all targets simultaneously.
Healer
- Top the health of the player/s hit by Felblaze Rush.
- Quickly spot-heal any player that gets hit by Ragnarok,
it takes a few ticks for it to become lethal!
Halls of Valor and God-King Skovald
Odyn Boss Guide
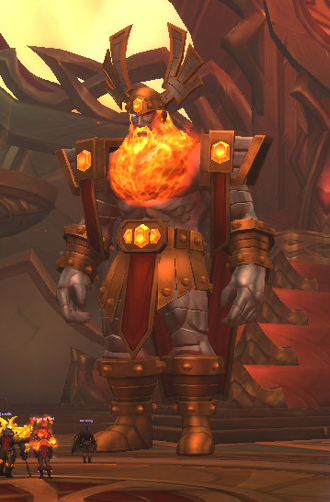
Once you defeat God-King Skovald, it will take a couple of seconds
until Odyn becomes available to be attacked.
Before you begin, you must understand how ![]() Runic Brand works. Once
the boss casts it, everyone in your party will receive a random branded sign, and upon
connecting it with the right rune on the ground (based on the color/markings), you will receive
Runic Brand works. Once
the boss casts it, everyone in your party will receive a random branded sign, and upon
connecting it with the right rune on the ground (based on the color/markings), you will receive
![]() Branded buff. Few important details about the boss fight: First, once you
take lethal damage, you will not be able to be combat-resurrected; you will instead be deemed
Branded buff. Few important details about the boss fight: First, once you
take lethal damage, you will not be able to be combat-resurrected; you will instead be deemed ![]() Unworthy and transported to a safe location,
unable to get back into the fight. Second, the boss fight ends once Odyn
reaches 80% health. More information is below:
Unworthy and transported to a safe location,
unable to get back into the fight. Second, the boss fight ends once Odyn
reaches 80% health. More information is below:
All Roles
- Once the boss casts Summon Stormforged Obliterator, focus the
Stormforged Obliterator and stop every cast of Surge you can
(stun also works).
- Avoid getting hit by the
 Spear of Light and its follow up ability -
 Glowing Fragment.
 - When Odyn casts Shatter Spears, try to have a healthy
distance from all Spear of Light before the cast goes off since it will
be much easier to avoid all the Glowing Fragments.
- Use movement speed abilities to get away from
 Radiant Tempest cast.
 - Once Odyn casts
 Runic Brand, find the rune matching your
- Upon Runic Brand cast, quickly navigate your way to connect the
branding on you towards the right rune on the ground. You can
either go by colors (which is much easier) or the shape of your rune.
- Using
 Bloodlust during the
  Branded buff is the best way to
speed up the fight.
Branded buff is the best way to
speed up the fight.
Tank
- Do your best to tank Stormforged Obliterator close to Odyn to enable your DPS to "cleave" both targets.
- Move the boss away from Spear of Lights, this way you will help your
team dodge the incoming Glowing Fragments easier!
Healer
- Top up players quickly if they get hit by Glowing Fragment, remember
if any players die during this encounter, they will be deemed
 Unworthy
and they will not be able to be resurrected until the encounter is over.
Unworthy
and they will not be able to be resurrected until the encounter is over.
Halls of Valor Loot Table
Hymdall
| Type | Item | Stats |
|---|---|---|
| Trinket | Vers | |
| Leather Wrist | Crit/Haste | |
| Cloth Feet | Mastery/Haste | |
| Plate Hands | Crit/Haste | |
| Mail Waist | Crit/Mastery |
Hyrja
| Type | Item | Stats |
|---|---|---|
| Ring | Crit/Mastery | |
| Leather Shoulder | Haste/Vers | |
| Plate Feet | Haste/Mastery | |
| Cloth Waist | Mastery/Vers | |
| Trinket | Mastery | |
| Mail Chest | Mastery/Haste |
Fenryr
| Type | Item | Stats |
|---|---|---|
| Neck | Mastery/Haste | |
| Back | Haste/Crit | |
| Leather Chest | Haste/Mastery | |
| Cloth Hands | Crit/Haste | |
| Plate Waist | Crit/Haste | |
| Trinket | Agi/Str Crit | |
| Mail Wrist | Haste/Crit |
God-King Skovald
| Type | Item | Stats |
|---|---|---|
| Ring | Mastery/Crit | |
| Trinket | Crit | |
| Leather Hands | Crit/Mastery | |
| Cloth Shoulder | Mastery/Haste | |
| Plate Legs | Crit/Mastery | |
| Mail Feet | Mastery/Crit |
Odyn
| Type | Item | Stats |
|---|---|---|
| Mail Head | Mastery/Haste | |
| Leather Head | Mastery/Haste | |
| Neck | Crit/Haste | |
| Plate Shoulder | Haste/Mastery | |
| Back | Vers/Mastery | |
| Mail Wrist | Crit/Vers | |
| Plate Wrist | Vers/Crit | |
| Leather Waist | Crit/Mastery | |
| Cloth Feet | Vers/Crit | |
| Trinket | Agi/Str Mastery |
Halls of Valor Achievements
There are 6 total achievements to obtain in Halls of Valor:
| Achievement | Criteria |
|---|---|
| Defeat Odyn in Halls of Valor. | |
| Defeat Odyn in Halls of Valor on |
|
| Defeat Odyn in Halls of Valor on |
|
| Defeat Odyn in Halls of Valor on |
|
| Complete Halls of Valor at |
|
| Splash all four vrykul kings with Mug of Mead in
Halls of Valor on |
Changelog
- 19 Dec. 2022: Guide added.