Welcome to our guide to The Nokhud Offensive dungeon in the Dragonflight World of Warcraft expansion. This guide will cover everything you need to know about the dungeon, including how to get to it, its layout, the trash and boss mechanics within, and its loot.
Getting into The Nokhud Offensive
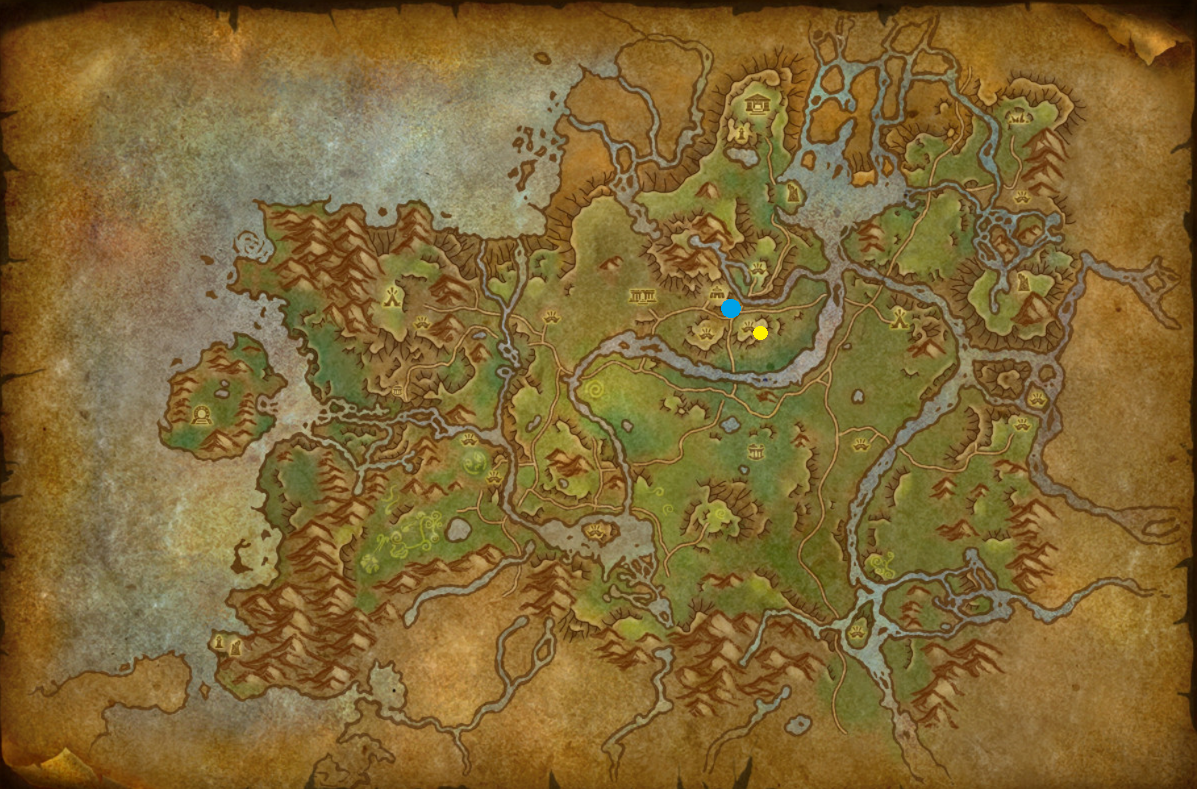
The Nokhud Offensive is a max-level dungeon located on the west coast of the Ohn'ahran Plains zone on the Dragon Isles. The nearest flight point for both Alliance and Horde players is Maruukai, Ohn'hran Plains, just a few feet south from the dungeon.
This guide will focus on an extensive overview of the dungeon, providing vital information
to complete it across all difficulties (Normal, ![]() Heroic,
and
Heroic,
and ![]() Mythic). We will cover all 4 boss fights supported by the most
notable trash enemies in the
dungeon and their important abilities. If you would like to learn about the other
Season 4 dungeons or the upcoming Mythic+ season instead, please see our
overviews linked below. Otherwise, without further ado, let us begin!
Mythic). We will cover all 4 boss fights supported by the most
notable trash enemies in the
dungeon and their important abilities. If you would like to learn about the other
Season 4 dungeons or the upcoming Mythic+ season instead, please see our
overviews linked below. Otherwise, without further ado, let us begin!
The Nokhud Offensive Layout
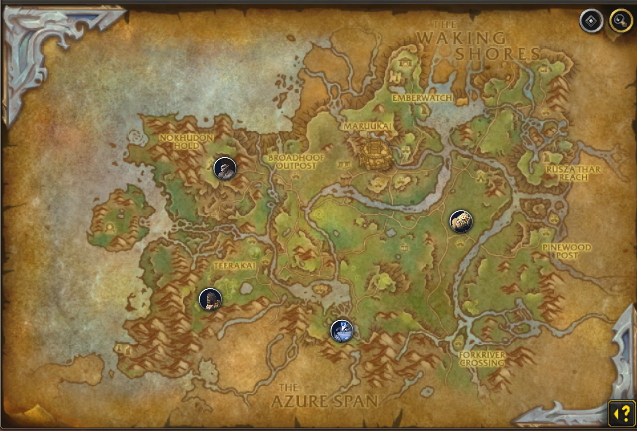
Boss Order in The Nokhud Offensive
This dungeon provides the flexibility to choose whichever boss you want to tackle first, with the only exception being Balakar Khan needing to be the last boss you engage. With that being said, a standard route for The Nokhud Offensive will be going from Granyth to The Raging Tempest, then Teera and Maruuk, before ending with Balakar Khan. However, there are no checkpoints in this dungeon, meaning if you die, you will be sent back to the entrance of the instance.
Dragonriding in The Nokhud Offensive
The Nokhud Offensive is the first dungeon of its kind that allows you to use a Dragonriding mount to travel from boss to boss. You are also able to use tornadoes, located throughout the whole map, to amplify your Dragonriding speed and travel faster. This detail is a part of the instance that will test your Dragonriding skills. The better you are, the faster you will be able to complete the dungeon. Finally, it is important to note that each of those "Tornadoes" has a pre-placed position. Knowing this, you can better plan your route leading to the boss of your choice.
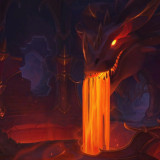
Field of Spears and Granyth
Notable Trash Before Granyth
Once you have entered the dungeon, you can hop on your Dragonriding mount of choice and head toward Granyth. However, you will not be able to engage the boss until you defeat the 3 Nokhud Lancemaster, upon which the boss is able to be attacked. There are also several other non-boss-enemies that you should pay attention to:
- Nokhud Longbow is one of the few static mobs in this dungeon.
You should pay attention to it because of its unavoidable damage
on random targets coming from
 Shoot. In addition, side-step
the
Shoot. In addition, side-step
the  Rain of Arrows ground animation.
 - Another important mob from this area is Nokhud Warspear,
with their important non-interruptible ability being
 Pierce.
The ability is cast on the highest-threat target (your tank) and applies a
stacking
Pierce.
The ability is cast on the highest-threat target (your tank) and applies a
stacking  Bleed effect. Be mindful of
  Swift Stab as it will usually
charge the furthest member of your party and apply Bleed effect upon
contact.
Swift Stab as it will usually
charge the furthest member of your party and apply Bleed effect upon
contact. - You can try to use Stun or Disruption effects to stop the
 Rally the Clan
coming from Nokhud Hornsounder, as this will make the surrounding mobs
gain 50% increased Physical damage done, making them much harder to deal with.
Rally the Clan
coming from Nokhud Hornsounder, as this will make the surrounding mobs
gain 50% increased Physical damage done, making them much harder to deal with. - Finally, you have the Nokhud Lancemaster; not only does he have the
most health, but it will also be important how your tank positions it because of
 Cleaving Strikes. Never stay in front of your tank. This is followed
by
Cleaving Strikes. Never stay in front of your tank. This is followed
by  War Stomp, which you must run out of melee to avoid being stunned by,
and
War Stomp, which you must run out of melee to avoid being stunned by,
and  Disruptive Shout, which must be interrupted at all cost or you
will end up "locked" out of spellcasting for 6 sec, in addition to taking
AoE Physical damage.
Disruptive Shout, which must be interrupted at all cost or you
will end up "locked" out of spellcasting for 6 sec, in addition to taking
AoE Physical damage.
Granyth Boss Guide
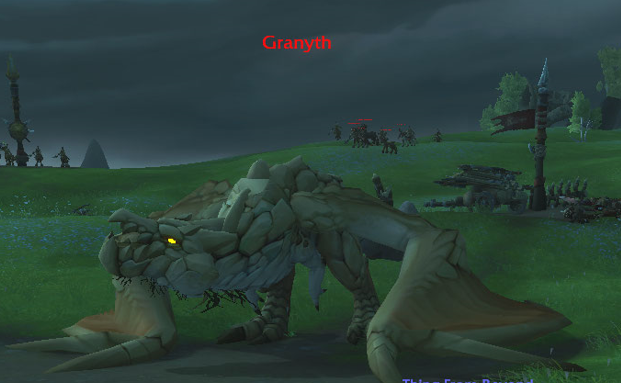
Upon Granyth reaching maximum Energy (100), it takes
around 27 sec to cast ![]() Eruption. The only way to stop
Eruption is to use
Eruption. The only way to stop
Eruption is to use ![]() Dragonkiller Lance before it wipes your team
because of its high AoE damage. Here are also a few important things to
know about the Dragonkiller Lance:
Dragonkiller Lance before it wipes your team
because of its high AoE damage. Here are also a few important things to
know about the Dragonkiller Lance:
-
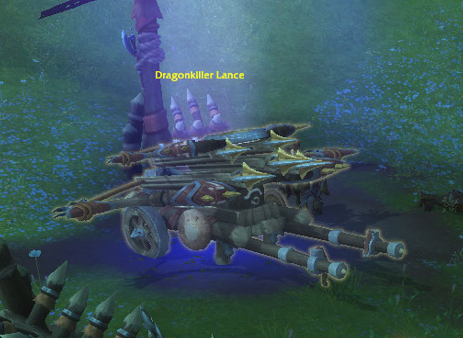 There are 3 different locations for
  Dragonkiller Lance
ballista.
Dragonkiller Lance
ballista. - The boss randomly activates one of the three Dragonkiller Lance
ballista a few seconds prior to
 Eruption cast.
 - You cannot shoot the Dragonkiller Lance before the boss activates them,
hence why you should always pre-assign a person to be ready to "click" on the lance.
- It is the only way to stop Eruption before it wipes your team.
- It stuns the boss for 5 sec and also removes 5% of its health.

All Roles
- Run away from
 Tectonic Stomp. Failing to do so will knock you away
and deal massive damage.
Tectonic Stomp. Failing to do so will knock you away
and deal massive damage. - Focus on killing the Nokhud Saboteur
at all cost to prevent them from casting
 Dismantle. Stun, disruption,
knockback, slow, and immobilize effects work on them.
Dismantle. Stun, disruption,
knockback, slow, and immobilize effects work on them.
Tank
- Move Granyth closer to the Nokhud Saboteur, allowing your team to "cleave" both targets and deal with them more quickly.
Healer
- Watch out for
 Shards of Stone; the unavoidable damage is not
to be underestimated.
Shards of Stone; the unavoidable damage is not
to be underestimated. - If an Eruption cast goes through, it will deal massive damage
to the entire party. Be ready with healing cooldowns in case you see a second
"tick" of the cast going through!
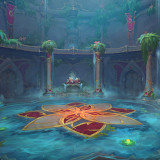
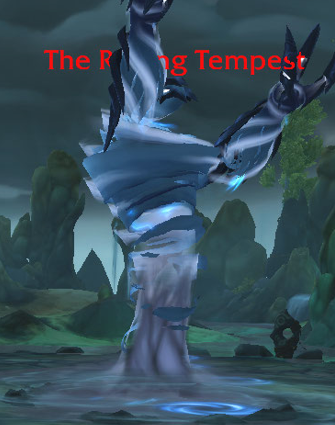
Ohn'iri Springs and The Raging Tempest
Notable Trash Before The Raging Tempest
Upon defeating Granyth, mount up and fly toward the second boss of the dungeon, The Raging Tempest. The boss will be immune to damage until you break the 4 Stormsurge Totems, located around the boss. Here are the most important non-boss-enemies you need to watch out for in this area:
- Stormcaller Boroo, Stormcaller Arynga, Stormcaller Solongo,
and StormcallerZarii are identical mobs with different names, spread across
all 4 packs of mobs that must be killed to spawn the boss. Watch out for
 Totemic Overload; it will do unavoidable AoE damage to everyone around
the Stormsurge Totem, hence why they will be a high-priority target to kill.
Totemic Overload; it will do unavoidable AoE damage to everyone around
the Stormsurge Totem, hence why they will be a high-priority target to kill. - Primalist Stormspeaker is the most dangerous caster in this area and there
are several abilities to watch out for. Interrupt
 Stormbolt at all costs.
Finally, assign one player to ALWAYS stop
Stormbolt at all costs.
Finally, assign one player to ALWAYS stop  Tempest, as it deals massive AoE
damage to everyone. However, if the Tempest cast goes through, the damage-over-time effect
can be dispelled.
Tempest, as it deals massive AoE
damage to everyone. However, if the Tempest cast goes through, the damage-over-time effect
can be dispelled. - Primalist Thunderbeast will cast
 Chain Lightning on a random player.
The targeted person must not be within 10 yards of anyone so the spell will not bounce.
Make sure you run out of its
Chain Lightning on a random player.
The targeted person must not be within 10 yards of anyone so the spell will not bounce.
Make sure you run out of its  Thunder Clap ability if you are in melee,
to avoid being hit.
Thunder Clap ability if you are in melee,
to avoid being hit. - Primal Stormshield is the last trash mob you need to watch out for!
Having a Purge effect will have immense value because of its reflective
 Stormshield absorb.
The Raging Tempest Boss Guide
This boss has an Energy bar initially set to 50, and it takes roughly
30 seconds until entering its ![]() Electrical Storm "phase", which
will be easier to deal with if you use your personal defensives combined with
your healer's cooldowns. Keep in mind, as soon as the phase is over the cycle
will repeat, consisting of Recharging Energy, Casting abilities, and
finally an
Electrical Storm "phase", which
will be easier to deal with if you use your personal defensives combined with
your healer's cooldowns. Keep in mind, as soon as the phase is over the cycle
will repeat, consisting of Recharging Energy, Casting abilities, and
finally an ![]() Electrical Storm phase again. Here are a few important
things to note before entering this phase:
Electrical Storm phase again. Here are a few important
things to note before entering this phase:
All Roles
- Periodically, every player of your party will get
 Lightning Strike.
It is important to be spread so you do not accidentally "clip' each other,
similar to the Quaking affix in Mythic+.
Lightning Strike.
It is important to be spread so you do not accidentally "clip' each other,
similar to the Quaking affix in Mythic+. -
 Collecting the orbs of
  Uncontrollable Energy on the ground will grant you 5% increased
damage and healing for 20 seconds, stacking. Be aware, they will deal
damage each time you "consume" one, though a common strategy is to let your DPS
have more so you can speed up the fight.
Uncontrollable Energy on the ground will grant you 5% increased
damage and healing for 20 seconds, stacking. Be aware, they will deal
damage each time you "consume" one, though a common strategy is to let your DPS
have more so you can speed up the fight. - Do not stay under the boss so you can avoid being hit by the The Raging Tempest
ability. Worry not, for The Raging Tempest has a big melee range, so you can stay a few
feet away and still auto-attack!
- Remember that Lightning Strike will cause
 Electrical Overload, destroying any orbs of Uncontrollable Energy
that get struck by it. Either collect them or make sure you do not cleave them.
Electrical Overload, destroying any orbs of Uncontrollable Energy
that get struck by it. Either collect them or make sure you do not cleave them.

Tank
- If you want to collect the Uncontrollable Energy as a tank, be
mindful of
 Wind Burst; stay in melee range at all times to avoid it!
 - Beware of
 Energy Surge hits, which are a good time to use your mitigation.
Healer
- When the Electrical Storm "phase" is active, make sure to have cooldowns
to cover the AoE damage hitting for your party in the next 15 sec.
- Dispel the buff coming from Energy Surge as quick as you can.
Teerakai, Teera, and Maruuk
Notable Trash Before Teera and Maruuk
It is time for the next boss. As always, use Dragonriding and the Tornado spawns to move faster to the Teera and Maruuk boss encounter. Before they activate, you must first defeat the 4 Soulharvesters (Soulharvester Duuren, Soulharvester Galtmaa, Soulharvester Tumen, and Soulharvester Mandakh) located in 4 different packs around the area. They share the same abilities just like the Stormcaller mobs located around The Raging Tempest's area, so understanding how one of them works will give you insight into what you can expect for the remaining Soulharvesters. Apart from them, there are a few more trash mobs you should pay attention to:
- Interrupt a Soulharvester's
 Death Bolt Volley at all costs,
as it does massive Shadow damage to everyone. Beware when they cast
Death Bolt Volley at all costs,
as it does massive Shadow damage to everyone. Beware when they cast  Shatter Soul.
Though they will only cast it on 3 random players from your party, you
will deal 30% less damage until you collect your soul or the duration expires.
Shatter Soul.
Though they will only cast it on 3 random players from your party, you
will deal 30% less damage until you collect your soul or the duration expires. - Ukhel Deathspeaker is another high-importance caster mob that will
periodically cast
 Chant of the Dead, it is important to stay at least 10 yards
away from the mob to avoid being damaged. When the Deathspeaker is casting the spell, do your best
to not have any Undead enemies in combat to prevent him from buffing their offensive
and defensive toolkit by 50%. If the cast goes through, you can use
an
Chant of the Dead, it is important to stay at least 10 yards
away from the mob to avoid being damaged. When the Deathspeaker is casting the spell, do your best
to not have any Undead enemies in combat to prevent him from buffing their offensive
and defensive toolkit by 50%. If the cast goes through, you can use
an  Enrage Dispel to remove the Enrage effect from the nearby mobs.
 - Once you engage Ukhel Beastcaller, your tank must pay attention to his
 Heavy Slash. In addition, the mob will call reinforcements with
  Desecrating Roar,
which cast cannot be interrupted.
Desecrating Roar,
which cast cannot be interrupted. - Avoid being hit by the
 Necrotic Eruption coming from Ukhel Corruptor.
Teera and Maruuk Boss Guide
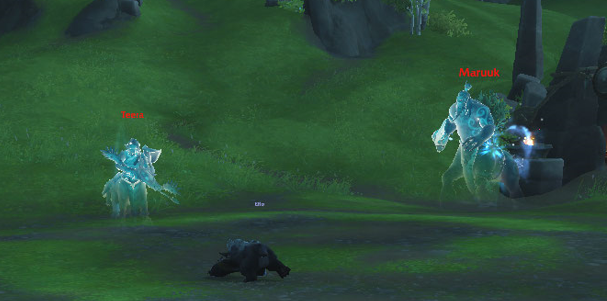
One very important detail to mention is that the two legendary centaurs share
health with ![]() Life Link, so the best possible strategy will be to always tank
them together so the DPS can effectively "cleave" them. Teera and
Maruuk, just like every boss so far, will have Energy, with Teera
starting at 50 and Maruuk with 0 at the beginning of the fight.
Upon reaching 100 Energy they will cast their signature abilities,
with Teera using
Life Link, so the best possible strategy will be to always tank
them together so the DPS can effectively "cleave" them. Teera and
Maruuk, just like every boss so far, will have Energy, with Teera
starting at 50 and Maruuk with 0 at the beginning of the fight.
Upon reaching 100 Energy they will cast their signature abilities,
with Teera using ![]() Gale Arrow and Maruuk using
Gale Arrow and Maruuk using ![]() Earthsplitter.
Here is a more detailed breakdown of the boss fight:
Earthsplitter.
Here is a more detailed breakdown of the boss fight:
All Roles
-
 Run away from
  Frightful Roar. Any fear-immune or immunity effects work,
such as a Warrior's
Frightful Roar. Any fear-immune or immunity effects work,
such as a Warrior's  Berserker Rage, Shaman's
 Tremor Totem, or Rogue's
  Cloak of Shadows and the like
in case you want to have higher uptime here.
Cloak of Shadows and the like
in case you want to have higher uptime here. - Place
 Gale Arrow away from the boss' locations, as this will help you
have less ground effects to worry about. The ability is cast on 4 members
from your party. An alternative strategy is to all stack together.
Gale Arrow away from the boss' locations, as this will help you
have less ground effects to worry about. The ability is cast on 4 members
from your party. An alternative strategy is to all stack together. - Beware of the pushback effect from
 Guardian Wind. The cast is
interruptible, so the faster you stop it, the better!
Guardian Wind. The cast is
interruptible, so the faster you stop it, the better! - Dodge Maruuk's Earthsplitter at all cost. You have 2 seconds
to avoid being hit by it; in case you cannot, remember that the damage is Physical
, so any immunities will help you survive here.

Tank
- Tank Teera and Maruuk together because of the
 Life Link
passive. This will allow your DPS to "cleave" both targets and speed up
the fight significantly.
Life Link
passive. This will allow your DPS to "cleave" both targets and speed up
the fight significantly. - The bosses must be no more than 20 yards away from each other to
avoid the
 Ancestral Bond buff, which will increase their damage by 5%
every 1 sec they spent further than 20 yards apart.
Ancestral Bond buff, which will increase their damage by 5%
every 1 sec they spent further than 20 yards apart. - When Teera casts
 Spirit Leap, quickly move to her for
better boss stacking to cleave both targets.
Spirit Leap, quickly move to her for
better boss stacking to cleave both targets. - Use your active mitigation upon
 Brutalize being cast to avoid
dropping to a critical health level.
Brutalize being cast to avoid
dropping to a critical health level.
Healer
- Watch out for Teera's Quick Shot; it is unavoidable damage
to a random player of your party.
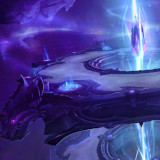
Nokhudon and Balakar Khan
Notable Trash Before Balakar Khan
Regardless of what order you choose to defeat the previous bosses, Balakar Khan
will only unlock once you have killed all of them, meaning you cannot go to him
immediately. Unlike the previous bosses, where you could freely fly to any pack
of your choice, your Dragonriding will be limited, as you must use your regular
non-dragonriding mount (or walk) once you get near the
Nokhudon area in order to pass through. Failing to do so will cause you
to get ![]() Stormcaller's Fury, being knocked back and dismounted! There are
also several important mob types prior to engaging the last boss. Although you
can choose to skip all of them and go straight to Balakar, he will be active,
unlike the previous bosses who required an "activation" process:
Stormcaller's Fury, being knocked back and dismounted! There are
also several important mob types prior to engaging the last boss. Although you
can choose to skip all of them and go straight to Balakar, he will be active,
unlike the previous bosses who required an "activation" process:
- Beware of Nokhudon Warspear and its Swift Stab ability;
it charges on a random player and leaves a Bleed effect on them, so
approach this mob with caution.
- Nokhud Stormcaller is the most dangerous caster in this area because
of Storm Shock hitting random targets. This ability will also leave a
lingering damage-over-time effect on the targeted player, so use a personal defensive
if you get two consecutive ones.
- Beware of NokhudonHoundsman's Shoot, as the unavoidable damage
goes on random party members. Do your best to use stun or disruption effects
to stop the
 Command: Seek cast.
Finally, there will be 2 avoidable "mini-bosses" leading up to
Balakar Khan: Batak and Balara. If you choose
to engage them, do your best to kill them simultaneously to avoid
the ![]() Raging Kin buff being present. Each of them has unique abilities
under their belt; here is more information:
Raging Kin buff being present. Each of them has unique abilities
under their belt; here is more information:
- Avoid Balara's
 Ravaging Spear at all times; failing to do
so might turn lethal.
Ravaging Spear at all times; failing to do
so might turn lethal. - Dodge the Broad Stomp frontal cast by Batak, as
it has a 20-yard range.
- Beware of the
 Vehement Charge from Balara; it will deal
damage and knock you back.
Vehement Charge from Balara; it will deal
damage and knock you back.
Balakar Khan Boss Guide
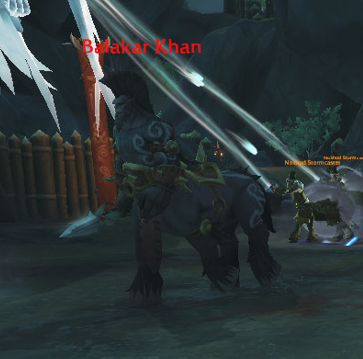
Balakar Khan is a 2-phase boss fight with a fair share of complex mechanics that will test the limits of your party. In addition, you will endure an intermission phase where you will combat several of his trusted minions. Below you can find a detailed breakdown of the fight:
All Roles
- Balakar Khan will cast
 Iron Spear on a random target from
your party, followed up by an immediate charge to "collect" his spear with
Iron Spear on a random target from
your party, followed up by an immediate charge to "collect" his spear with  Iron Stampede.
A common strategy is to "bait" the charge near a wall to shorten his "charge."
and have higher DPS uptime.
Iron Stampede.
A common strategy is to "bait" the charge near a wall to shorten his "charge."
and have higher DPS uptime. - Dodge the Upheaval and Crackling Upheaval abilities at all cost,
as failing to do so will drop you to critical health. In Phase 2, after every
Crackling Upheaval, there will be a follow up spell called
 Quake,
creating a lingering AoE pool on the ground that does damage upon contact.
Quake,
creating a lingering AoE pool on the ground that does damage upon contact. -
 Interrupt the Storm Bolt cast coming from the Nokhud Stormcaster
during the Intermission. This will allow for better stacking on the mobs
and enable "cleaving", which will speed up the phase.
Interrupt the Storm Bolt cast coming from the Nokhud Stormcaster
during the Intermission. This will allow for better stacking on the mobs
and enable "cleaving", which will speed up the phase. - Dodge the
 Lightning on the ground at all times during the
Intermission.
Lightning on the ground at all times during the
Intermission. - Balakar Khan will cast
 Static Spear on a random player from your party;
upon impact, it will pull the existing party members to its location. You have a short
time to react and get away from it to avoid being hit by the Iron Stampede
(same charge as in Phase 1).
Static Spear on a random player from your party;
upon impact, it will pull the existing party members to its location. You have a short
time to react and get away from it to avoid being hit by the Iron Stampede
(same charge as in Phase 1).

Tank
- Pay attention to
 Rending Strike as it leaves a nasty Bleed effect
and it increases the damage from Savage Strike by 500%. It is best to use
active mitigation or any sort of defensive at this moment.
Rending Strike as it leaves a nasty Bleed effect
and it increases the damage from Savage Strike by 500%. It is best to use
active mitigation or any sort of defensive at this moment. - Do your best to stack Nokhud Stormcaster during the intermission to allow your team to effectively cleave.
Healer
- During the intermission phase, your entire team will be taking damage from
Stormwinds, which is why you want to kill the Nokhud Stormcaster
as quickly as possible to end the phase. Here is a good place to use your healing cooldowns.
- Dispel the effect from
 Conductive Strike as quick as you can.
This is a very important dispel!
Conductive Strike as quick as you can.
This is a very important dispel!
The Nokhud Offensive Loot Table
Granyth
| Type | Item | Stats |
|---|---|---|
| Cloth Shoulder | Mastery/Vers | |
| Plate Legs | Haste/Mastery | |
| Trinket | Agi/Str | |
| Polearm | Str, Vers/Crit | |
| Mail Wrist | Mastery/Haste | |
| Leather Head | Mastery/Haste |
The Raging Tempest
| Type | Item | Stats |
|---|---|---|
| Trinket | Haste | |
| Staff | Vers/Mastery | |
| 1H Sword | Str, Mastery/Crit | |
| Plate Wrist | Mastery/Vers | |
| Ring | Vers/Haste |
Teera and Maruuk
| Type | Item | Stats |
|---|---|---|
| Bow | Haste/Crit | |
| Trinket | Int | |
| Trinket | Str | |
| Trinket | Int | |
| Leather Chest | Haste/Crit | |
| Neck | Mastery/Haste |
Balakar Khan
| Type | Item | Stats |
|---|---|---|
| Cloth Chest | Haste/Vers | |
| Dagger | Mastery/Haste | |
| Leather Legs | Haste/Crit | |
| Mail Feet | Mastery/Haste | |
| Plate Shoulder | Crit/Vers | |
| Warglaive | Haste/Vers |
The Nokhud Offensive Achievements
There are 9 total achievements to obtain in The Nokhud Offensive:
| Achievement | Criteria |
|---|---|
| Defeat Balakar Khan in The Nokhud Offensive | |
| Defeat Balakar Khan in The Nokhud Offensive
on |
|
| Defeat Balakar Khan in The Nokhud Offensive
on |
|
| Defeat Balakar Khan in The Nokhud Offensive
on |
|
| Complete the Nokhud Offensive at |
|
| Defeat Balakar Khan after healing Ohn'ahra
to full health in The Nokhud Offensive on |
|
| Deliver eight warm ohuna eggs to Ohuna Keeper Taruk
in a single visit to The Nokhud Offensive on |
|
| Defeat Teera and Maruuk while holding
while holding the Spear of Tolui, War Axe of Berke, and
Bow of Sartaq in The Nokhud Offensive on |
|
| Defeat The Raging Tempest after striking a single
player with 5 |
Changelog
- 23 Apr. 2024: Guide updated for Season 4.
- 25 Nov. 2022: Guide added.