

Vault of the Incarnates Guides
TankNotes
I also have my website dedicated to both tanks and raid leaders where I share my insight on the bosses with strategy and preparation advice which I will update after my guild has completed progress. If you are interested in this or want to discuss it on Discord, the links to them are below:
Strategy Guide: Quick TLDR Guide
Phase 1
- Move away from the raid with
 Static Charge to create
 Static Field puddles.
 - Avoid
 Lightning Breath.
 - Be spread out for
 Volatile Current any players hit (and players
within 8 yards will create a Volatile Spark.
Volatile Current any players hit (and players
within 8 yards will create a Volatile Spark. - Destroy Volatile Sparks by either dispelling
 Volatile or Interrupting
 Burst.
 - Avoid
 Lightning Strikes. Standing in them will stun you and deal
a large amount of damage.
Lightning Strikes. Standing in them will stun you and deal
a large amount of damage. - Tanks. Swap at 1 stack of
 Electrified Jaws.
 - Position yourself in front of a Static Field puddle to avoid being
pushed off the platform when Raszageth reaches 100 energy and casts
 Hurricane Wing.
Intermission 1: 65%
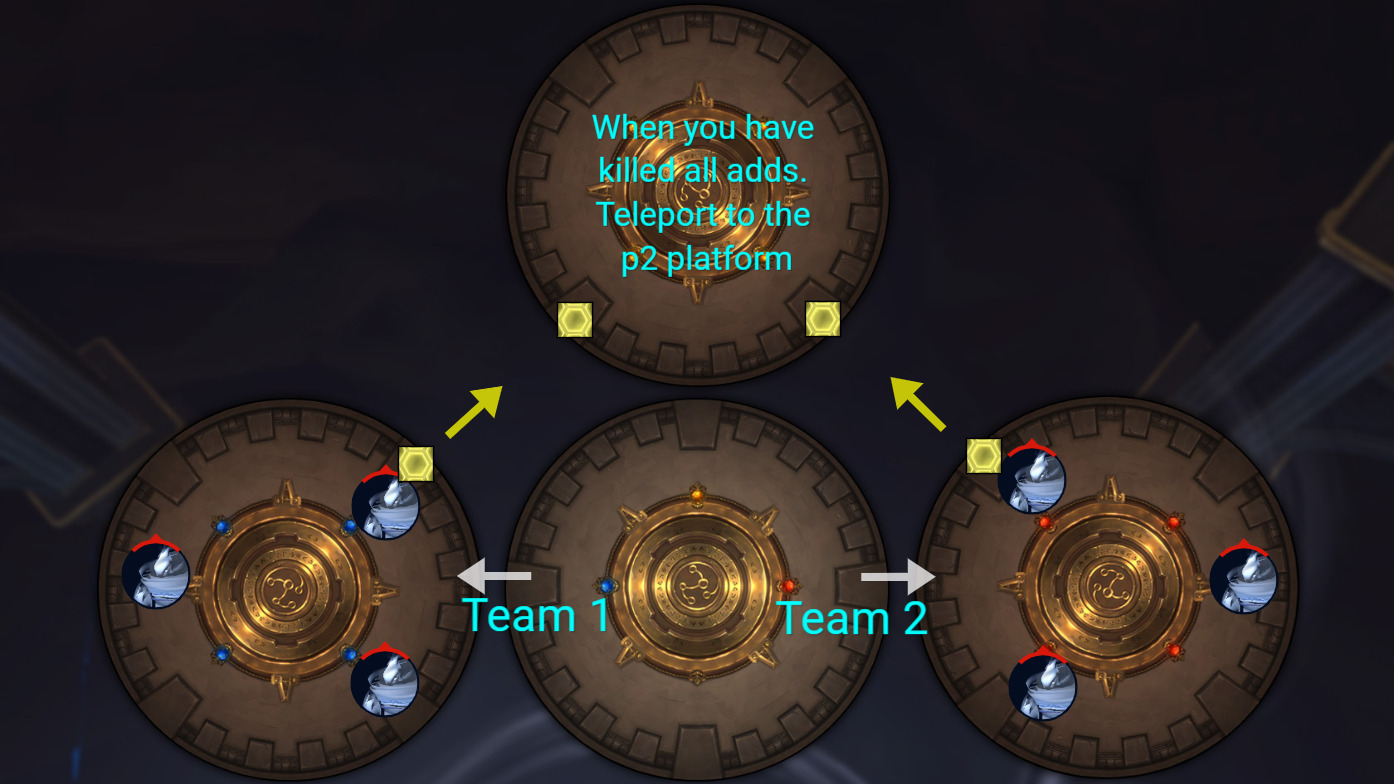
- The raid will split in two. Know which side you are going to.
- Watch where Raszageth is flying and avoid
 Lightning Devastation.
 - When the shield on the Surging Ruiner is removed, multiple Othsworn Vanguards and Stormseeker Acolytes spawn.
- Keep the Stormseeker Acolyte interrupted.
 Heroic/
 Mythic: Move away with Surging Blast.
- After you have killed all of the adds on your platform, teleport to the phase 2 platform.
Phase 2
- Run through the wave from
 Tempest Wing to avoid being pushed off.
 - Mythic: Spread from other players during Tempest Wing.
- Do not be in
 Fulminating Charge when it expires.
 - When Raszageth reaches 100 Energy stack with your correct
 Stormcharged
team for a damage and healing boost.
Stormcharged
team for a damage and healing boost. - Heroic/Mythic: Avoid colliding with players that do not match
your polarity as it will deal additional damage to players around you.
Intermission 2: 0% Vault Integrity
- Avoid
 Ball Lightning.
 - Kill any Seeking Stormlings before they reach the Colossal Stormfiend(s).
- After you have killed the Colossal Stormfiend(s), Raszageth will land and knock the raid away. Use this knockback to get to the final platform.
Phase 3
- The platform is slowly getting smaller in this phase. Kill the boss before you run out of space!
- Tanks. Mitigate the channeled damage from
 Thunderous Blast
to reduce the raid damage taken.
Thunderous Blast
to reduce the raid damage taken.
Strategy Guide: Full Guide
Phase 1
The goal of this phase is to get Razageth down to 65% Health.
- Static Charge will be applied on 3 in the raid, and
they will have this debuff applied for 8 seconds. When the debuff expires,
they will place a Static Field on the floor at their location. These
Static Field's will slow you by 50% and also slow forced movement
effects such as Hurricane Wing (Raszageth 100 energy ability). Place
these not too far away from the raid, as you will want to get pushed into them.
- Raszageth will pick a random player in the raid and cast Lightning Breath on
them. Utilize movement speed abilities for the raid to move away from it, such as
 Stampeding Roar and
  Wind Rush Totem.
 - Volatile Current will create circles around players and spawn
Volatile Sparks after it expires. They will explode if their casts are not stopped.
The following effects will stop their casts;
- Volatile is dispelled. Make use of purges to remove this.
 Arcane Torrent (Blood Elf Racial) or
  Mass Dispel will remove this
buff from multiple enemies at once.
Mass Dispel will remove this
buff from multiple enemies at once. - Interrupting Burst (or letting the cast go through) will also
despawn the Volatile Spark. Ideally, people should interrupt their own Spark.
- Displacing the Volatile Spark will interrupt the cast. This can be done with abilities
such as
 Death Grip,
  Typhoon,
  Blinding Light,
  Leg Sweep.
- Healers. Raszageth will pulse damage on the raid with
 Electric Scales.
 - Lightning Strikes will spawn in the room. Standing in them will
stun you and deal a large amount of damage. Move away from them!
- Tanks. Swap at 1 stack of Electrified Jaws.
- When Raszageth reaches 100 energy, she will cast Hurricane Wing
which will push back players and deal damage based on the distance you are pushed
back. Utilize Static Field's to not be pushed off the platform.
![]() Heroic changes:
Heroic changes:
- Volatile Charges have 2 stacks of Volatile. This means that
2 purges/interrupts are now required to remove it from the encounter.
![]() Mythic changes:
Mythic changes:
- Static Charge no longer leaves a puddle on the ground. This means
that you will need to run against Hurricane Wing and stay on the
platform.
- Volatile Charges have 3 stacks of Volatile.This means that
3 purges/interrupts are now required to remove it from the encounter.
Intermission 1: 65% HP
This intermission begins with Raszageth reaching 65% Health. She will summon
adds on the left and right platforms and take 99% less damage from ![]() Ruinous Shroud. This phase will
last a maximum of 75 seconds.
Ruinous Shroud. This phase will
last a maximum of 75 seconds.
- Raszageth will remove 1% Vault Integrity every 1.5 seconds. This phase will end once you have defeated all the adds or have removed 50% Vault Integrity.
- The raid will need to split into two teams and jump to the platforms on either side of the room. Have an even raid split to ensure you can safely complete this phase.
- During this phase, Razageth will be sweeping over the platform with
Lightning Devastation. Ensure you are not standing in this as you
will take a large amount of damage and ticking damage every 2 seconds.
- When you reach your platform, you will see Surging Ruiner adds with shields on them. When this shield has been destroyed is removed multiple Oathsworn Vanguards, and Stormseeker Acolytes spawn.
- Surging Ruiner. This add will apply
 Surge to itself.
This shield deals damage to the entire raid every 3 seconds. When
Surge has been removed, it will
Surge to itself.
This shield deals damage to the entire raid every 3 seconds. When
Surge has been removed, it will  Overload, which deals
even more ticking damage and increases the damage of all other enemies by 100%
until it dies. Evokers should use
Overload, which deals
even more ticking damage and increases the damage of all other enemies by 100%
until it dies. Evokers should use  Unravel and Warriors should use
 Wrecking Throw on these.
 - Oathsworn Vanguard. This add will gain a stack of
 Windforce Strikes
each time it attacks. This buffs it with attack speed and movement speed per stack.
Windforce Strikes
each time it attacks. This buffs it with attack speed and movement speed per stack. - Stormseeker Acolyte. These low kill priority adds will just cast
Storm Bolt. This is an interruptable cast, which your raid
needs to keep interrupting.
![]() Heroic Changes
Heroic Changes
- Surging Ruiner. This add will now apply the Surging Blast debuff
to several players. They will need to move away before their debuff expires, as they will
deal damage to all players within 7 yards.
- Stormseeker Acolyte. Will gain an
 Enrageenrage style effect when
they reach 30% health. They gain the buff
Enrageenrage style effect when
they reach 30% health. They gain the buff  Ascension, which increases their
haste by 150%, making their casts much harder to interrupt!
Ascension, which increases their
haste by 150%, making their casts much harder to interrupt!
![]() Mythic changes:
Mythic changes:
- For Mythic, there are two new adds. The Frostforged Zealot and Flamesworn Herald. These are your highest priority adds to kill.
- Flamesworn Herald. This add will apply
 Flame Shield to itself,
making it immune to interrupts while the shield holds. This is a priority to remove
as it will also cast
Flame Shield to itself,
making it immune to interrupts while the shield holds. This is a priority to remove
as it will also cast  Blazing Roar, which deals a large amount of
damage to the raid and buffs all of the adds by 150%! Evokers should use Unravel
and Warriors should use Wrecking Throw on these.
Blazing Roar, which deals a large amount of
damage to the raid and buffs all of the adds by 150%! Evokers should use Unravel
and Warriors should use Wrecking Throw on these. - Frostforged Zealot. This add will cast
 Shattering Shroud, which
deals damage to the entire raid and applies a healing absorb to them.
Shattering Shroud, which
deals damage to the entire raid and applies a healing absorb to them.
Phase 2
This phase ends when the Vault Integrity has reached 0%. The faster you complete the intermission, the more time you have in this phase.
- Raszageth maintains the abilities Volatile Current, Electrified Jaws
Electric Scales and Lightning Strikes from Phase 1.
- Tempest Wing will push back the raid and deal ticking damage,
the pushback is not as harsh as the pushback from Phase 1.
- Two new abilities are added for this phase Fulminating Charge and
a new 100 energy ability Stormsurge.
- Fulminating Charge will be applied to several players. This debuff
reduces the target's movement speed and deals damage when it expires after 6 seconds.
It will also apply the Lingering Charge debuff to the player after it
expires, which is a simple DoT. If any players are caught in the blast after the
debuff times out; it will jump to the closest player!
- Stormsurge is the new 100 energy ability. Raszageth will
apply a huge absorb shield and pulse damage on the raid, which increases in
damage every tick. The raid will need to destroy this shield within 25 seconds
or have a 1.5-minute DoT applied to them! Luckily we have buffs during this phase.
- Every player in the raid will be Stormcharged and marked with
either a positive (lightning orb icon) or a negative charge (tornado icon).
- If you are within 5 yards of another player who shares the same type of charge
as yourself, you will gain
 Focused Charge, which increases your damage
and healing by 200%.
Focused Charge, which increases your damage
and healing by 200%. - If you are not within 5 yards of another player who shares the same type of
charge, then you will have the
 Scattered Charge debuff applied which
deals damage to you every second.
Scattered Charge debuff applied which
deals damage to you every second.
- Evokers should use Unravel and Warriors should use Wrecking Throw
to break the shield faster.
![]() Heroic Changes
Heroic Changes
- Scattered Charge will now deal damage to all nearby players
that do not match your polarity.
![]() Mythic changes:
Mythic changes:
- Raszageth will periodically change the polarities of some players by casting
 Inversion be mindful of when this is happening and be ready to move
instantly.
Inversion be mindful of when this is happening and be ready to move
instantly. - Players hit by the Storm Wave from Tempest Wing will pulse
damage around them. Spread for the Tempest Wing.
- The target of Fulminating Charge is rooted.
Intermission 2: 0% Vault Integrity
When the vault integrity hits 0%, Raszageth will lift off and begin the second intermission.
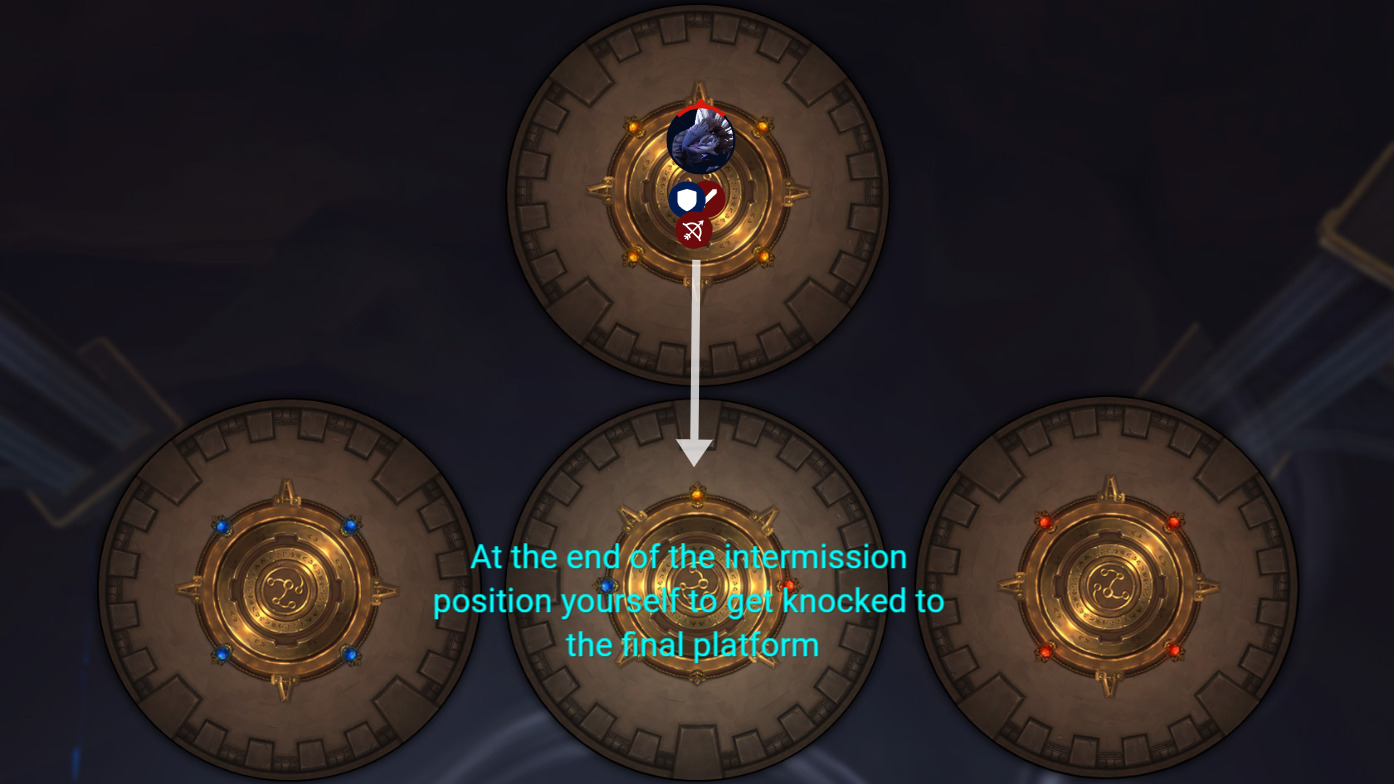
- As with the first intermission, you will need to dodge Lightning Devastation.
- There is now only one type of add in this intermission; however, it does spawn its own adds.
- Colossal Stormfiend. This add will teleport to players in a similar way to the Lightning intermission add from Kurog Grimtotem and deal damage to the entire raid every time it does this.
-
- When it teleports away it will create Seeking Stormlings from the location it teleported from.
- If the Seeking Stormlings reach the Colossal Stormfiend, they will heal and increase its maximum health and damage for each Stormling that reached it.
- You, unfortunately, cannot keep the Stormlings in CC as when they reach 100 Energy,
they gain
 Indomitable Focus and become immune to CC. Focus on killing
the Stormlings when they appear.
Indomitable Focus and become immune to CC. Focus on killing
the Stormlings when they appear.
- Colossal Stormfiend. will also cast Ball Lightning which
deals damage to all players in its path. Avoid this by moving out of the path.
- Healers.
 Crackling Energy is a pulsing aura from the Colossal
Stormfiend, which deals damage every 2 seconds.
Crackling Energy is a pulsing aura from the Colossal
Stormfiend, which deals damage every 2 seconds.
![]() Heroic Changes
Heroic Changes
- There are now two Colossal Stormfiends.
- When a Colossal Stormfiend dies, any remaining Colossal Stormfiends will gain
30% increased attack speed and deal more damage with Crackling Energy.
- Aim to get them low and kill them at a similar time.
![]() Mythic Changes
Mythic Changes
- In addition to the two Colossal Stormfiends there is now an Electrified Colossal Stormfiend.
- This Stormfiend does not require a tank and will pulse damage onto the raid and teleport at the same time as the Colossal Stormfiends.
Phase 3
The final phase of the encounter! This phase has a soft enrage where the platform will get smaller over time.
- Use
 Bloodlust /
  Heroism on this phase, as it is a DPS check.
 - As the phase goes on, the edge of the room will slowly close in from
 Raging Storm.
Standing in this will apply damage to you every second with
Raging Storm.
Standing in this will apply damage to you every second with  Storm's Spite.
 - Raszageth maintains the following abilities in this phase: Tempest Wing,
Fulminating Charge, Lightning Breath, Lightning Strikes
, and Electric Scales.
- There is one new ability in this phase, and its a new tank mechanic!
- Tanks. The new tank mechanic for this phase is Thunderous Blast.
This mechanic works in two stages:
-
- Step 1: Raszageth will channel a beam of Nature damage on the tank dealing damage every 0.3 seconds.
- Step 2: You will replicate the damage you took from that beam on the raid 1.5 seconds later.
- This means that to reduce raid damage taken, you need to reduce your damage taken. Utilize your personal cooldowns and some external cooldowns to keep the raid alive. A good tank is essential here.
- Additionally, the tank is debuffed with Thunderstruck Armor which
increases their damage taken by 100% for 40 seconds, so they cannot take two in a row.
![]() Mythic Changes
Mythic Changes
- Storm's Spite tornadoes will now spawn from the edge of the room
and float towards Raszageth. If any of these reach the boss she will heal for 5%
and deal 20% more damage. These can be intercepted by players but they will have a
permanent DoT applied to them.
Changelog
- 18 Mar. 2023: Small updates to include Mythic information.
- 15 Dec. 2022: Updated Intermission information based on recent kill informations. Added imagery for how intermissions work.
- 12 Dec. 2022: Fixed hyperlinks, added tags, added video clip descriptions.
- 11 Dec. 2022: Guide added.