

Broodkeeper Diurna Raid Guide in Vault of the Incarnates
Vault of the Incarnates Guides
TankNotes
I also have my website dedicated to both tanks and raid leaders where I share my insight on the bosses with strategy and preparation advice which I will update after my guild has completed progress. If you are interested in this or want to discuss it on Discord, the links to them are below:
Strategy Guide: Quick TLDR Guide
Phase 1
- This phase will last either 5 minutes or when all of the eggs have been destroyed.
- You should split the raid into two teams. Boss and adds.
- Tanks: One tank will be on Broodkeeper, and one will be on add duty.
- Tanks:
 Mortal Stoneclaws is cast on the boss tank, which reduces
healing received.
Mortal Stoneclaws is cast on the boss tank, which reduces
healing received. - The boss team will focus on breaking eggs with
 Greatstaff's Wrath
and the add team will move to adds as they are spawning to kill them efficiently
and get back to the boss. Focus on the eggs targeted by
Greatstaff's Wrath
and the add team will move to adds as they are spawning to kill them efficiently
and get back to the boss. Focus on the eggs targeted by  Rapid Incubation!
 - The boss team players breaking eggs must use the extra action button spell on the staff to be fixated. Bring the fixated beam through an egg that has a timer on top of it to destroy it.
- Dodge
 Wildfire.
  Heroic: Wildfire now deals damage around each player. Spread.
 Icy Shroud either needs to be healed off or dispelled.
- The add team will need to kill the adds in the following priority system: Juveniles > Flamebenders > Stormbringers > Earthreavers > Mages > Legionnaires.
- Interrupt Mages and Stormbringers.
- Spread with
 Ionizing Charge.
Phase 2
- If any eggs remain, Broodkeeper will keep spawning adds. If no eggs remain, Broodkeeper will no longer spawn adds.
- Broodkeeper will gain stacks of
 Broodkeeper's Fury periodically
increasing her damage done.
Broodkeeper's Fury periodically
increasing her damage done. - Tanks: Mortal Stoneclaws is now cast twice as often, and the
duration is doubled. Swap after every stack.
- Greatstaff's Wrath will now pick random players instead of players
who are selected to be fixated.
- Icy Shroud is replaced with
 Frozen Shroud; this creates an
attackable shield around the player, which needs to be destroyed before they can move.
Frozen Shroud; this creates an
attackable shield around the player, which needs to be destroyed before they can move.
Add Spawn Locations
Normal and Heroic
- Add wave 1: 2x Primalist Mages and 1x Juvenile Frost Proto-Dragon.
- Add wave 2: 1x Drakonid Stormbringer, 1x Primalist Mage, and 1x Tarasek Legionnaire.
- Add wave 3: 1x Dragonspawn Flamebender, and 3x Tarasek Legionnaires.
- Add wave 4: 1x Tarasek Earthreaver, and 2x Primalist Mages.
- Add wave 5: 1x Juvenile Frost Proto-Dragon, 1x Drakonid Stormbringer, and 2x Primalist Mages.
- Add wave 6: 3x Primalist Mages, and 2x Tarasek Legionnaire.
- Add wave 7: 1x Dragonspawn Flamebender, 1x Tarasek Earthreaver, and 1x Tarasek Legionnaire.
- Add wave 8: 3x Primalist Mages, and 2x Tarasek Legionnaire.
- Add wave 9: 3x Primalist Mages, and 1x Drakonid Stormbringer.
- Add wave 10: 3x Primalist Mages, and 1x Juvenile Frost Proto-Dragon.
- Add waves after this are unknown but can spawn if you have not destroyed all of the eggs in the room.
Mythic
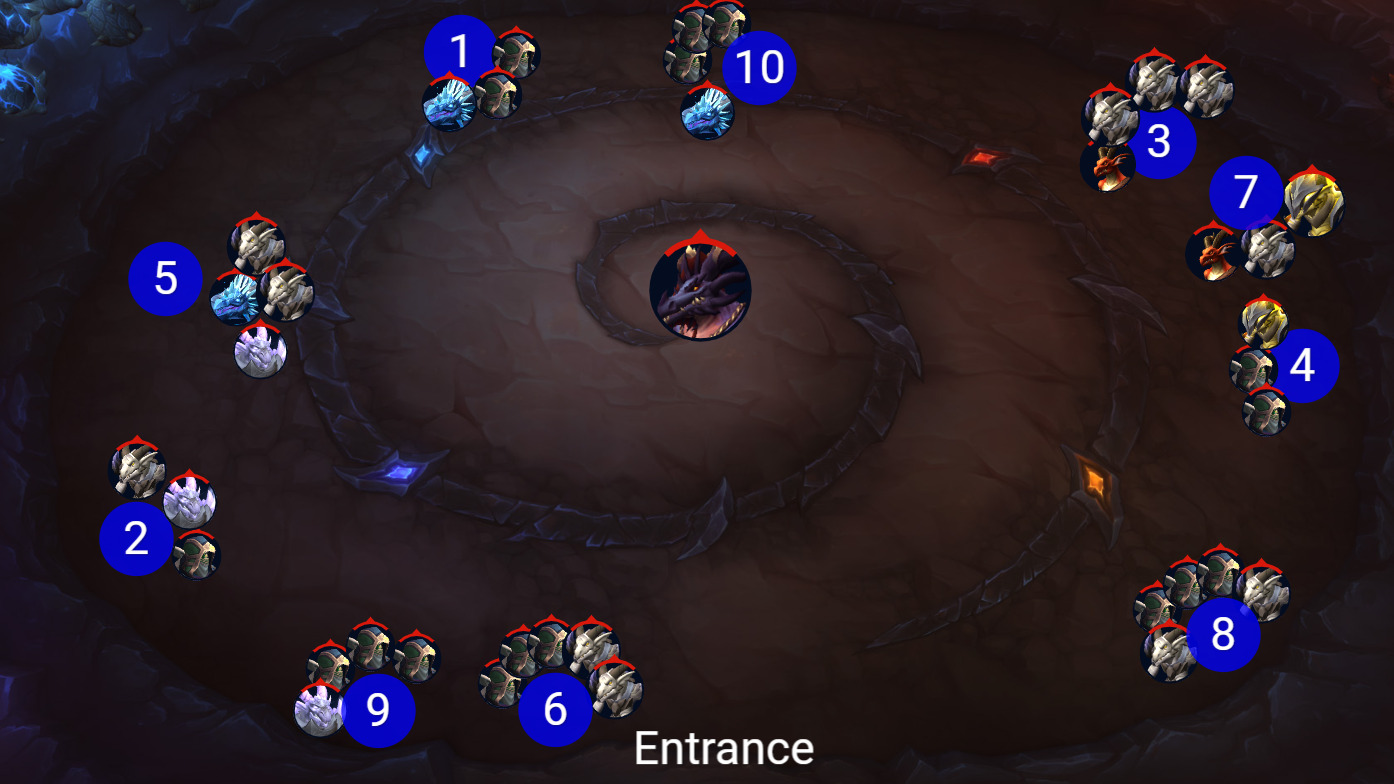
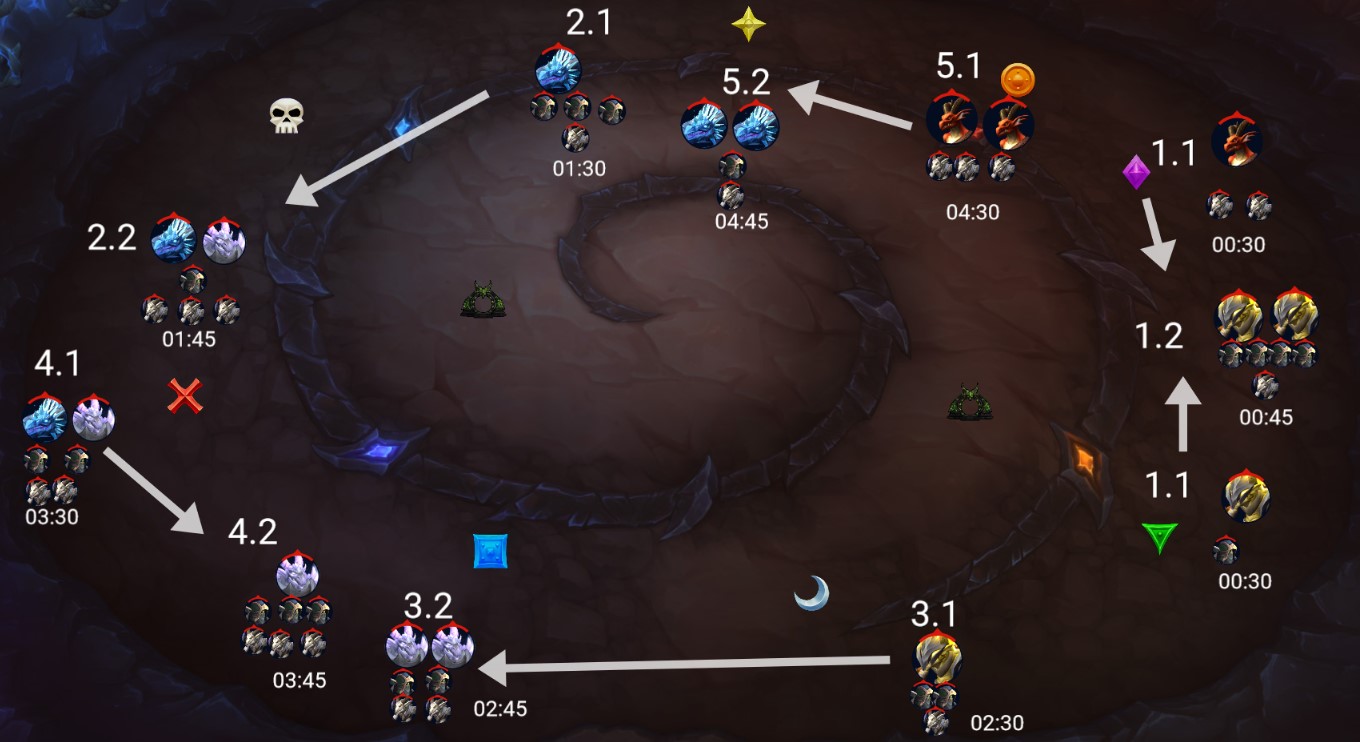
The add waves on Mythic spawn in pairs in set locations around the room as shown in the image below:
Strategy Guide: Full Guide
Phase 1
The goal of this phase is to destroy all of the eggs in the room and get Broodkeeper into Phase 2. There are two ways of approaching this phase, and they will be detailed below the regular and speed strategies.
- Before the pull, establish who will be the boss and add teams. The boss team does not need many players as all they need to manage are breaking eggs and keeping the tank alive.
- There are 24 eggs in the room. You have a Greatstaff's Wrath cast every
30 seconds (starting at 15 seconds). This means by the time she automatically hits
Phase 2, you will have 11 casts in total. You will need to break 2 additional eggs
in addition to the 2 eggs, you will break per cast, which Rapid Incubation impacts
during phase 1 to prevent adds spawning in phase 2.
- Boss team: Broodkeeper will use Rapid Incubation on the nearest
two eggs. A beam indicates this from the boss. Make sure the eggs selected
are close to you, if not move the boss.
- Boss team: The tank in this team will have
 Mortal Wounds on them
while tanking and will require additional healing to counter the reduction.
Mortal Wounds on them
while tanking and will require additional healing to counter the reduction. - Boss team: The players breaking the eggs will do this by clicking the
extra action button while they are standing near the staff after Greatstaff's Wrath
is cast. This will then create a beam that will follow them until it breaks an egg
(or the egg hatches). You can create only three beams per staff. This
beam persists for a couple of seconds after breaking the egg, making breaking
multiple eggs with a single beam possible!
- Healer. Boss team: Dispel Icy Shroud from the tank as a priority,
and heal others. If you are a priest healer, you can mass dispel to remove
multiple at once!
- Tank. Boss team: Be mindful of your pathing around the room as Broodkeeper
has the
 Broodkeeper's Bond aura, which will buff adds within 50 yards.
 - Boss team: Wildfire is cast on players within 50 yards of
the boss. Move out of the area to avoid additional damage taken.
- Add team: Adds will spawn around the room in a set pattern; you can see where they will spawn as glowing orbs will show on their spawn locations. Kill the add wave and rejoin the boss team before the next wave spawns.
![]() Heroic changes:
Heroic changes:
- There are now 28 eggs in the room. This means that you will need to break 6 additional eggs to prevent adds spawning in Phase 2.
- Boss team: Wildfire will now deal additonal
damage to players nearby. A circle around your character indicates this.
This means that you can no longer be stacked during Wildfire. Melee will
need some space near the boss to spread out with this.
![]() Mythic changes:
Mythic changes:
- There are now 32 eggs in the room. This means that you will need to break 10 additional eggs to prevent adds spawning in Phase 2.
- As the beam from Greatstaff's Wrath travels it will leave
 Storm Fissure
behind it, dealing damage to players within 3 yards of the path every 0.5 seconds.
Storm Fissure
behind it, dealing damage to players within 3 yards of the path every 0.5 seconds.  Lingering Gaze is a new mechanic which increases damage taken by
players who stay within 50 yards of the boss by 1% every 7 seconds. You can reset this by
moving 50 yards away for 30 seconds.
Lingering Gaze is a new mechanic which increases damage taken by
players who stay within 50 yards of the boss by 1% every 7 seconds. You can reset this by
moving 50 yards away for 30 seconds.
List of adds and what they do
- Primalist Mage. These will cast
 Ice Barrage at random players.
This can be interrupted. Interrupt their casts as it deals quite a large amount of damage.
Ice Barrage at random players.
This can be interrupted. Interrupt their casts as it deals quite a large amount of damage. - Tarasek Legionnaire. These will use
 Vicious Thrust on the tank.
Fairly forgettable.
Vicious Thrust on the tank.
Fairly forgettable. - Tarasek Earthreaver. These will cast
 Tremors on the tank.
Tremors is a frontal cone, and the tank should point this away from the
raid.
Tremors on the tank.
Tremors is a frontal cone, and the tank should point this away from the
raid. - Dragonspawn Flamebender. Creates
 Flame Sentry orbs. These will
act as rotating flamethrowers and need to be avoided. They spawn on player locations
and, as a result, can be baited to avoid the room being cluttered.
Flame Sentry orbs. These will
act as rotating flamethrowers and need to be avoided. They spawn on player locations
and, as a result, can be baited to avoid the room being cluttered. - Juvenile Frost Proto-Dragon. These will cast
 Chilling Tantrum, which
damages all players within 50 yards. This will also reduce your movement
speed. This is your second highest priority add to kill.
Chilling Tantrum, which
damages all players within 50 yards. This will also reduce your movement
speed. This is your second highest priority add to kill.
- Drakonid Stormbringer. These cast Ionizing Charge which applies
a debuff to several players making them pulse damage around them. Spread this
to prevent unnecessary damage.
![]() Heroic changes:
Heroic changes:
- Tarasek Earthreaver. They will now cast
 Burrowing Strike
which will apply a stacking armor reduction debuff to the tank.
Burrowing Strike
which will apply a stacking armor reduction debuff to the tank. - Dragonspawn Flamebender. They will now cast
 Cauterizing Flashflames
which deals 20% of its own HP as damage to all players and then heals for 200%
of the damage, it dealt over 9 seconds. This add is now your top priority to kill.
Cauterizing Flashflames
which deals 20% of its own HP as damage to all players and then heals for 200%
of the damage, it dealt over 9 seconds. This add is now your top priority to kill. - Juvenile Frost Proto-Dragon. They will now cast
 Rending Bite
on the tank, which deals a large amount of damage and bleeds the tank.
Rending Bite
on the tank, which deals a large amount of damage and bleeds the tank. - Drakonid Stormbringer. They will now cast
 Static Jolt.
This can be interrupted. A random player is targeted, and if the cast is
successful, they will take a large amount of nature damage and be stunned for two seconds.
Static Jolt.
This can be interrupted. A random player is targeted, and if the cast is
successful, they will take a large amount of nature damage and be stunned for two seconds.
Phase 2
After all eggs have been destroyed (or the fight has reached 5 minutes in duration) phase 2 will begin.
- If any eggs remain, Broodkeeper will keep spawning adds. If no eggs remain, Broodkeeper will no longer spawn adds.
- Broodkeeper will gain stacks of Broodkeeper's Fury periodically
increasing her damage done, making this a deadly moment of the fight.
- Use
 Bloodlust/
 Heroism in this phase.
 - Tanks: Mortal Stoneclaws is now cast twice as often, and the
duration is doubled. Swap after every stack.
- Greatstaff's Wrath will now pick random players instead of players
who are selected to be fixated.
- Icy Shroud is replaced with Frozen Shroud; this creates an
attackable shield around the player, which needs to be destroyed before they can move
Stack players for this mechanic to break the shields.
- As the phase goes on, Frozen Shroud becomes more and more deadly. Aim
to have raid cooldowns ready for these, such as
 Rallying Cry or
  Aura Mastery.
![]() Mythic changes:
Mythic changes:
- Mortal Wounds in this phase is now a 90% healing reduction. This means
that your tanks need to be much more attentive when this is cast as damage
that follows this may kill them.
- After the tank has been hit with Mortal Stoneclaws,
 Detonating Stoneslam
will be applied which is a 6 second DoT followed by a large AoE explosion. The damage
from the AoE explosion can be split with other players.
Detonating Stoneslam
will be applied which is a 6 second DoT followed by a large AoE explosion. The damage
from the AoE explosion can be split with other players.
Changelog
- 18 Mar. 2023: Added Mythic add locations and timers. Clarified Mythic P2 tank debuff.
- 12 Dec. 2022: Fixed hyperlinks, added tags, added video clip descriptions.
- 11 Dec. 2022: Guide added.