The Eternal Palace Raid Guides for Battle for Azeroth
The Eternal Palace is an 8-boss raid instance added in World of Warcraft Patch 8.2, launching on July 9th/10th. It represents the 24th tier of content in World of Warcraft. The Eternal Palace is available in LFR, Normal, Heroic, and Mythic difficulties.
Lore
At the time of the Great Sundering, Queen Azshara was given a choice: to live on as a servant of N'Zoth or perish in Zin-Azshari after the destruction of the Well of Eternity. Her choice to serve N'Zoth gave birth to a new race, the Naga, and under her leadership, they built an empire under the seas with The Eternal Palace at its heart.
Entrance of the Eternal Palace
 The Eternal Palace raid instance is located in Nazjatar. The entrance to the
instance is located underneath the place called Gate of the Queen and
is reached by swimming down from the small lake at that location. The lake is currently
protected by a barrier, which prevents entering it. We know it opens at the end of
the Nazjatar quest line.
 Meanwhile, a secondary access exists, but we do not know if it is
intended. There is a cave at coordinates 42.3, 13.3 in Nazjatar called
Chitterspine Grotto (just west of the Gate of the Queen). It is full of crabs
and once you submerge in the water there, you are going to be
followed by N'Zoth in his fish form and teleported to the raid's entrance.
The reason why we do not know if it is intended is because you get the
 ![]() Danger
debuff upon being teleported. At the raid entrance, you are granted
Danger
debuff upon being teleported. At the raid entrance, you are granted
![]() Guest of the Queen, which will allow you to breathe underwater in the instance. There,
you will also find a Displacement Pedestal to teleport back to the surface
(at the Tidal Conflux).
Guest of the Queen, which will allow you to breathe underwater in the instance. There,
you will also find a Displacement Pedestal to teleport back to the surface
(at the Tidal Conflux).
Unlock Schedule
- July 9, 2019 — Normal and Heroic Difficulties
- July 16, 2019 — Mythic and Raid Finder Wing 1 (Abyssal Commander Sivara, Blackwater Behemoth, Radiance of Azshara)
- July 30, 2019 — Raid Finder Wing 2 (Lady Ashvane, Orgozoa, The Queen's Court)
- August 13, 2019 — Raid Finder Wing 3 (Za'qul, Queen Azshara)
Boss Order
The boss order in The Eternal Palace is mostly linear — the only choice your raid can make is the order in which to attempt the second and third bosses, Blackwater Behemoth and Radiance of Azshara. The order of the bosses is as follows.
- Abyssal Commander Sivara;
- Blackwater Behemoth or Radiance of Azshara;
- Radiance of Azshara or Blackwater Behemoth;
- Lady Ashvane;
- Orgozoa;
- The Queen's Court;
- Za'qul;
- Queen Azshara.
Maps, Overview, and Lore of the Bosses
Dais of Eternity
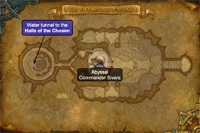 Upon entering the raid, you will find yourself in the Dais of Eternity.
This is a large room at the back of which the first boss,
Abyssal Commander Sivara,
is awaiting you. Little is known of the army Azshara created following
the millenia spent in the
depths, but Abyssal Commander Sivara has led the Naga vanguard to countless
victories. With an excellent strategic mind and strong mastery of both physical
and magical combat, she is both a deadly commander and soldier.
The fight against Abyssal Commander Sivara is actually surprisingly complex for a first encounter, and it requires correct positioning throughout the fight, as the raid must be split into two groups, with any failures to execute this correctly most likely leading to a wipe. For more information about the fight, please refer to our Abyssal Commander Sivara strategy guide.
After Abyssal Commander Sivara is defeated, take the stairs at the back of the room to reach a smaller room where you will be able to swim through a submerged tunnel to the second zone of the raid: Halls of the Chosen.
Halls of the Chosen and Darkest Depths
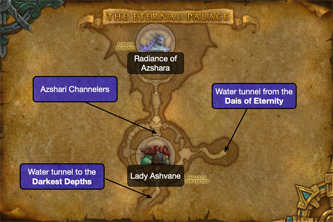
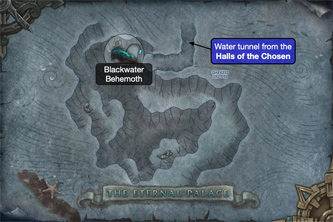
The Halls of the Chosen house two bosses: Lady Ashvane and Radiance of Azshara. Lady Ashvane cannot immediately be engaged. You first need to defeat both Radiance of Azshara and another boss located in the Darkest Depths: the Blackwater Behemoth. We think the best course of action is the following.
- As you enter the Halls of the Chosen, head towards the tunnel that leads to the Darkest Depths and defeat the Blackwater Behemoth.
- Go back to the Halls of the Chosen and defeat the Radiance of Azshara.
- Then, start making your way back towards Lady Ashvane's room. On the way there, incapacitate or kill the Azshari Channelers (marked on the above map), to take down the barrier protecting Lady Ashvane.
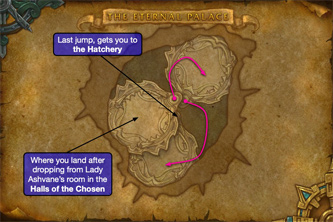
- After killing Lady Ashvane, the floor at the center of her room will shatter, allowing you to jump down to The Traverse, the next area.
The Blackwater Behemoth was summoned from seas so deep that even the depth-dwelling Naga will not venture to its home. It wields immense power that, without the iron grip of its Queen to command it, would quickly spiral out of control. Its presence as the guardian of Azshara’s treasure is yet another testament to her otherworldly strength. The encounter with this boss is an underwater fight that requires your raid to carefully manage the timing of a beneficial debuff, while also stressing correct positioning and movement. For more information, please refer to our Blackwater Behemoth strategy guide.
With the Wrath of Azshara having already been defeated in the Eye of Azshara, it should come as no surprise that this writhing elemental monstrosity has once again resurfaced as the Radiance of Azshara. It is powered by the soul of Azshara’s handmaiden, given willingly and locked away in a pendant worn by Azshara, and personifies the radiance of the queen herself. This fight has 2 phases, during which you must face a stationary boss (during Phase One) and a large Stormwraith (during Phase Two), with the two phases cycling back and forth until the boss is defeated. Movement and coordination are crucial here. For more information about this fight, please refer to our Radiance of Azshara strategy guide.
After her defeat at Boralus by the Kul Tiran fleet, Lady Ashvane was imprisoned in Tol Dagor; she broke out of her prison with the help of the Horde, but she soon revealed her allegiance to Azshara and the Naga. When confronted and placed once again in peril, her new Queen saved her once again, eventually solidifying a dark pact between the two and turning Lady Ashvane into a monstrosity, albeit a powerful one. This encounter features two phases cycling back and forth until Lady Ashvane is defeated. She has a large absorption shield that needs to be depleted during Phase One, before she can be damaged during Phase Two, which lasts a set amount of time (when it ends, Phase One restart, but the absorption shield grows larger with each new Phase One). For more details, please refer to our Lady Ashvane strategy guide.
The Traverse
The Traverse is the fourth zone of the raid, and the only one to feature no boss. It is a succession of 3 platforms with trash to kill on each of them. Once you are done with a platform, take the flight path to the next platform (see screenshot above). The flight path from the 3rd platform takes you to the next zone: The Hatchery.
The Hatchery
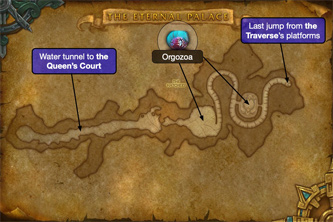 Almost immediately upon entering this area, you will encounter Orgozoa who acts as an overseer for the
hatchery, ensuring that all Azshara’s creations are looked after and kept ready
for the moment they are needed. The fight to defeat Orgozoa is split in two distinct
phases, each taking place in a different location. The room where you initially find
Orgozoa is where Phase One happens. You fight the boss and some recurring adds
for a short duration of time. Then the boss flees to the next room and the
raid needs to avoid a number of sources of environmental damage while pursuing
the overseer. Phase Two is mostly like Phase One, with more varied adds.
Overall, the fight is particularly difficult on healers, with high raid-wide
damage that increases over time.
For more information on how to defeat this boss, please refer
to our Orgozoa strategy guide.
Once Orgozoa is defeated, you can make your way to the Queen's Court by taking the underwater tunnel marked in the map above.
The Queen's Court
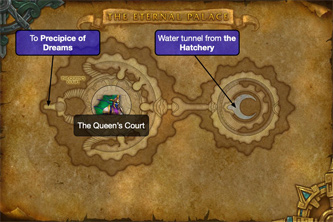 After emerging from the submerged tunnel, continue to the next room where you will find
Silivaz the Zealous and Pashmar the Fanatical, who form the
Queen's Court. Ever faithful,
they are the most loyal of Azshara’s followers and would gladly lay down their
lives for her at a moment’s notice; after ensuring her safety and enforcing her
will for countless millennia, these Naga will stop at nothing to prevent
intruders from reaching their Queen. This encounter is relatively static, in
the sense that the raid is going to stay mostly in the same place for the entire
fight, but there is a very large amount of abilities to react to. The two bosses
do not share health and must be killed at the same time.
For more information about all that, please refer to our
Queen's Court strategy guide.
Precipice of Dreams
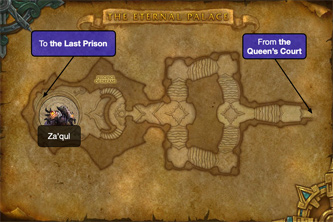 After defeating the Queen's Court, you will find yourself in the
Precipice of Dreams, where you will face
Za'qul, Harbinger of Ny'alotha.
A server of N'Zoth, Za'qul exists to destroy, acting as the harbinger for Azeroth and beyond; in
our darkest moments, he seeks to pick apart our defences to ensure the
smoothest takeover for his master.
The fight against Za'qul is a four-phase encounter of a complexity much greater than any of the previous encounters in the raid. The fight is long and incorporates a growing number of abilities that are re-used and evolved as the fight progresses, all culminating in a final phase that brings everything together, and which requires near-flawless execution from your raid to succeed. For more information, please refer to our Za'qul strategy guide.
The Last Prison
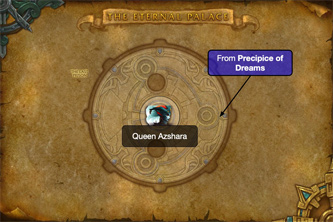 With Za'qul defeated, you can proceed to the Last Prison, where you will
face Queen Azshara, who
has been plotting her return to the surface and the destruction of all who
stand against her since the day she made her pact with N’Zoth. With an
overwhelming level of power, eons of planning behind her, and an Old God
supporting her, the Queen of the Naga could be one of the most dangerous
threats Azeroth has faced.
The fight against Queen Azshara is a long, complex, and gruelling 4-phase fight (with an added two transition phases) that will test your raid's concentration and coordination at every step. Like many great end-of-raid bosses in World of Warcraft, your group will have to progress and learn the fight phase by phase, one step at a time, before it can all finally come together for a successful kill.
For more information, please refer to our Queen Azshara strategy guide.
Loot
Loot in the Eternal Palace include weapons and armor pieces in all difficulties:
item level 400 for LFR, 415 for Normal, 430 for Heroic, and 445 for Mythic. In addition,
pets drop from select bosses: ![]() Lightless Ambusher,
Lightless Ambusher, ![]() Mindlost Bloodfrenzy,
Mindlost Bloodfrenzy,
![]() Nameless Octopode, and
Nameless Octopode, and ![]() Zanj'ir Poker. Finally, all upgrades
for essences Condensed Life-Force,
Vitality Conduit, and Azeroth's Undying Gift are found in
the raid.
Zanj'ir Poker. Finally, all upgrades
for essences Condensed Life-Force,
Vitality Conduit, and Azeroth's Undying Gift are found in
the raid.
We can also mention the ![]() Azshari Bloatray, a reward for
completing the
Azshari Bloatray, a reward for
completing the ![]() Glory of the Eternal Raider achievement.
Glory of the Eternal Raider achievement.
For more information, please refer to our Eternal Palace Loot and Essence guide.
Achievements
There are 26 achievements to be earned in the Eternal Palace. We present them here according to the difficulty you need to complete them in.
LFR+
 The Grand Reception — Defeat Abyssal Commander Sivara,
Blackwater Behemoth, and Radiance of Azshara in
any difficulty.
 Depths of the Devoted — Defeat Lady Ashvane,
Orgozoa, and The Queen's Court
in any difficulty.
 The Circle of Stars — Defeat Za'qul and
Queen Azshara in any difficulty.
Normal+
 You and What Army? — Defeat Abyssal Commander Sivara in The
Eternal Palace while all three of her lieutenants are alive and engaged in the
fight on Normal difficulty or higher.
 Intro to Marine Biology — Defeat the Blackwater Behemoth in The
Eternal Palace after collecting 50 samples of sea life from within the Darkest
Depths on Normal difficulty of higher.
 Fun Run — Defeat Radiance of Azshara in The Eternal Palace
after running 6 consecutive complete laps around her arena without falling into
the water on Normal difficulty or higher.
 Simple Geometry — Defeat Lady Ashvane in The Eternal Palace
after having each cast of Arcing Azerite pass through her on Normal difficulty
or higher.
 A Smack of Jellyfish — Defeat Orgozoa in the Hatchery in The Eternal
Palace after incubating a baby Zoatroid on Normal difficulty or higher.
 If It Please the Court — Perform various emotes to earn Queen
Azshara's Favor in the Eternal Palace, then defeat The Queen's Court on Normal
difficulty or higher.
If It Please the Court — Perform various emotes to earn Queen
Azshara's Favor in the Eternal Palace, then defeat The Queen's Court on Normal
difficulty or higher.-
 Lactose Intolerant — Defeat Za'qul in the Eternal
Palace after killing ten Twinklehoof Bovine on Normal difficulty or higher.
  The Best of Us — Defeat Queen Azshara in The Eternal Palace
with one player still alive who is currently affected by
 Essence of Azeroth on Normal difficulty or higher.
 Glory of the Eternal Raider — Complete the 8 other achievements mentioned above
and earn a
  Azshari Bloatray.
 The Eternal Palace Guild Run — Defeat the bosses The Eternal Palace on Normal difficulty or higher, while in a guild group.
Heroic+
 Ahead of the Curve: Queen Azshara — Defeat Queen Azshara in The Eternal Palace
on Heroic difficulty or higher, before the release of the next raid tier.
Mythic
 Mythic: Abyssal Commander Sivara — Defeat Abyssal Commander Sivara in The Eternal Palace on Mythic difficulty.
 Mythic: Blackwater Behemoth — Defeat Blackwater Behemoth in The Eternal Palace on Mythic difficulty.
 Mythic: Radiance of Azshara — Defeat Radiance of Azshara in The Eternal Palace on Mythic difficulty.
 Mythic: Lady Ashvane — Defeat Lady Ashvane in The Eternal Palace on Mythic difficulty.
 Mythic: Orgozoa — Defeat Orgozoa in The Eternal Palace on Mythic difficulty.
 Mythic: The Queen's Court — Defeat The Queen's Court in The Eternal Palace on Mythic difficulty.
 Mythic: Za'qul — Defeat Za'qul in The Eternal Palace on Mythic difficulty.
 Mythic: Queen Azshara — Defeat Queen Azshara in The Eternal Palace on Mythic difficulty.
 Mythic: Queen Azshara Guild Run — Defeat Queen Azshara in The Eternal Palace on Mythic difficulty while in a guild group.
 Cutting Edge: Queen Azshara — Defeat Queen Azshara in The Eternal Palace on Mythic difficulty, before the release of the next raid tier.
 Hall of Fame: Queen Azshara (Alliance) — Among the first one hundred Alliance guilds worldwide to defeat Queen Azshara on Mythic difficulty.
 Hall of Fame: Queen Azshara (Horde) — Among the first one hundred Horde guilds worldwide to defeat Queen Azshara on Mythic difficulty.
Changelog
- 08 Jul. 2019: Added loot, opening schedule and last 2 bosses.
Class Guides
Raid Guides
BfA Guides
Patch 8.3 Profession Changes
- Warcraft Returns! 10th Anniversary Edition SteelBook Now Available for Pre-Order
- Insane Solo Ritual Site Farm Is Printing Hero Crests in WoW Right Now
- This Bonus Roll Hack Could Boost Your BiS Chances in WoW This Week
- Class Fixes and Dungeon Tuning: Midnight 12.0.5 Hotfixes, April 28th
- Updating Quel’Thalas: New Blizzard Video on Rebuilding the Zone for Midnight
- How to Obtain All Collectibles From the Broken Throne Ritual Site
- Where Does Your Class Rank in DPS? 12.0.5’s Winners and Losers Are Clear
- WoW Patch 12.0.7 Is Already in Internal Testing and Adds Another One-Boss Raid
