

Radiance of Azshara Strategy Guide in The Eternal Palace Raid

Welcome to our strategy guide for the encounter with Radiance of Azshara in The Eternal Palace raid. Here, you will first find the strategy to defeat the boss, followed by a detailed analysis of the abilities.
To familiarize yourself with the encounter, we suggest you watch this short video guide from Hazel Nutty.
Fight Overview
The fight against the Radiance of Azshara is a two-phase encounter, with the two phases cycling back and forth until the boss is killed.
In Phase One, players will have to constantly avoid moving tornadoes
(![]() Arcanado) while also dealing with a few other positioning
constraints, while Phase Two will require players to navigate through a
damaging
Arcanado) while also dealing with a few other positioning
constraints, while Phase Two will require players to navigate through a
damaging ![]() Ancient Tempest that also reduces visibility, in order to
engage and defeat a large add and resume Phase One.
Ancient Tempest that also reduces visibility, in order to
engage and defeat a large add and resume Phase One.
Strategy / Fight Summary
 Radiance of Azshara during Phase One, with
 Phase One lasts for 100 seconds (until Radiance of Azshara's energy bar reaches 100%), during which time the raid must perform a few tasks.
- Damage the boss while staying out of the water (both around the boss as well as at the back of the room).
- Move out of
 Arcanado Burst areas and avoid coming into contact with
any
Arcanado Burst areas and avoid coming into contact with
any  Arcanado tornadoes, and avoid these moving Arcanados throughout
the phase.
Arcanado tornadoes, and avoid these moving Arcanados throughout
the phase. - Players debuffed by
 Arcane Bomb should move out of the raid, to a
safe location near the edge of the room, where they must be dispelled in order
to drop their Arcane Bomb void zones where they will not affect anyone.
Arcane Bomb should move out of the raid, to a
safe location near the edge of the room, where they must be dispelled in order
to drop their Arcane Bomb void zones where they will not affect anyone. - Tanks will have to taunt switch for the boss's
 Tide Fist ability.
 - Healers will need to heal up the unavoidable damage from
 Unshackled Power.
 Before
 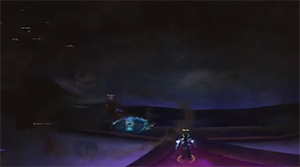 After
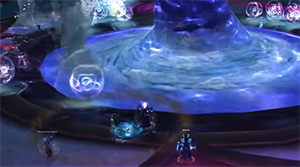
After When Radiance of Azshara reaches 100% energy, it casts ![]() Ancient Tempest
and Phase Two starts. The room becomes very dark (see images above) and
players must find their way to an add called Stormwraith
and kill it for Phase One to restart. This phase is more difficult and players
must perform the following tasks.
Ancient Tempest
and Phase Two starts. The room becomes very dark (see images above) and
players must find their way to an add called Stormwraith
and kill it for Phase One to restart. This phase is more difficult and players
must perform the following tasks.
- Everyone must quickly make their way to the Stormwraith, which is located
in the center of the tempest (referred to as the Eye of the Storm in the dungeon journal).
- Players will have to communicate, since the location of the Stormwraith is
not fixed, and visibility is very poor due to the
 Ancient Tempest.
- Players will have to communicate, since the location of the Stormwraith is
not fixed, and visibility is very poor due to the
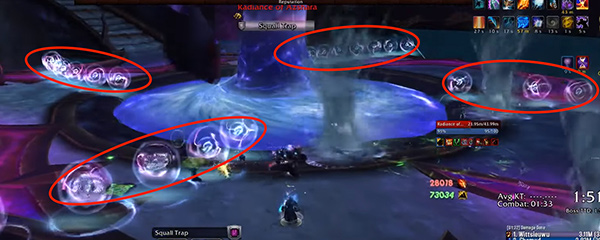
- As few of the
 Squall Traps blocking access around the platform
as possible should be detonated, since this deals damage and results in very
disruptive Arcanados. If the raid must cross a Squall Trap line,
ideally a single Squall Trap should be purposefully detonated to form a
gap, as is illustrated in the following image.
Squall Traps blocking access around the platform
as possible should be detonated, since this deals damage and results in very
disruptive Arcanados. If the raid must cross a Squall Trap line,
ideally a single Squall Trap should be purposefully detonated to form a
gap, as is illustrated in the following image.

- The Stormwraith's
 Focus Power cast should be interrupted,
and the Stormwraith should be focused down. Since the Stormwraith is harmless
while casting this ability, we recommend interrupting it as close as possible
to the end of the 15-second cast time.
Focus Power cast should be interrupted,
and the Stormwraith should be focused down. Since the Stormwraith is harmless
while casting this ability, we recommend interrupting it as close as possible
to the end of the 15-second cast time. - Within the Eye of the Storm, players will need to be mindful of the
frequent knock-backs caused by the Stormwraith's
 Gale Buffet (and to try not to get knocked back either into water or
into the Ancient Tempest).
Gale Buffet (and to try not to get knocked back either into water or
into the Ancient Tempest). - The Stormlings that spawn during this phase should be crowd controlled, interrupted, and cleaved down.
- Players affected by Arcane Bomb must move to the edge of the
Eye of the Storm to have their debuff dispelled.

Once the Stormwraith dies, Phase One will resume and the fight will continue this way until the boss is killed. Depending on your raid's DPS and the tuning of the fight, you may only have to endure a single Phase Two.
Tank Concerns
During Phase One, tanks only have one job, which is to taunt off one
another whenever the active tank is debuffed by ![]() Tide Fist. As the boss
is stationary, the active tank must make sure to always be within range of
the boss (as otherwise the boss will attack and kill other players), all while
staying out of the waters around the boss.
Tide Fist. As the boss
is stationary, the active tank must make sure to always be within range of
the boss (as otherwise the boss will attack and kill other players), all while
staying out of the waters around the boss.
During Phase Two, the tanks will need to quickly make their way to
the Eye of the Storm to pick up the Stormwraith, and interrupt its
cast of ![]() Focus Power (ideally as late as possible). From there, tanks
will simply have to tank the Stormwraith within the Eye of the Storm, while
also picking up and using crowd control on the Stormlings.
Focus Power (ideally as late as possible). From there, tanks
will simply have to tank the Stormwraith within the Eye of the Storm, while
also picking up and using crowd control on the Stormlings.
Heroism/Bloodlust/Time Warp
We recommend using ![]() Heroism/
Heroism/![]() Bloodlust/
Bloodlust/![]() Time Warp
at the start of the fight, since no other time in the fight requires it
specifically, and using it at the start allows the entire raid to take maximum
advantage of their cooldowns and potions.
Time Warp
at the start of the fight, since no other time in the fight requires it
specifically, and using it at the start allows the entire raid to take maximum
advantage of their cooldowns and potions.
Summary for Tanks
- During Phase One, perform a tank switch after each
Tide Fist cast. Make sure not to walk into the waters surrounding
the boss.
- During Phase Two, move to the Eye of the Storm and pick up the Stormwraith and Stormling adds, and tank them within the Eye of the Storm.
Summary for Healers and DPS
- During Phase
- Constantly be on the look-out for Arcanado tornadoes and avoid
getting hit by them.
- Stay away from the water at the center of the fighting area as well as at the back of it.
- Move away from other players when affected by
 Arcane Bomb, going to
a safe, remote location to drop the void zone when healers dispel you.
Arcane Bomb, going to
a safe, remote location to drop the void zone when healers dispel you.
- Constantly be on the look-out for
- During Phase Two
- Make your way to the Eye of the Storm as quickly as possible, ideally
through gaps in the Squall Trap lines (if a gap does not exist,
detonate a single Squall Trap to make room).
- Interrupt the Stormwraith's
 Focus Power cast, and then
DPS it and the Stormling adds down while remaining within the Eye of
the Storm.
Focus Power cast, and then
DPS it and the Stormling adds down while remaining within the Eye of
the Storm. - Beware of the frequent knockbacks that the Stormwraith will cast through
Gale Buffet.
- Make your way to the Eye of the Storm as quickly as possible, ideally
through gaps in the
Abilities
The fight against the Radiance of Azshara is a two-phase encounter, with the two phases alternating until the boss is defeated.
Phase One lasts 1 minute and 40 seconds (100 seconds), after which the boss enters a phase during which it cannot be damaged (Phase Two), during which time the raid must defeat an add. Once the add is killed, another Phase One (1 minute and 40 seconds long) will start, and so on.
Fighting Area
The boss is stationary throughout the fight (regardless of phase), and is located at the center of a large circular platform. In the middle of the platform, where the boss is located, there is a pool of water, which deals high Arcane damage to any players that come in contact with it and knocks them back.
Moreover, around the edges of the platform, there are other pools of water that also deal heavy damage to players who enter them (but these do not knock back).
Phase One
As stated, each Phase One lasts 1 minute and 40 seconds. During this time, the boss uses a number of abilities.
Tide Fist (Tank Debuff)
![]() Tide Fist is an ability that the boss uses against his current
target, dealing very high Physical damage to them and debuffing them for
20 seconds to take 200% increased Physical damage.
Tide Fist is an ability that the boss uses against his current
target, dealing very high Physical damage to them and debuffing them for
20 seconds to take 200% increased Physical damage.
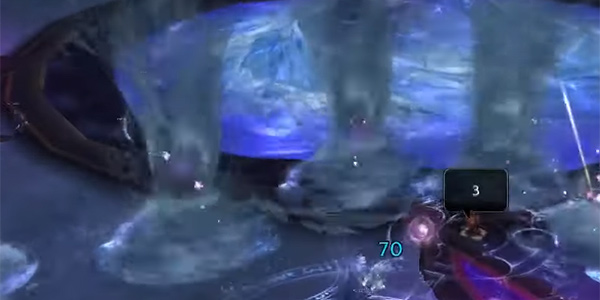
Arcanado Burst
![]() Arcanado Burst is an ability the bosses uses regularly throughout
Phase One. This targets several random raid members and marks areas around
their locations. A few moments later, an
Arcanado Burst is an ability the bosses uses regularly throughout
Phase One. This targets several random raid members and marks areas around
their locations. A few moments later, an ![]() Arcanado (basically a
tornado) forms at each of these locations, dealing Arcane damage to anyone
still standing there.
Arcanado (basically a
tornado) forms at each of these locations, dealing Arcane damage to anyone
still standing there.
The ![]() Arcanados persist for 20 seconds, during which time they
slowly move around the platform, dealing Frost damage to any players they
come in contact with and knocking them back.
Arcanados persist for 20 seconds, during which time they
slowly move around the platform, dealing Frost damage to any players they
come in contact with and knocking them back.
Given the frequency with which ![]() Arcanado Burst is cast, your raid
will need to deal with avoiding
Arcanado Burst is cast, your raid
will need to deal with avoiding ![]() Arcanados practically all throughout
Phase One.
Arcanados practically all throughout
Phase One.
You can see below what ![]() Arcanado Burst and the subsequent
Arcanado Burst and the subsequent
![]() Arcanado look like.
Arcanado look like.

Arcane Bomb

![]() Arcane Bomb is a debuff the boss places on random raid members.
This is a 10-second debuff that creates a large radius around the affected
player (and which moves with them). When the debuff expires, it deals high
Arcane damage within that radius, also stunning any affected players for
6 seconds.
Arcane Bomb is a debuff the boss places on random raid members.
This is a 10-second debuff that creates a large radius around the affected
player (and which moves with them). When the debuff expires, it deals high
Arcane damage within that radius, also stunning any affected players for
6 seconds.
![]() Arcane Bomb can be dispelled, however, and doing so will remove it
from the player and leave the area (basically now a void zone) on the ground
at the location where the player was dispelled. At the end of the 10-second
duration, the void zone will detonate, dealing the same high Arcane damage
and stunning players for 6 seconds, exactly as if it had stayed on the original
target all along and expired normally.
Arcane Bomb can be dispelled, however, and doing so will remove it
from the player and leave the area (basically now a void zone) on the ground
at the location where the player was dispelled. At the end of the 10-second
duration, the void zone will detonate, dealing the same high Arcane damage
and stunning players for 6 seconds, exactly as if it had stayed on the original
target all along and expired normally.
Unshackled Power
![]() Unshackled Power is an ability the boss uses every 20 seconds,
which deals raid-wide Arcane damage.
Unshackled Power is an ability the boss uses every 20 seconds,
which deals raid-wide Arcane damage.
Phase Two
Whenever Phase Two starts, several things happen.
- Radiance of Azshara stops using abilities (except for
Arcane Bomb) and can no longer be
damaged (taking 99% reduced damage).
- The entire fighting area is covered in an Ancient Tempest,
essentially a sort of dust storm that greatly reduces player visibility, which
deals constant and increasing raid-wide damage, and pushes players away from
a designated area on the platform where a large add, a Stormwraith, has
spawned.
- The area where the Stormwraith spawns is random, although it appears to have a preference for spawning as far away from most of the raid as possible.
- The area around the Stormwraith (a rather large radius) is safe
from the Ancient Tempest.
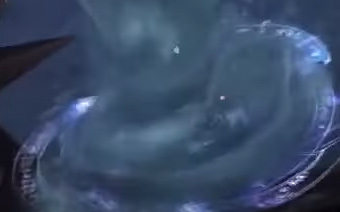
- Several lines of Squall Traps will form on the
platform, dividing it into quadrants all the way from the center to the
outer edge. These lines actually appear a few seconds before the start
of Phase Two, but we decided to treat them as a Phase Two ability.
- If a player runs into a Squall Trap, it will detonate, dealing
damage to that player and spawning an Arcanado.
- If a player runs into a Squall Trap, it will detonate, dealing
damage to that player and spawning an
Once the Stormwraith is defeated, the ![]() Ancient Tempest will
stop,
Ancient Tempest will
stop, ![]() Squall Traps will disappear (except on Heroic and Mythic
difficulties, where they persist), and Phase One will resume once again.
Squall Traps will disappear (except on Heroic and Mythic
difficulties, where they persist), and Phase One will resume once again.
Below you can see an image with the Squall Trap lines, and get an idea of how they divide the space.
Stormwraith Abilities
As stated, the Stormwraith is located in a safe zone within the
![]() Ancient Tempest (an area designated as the Eye of the Storm).
At the beginning of Phase Two, the Stormwraith will start casting an
ability called
Ancient Tempest (an area designated as the Eye of the Storm).
At the beginning of Phase Two, the Stormwraith will start casting an
ability called ![]() Focus Power which, if the 15-second cast is not
interrupted, will boost the Stormwraith's damage by 500%.
Focus Power which, if the 15-second cast is not
interrupted, will boost the Stormwraith's damage by 500%.
Whenever the Stormwraith is not casting ![]() Focus Power (which it will
attempt to do after the initial cast, as well), it will spam
Focus Power (which it will
attempt to do after the initial cast, as well), it will spam
![]() Gale Buffet, which deals Frost damage to all players in a 50-yard
radius (essentially raid-wide, since the entire raid will want to be within
the Eye of the Storm) and knocks back affected targets.
Gale Buffet, which deals Frost damage to all players in a 50-yard
radius (essentially raid-wide, since the entire raid will want to be within
the Eye of the Storm) and knocks back affected targets.
The Stormwraith will spawn Stormlings, small adds that spawn in sets of 3. These adds will regularly cast interruptible Chain Lighting-style attacks against the raid. They are susceptible to all forms of crowd control.
Finally, both the Stormwraith and the Stormlings take 99%
reduced damage and heal for 10% of their maximum health every second if they
are brought within the ![]() Ancient Tempest (gaining a buff called
Ancient Tempest (gaining a buff called
![]() Swirling Winds).
Swirling Winds).
Heroic Difficulty Changes
The only difference from LFR/Normal to Heroic mode is that in Heroic mode,
![]() Squall Trap lines do not despawn when the boss re-enters Phase One,
meaning that your raid will have to keep dealing with them in the new Phase
One.
Squall Trap lines do not despawn when the boss re-enters Phase One,
meaning that your raid will have to keep dealing with them in the new Phase
One.
Mythic Difficulty
Mythic Difficulty Changes
On Mythic difficulty, the difference is that during Phase Two, two Stormwraiths will spawn in different locations, apart from one another (but both rather far from where the raid is located). Each Stormwraith will have its own Eye of the Storm safe zone around them. Aside from there being two of them, the Stormwraiths work the same as on the other difficulties.
In addition to this change, the boss and the adds have more health and deal more damage than in Heroic mode.
Mythic Difficulty Strategy
The Phase One strategy of the fight remains exactly as in Heroic mode.
For Phase Two, you will need to split your raid into two groups (which you should assign ahead of time, of course). Each group should handle one of the two Stormwraiths.
Note that once a Stormwraith is killed, the safe
zone around it disappears, meaning that if one group kills their Stormwraith
long before the other group, these players will likely die with the safe
zone gone and the ![]() Ancient Tempest still going on until the other
Stormwraith dies and the phase ends. As such, the two Stormwraiths should
die at the same time, or as close to this as your raid can manage it.
Ancient Tempest still going on until the other
Stormwraith dies and the phase ends. As such, the two Stormwraiths should
die at the same time, or as close to this as your raid can manage it.
Loot
| Item> | Type | Slot |
|---|---|---|
| Mace | Two Hand | |
| Shield | Off Hand | |
| Cloth Armor | Head | |
| Cloth Armor | Wrists | |
| Cloth Armor | Hands | |
| Cloth Armor | Waist | |
| Leather Armor | Shoulders | |
| Leather Armor | Legs | |
| Leather Armor | Feet | |
| Mail Armor | Chest | |
| Mail Armor | Wrists | |
| Mail Armor | Hands | |
| Plate Armor | Head | |
| Plate Armor | Waist | |
| Accessory | Trinket | |
| Essence upgrades |
For more information, please refer to our Eternal Palace Loot and Essence guide.
Class-specific Advice for Radiance of Azshara
Changelog
- 15 Jul. 2019: Mythic section added.
- 08 Jul. 2019: Added loot.
- 05 Jul. 2019: Guide added.