

Abyssal Commander Sivara Strategy Guide in The Eternal Palace Raid

Welcome to our strategy guide for the encounter with Abyssal Commander Sivara in The Eternal Palace raid. Here, you will first find the strategy to defeat the boss, followed by a detailed analysis of the abilities.
To familiarize yourself with the encounter, we suggest you watch this short video guide from Hazel Nutty.
Strategy Overview: Chimeric Marks and Unstable Mixture
The fight against Abyssal Commander Sivara is a single-phase encounter (with no adds whatsoever), during which proper raid movement and proper positioning is crucial. The boss does not need to be actively faced away from the group (she does not cleave or use a breath attack), but generally melee players will want to be behind the boss to ensure their hits land.
Immediately below, we go over ![]() Chimeric Marks and
Chimeric Marks and ![]() Unstable Mixture,
the two most important abilities of the fight, and their interaction. Then, we go
on to tackle positioning constraints and finer strategy details. Finally, we
give summaries of what tanks, healers, and DPS need to do.
Unstable Mixture,
the two most important abilities of the fight, and their interaction. Then, we go
on to tackle positioning constraints and finer strategy details. Finally, we
give summaries of what tanks, healers, and DPS need to do.
At the beginning of the fight, ![]() Chimeric Marks debuffs players in the entire
raid with either a Frost debuff (
Chimeric Marks debuffs players in the entire
raid with either a Frost debuff (![]() Frost Mark — deals
damage every second and reduces movement speed)
or a Poison debuff (
Frost Mark — deals
damage every second and reduces movement speed)
or a Poison debuff (![]() Toxic Brand — deals
damage every second and reduce healing received). Both debuffs stack when hit
by various abilities during the fight. Throughout
the fight, Frost void zones and Poison
void zones will also appear (as a result of players dropping them after having been targeted
by abilities). Coming in contact with a player with the other debuff or walking
in a void zone of the other school triggers
Toxic Brand — deals
damage every second and reduce healing received). Both debuffs stack when hit
by various abilities during the fight. Throughout
the fight, Frost void zones and Poison
void zones will also appear (as a result of players dropping them after having been targeted
by abilities). Coming in contact with a player with the other debuff or walking
in a void zone of the other school triggers ![]() Unstable Mixture, dealing raid-wide
damage. To avoid this, you need to physically split the encounter area in two: a Frost
area for players with
Unstable Mixture, dealing raid-wide
damage. To avoid this, you need to physically split the encounter area in two: a Frost
area for players with ![]() Frost Mark and a Poison area for
players with
Frost Mark and a Poison area for
players with ![]() Toxic Brand. The two tanks always get a different debuff.
Toxic Brand. The two tanks always get a different debuff.
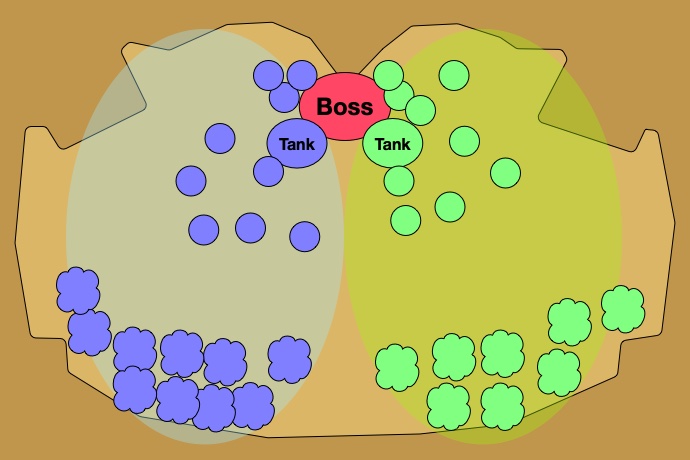 Sivara's room is split into two areas, one for Frost-debuffed players
and one for Poison-debuffed people. Sivara is tanked between the two areas.
Frost void are to be dropped at the back of the Frost area and Poison
void zones are to be dropped at the back of the Poison area.
Sivara's room is split into two areas, one for Frost-debuffed players
and one for Poison-debuffed people. Sivara is tanked between the two areas.
Frost void are to be dropped at the back of the Frost area and Poison
void zones are to be dropped at the back of the Poison area.
The fight is complicated further by the fact that the boss changes the
debuff of part of the raid several times throughout the fight
(![]() Inversion — cast approximately every 70 seconds), which means that there will be
Frost-debuffed players in the Poison
area and Poison-debuffed players in the Frost area.
These players will need to make their way to the proper area without
triggering
Inversion — cast approximately every 70 seconds), which means that there will be
Frost-debuffed players in the Poison
area and Poison-debuffed players in the Frost area.
These players will need to make their way to the proper area without
triggering ![]() Unstable Mixture.
Unstable Mixture.
 When
When Finally, several abilities require movement, so players
must always be careful and avoid triggering ![]() Unstable Mixture.
Because the Frost and Poison
debuffs are stacked by several abilities (causing the debuffs to deal
increasing damage) throughout the fight and because the only way to reset these
stacks is by triggering Unstable Mixture, a few Unstable Mixtures will
inevitably go off, but this should always be done in concert with the
healers.
Unstable Mixture.
Because the Frost and Poison
debuffs are stacked by several abilities (causing the debuffs to deal
increasing damage) throughout the fight and because the only way to reset these
stacks is by triggering Unstable Mixture, a few Unstable Mixtures will
inevitably go off, but this should always be done in concert with the
healers.
Watch Out For Crushing Reverberation
The boss sometimes casts ![]() Crushing Reverberation on the active tank.
Some raid members of their Chimeric Mark group should help soak this by being within
5 yards. Depending on the difficulty and the actual tuning, the number of
required soakers will depend. Melee can help soak, if needed, by simply
moving next to the tank when Crushing Reverberation is about to be cast,
and then moving back behind the boss.
Crushing Reverberation on the active tank.
Some raid members of their Chimeric Mark group should help soak this by being within
5 yards. Depending on the difficulty and the actual tuning, the number of
required soakers will depend. Melee can help soak, if needed, by simply
moving next to the tank when Crushing Reverberation is about to be cast,
and then moving back behind the boss.
![]() Crushing Reverberation also sends out a shockwave that knocks
all players back. This can send careless players into void zones,
which needs to be avoided.
Crushing Reverberation also sends out a shockwave that knocks
all players back. This can send careless players into void zones,
which needs to be avoided.
Dropping Void Zones
Non-tank players are regularly debuffed by ![]() Overflow, which causes
them to drop Frost or Poison
void zones (the school of their debuff) on the floor after 6 seconds. These
players must move away from other players, and drop the resulting void zone in
a safe area, preferably off to the side of the room (see maps above).
Overflow, which causes
them to drop Frost or Poison
void zones (the school of their debuff) on the floor after 6 seconds. These
players must move away from other players, and drop the resulting void zone in
a safe area, preferably off to the side of the room (see maps above).
On LFR and Normal difficulty (and possibly even on Heroic), it should not be necessary for any players to help soak the explosion from Overflow; if, however, you do choose to do so for safety, players soaking Overflow should have the same debuff as the targeted player.
The other source of void zones is ![]() Frostvenom Tipped,
which is an ability that only targets tanks (see below).
Frostvenom Tipped,
which is an ability that only targets tanks (see below).
Avoiding Unstable Mixture
A crucial part of the fight is minimizing the number of
![]() Unstable Mixtures that go off. Ideally, you should have none at all,
but this is not realistic as players will most likely have to trigger some,
because it is the only way to clear their stacks of
Unstable Mixtures that go off. Ideally, you should have none at all,
but this is not realistic as players will most likely have to trigger some,
because it is the only way to clear their stacks of ![]() Chimeric Marks when they get too
high. This is perfectly acceptable — just make sure that you do not
overlap too many Unstable Mixture explosions, as the cumulative damage could
result in deaths.
Chimeric Marks when they get too
high. This is perfectly acceptable — just make sure that you do not
overlap too many Unstable Mixture explosions, as the cumulative damage could
result in deaths.
To avoid any accidental ![]() Unstable Mixtures, be careful of the
following situations.
Unstable Mixtures, be careful of the
following situations.
- Make sure that players who soak
 Overflow (if your raid chooses to
do this) have the same Chimeric Mark as the original target of Overflow.
Overflow (if your raid chooses to
do this) have the same Chimeric Mark as the original target of Overflow. - Make sure to never come into contact with Frost or
Poison void zones, especially when you have the opposing
Chimeric Mark. Note the
 Crushing Reverberation knock-back.
 - Before
 Inversion is cast, players must be spread out 4 yards
apart, to ensure that no two players of opposing Chimeric Marks touch.
Furthermore, after Inversion, players must leave enough space in the room
for everyone whose debuff has changed to make their way to the correct
group.
Inversion is cast, players must be spread out 4 yards
apart, to ensure that no two players of opposing Chimeric Marks touch.
Furthermore, after Inversion, players must leave enough space in the room
for everyone whose debuff has changed to make their way to the correct
group.
Frostshock Bolts
Players sometimes are targeted by ![]() Frostshock Bolts, which fires
a Frost or Poison
bolt at them and freezes them. Make sure that a player of the
corresponding Chimeric Mark debuff intercepts the bolt. Furthermore,
freezed players need to be freed by players with the same Chimeric Mark debuff.
Frostshock Bolts, which fires
a Frost or Poison
bolt at them and freezes them. Make sure that a player of the
corresponding Chimeric Mark debuff intercepts the bolt. Furthermore,
freezed players need to be freed by players with the same Chimeric Mark debuff.
In LFR and Normal difficulty, it is probably easier for the raid to
have the targeted player hit by the bolt and handle the resulting
![]() Unstable Mixture, rather than have it intercepted by
a player from the other debuff group.
Unstable Mixture, rather than have it intercepted by
a player from the other debuff group.
To intercept a bolt, have the targeted player move towards the other group. This will make it easier for a melee player from the other group to move towards the arrow that indicates the direction of the bolt and intercept it. After this, make sure a player with the same debuff unpin the targeted players. If the targeted player has the Frost debuff, they need to move towards the Poison group so that a member of that group intercept the bolt. After that, another player with the Frost debuff must unpin them.
Overwhelming Barrage


When the boss casts ![]() Overwhelming Barrage (approximately every 40
seconds, when her Energy bar reaches 100%), one half of the boss will fire
Frost projectiles and the other half will fire
Poison projectiles. As you can see in the images
above, there is a short casting animation around the boss, before projectiles
appear and start firing. In our PTR experience,
the Frost projectiles are always fired towards
the Frost void zones and the
Poison projectiles are always fired towards
the Poison void zones. Note that projectiles
are not all fired at the same time, making it possible to avoid them.
Overwhelming Barrage (approximately every 40
seconds, when her Energy bar reaches 100%), one half of the boss will fire
Frost projectiles and the other half will fire
Poison projectiles. As you can see in the images
above, there is a short casting animation around the boss, before projectiles
appear and start firing. In our PTR experience,
the Frost projectiles are always fired towards
the Frost void zones and the
Poison projectiles are always fired towards
the Poison void zones. Note that projectiles
are not all fired at the same time, making it possible to avoid them.
In case some players are going to get hit with the wrong school of
projectile (for example by a Frost projectile
when they have the Poison debuff), they need
to move to the right side of the boss. Getting hit by a projectile of the
wrong school causes an ![]() Unstable Mixture, while getting hit by a
projectile of the right school increases your stacks of the debuff by 1.
Unstable Mixture, while getting hit by a
projectile of the right school increases your stacks of the debuff by 1.
Managing Chimeric Mark Stacks
Players should avoid letting their ![]() Chimeric Marks debuff stack too high,
which is mostly done by not staying in void zones after dropping them,
not walking in void zones dropped by others, and avoiding the
projectiles of
Chimeric Marks debuff stack too high,
which is mostly done by not staying in void zones after dropping them,
not walking in void zones dropped by others, and avoiding the
projectiles of ![]() Overwhelming Barrage.
Overwhelming Barrage.
However, it is quite likely that, throughout the fight, players will need to
reset their stacks by triggering an ![]() Unstable Mixture. As long as this
is communicated ahead of time to the healers (or at least timed in such a way
as not to cause them too many problems), it is perfectly acceptable to do
this. The best way is for the player who wishes to reset their debuffs to
simply step into a void zone of the opposite type.
Unstable Mixture. As long as this
is communicated ahead of time to the healers (or at least timed in such a way
as not to cause them too many problems), it is perfectly acceptable to do
this. The best way is for the player who wishes to reset their debuffs to
simply step into a void zone of the opposite type.
Inversion
Dealing with ![]() Inversion is an important part of the fight. When
this ability is about to be cast, all raid members should spread out more
than 4 yards apart. Then, once the new distribution of
Inversion is an important part of the fight. When
this ability is about to be cast, all raid members should spread out more
than 4 yards apart. Then, once the new distribution of ![]() Chimeric Marks
is set, the players whose debuffs have changed will have to make their
way to the correct half of the raid.
Chimeric Marks
is set, the players whose debuffs have changed will have to make their
way to the correct half of the raid.
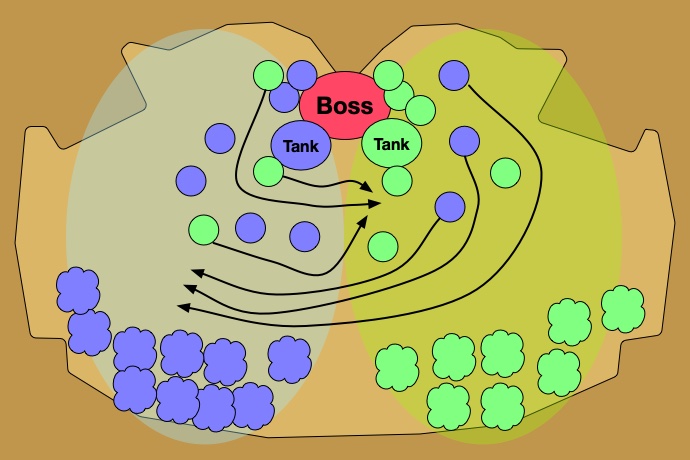
In practice, all the players whose debuffs change are rooted for 4
seconds with ![]() Inversion Sickness once the new debuffs have gone out;
think of this as a sort of grace period during which all the members who are
not rooted can move around freely, forming
clear free paths for the newly debuffed players to move through once their
4-second roots run out. Once these roots run out, the players should carefully
move to their new groups.
Inversion Sickness once the new debuffs have gone out;
think of this as a sort of grace period during which all the members who are
not rooted can move around freely, forming
clear free paths for the newly debuffed players to move through once their
4-second roots run out. Once these roots run out, the players should carefully
move to their new groups.
Heroism/Bloodlust/Time Warp
We recommend using ![]() Heroism/
Heroism/![]() Bloodlust/
Bloodlust/![]() Time Warp on
the pull, for the highest benefit in terms of DPS gain. There is no other
stage of the fight where this ability is better used.
Time Warp on
the pull, for the highest benefit in terms of DPS gain. There is no other
stage of the fight where this ability is better used.
Tank Concerns
Tanks have two things to worry about during this fight:
![]() Crushing Reverberation (which we already mentioned
above and
Crushing Reverberation (which we already mentioned
above and
![]() Frostvenom Tipped.
Frostvenom Tipped.
![]() Frostvenom Tipped stacks a debuff on the active tank. We advise
taunt-switching whenever stacks get too high (we advise
switching around 5 stacks). After the switch, the debuff, which has a 10-second duration
will expire, causing them to drop a void zone at their location (Frost void
zone if they have
Frostvenom Tipped stacks a debuff on the active tank. We advise
taunt-switching whenever stacks get too high (we advise
switching around 5 stacks). After the switch, the debuff, which has a 10-second duration
will expire, causing them to drop a void zone at their location (Frost void
zone if they have ![]() Frost Mark, Poison void zone
if they have
Frost Mark, Poison void zone
if they have ![]() Toxic Brand).
So, tanks should, once they are no longer tanking
the boss, move to a safe location, at the edge of the room, in order to drop
their void zone.
Toxic Brand).
So, tanks should, once they are no longer tanking
the boss, move to a safe location, at the edge of the room, in order to drop
their void zone.
Heroic Difficulty Changes
Heroic difficulty has 2 notable changes.
![]() Inversion now also switches the type of all existing void zones.
This means that Frost void zones become
Frost and vice versa. As a result, players who had
their
Inversion now also switches the type of all existing void zones.
This means that Frost void zones become
Frost and vice versa. As a result, players who had
their ![]() Chimeric Marks debuff changed by
Chimeric Marks debuff changed by ![]() Inversion do not need
to move (unlike in LFR and Normal difficulties), because they already have the
right debuff. It means that it is the players who did not have their debuff changed
by
Inversion do not need
to move (unlike in LFR and Normal difficulties), because they already have the
right debuff. It means that it is the players who did not have their debuff changed
by ![]() Inversion who need to move to the other side.
Inversion who need to move to the other side.
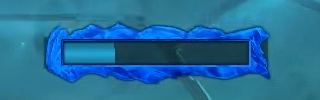

Starting with Heroic difficulty, players are given an energy
bar, the color of which correspond to their ![]() Chimeric Marks debuff.
Chimeric Marks debuff.
- Frost-debuffed players need to regularly move
to prevent their bar from filling up. If it does, they are frozen for 8 seconds
by
 Frozen Blood.
 - Poison-debuffed players, need to avoid
moving to prevent their Poison bar from filling up, they are disoriented for
8 seconds by
 Venomous Blood.
Finally, it is possible that the tuning of the damage from
![]() Overflow and
Overflow and ![]() Crushing Reverberation will influence
the number of players needed to soak these abilities. Similarly,
the raid might no longer get away with letting players get
hit by
Crushing Reverberation will influence
the number of players needed to soak these abilities. Similarly,
the raid might no longer get away with letting players get
hit by ![]() Frostshock Bolts. In this case, have targeted
players move towards the middle of the room and have
a player from the other group intercept the bolt.
Frostshock Bolts. In this case, have targeted
players move towards the middle of the room and have
a player from the other group intercept the bolt.
Summary for Tanks
- Tank the boss in the middle of the room and stay on the side of
the room assigned to your
 Chimeric Marks debuff
(beware of Inversion changing the void zones in
Heroic and Mythic difficulties).
Chimeric Marks debuff
(beware of Inversion changing the void zones in
Heroic and Mythic difficulties). - Do not walk in void zones or come in contact with a player who has
the other Chimeric Marks debuff.
- Watch out for Crushing Reverberation and ask for players to
help you soak it if necessary (especially in Heroic and Mythic difficulties).
- Let the other tank taunt-switch the boss from you whenever your
stacks of
 Rimefrost or
  Septic Taint (from
  Frostvenom Tipped)
get too high. Then move away from the raid and drop your void zone with
the other void zones of your debuff.
Frostvenom Tipped)
get too high. Then move away from the raid and drop your void zone with
the other void zones of your debuff. - Avoid the projectiles from
 Overwhelming Barrage if you can.
Summary for Healers and DPS
- Always stay on the side of the room assigned to your Chimeric Marks debuff:
Frost area if you have
 Frost Mark
or Poison area if you have
Frost Mark
or Poison area if you have  Toxic Brand
(beware of Inversion changing the void zones in
Heroic and Mythic difficulties).
Toxic Brand
(beware of Inversion changing the void zones in
Heroic and Mythic difficulties). - Make sure the knockback from Crushing Reverberation does not
send you in a void zone. Help the tank soak the initial damage if they ask.
- Do not walk in void zones or come in contact with a player who has
the other Chimeric Marks debuff.
- Drop your void zones (from Overflow) at the back of your area. In Mythic
difficulty (and possibly Heroic as well), ask for people to help you soak the damage
from the explosion.
- Ignore
 Frostshock Bolts and let it pin you in LFR and Normal difficulties.
In Heroic and Mythic difficulties, move towards the other group so that one of
their player can intercept the bolt.
Frostshock Bolts and let it pin you in LFR and Normal difficulties.
In Heroic and Mythic difficulties, move towards the other group so that one of
their player can intercept the bolt. - Unpin players of your group pinned by Frostshock Bolts.
- Avoid the projectiles from Overwhelming Barrage if you can.
- Speak with your healers before reseting your Chimeric Marks debuff
(walking in a void zone from the other area is the simplest way).
What Increases Your Stacks
Below, you will find a recap of all the ways you can increase
the stacks of your ![]() Chimeric Marks debuff:
Chimeric Marks debuff:
- walking in a void zone of the same school (Frost void zone
if you have Frost Mark, for example);
- getting hit by a projectile from Overwhelming Barrage of the
same school (Frost projectile if you have
Frost Mark, for example);
- intercepting a bolt from Frostshock Bolts;
- when the boss casts Chimeric Marks in Mythic difficulty.
Note that your stacks are maintained when ![]() Inversion changes your debuff.
Inversion changes your debuff.
What Triggers an Unstable Mixture
![]() Unstable Mixture is triggered when:
Unstable Mixture is triggered when:
- two players with different debuffs come into contact with one another;
- walking in a void zone of the opposite school (Frost void zone
if you have Toxic Brand, for example);
- a player is targeted by Frostshock Bolts and no one intercepts the bolt;
- a player is hit by a projectile from Overwhelming Barrage of
the opposite school; (Frost projectile if you have
Toxic Brand, for example).
Note that ![]() Unstable Mixture deals Nature damage, but this does not
trigger further Unstable Mixtures. At the beginning of the fight, there is a grace period of a few seconds
during which
Unstable Mixture deals Nature damage, but this does not
trigger further Unstable Mixtures. At the beginning of the fight, there is a grace period of a few seconds
during which ![]() Unstable Mixture cannot trigger, which gives the raid
enough time to get into position. Players who trigger an Unstable Mixture
have their debuff stack reset.
Unstable Mixture cannot trigger, which gives the raid
enough time to get into position. Players who trigger an Unstable Mixture
have their debuff stack reset.
Mythic Difficulty
Mythic Difficulty Changes
Mythic difficulty adds one change over Heroic difficulty. Sivara now casts
![]() Chimeric Marks every 20 to 25 seconds, causing stacks of the debuffs to
increase.
Chimeric Marks every 20 to 25 seconds, causing stacks of the debuffs to
increase.
Aside from this, the boss has more health and deals more damage than in Heroic mode.
Mythic Strategy
The result of the ![]() Chimeric Marks change is that everyone in the
raid will eventually have to trigger
Chimeric Marks change is that everyone in the
raid will eventually have to trigger ![]() Unstable Mixture. We recommend
that players clear their Chimeric Mark debuffs (
Unstable Mixture. We recommend
that players clear their Chimeric Mark debuffs (![]() Frost Mark /
Frost Mark /
![]() Toxic Brand at 5-6 stacks.
Toxic Brand at 5-6 stacks.
Players will intentionally trigger ![]() Unstable Mixtures to clear
Unstable Mixtures to clear
![]() Chimeric Marks stacks, and they should do so in a staggered way, in order to prevent combined damage
bursts from causing deaths. Exactly how you choose to stagger the
Chimeric Marks stacks, and they should do so in a staggered way, in order to prevent combined damage
bursts from causing deaths. Exactly how you choose to stagger the
![]() Unstable Mixtures will depend on your raid, but as long as you have
players trigger Unstable Mixture to clear around 5-6 stacks of their debuff,
you should be fine.
Unstable Mixtures will depend on your raid, but as long as you have
players trigger Unstable Mixture to clear around 5-6 stacks of their debuff,
you should be fine.
It is important to avoid ![]() Unstable Mixtures lining up with
either
Unstable Mixtures lining up with
either ![]() Crushing Reverberation or
Crushing Reverberation or ![]() Overwhelming Barrage, since
the combined damage may be too dangerous.
Overwhelming Barrage, since
the combined damage may be too dangerous.
One final note is regarding ![]() Overflow: live server tuning allows
many classes and specs to solo the damage from this explosion without the
need for any additional soakers. Any class with immunities, and even strong
personal cooldowns, should be able to handle this explosion on their own.
Players who cannot handle the explosion on their own should have an external
cooldown used on them (such as
Overflow: live server tuning allows
many classes and specs to solo the damage from this explosion without the
need for any additional soakers. Any class with immunities, and even strong
personal cooldowns, should be able to handle this explosion on their own.
Players who cannot handle the explosion on their own should have an external
cooldown used on them (such as ![]() Life Cocoon, or even a
Life Cocoon, or even a
![]() Void Stone effect).
Void Stone effect).
If worse comes to worst, you can have a few raid members of the same Chimeric Mark help soak the explosion, but this should only rarely be needed.
Loot
| Item> | Type | Slot |
|---|---|---|
| Axe | One Hand | |
| Crossbow | ||
| Dagger | ||
| Fist Weapon | One Hand | |
| Frill | Off Hand | |
| Mace | One Hand | |
| Polearm | ||
| Cloth Armor | Chest | |
| Cloth Armor | Legs | |
| Leather Armor | Head | |
| Leather Armor | Wrists | |
| Mail Armor | Shoulders | |
| Mail Armor | Waist | |
| Plate Armor | Chest | |
| Plate Armor | Wrists | |
| Plate Armor | Hands | |
| Plate Armor | Feet | |
| Accessory | Trinket |
For more information, please refer to our Eternal Palace Loot and Essence guide.
Class-specific Advice for Abyssal Commander Sivara
Changelog
- 17 Jul. 2019: Updated Mythic section following live server experience.
- 15 Jul. 2019: Mythic section added.
- 08 Jul. 2019: Added loot.
- 05 Jul. 2019: Guide added.