

Welcome to our strategy guide for the encounter with Orgozoa in The Eternal Palace raid. Here, you will first find the strategy to defeat the boss, followed by a detailed analysis of the abilities.
To familiarize yourself with the encounter, we suggest you watch this short video guide from Hazel Nutty.
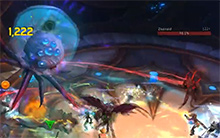
Fight Overview
The encounter against Orgozoa is a two-phase fight that is especially hard on your healers. Throughout the fight, the raid and the tanks will take large amounts of damage from various sources, making any avoidable damage that raid members take become truly problematic for the healers.
The boss uses the same abilities in both Phase One and Phase Two (which are very similar), and you will also need to go through a Transition Phase. The transition into Phase Two happens after 3 minutes and 30 seconds.
Strategy / Fight Summary
Phase One
During Phase One, the tanks have the most important role: they must make
use of the ![]() Desensitizing Sting debuff (which reduces damage taken) the
boss stacks on the current tank to soak the
Desensitizing Sting debuff (which reduces damage taken) the
boss stacks on the current tank to soak the ![]() Amniotic Splatter void
zones that the Zoatroid adds leave behind when they die. These void
zones will wipe the raid if they are not soaked, and only the tank with a high
number of Desensitizing Sting stacks (8 or 9, ideally — at 10 stacks
the tank is instantly killed) can survive the damage they deal if they are
soaked.
Amniotic Splatter void
zones that the Zoatroid adds leave behind when they die. These void
zones will wipe the raid if they are not soaked, and only the tank with a high
number of Desensitizing Sting stacks (8 or 9, ideally — at 10 stacks
the tank is instantly killed) can survive the damage they deal if they are
soaked.
In practice, this is what should happen.
- Tank A starts tanking the boss until the Zoatroid adds spawn.
- When the adds have spawned, tank B should taunt the boss and tank A
should pick up the adds and move them away from the boss (at least 15 yards
away, so that the boss does not buff them with
 Chaotic Growth).
 - The adds should be focused down by the raid and quickly killed.
- Tank A, who should still have the
 Desensitizing Sting debuff
active, must stand in each of the void zones for 5 seconds after it appears, at
which point the void zone explodes. This should only deal minor damage to the
soaking tank, but keep in mind that it does also deal an amount of raid-wide
damage.
Desensitizing Sting debuff
active, must stand in each of the void zones for 5 seconds after it appears, at
which point the void zone explodes. This should only deal minor damage to the
soaking tank, but keep in mind that it does also deal an amount of raid-wide
damage. - Tank A must then take over the boss before Tank B's
Desensitizing Sting stacks reach 10.
- From here, each time a set of adds spawns, the tank who is not currently tanking the boss should pick them up and then handle soaking the resulting void zones.
 Tanking Zoatroid adds
 Soaking
 Keep in mind that you can also soak these void zones with player immunities
like ![]() Ice Block, should your tank's stacks have somehow dropped off
by the time the void zones must be soaked (if, for example, the adds took to
long to die).
Ice Block, should your tank's stacks have somehow dropped off
by the time the void zones must be soaked (if, for example, the adds took to
long to die).
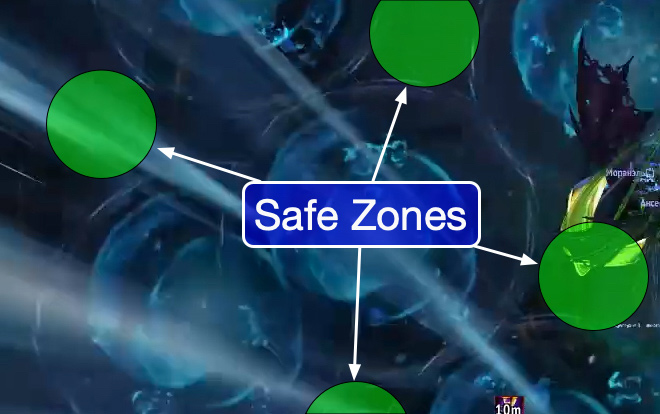
Aside from this, during Phase One, all raid members will have to be careful
to properly avoid the damaging areas of ![]() Dribbling Ichor, which simply
requires good reactions and clever positioning in the safe zones (see image below).
Dribbling Ichor, which simply
requires good reactions and clever positioning in the safe zones (see image below).
The last ability for this phase is the ![]() Incubation Fluid debuff. This
is primarily the concern of the healers, who will need to keep up with the
damage that the players affected by this debuff (which will eventually affect
most of the raid by the end of the phase) take.
Incubation Fluid debuff. This
is primarily the concern of the healers, who will need to keep up with the
damage that the players affected by this debuff (which will eventually affect
most of the raid by the end of the phase) take.
However, due to the fact that the boss regularly casts
![]() Arcing Current, players affected by
Arcing Current, players affected by ![]() Incubation Fluid
must make sure to always be far enough away from any raid members not
affected by this, as otherwise they will also be damaged and Incubation Fluid
will spread to them as well.
Incubation Fluid
must make sure to always be far enough away from any raid members not
affected by this, as otherwise they will also be damaged and Incubation Fluid
will spread to them as well.
The ramping damage of ![]() Incubation Fluid to the raid will cause
significant strain on the healers, who may need to resort to rotating
cooldowns by the end of the phase. Any carelessness in positioning that
leads to additional Incubation Fluid debuffs being applied early due to
chaining
Incubation Fluid to the raid will cause
significant strain on the healers, who may need to resort to rotating
cooldowns by the end of the phase. Any carelessness in positioning that
leads to additional Incubation Fluid debuffs being applied early due to
chaining ![]() Arcing Current will only make the phase that much harder,
and this could be enough to overwhelm the raid.
Arcing Current will only make the phase that much harder,
and this could be enough to overwhelm the raid.
Transition Phase
After 3 minutes and 30 seconds, the Transition Phase begins. All
![]() Incubation Fluid stacks will be removed, but you will have to deal with
the final spawn of Zoatroid adds, which happens a few seconds before the
end of Phase One.
Incubation Fluid stacks will be removed, but you will have to deal with
the final spawn of Zoatroid adds, which happens a few seconds before the
end of Phase One.
The best strategy currently seems to be to deal with the Zoatroids in the Phase One area, just as you dealt with the previous spawns of Zoatroids during Phase One.
As soon as the adds are dead, all raid members must make their way down
towards the boss. The tank who must soak the ![]() Amniotic Splatter void
zones should stay behind to perform this task and then catch up to the
raid.
Amniotic Splatter void
zones should stay behind to perform this task and then catch up to the
raid.
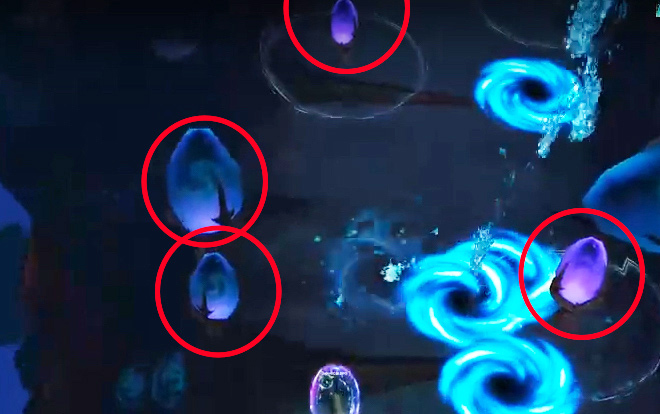
Moving down towards the boss should be a simple enough process: all raid members must avoid coming within 5 yards of any eggs (marked in red in the image below), as this will damage and knock them back, and players must also be careful not to be knocked back by the falling projectiles (crash zone marked with swirly blue void zones).

Once at the bottom of the ramp, you will have to make sure to interrupt
the boss's ![]() Massive Incubator cast. If you moved to the boss quickly
enough, you can take advantage of the fact that he is still casting (and not
doing anything else) and do some
damage to him before interrupting the cast as late as possible.
Massive Incubator cast. If you moved to the boss quickly
enough, you can take advantage of the fact that he is still casting (and not
doing anything else) and do some
damage to him before interrupting the cast as late as possible.
Phase Two
Phase Two is mechanically identical to Phase One, except for the 3 new types of adds. We explain how to deal with these adds below, but aside from this, your execution of the phase should be exactly the same as what you were doing during Phase One.
Every minute or so, 2 adds spawn. They can be of 3 different types (Zanj'ir Myrmidons,
Azsh'ari Witches, and Dreadcoil Hulks) and must be kept at least
15 yards away from the boss (its ![]() Chaotic Growth ability buffs them
just like it buffs the Zoatroids), and they must be quickly killed
when they spawn.
Chaotic Growth ability buffs them
just like it buffs the Zoatroids), and they must be quickly killed
when they spawn.
You can group these adds up (together with any Zoatroids that spawn in Heroic and Mythic difficulties), in order to AoE them all down.
Players targeted by the Myrmidons' ![]() Aqua Lance should move to the
side of the room, so that the void zone that appears 4 seconds later is not
placed in a location where it could impede the raid.
Aqua Lance should move to the
side of the room, so that the void zone that appears 4 seconds later is not
placed in a location where it could impede the raid.
The Witches' ![]() Conductive Pulse casts should be interrupted, while
the damage they deal to random raid members with
Conductive Pulse casts should be interrupted, while
the damage they deal to random raid members with ![]() Shocking Lightning
must simply be healed through.
Shocking Lightning
must simply be healed through.
Finally, the Hulks' ![]() Powerful Stomp must be soaked in order to
prevent
Powerful Stomp must be soaked in order to
prevent ![]() Reverberating Tremor from dealing massive, wipe-inducing
damage to the raid. We recommend that the tank handling the adds be the only
one in range of the Hulk when Powerful Stomp is cast, as their
Reverberating Tremor from dealing massive, wipe-inducing
damage to the raid. We recommend that the tank handling the adds be the only
one in range of the Hulk when Powerful Stomp is cast, as their
![]() Desensitizing Sting stacks should allow them to survive. They should
be tanking the Hulks anyway, so it is up to other players to make sure they do
not somehow end up splitting the damage with the tank, since this will most
certainly kill them.
Desensitizing Sting stacks should allow them to survive. They should
be tanking the Hulks anyway, so it is up to other players to make sure they do
not somehow end up splitting the damage with the tank, since this will most
certainly kill them.
Tank Damage
As stated later on in the guide, Orgozoa deals extremely high melee
damage. This is typically mitigated by the ![]() Desensitizing Sting debuff
the boss stacks on its current target, but whenever a tank starts tanking Orgozoa
(the start of the fight, the start of Phase Two, and each time after a tank
swap), they will have no Desensitizing Sting stacks, and will therefore take
all the damage.
Desensitizing Sting debuff
the boss stacks on its current target, but whenever a tank starts tanking Orgozoa
(the start of the fight, the start of Phase Two, and each time after a tank
swap), they will have no Desensitizing Sting stacks, and will therefore take
all the damage.
Tanks will need to save personal cooldowns for these moments (whether or not active mitigation is sufficient will depend on a variety of factors such as gear level and encounter difficulty), and healers should also be prepared for this high incoming tank damage.
Heroism/Bloodlust/Time Warp
We recommend using ![]() Heroism/
Heroism/![]() Bloodlust/
Bloodlust/![]() Time Warp
towards the end of the fight, in Phase Two. This is because Phase Two is the
most difficult part of the fight, and particularly towards the end the raid
will take very high damage (almost everyone will be debuffed by
Time Warp
towards the end of the fight, in Phase Two. This is because Phase Two is the
most difficult part of the fight, and particularly towards the end the raid
will take very high damage (almost everyone will be debuffed by
![]() Incubation Fluid, among other things), and using it here will also help
increase the healers' throughput.
Incubation Fluid, among other things), and using it here will also help
increase the healers' throughput.
That said, it may prove to be acceptable to use it on the pull as well, in order to maximize its effect on raid DPS and therefore shorten the fight.
Summary for Tanks
- In Phase One and Two, tank swap before the current tank's Desensitizing Sting stacks
reach 10.
- The off-tank must pick up the Zoatroid adds during Phase One (and during Phase Two, on Heroic mode), and tank them more than 15 yards away from the boss. After they are dead, this tank must soak the resulting void zones.
- During Phase Two, all adds must be picked up and tanked more than 15 yards away from the boss.
Summary for Healers and DPS
Phase One
- DPS players must focus on killing the Zoatroid adds when they spawn.
- Avoid being hit by
 Dribbling Ichor.
 - Players affected by
 Incubation Fluid should stay away from other
raid members.
Incubation Fluid should stay away from other
raid members. - Healers must account for the increased damage taken by players affected by
Incubation Fluid.
Transition Phase
- Move down the ramp to the boss's new location without touching purple eggs and while dodging the marked areas on the ground.
Phase Two
- Perform the same tasks as during Phase One. On Heroic mode, the Zoatroid adds will also be present during this phase.
- DPS any new adds that spawn during this phase.
- Interrupt the Witches'
 Conductive Pulse.
 - If targeted by
 Aqua Lance, move away from the raid, to the side
of the room, to drop the resulting void zone.
Aqua Lance, move away from the raid, to the side
of the room, to drop the resulting void zone. - Move away from the Hulks when they are casting
 Reverberating Tremor.
Abilities
The encounter against Orgozoa is a two-phase fight during which the raid must face the boss as well as several types of adds.
Phase One lasts approximately 3 minutes and 30 seconds, at which point the
boss will leave the arena and descend to a second location (the fighting area
for Phase Two). Your raid must make its way down to the boss by navigating
a ramp, and then interrupt the boss's cast of
![]() Massive Incubator to start Phase Two.
Massive Incubator to start Phase Two.
Phase Two lasts until the boss is killed.
Phase One
During Phase One, Orgozoa uses a number of abilities against your raid. In addition to this, the boss regularly spawns Zoatroid adds.
Desensitizing Sting (Tank Debuff)
Orgozoa's melee attacks are particularly powerful. However, the
boss stacks ![]() Desensitizing Sting on its current target. This stacking
debuff has a 45-second duration and it reduces all damage taken by the target
by 10% per stack. If Desensitizing Sting reaches 10 stacks, the target
immediately dies (due to something called
Desensitizing Sting on its current target. This stacking
debuff has a 45-second duration and it reduces all damage taken by the target
by 10% per stack. If Desensitizing Sting reaches 10 stacks, the target
immediately dies (due to something called ![]() Heart-Stopping Paralysis).
Heart-Stopping Paralysis).
Incubation Fluid
![]() Incubation Fluid is a debuff that lasts for the entire duration of
the phase, and which deals Nature damage every second to the affected
player.
Incubation Fluid is a debuff that lasts for the entire duration of
the phase, and which deals Nature damage every second to the affected
player.
The boss will debuff a random raid member with ![]() Incubation Fluid
at the start of Phase One, and then additional players will be debuffed as
the phase goes on. By the end of the phase, most of the raid will be
affected by this debuff, resulting in very high raid-wide damage.
Incubation Fluid
at the start of Phase One, and then additional players will be debuffed as
the phase goes on. By the end of the phase, most of the raid will be
affected by this debuff, resulting in very high raid-wide damage.
Moreover, the boss will regularly cast ![]() Arcing Current at a random
player affected by
Arcing Current at a random
player affected by ![]() Incubation Fluid. This deals a burst of Nature
damage to that player, and chains to up to 3 nearby targets (we are not sure
what the range is exactly, but it appears to be around 8 yards), also
afflicting them with Incubation Fluid, if they did not already have it.
Incubation Fluid. This deals a burst of Nature
damage to that player, and chains to up to 3 nearby targets (we are not sure
what the range is exactly, but it appears to be around 8 yards), also
afflicting them with Incubation Fluid, if they did not already have it.
Dribbling Ichor
Throughout Phase One, ![]() Dribbling Ichor will sometimes cause most of the
room to be marked by areas where damage ichor will fall from the roof for a few
seconds. Although most of the room is covered, there are always safe spaces
between the many marked areas where players can stand to avoid being
damaged.
Dribbling Ichor will sometimes cause most of the
room to be marked by areas where damage ichor will fall from the roof for a few
seconds. Although most of the room is covered, there are always safe spaces
between the many marked areas where players can stand to avoid being
damaged.
The boss typically casts ![]() Dribbling Ichor 3 times in quick
succession, with the safe areas changing each time.
Dribbling Ichor 3 times in quick
succession, with the safe areas changing each time.
Here is what the ![]() Dribbling Ichor looks like; you can also
see safe zones.
Dribbling Ichor looks like; you can also
see safe zones.
Chaotic Growth
![]() Chaotic Growth is a passive ability of Orgozoa which buffs
any adds within 15 yards of the boss, increasing their damage done and
reducing their damage taken by 50%.
Chaotic Growth is a passive ability of Orgozoa which buffs
any adds within 15 yards of the boss, increasing their damage done and
reducing their damage taken by 50%.
Zoatroid Adds
40 seconds after the start of the fight, and roughly every 1 minute and 20 seconds after that, the boss will summon 3 Zoatroid adds.
These adds melee and must be tanked. While alive, they sometimes cast
![]() Pervasive Shock, which deals a small amount of raid-wide Nature
damage.
Pervasive Shock, which deals a small amount of raid-wide Nature
damage.
When killed, each Zoatroid leaves behind an ![]() Amniotic Splatter
void zone. This lasts for 5 seconds, at which point it explodes. If no
players are within the void zone when it explodes, it deals extremely high
raid-wide damage as well as dealing more raid-wide damage every 2 seconds
for 30 seconds. The raid-wide damage caused by this is so high that it
essentially guarantees a wipe.
Amniotic Splatter
void zone. This lasts for 5 seconds, at which point it explodes. If no
players are within the void zone when it explodes, it deals extremely high
raid-wide damage as well as dealing more raid-wide damage every 2 seconds
for 30 seconds. The raid-wide damage caused by this is so high that it
essentially guarantees a wipe.
If, however, there is at least one player inside the
![]() Amniotic Splatter void zone when it explodes, this player will take an
extremely high amount of damage, and the raid will take a much smaller and
more manageable amount of time, once (without any damage over time
component).
Amniotic Splatter void zone when it explodes, this player will take an
extremely high amount of damage, and the raid will take a much smaller and
more manageable amount of time, once (without any damage over time
component).
Transition Phase
About 3 minutes and 30 seconds after the start of Phase One, the boss will disappear and a way will open up allowing the raid to follow it to its new location.
This moment coincides with a set of new Zoatroid adds spawning
(actually, the adds spawn just a few seconds before the boss disappears). When
Phase One ends, all ![]() Incubation Fluid stacks are also removed from
raid members.
Incubation Fluid stacks are also removed from
raid members.
When moving down the ramp to the boss's new location, there are two mechanics for the raid to look out for.
There are many purple eggs located on the descending ramp, and getting too
close (within 5 yards) to one will trigger an ![]() Eggsplosion, dealing
damage to that player and knocking them back.
Eggsplosion, dealing
damage to that player and knocking them back.
In addition to the eggs, random areas of the ground are also constantly marked, and projectiles land in each area a few moments later, knocking back any players hit by them.
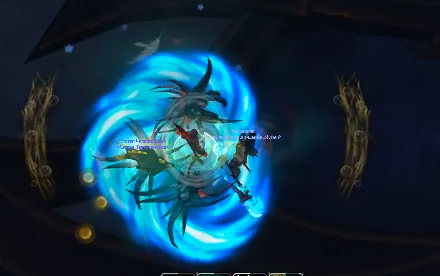
At the bottom of the ramp, the boss is casting ![]() Massive Incubator.
We are not sure what happens if the boss completes this cast, but it certainly
has a negative effect on the encounter and should be avoided. The cast is
interruptible and, normally, your raid should reach the boss in time before
the cast ends. Once Massive Incubator is interrupted, Phase Two begins.
Massive Incubator.
We are not sure what happens if the boss completes this cast, but it certainly
has a negative effect on the encounter and should be avoided. The cast is
interruptible and, normally, your raid should reach the boss in time before
the cast ends. Once Massive Incubator is interrupted, Phase Two begins.
Phase Two
Phase Two is almost identical to Phase One, except that it takes place in the new fighting area, which is somewhat larger than the Phase One area.
The boss keeps using the same abilities from Phase One, but spawns 2 adds every 80 seconds or so. These can be of 3 different types, which we detail below. We have not noticed any pattern for the add spawns during Phase Two. In Heroic and Mythic difficulty, the boss also spawns Zoatroid adds, but PTR testing did not seem to have them.
Zanj'ir Myrmidon
Zanj'ir Myrmidons cast ![]() Aqua Lance at random raid members.
This marks a target and, 4 seconds later, hits it with a projectile that
deals damage and leaves behind a
Aqua Lance at random raid members.
This marks a target and, 4 seconds later, hits it with a projectile that
deals damage and leaves behind a ![]() Raging Rapids void zone at their
location, lasting approximately 40 seconds.
Raging Rapids void zone at their
location, lasting approximately 40 seconds.
Azsh'ari Witch
Azsh'ari Witches deal unavoidable damage to random raid members
with ![]() Shocking Lightning, and also attempt to cast the
interruptible
Shocking Lightning, and also attempt to cast the
interruptible ![]() Conductive Pulse, which stuns all raid members for
3 seconds it successfully cast.
Conductive Pulse, which stuns all raid members for
3 seconds it successfully cast.
Dreadcoil Hulk
Dreadcoil Hulk adds cast ![]() Powerful Stomp, which deals a
massive amount of Physical damage split between players within 16 yards of
the Hulk. If no players are hit by Powerful Stomp, then the entire raid
will take high Physical damage from
Powerful Stomp, which deals a
massive amount of Physical damage split between players within 16 yards of
the Hulk. If no players are hit by Powerful Stomp, then the entire raid
will take high Physical damage from ![]() Reverberating Tremor.
Reverberating Tremor.
Heroic Difficulty Changes
In Heroic mode, the Zoatroid adds continue to spawn even during Phase Two, and this is the only change from LFR/Normal mode.
Mythic Difficulty
Mythic Difficulty Changes
In Mythic mode, ![]() Arcing Current targets all players affected by
Arcing Current targets all players affected by
![]() Incubation Fluid.
Incubation Fluid.
Moreover, Zoatroid adds spawn much more frequently in Mythic mode,
including during ![]() Dribbling Ichor casts, making picking them up and
generally dealing with them much more difficult.
Dribbling Ichor casts, making picking them up and
generally dealing with them much more difficult.
Aside from this, the boss and the adds have increased health and deal increased damage.
Mythic Strategy
The fight is almost the same as in Heroic mode, with both of the mechanical changes really just resulting in more damage taken by the raid, and more adds to be dealt with (which, in the end, is also just more damage taken).
Healers will have to have increased output to deal with the higher damage
caused by all ![]() Incubation Fluid players being hit by
Incubation Fluid players being hit by
![]() Arcing Current. Due to this, properly spreading out is even more
important in Mythic mode than in Heroic.
Arcing Current. Due to this, properly spreading out is even more
important in Mythic mode than in Heroic.
Tanks will need to pick up more Zoatroids, including during
![]() Dribbling Ichor, but aside from making sure to use damage mitigation
to compensate for the additional damage they may take, nothing much should
change for them in Mythic.
Dribbling Ichor, but aside from making sure to use damage mitigation
to compensate for the additional damage they may take, nothing much should
change for them in Mythic.
Screenshot Credit
We thank Vlad Kotov for the screenshots we used from their Orgozoa PTR video, as well as Gildart.
Loot
| Item> | Type | Slot |
|---|---|---|
| Crossbow | ||
| Fist Weapon | ||
| Mace | Two Hand | |
| Polearm | ||
| Shield | Off Hand | |
| Sword | One Hand | |
| Cloth Armor | Head | |
| Cloth Armor | Waist | |
| Leather Armor | Shoulders | |
| Leather Armor | Legs | |
| Mail Armor | Chest | |
| Plate Armor | Head | |
| Accessory | Back | |
| Accessory | Trinket | |
| Accessory | Trinket |
For more information, please refer to our Eternal Palace Loot and Essence guide.
Class-specific Advice for Orgozoa
Changelog
- 15 Jul. 2019: Added Mythic section.
- 09 Jul. 2019: Removed mention of being able to shortcut the transition phase.
- 08 Jul. 2019: Added loot.
- 05 Jul. 2019: Guide added.