

Warfronts Guide in Battle for Azeroth (BfA 8.3)

Battle for Azeroth Features Guides
Welcome to the Warfronts guide where we will explore everything about the new Battle for Azeroth feature and how it pertains to your character growth and progression! This guide will cover the Battle for Stormgarde and the Battle for Darkshore.
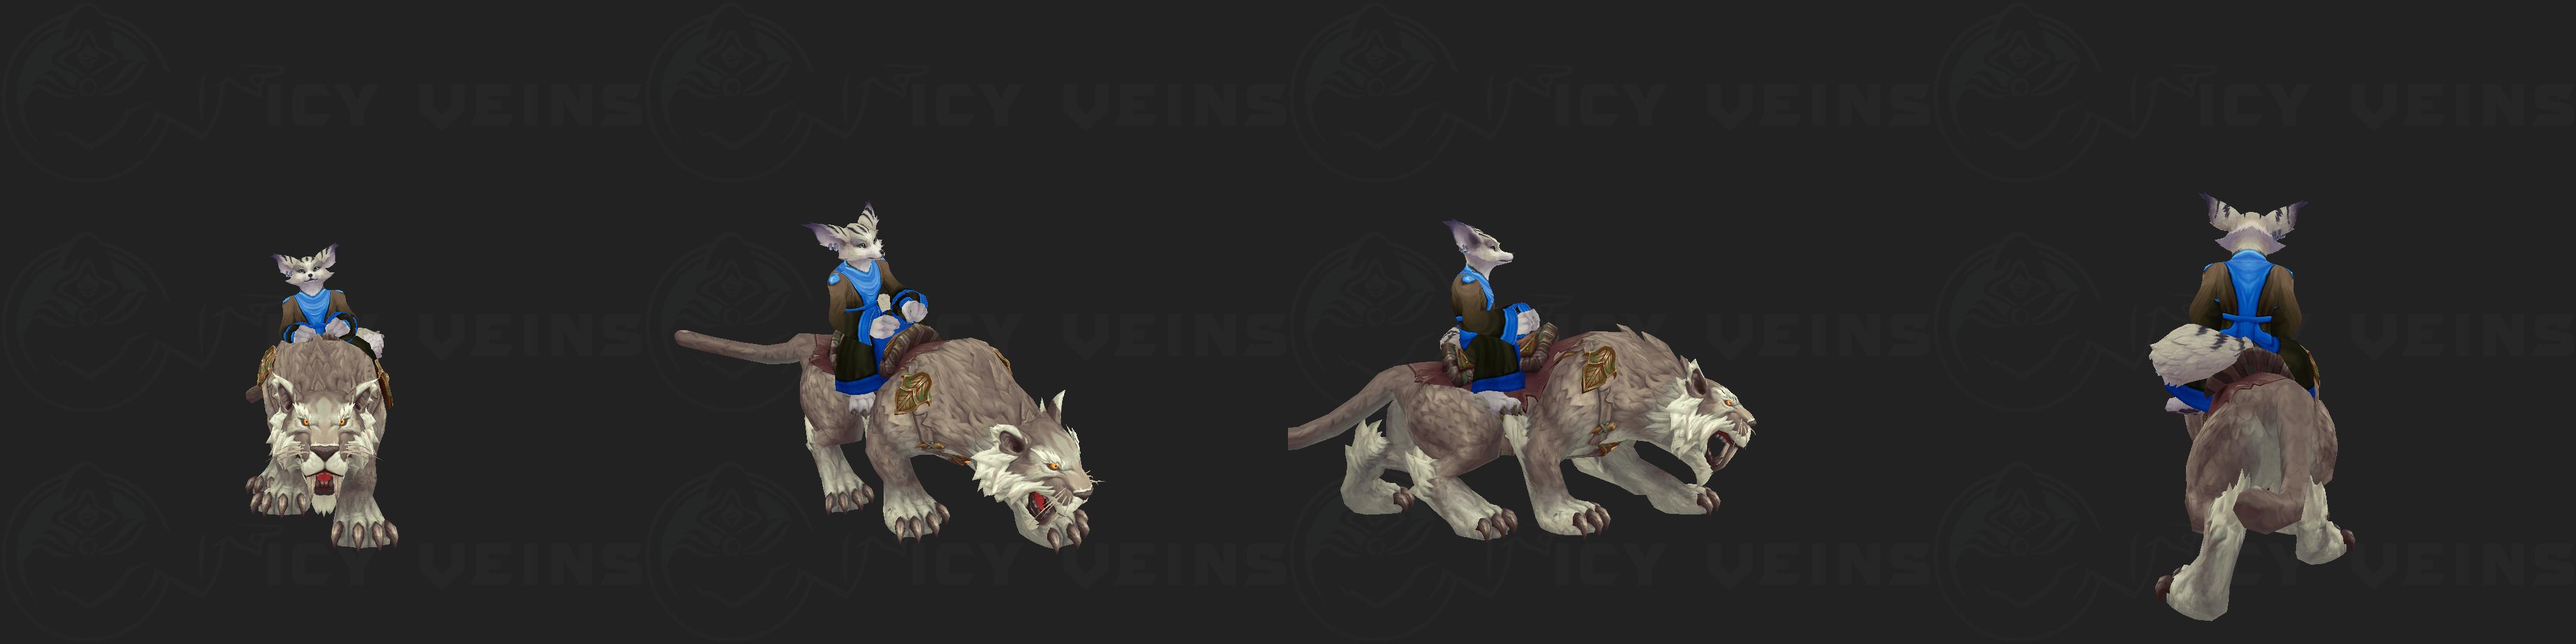
In Patch 8.3, the Battle for Darkshore warfront can now be played in Heroic mode, which rewards an exclusive mount: Sandy Nightsaber (see below).
The Cycle of Warfronts
Warfronts are large scale battles that are focused around the war between
the Alliance and the Horde. This content will cycle in a method that has one
faction starting with control of an area (therefore having access to exclusive
mobs, world bosses, and their respective loot) while the opposing faction
contributes items, Gold, and ![]() War Resources to build faction power. Once
the resource contribution has reached its 100% requirements, a battle for the
area becomes accessible. This resource contribution is on a region-wide basis,
similar to how the Mage Tower progress was in Legion on the Broken Shore and it
rewards Azerite and reputation. After the attack is completed (it cannot
fail), the assaulting faction will take control of the area while the other
faction begins its resource acquisition to initiate its attack on the area.
War Resources to build faction power. Once
the resource contribution has reached its 100% requirements, a battle for the
area becomes accessible. This resource contribution is on a region-wide basis,
similar to how the Mage Tower progress was in Legion on the Broken Shore and it
rewards Azerite and reputation. After the attack is completed (it cannot
fail), the assaulting faction will take control of the area while the other
faction begins its resource acquisition to initiate its attack on the area.
Getting Started
There will be a short introduction to the Warfront area which will introduce you to some landmarks and then initiate a quest to make a contribution to your Warfront effort. Complete the intro and then do the contributions once you have the quest to do so, not just the daily blue !s indicating a daily quest.
Patch 8.3 Changes — Heroic Darkshore
Patch 8.3 brings few changes to the Warfronts, but there will finally be a Heroic mode for the Darkshore Warfront, which will bring with it item level 460 gear rewards and more of a challenge for players who enjoy them.
After you complete the Battle for Darkshore on Heroic Difficulty,
![]() Sandy Nightsaber can be purchased from Provisioner Stoutforge
in Boralus for 350
Sandy Nightsaber can be purchased from Provisioner Stoutforge
in Boralus for 350 ![]() 7th Legion Service Medals or from Provisioner Mukra
located at the docks of Dazar'alor for 350
7th Legion Service Medals or from Provisioner Mukra
located at the docks of Dazar'alor for 350 ![]() Honorbound Service Medals.
Honorbound Service Medals.
Patch 8.2 Changes — Heroic Warfronts
With Patch 8.2, players will have a new version of Warfronts available. Heroic Warfronts offer a more challenging version of any specific Warfront. Players can only queue up for Heroic Warfronts when in a raid party of either 10 or 20 players. The health and damage of the enemies in the Warfront will scale based on the number of players you have over a minimum 10 people in the party. Scaling of the Warfronts will be designed for players around 415 item level and Battle for Stromgarde will be the only available Heroic Warfront at this time. We will be updating this section with information as it becomes available.
Differences between Normal and Heroic Warfronts
- Enemies will have an increased amount of health and it will scale with the amount of players within the Warfront party that are at 415 item level.
- Enemy Commanders will join the fight occasionally and begin to assault your base and commander. Due to the commander being powerful, you will need to repel this attack with your group. When his health reaches 60%, he will hearth back to his own base.
- Increase of cost for both Demolishers and Siege Engines to 160 Iron.
- Players can only queue up for Heroic Warfronts with a raid group of 10 to 20 players.
Heroic Warfront Rewards
Players that win a Heroic Warfront, along with completing Heroic Warfront: The Battle for Stromgarde will be rewarded with a 425 item level set piece for either The Honorbound or 7th Legion. Players will find that these items are just under the item level of the Heroic mode of The Eternal Palace raid. Players will also unlock achievements upon completion of Heroic Warfronts.
 Heroic: War is Hell/
 Heroic: War is Hell
 Heroic: Tour of War/ Heroic: Tour of War
Your Contribution to Warfronts
Contributing to your faction's Warfront effort involves giving
![]() War Resources, Gold, and items created from professions. These
contributions are on a daily lockout, so be sure to do this each and every day
as the reputation gains are enormously beneficial towards progressing on your
faction's War Campaign. With Patch 8.2, there are still fewer contribution daily
quests, but these quests are refreshed daily instead of each cycle which expedites
the contribution phase completion rate and provides ample opportunity for more
Artifact Power and reputation rewards.
War Resources, Gold, and items created from professions. These
contributions are on a daily lockout, so be sure to do this each and every day
as the reputation gains are enormously beneficial towards progressing on your
faction's War Campaign. With Patch 8.2, there are still fewer contribution daily
quests, but these quests are refreshed daily instead of each cycle which expedites
the contribution phase completion rate and provides ample opportunity for more
Artifact Power and reputation rewards.
The gold contribution Wartime Donations: Gold (Alliance) / Wartime Donations: Gold (Horde) requests only 100g. This is a trivial amount of gold and should be made daily. This rewards 500 Azerite and 150 reputation with the 7th Legion or The Honorbound. Each daily quest turn in rewards 150 reputation and 500 Azerite which has incredible potential to progress towards Exalted status with the 7th Legion and the Honorbound which unlocks your Allied Races of the Mag'har Orcs and Dark Iron Dwarves. All ten quests can be done each day, so your maximum turn in is exchanging 100 gold, 100 War Resources, and assorted profession items for a total potential of 1,500 reputation and 5,000 Azerite. This also progresses your faction's contribution bar which will enable the Warfront activity that will reward you with a 370 item level piece of gear and grant access to the world boss as well as the rare enemies and World Quests in Arathi Highlands.
The crafted items from professions are likely going to be expensive at the start of the expansion, but these items may drop in value and be a better value to turn in as time passes. The NPCs that request items do not always ask for the same items, so be ready to hit up the auction house with a shopping list each day. Here are the profession-related items that can be used for a Wartime Contribution.
In Patch 8.1's Battle for Darkshore, the contribution potential for Azerite Power had effectively been doubled. This allowed for much quicker earning potential of Azerite Power since both warfronts can be progressed concurrently.
| Profession | Item(s) Requested |
|---|---|
| Alchemy/Herbalism | Possibilities include |
| Blacksmithing/Mining | Possibilities include |
| Cooking/Fishing | Possibilities include |
| Enchanting | |
| Engineering | |
| Inscription | Examples include |
| Jewelcrafting | Any cut level green gem such as |
| Leatherworking/Skinning | Examples include |
| Tailoring |
Contributions can be made once each day while the Warfront territory is controlled by the opposite faction.
Warfront Strategy
Warfronts can be lost, and it is difficult to do so, but that does not mean you want to win slower and take longer to get to that World Boss and sweet, sweet loot to be had while your faction controls the area!
Fighting or gathering are your two primary types of activities to be done during Warfronts. If you are on the lower end of gear, you should partake in gathering as this will enable you to have the greatest effect on your team's ability to win faster. If you like gathering, you should gather. Most players in this type of combat style will prefer to fight, so if you are akin to gathering, we recommend that you do just that! For the fighters, you will fight alongside troops that you help empower and work to control bases.
Stage 1
The beginning of the Battle for Stormgarde and the Battle for Darkshore will
have you starting off with a clear path and objective to defeat
a mini boss. As soon as the mini boss dies, you will want to capture the nearby
Mine and Mill. While at the Mine and Mill, you will want to
gather ![]() Iron or
Iron or ![]() Wood to help contribute to your effort. If the
Mine or Mill is overcrowded, consider going to the other location. If
you or someone else provide some leadership during this process, try to divide
the team up so that half goes to the Mine and half goes to the Mill.
Wood to help contribute to your effort. If the
Mine or Mill is overcrowded, consider going to the other location. If
you or someone else provide some leadership during this process, try to divide
the team up so that half goes to the Mine and half goes to the Mill.
This initial stage is similar in both the Battle for Stormgarde and the Battle for Darkshore. Despite the different names, mentioned below, the objective is exactly the same in both warfronts which is to focus on securing both places in order to generate more resources which expedites the construction of buildings and vehicles.
- Stormgarde Mine = Drywhisker Mine
- Darkshore Mine = Lornesta Mine
- Stormgarde Mill = Hatchet Ridge
- Darkshore Mill = Cinderfall Grove
IT IS VERY IMPORTANT TO HAVE AT LEAST HALF OF YOUR RAID GATHERING RESOURCES! Players will tend to go fight when they are not sure what to do, so be the hero your side needs and gather wood and iron!
Stage 2
During this phase of the Warfront, your team will want to divide and conquer. Half of your team will want to focus on gathering and building while the other half focuses on offense and destruction. Again, an even split is highly recommended as too many on gathering and building will slow the offense while too many on offense will prove to take too long to build vehicles and buildings necessary to succeed. Under organized leadership, the gathering and building team should be the ten lowest item level or experienced players as this role is less demanding having only the need to defeat smaller enemies and use the resources gathered to construct buildings and vehicles. The offensive team should be your ten highest item level or experienced players while ensuring that at least 1 tank and 1 healer also accompany the team.
This phase needs a continued supply of resources coming in to enhance the buildings further. It may not feel like gathering supplies is really contributing to the warfront, but upgrading buildings and building your siege vehicles to break down the enemy gates faster is the fastest way to expedite warfront victories.
Put a high priority on taking over the central location first and foremost. This central location is High Perch in Stormgarde and Gloomtide Strand in Darkshore. Once it is conquered, make sure to defend it properly. The demolishers and siege engines will be using this path to approach the siege towers and siege gate! Once the center hub is conquered, feel free to capture the left and right locations if the gatherers have not finished constructing a Workshop yet.
There are many buildings you can construct to boost your faction's conquering power during the Warfront. Focusing on gathering resources allows for faster construction and upgrades of buildings.
Stormgarde Building Priorities
- Great Hall → Keep/Stronghold → Castle/Fortress — This
building and its upgrades have numerous benefits including boosting the
acquisition rate of
 Iron and
  Wood resources, unlocking a
commander option from the Barracks at Keep/Stronghold level, and unlocking
commander special ability as well as increased damage by Siege
Engines/Demolishers at Castle/Fortress level.
Wood resources, unlocking a
commander option from the Barracks at Keep/Stronghold level, and unlocking
commander special ability as well as increased damage by Siege
Engines/Demolishers at Castle/Fortress level. - Altar of Storms → This building allows for player power buffs in
the form of trading resources for
 Bristling Power which increases your
damage, healing, and health by 10%, stacking up to 4 times as well as having the
opportunity for a player to gain the
Bristling Power which increases your
damage, healing, and health by 10%, stacking up to 4 times as well as having the
opportunity for a player to gain the  Call of the Storm buff if they
locate the
Call of the Storm buff if they
locate the  Essence of Storms, which is a rare drop during the
Warfront.
Essence of Storms, which is a rare drop during the
Warfront. - Barracks — This building is your primary source of troops which allows the trading of Iron for troops that will fight the opposing faction and aid in assaulting and defending bases.
- Warmill — This building enables you to trade resources for weapon and armor enhancements of your troops.
- Workshop — This building enables you to construct Siege Engines/Demolishers which are key to winning Warfronts.
Gathering & Building Team Priority
- Acquire 140 Iron and 140 Wood to purchase the Barracks.
- Acquire 260 Iron and 140 Wood to purchase the War Mill.
- Acquire 260 Iron and 140 Wood to purchase the Altar of Storms.
- Acquire 380 Iron and 180 Wood to upgrade your Great Hall to a Keep/Stronghold.
- Acquire 500 Iron and 220 Wood to purchase the Workshop and then create Siege Engines/Demolishers
- Acquire 620 Iron and 260 Wood to upgrade your Stronghold to a Castle/Fortress
In summary, upgrade your Barracks, then upgrade the War Mill/Armory, then upgrade the Altar of Storms, then upgrade your Great Hall, then build a Workshop, then build 3 Demolishers, then push towards victory! For the Battle of Darkshore, follow a similar priority with the equivalent buildings!
Note that for the gathering and building team, Iron will have a much higher demand and should be prioritized in the gathering process. Unlocking the Barracks and War Mill provide a huge boost to your troops' offensive and defensive capabilities while the Altar of Storms boosts player power significantly. The Stronghold upgrade increases your resource generation that will speed up the production rate of the Workshop which will greatly increase your team's destructive capabilities. Finally, perform the final upgrade to your Great Hall to further increase resource generation to produce more troops and Siege Engines/Demolishers.
While gathering resources, these players should also react to attack waves from the opposite faction and defend the Mine and Mill from attacks. The gathering and defending team should focus on upgrades until three vehicles are created at which point the focus on production shifts towards escorting vehicles and defending bases.
While the gatherers upgrade your building potential, the offensive party should be focused on capturing vital locations that are beneficial to the Warfront winning effort.
Offensive Party Priority
The offensive party should be assaulting the central control point first which enables the siege vehicles to begin working on enemy towers and enemy gates. Once the center control point is taken, the West and East locations should be captured for troop battle power increases and enemy choke points.
Once these points are captured, the focus should be to defend the control points while defending the siege vehicles. The gathering team should be able to send the maximum three siege vehicles. If a siege vehicle is destroyed, be sure to communicate to your team that a new siege vehicle is needed in order to expedite the process of tearing down the enemy towers and gate.
Stage 3
This phase is all about finishing off the opposition and taking what is yours! Escort your siege vehicles to the enemy gates, destroy the gates, and kill the enemy commander. All gatherers and defenders in this phase should switch to offense and help escort the vehicles to the gates. Once the gates are down, all 20 players should attack and defeat the enemy commander for victory!
Do not advance on the control point in front of the enemy gates before siege vehicles are active! It is a waste of time and you will likely die. It is also IMPERATIVE that you do NOT approach the gate until the siege vehicles have finished breaking down the gate. Making this mistake is certain death. Your goal here is to DEFEND the siege vehicles and kill enemy waves. Protect the last control point flag. Once the gate is down, focus down the enemy commander.
Stormgarde Quests & Rewards
Quest rewards have been increased with Patch 8.1. All item level 340 rewards have been increased to item level 370 rewards while item level 370 rewards have been upgraded to item level 400 rewards!
The quests available while in control of the Warfront are lucrative
![]() War Resources opportunities with four quests rewarding 200 War Resources
each. There is also a 370 Equipment Cache that can give 370 item level loot
including weapons.
War Resources opportunities with four quests rewarding 200 War Resources
each. There is also a 370 Equipment Cache that can give 370 item level loot
including weapons.
- Boulderfist Beatdown — 200
 War Resources
 - Sins of the Syndicate — 200 War Resources
- Twice-Exiled — 200 War Resources
- Wiping Out the Witherbark — 200 War Resources
- Executing Exorcisms — 300
 Azerite
 - The League Will Lose — 370 item level equipment cache
Darkshore Quests & Rewards
Quest rewards have been increased with Patch 8.1. All item level 340 rewards have been increased to item level 370 rewards while item level 370 rewards have been upgraded to item level 400 rewards!
- Buzzkill — 200 War Resources and 5
 Honorbound Service Medal
 - Buzzkill — 200 War Resources and 5
 7th Legion Service Medal
 - Tapping the Breach — 300 Azerite and 5 Honorbound Service Medal
- Remaining Threats — 200 War Resources and 5 Honorbound Service Medal
- Remaining Threats — 200 War Resources and 5 7th Legion Service Medal
Goliaths
Players will find Goliaths scattered throughout the Arathi Highlands and Darkshore. These have a chance to drop items that can help players in battle for a duration of 10 minutes, which comes in handy when needing to kill Elites that inhabit whichever Warfront you are participating in.
Arathi Highlands Goliaths
- Cresting Goliath: Drops
 Cresting Essence, which calls forth
an ally to assist the player in battle in the Arathi Highlands for 10 minutes.
This item has a 3-second cooldown.
Cresting Essence, which calls forth
an ally to assist the player in battle in the Arathi Highlands for 10 minutes.
This item has a 3-second cooldown. - Thundering Goliath: Drops
 Thundering Essence, which calls forth
an ally to assist the player in battle in the Arathi Highlands for 10 minutes.
This item has a 3-second cooldown.
Thundering Essence, which calls forth
an ally to assist the player in battle in the Arathi Highlands for 10 minutes.
This item has a 3-second cooldown. - Rumbling Goliath: Drops
 Rumbling Essence, which calls forth
an ally to assist the player in battle in the Arathi Highlands for 10 minutes.
This item has a 3-second cooldown.
Rumbling Essence, which calls forth
an ally to assist the player in battle in the Arathi Highlands for 10 minutes.
This item has a 3-second cooldown. - Burning Goliath: Drops
 Burning Essence, which calls forth
an ally to assist the player in battle in the Arathi Highlands for 10 minutes.
This item has a 3-second cooldown.
Burning Essence, which calls forth
an ally to assist the player in battle in the Arathi Highlands for 10 minutes.
This item has a 3-second cooldown.
World Bosses
While in control of the Stormgarde Warfront area, the controlling faction will have
access to a World Boss to defeat: Doom's Howl for the Alliance to take
down or ![]() The Lion's Roar for Horde. These World Bosses are the source of
item level 370 loot which is equivalent to Heroic Uldir loot as well as a
faction exclusive toy for each.
The Lion's Roar for Horde. These World Bosses are the source of
item level 370 loot which is equivalent to Heroic Uldir loot as well as a
faction exclusive toy for each.
While in control of the Darkshore Warfront area, the controlling faction will have access to a World Boss to defeat: Ivus the Forest Lord for the Horde and Ivus the Decayed for the Alliance. Both versions of this classic NPC will drop item level 400 gear.
Doom's Howl / Lion's Roar Loot
| Item Name | Armor | Slot | Main Stats |
|---|---|---|---|
|
Cloth | Head |
|
|
Cloth | Shoulder |
|
|
Leather | Shoulder |
|
|
Leather | Chest |
|
|
Head |
|
|
|
Chest |
|
|
|
Plate | Shoulder |
|
|
Plate | Chest |
|
|
Trinket |
|
|
|
Trinket |
|
|
|
Trinket |
|
Ivus the Decayed / Forest Lord Loot
| Item Name | Armor | Slot | Main Stats |
|---|---|---|---|
|
Cloth | Chest |
|
|
Cloth | Waist |
|
|
Leather | Head |
|
|
Leather | Waist |
|
|
Shoulder |
|
|
|
Hands |
|
|
|
Plate | Head |
|
|
Plate | Feet |
|
|
Trinket |
|
|
|
Trinket |
|
|
|
Trinket |
|
Rewards and Loot
Players that complete and partipate in Warfronts can obtain 370 item level gear once per Warfront completion each week. Gear is not guaranteed, but the drop rate is high. While in control of the Warfront area, Players will be able to find and earn Mounts, Battle Pets, Toys and Achievements. You can find each section below.
Arathi Highlands Mounts
| Mount | Source | Faction |
|---|---|---|
| Beastrider Kama | Horde/Alliance | |
| Skullripper | Horde/Alliance | |
| Nimar the Slayer | Horde/Alliance | |
| Overseer Krix | Horde/Alliance | |
| Knight-Captain Aldrin | Horde | |
| Doomrider Helgrim | Alliance |
Please note that in order for Doomrider Helgrim to spawn, Alliance will need to be in control of the Arathi Highlands Warfront and Knight-Captain Aldrin will spawn when the Horde is in control of the Warfront.
Darkshore Mounts
| Mount | Source | Faction |
|---|---|---|
| Alash'anir | Horde/Alliance | |
| Frightened Kodo | Horde/Alliance | |
| Agathe Wyrmwood | Alliance | |
| Croz Bloodrage | Alliance | |
| Moxo the Beheader | Alliance | |
| Blackpaw | Horde | |
| Shadowclaw | Horde | |
| Athil Dewfire | Horde |
Arathi Highlands Battle Pets
| Pet | Source | Location |
|---|---|---|
| Branchlord Aldrus | 22.9, 22.2 | |
| Plaguefeather | 36.9, 66.0 | |
| Fozruk | Patrols around Arathi Highlands | |
| Venomarus | 56.7, 54.1 | |
| Ragebeak | When the Horde controls the Warfront, the coordinates to find Ragebeak are 11.9, 52.1 and when Allance controls the warfront, the coordinates are 18.6, 27.8. |
Stormgarde Toys
 Brazier Cap: This toy drops from Geomancer Flintdagger,
who is found at (80,29) inside the cave.
Brazier Cap: This toy drops from Geomancer Flintdagger,
who is found at (80,29) inside the cave. Coldrage's Cooler: This toy drops from Kor'gresh Coldrage,
who is found at (49,84) inside the Western cave.
Coldrage's Cooler: This toy drops from Kor'gresh Coldrage,
who is found at (49,84) inside the Western cave. Foul Belly: This toy drops from Foulbelly, who can be found
at (23,50) inside a cave where the entrance is near 29,45.
Foul Belly: This toy drops from Foulbelly, who can be found
at (23,50) inside a cave where the entrance is near 29,45. Kovork Kostume: This toy drops from Kovork, who is found
at 25,49 inside a cave where the entrance is near 29,45.
Kovork Kostume: This toy drops from Kovork, who is found
at 25,49 inside a cave where the entrance is near 29,45. Magic Fun Rock: drops from Ruul Onestone, who is
found at 43,57.
Magic Fun Rock: drops from Ruul Onestone, who is
found at 43,57. Molok Morion: This toy drops from Molok the Crusher,
who is found at 47,79.
Molok Morion: This toy drops from Molok the Crusher,
who is found at 47,79. Spectral Visage: This toy drops from Horrific Apparition,
who is found at 26,35 or 20,61.
Spectral Visage: This toy drops from Horrific Apparition,
who is found at 26,35 or 20,61. Syndicate Mask: This toy drops from Singer,
who is found at 51,41 or 51,57.
Syndicate Mask: This toy drops from Singer,
who is found at 51,41 or 51,57. Witherbark Gong: This toy drops from Zalas Witherbark,
who is found at 63,81.
Witherbark Gong: This toy drops from Zalas Witherbark,
who is found at 63,81.
Darkshore Toys
 Echo of Elune: An Alliance-only toy
 Brynja's Beacon: A Horde-only toy
 Dark Ranger's Spare Cowl: A Horde-only toy
Transmog Items
Players can obtain the achievement ![]() Don't Warfront Me by collecting all
of the pieces of an Arathi Highlands and Darkshore transmog set's tint. The gear
that players are awarded from Warfronts are all based on Horde and Alliance
representation, and the three tiers of armor transmogs based on how it was
obtained from either Warfront.
Don't Warfront Me by collecting all
of the pieces of an Arathi Highlands and Darkshore transmog set's tint. The gear
that players are awarded from Warfronts are all based on Horde and Alliance
representation, and the three tiers of armor transmogs based on how it was
obtained from either Warfront.
Achievements
There are achievements to be earned in your conquest efforts in the Warfronts available!
Alliance and Horde Achievements
 An Eventful Battle — earned by completing several random events that
occur within the Battle for Stromgarde
An Eventful Battle — earned by completing several random events that
occur within the Battle for Stromgarde
Alliance Achievements
- War is Hell — earned by defeating the Horde in the Battle for
Stormgarde
 Strike Hard — earned by capturing any of the locations in the
Battle for Stormgarde
Strike Hard — earned by capturing any of the locations in the
Battle for Stormgarde Strike Fast — earned by capturing all locations in the Battle for
Stormgarde (not necessarily all in the same battle)
Strike Fast — earned by capturing all locations in the Battle for
Stormgarde (not necessarily all in the same battle) Leader of Troops — earned by recruiting one of every troop in the
Battle for Stormgarde which includes the Footmen, Riflemen, Priests, Knights,
and Siege Engine (not necessarily all in the same battle)
Leader of Troops — earned by recruiting one of every troop in the
Battle for Stormgarde which includes the Footmen, Riflemen, Priests, Knights,
and Siege Engine (not necessarily all in the same battle)- Tour of War — earned by defeating all three of the enemy commanders
in the Battle for Stormgarde which includes slaying Eitrigg,
Rokhan, and Lady Liadrin (only one commander appears per battle)
 By Nature's Call — earned by embodying every Alliance hero in the
Battle for Darkshore
By Nature's Call — earned by embodying every Alliance hero in the
Battle for Darkshore Under Cover of Darkness — earned by capturing a single location
in the Battle for Darkshore
Under Cover of Darkness — earned by capturing a single location
in the Battle for Darkshore Night Moves — earned by capturing every location in the Battle
for Darkshore
Night Moves — earned by capturing every location in the Battle
for Darkshore Recruitment Officer — earned by recruiting one of every troop
into the Battle for Darkshore
Recruitment Officer — earned by recruiting one of every troop
into the Battle for Darkshore War for the Shore — earned by completing the Battle for Darkshore
Horde Achievements
- War is Hell — earned by defeating the Alliance in the Battle of
Stormgarde
- Strike Hard — earned by capturing any of the locations in the Battle
for Stormgarde
- Strike Fast — earned by capturing all locations in the Battle for
Stormgarde (not necessarily all in the same battle)
- Leader of Troops — earned by recruiting one of every troop in the
Battle for Stormgarde which includes Grunts, Axe Throwers, Shamans, Raiders,
and Demolishers (not necessarily all in the same battle)
- Tour of War — earned by defeating all three of the enemy commanders
in the Battle for Stormgarde which includes slaying Danath Trollbane,
Turalyon, and Muradin (only one commander appears per battle)
- Deforester — earned by embodying every Horde hero in the Battle for Darkshore
- Under Cover of Darkness — earned by capturing a single location
in the Battle for Darkshore
- Night Moves — earned by capturing every location in the Battle
for Darkshore
- Recruitment Officer — earned by recruiting one of every troop
into the Battle for Darkshore
 War for the Shore — earned by completing the Battle for Darkshore
Honorbound & 7th Legion Service Medal Vendor
When Patch 8.1 launched, a new currency was introduced from World Quests from the opposite faction continent where incursions and Warfront World Quests are located. These can be exchanged for various goods that are listed below:
| Item | Cost | Description |
|---|---|---|
|
An account bound experience potion that stacks to a max of 20. | |
|
|
A battle worn cloak transmog. |
|
Tank stat focused cloak heirloom. | |
|
A Critical Strike party buff heirloom trinket with an on use effect. | |
|
A threat reduction heirloom trinket with an on use effect. | |
|
A Haste party buff heirloom trinket with an on use effect. | |
|
A Versatility party buff heirloom trinket with an on use effect. | |
| 100x |
Summons the Trecker Battle Pet. | |
| 100x |
Summons the |
|
|
|
A faction colored Transmog cloak. |
| 125x |
A Warfront themed toy, which once summoned, can be controlled and throw small glaives at other players. | |
| 125x |
A Warfront themed toy, which once summoned, can be controlled and throw small blight bombs at other players. | |
| 200x |
Krolusk mount that is colored to represent the Alliance. | |
| 200x |
Krolusk mount that is colored to represent the Horde. | |
| 300x |
A 395 Haste/Crit Ring that can teleport you to Boarlus and has a 30 minute cooldown. | |
| 300x |
A 395 Haste/Crit Ring that can teleport you to Dazar'lor and has a 30 minute cooldown. | |
| 750x |
Warfront Alliance themed mount. | |
| 750x |
Warfront Horde themed mount. |
Of particular note from these rewards are the ![]() Draught of Ten Lands which
will make leveling alternate characters easier and faster. The rings are also
of note because they are item level 380 and provide a teleport back to your faction's
home city. While this does share a cooldown with your
Draught of Ten Lands which
will make leveling alternate characters easier and faster. The rings are also
of note because they are item level 380 and provide a teleport back to your faction's
home city. While this does share a cooldown with your ![]() Hearthstone, you
can use this ring as a quick portal to your home city and set your
Hearthstone, you
can use this ring as a quick portal to your home city and set your ![]() Hearthstone
in a more convenient place!
Hearthstone
in a more convenient place!
Conclusion
Thank you for reading this Warfronts guide! We hope that you will find the Warfronts feature as fun and lucrative as we do! As more Warfronts become available in the future, this guide will be updated to reflect all the new strategies and loot!
Changelog
- 05 Jan. 2020: Added new Patch 8.3 mount.
- 20 Dec. 2019: Added note about Heroic Darkshore in Patch 8.3.
- 08 Jul. 2019: Updated and organized various sections with information from Patch 8.2.
- 03 Jul. 2019: Added Heroic Warfront information from Patch 8.2.
- 04 Dec. 2018: Added Patch 8.1 information.
- 15 Oct. 2018: Added Alliance contributions for Oct. 9 contribution phase and amended master table to show more examples.
- 27 Sep. 2018: Added Horde contributions for Sep. 27 contribution phase.
- 17 Sep. 2018: Added Alliance contributions and quest information.
- 09 Sep. 2018: Added summary information on each section and mentioned loot drop rate notes.
- 04 Sep. 2018: Added contribution notes, list, and details about contribution quests and lockout timings.
- 11 Aug. 2018: Added Warfront pet, mount, and toy locations, added achievements, and corrected Warfront contribution reputation and Azerite reward amounts.
- 10 Aug. 2018: Added Warfronts guide.