

The Highlord's Return: a Legion Timewalking Mage Tower Guide for Tanks
This Mage Tower challenge for tank specializations — Blood Death Knight, Brewmaster Monk, Guardian Druid, Protection Paladin, Protection Warrior, and Vengeance Demon Hunter — is a two phase encounter which tests your ability to use your defensives properly while also making you pay attention to your surroundings.
The two main enemies you will be facing are Inquisitor Variss and Highlord Kruul. One of them will be active during Phase One while the other one becomes active during Phase Two. In addition to them there are also various adds that spawn and need to be dealt with.
On the following page you will get to know all of the abilities the enemies have, how to counter them, and how to successfully complete The Highlord's Return Mage Tower Challenge!
How to find the Tank Mage Tower Challenge
Patch 10.0.5 has re-opened the Mage Tower Challenge, meaning you can once again complete and collect the various rewards offered! As it stands, the Mage Tower will remain open until the end of the expansion, so there should be plenty of time.
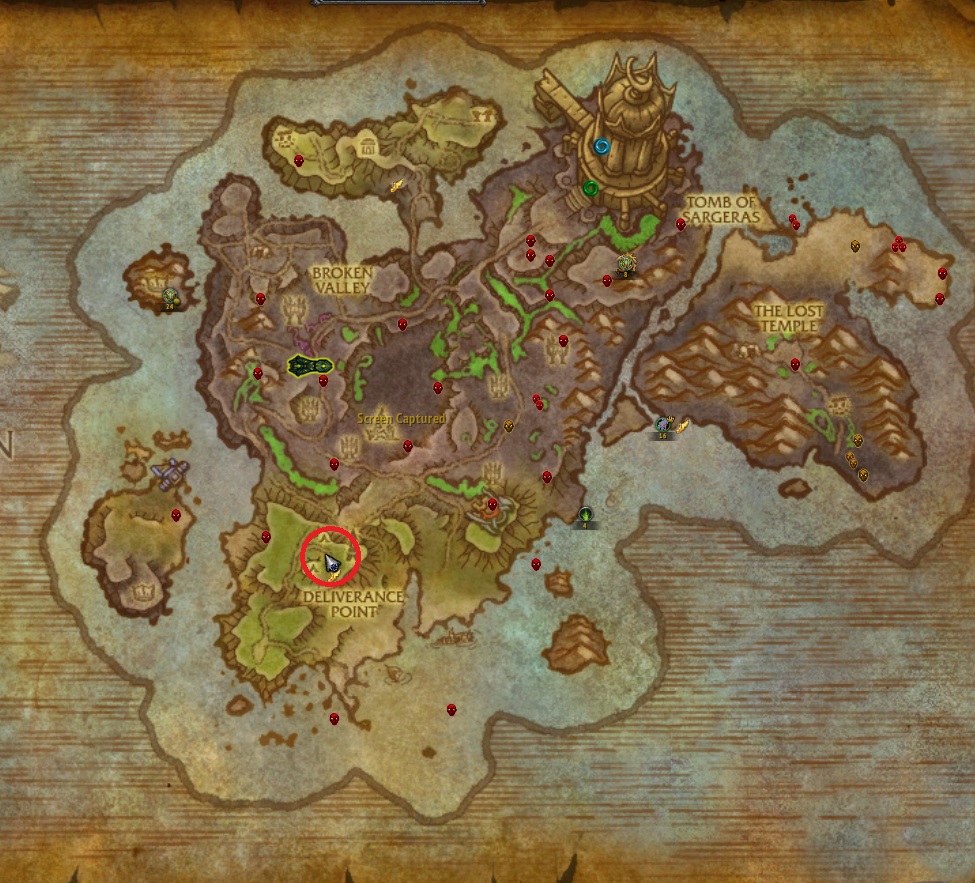
The Highlord's Return is meant for all the tank specializations: Blood Death Knight, Brewmaster Monk, Guardian Druid, Protection Paladin, Protection Warrior, and Vengeance Demon Hunter. You can queue for it in the Broken Shore main hub area by talking to War Councilor Victoria.
To reach this area, you can take a portal from Orgrimmar / Stormwind's
portal room to Azsuna and then fly or take the flight path to the Broken Shore
hub, Deliverance Point. You can also use the ![]() Dalaran Hearthstone
to quickly reach Dalaran and then fly to Deliverance Point.
Dalaran Hearthstone
to quickly reach Dalaran and then fly to Deliverance Point.
The Highlord's Return Challenge Overview
The tank challenge known as The Highlord's Return is a 2-phase encounter where you need to deal with various enemies while keeping Prophet Velen alive. In Phase 1, your main enemy is Inquisitor Variss; after he dies, Phase 2 starts, and your main target will be Highlord Kruul. If Velen or Kor'vas Bloodthorn dies at any point in the encounter, it will automatically end.
The main struggle points of this encounter are paying attention to various knockback effects so you do not get knocked off the platform, and using your defensives properly.
If you wish to take a quick refresher course on the tank you are about to do the Mage Tower Challenge on, you can take a look at the guides below.
Gear for the Tank Mage Tower Challenge
There are no items that are mandatory for you to complete the Tank Mage Tower Challenge. That said, there are ways you can optimize your gear a bit if you wish to.
Whenever you enter the Mage Tower, your gear will be downscaled to item level 120. Due to this reason, any gear that has multiple sockets on it can be more useful than your currently equipped gear.
Some old trinkets are mighty in the
Challenge. ![]() Pocket-Sized Computation Device with
Pocket-Sized Computation Device with ![]() Cyclotronic Blast
is a solid burst of damage that you can deal to the enemies.
Cyclotronic Blast
is a solid burst of damage that you can deal to the enemies.
Gear Restrictions
Something to keep in mind is that there are a lot of gear effects and systems that have been disabled during the Challenge.
- Dragonflight Embellishments
- Shards of Domination;
- Legendary Powers from Shadowlands or Legion;
- Battle for Azeroth and other previous expansion systems (Azerite Gear, Traits, Essences, Shards);
- Tier set bonuses;
- Mists of Pandaria Legendary Meta Gems.
Crafted Gear for Timewalking
Crafting Mists of Pandaria Dreadful gear with ![]() Relic of the Past IV or
Relic of the Past IV or
![]() Relic of the Past V is an excellent alternate source of Timewalking gear as
it will have sockets and will be of a low enough item level to receive legacy
gems/enchants.
Relic of the Past V is an excellent alternate source of Timewalking gear as
it will have sockets and will be of a low enough item level to receive legacy
gems/enchants.
Gems and Enchants for Timewalking Gear
If you are using Shadowlands gear, you should use the current expansion gems and enchants, as the ones linked below will not work for you. If you are using Timewalking gear, you should instead use the enchants and gems listed below.
- Meta Gems for Head slot:
- Strength:
 Chaotic Skyflare Diamond
 - Agility:
 Agile Primal Diamond
- Strength:
- Strength: 1x
 Sovereign Tanzanite and rest
 Bold Queen's Garnet
 - Agility: 1x
 Nightmare Tear and rest
Delicate Queen's Garnet
Nightmare Tear and rest
Delicate Queen's Garnet
| Slot | Strength tank recommendation | Agility tank recommendation |
|---|---|---|
| Neck | ||
| Shoulder | ||
| Cloak | ||
| Chest | ||
| Wrists | ||
| Gloves | ||
| Legs | ||
| Boots | ||
| Rings | Shadowlands Tenet Enchants | |
| Weapon |
Strategy for The Highlord's Return (Kruul)
Over the 2 phases of the encounter, your main focus should be on avoiding the various knockback effects while simultaneously keeping Prophet Velen alive and dealing damage to either Inquisitor Variss or Highlord Kruul. Although there are many different types of adds that spawn, most of them have low health and can be cleaved down.
One important thing to note is to try and keep as many big defensives for
the second phase of the encounter as you need them to survive the ![]() Annihilate
stacks.
Annihilate
stacks. ![]() Feral Hide Drums should also be saved for the second phase
as that phase is on a timer due to the damage intake increase from
Highlord Kruul.
Feral Hide Drums should also be saved for the second phase
as that phase is on a timer due to the damage intake increase from
Highlord Kruul.
Phase 1 of the encounter
During Phase 1, you have to deal with Inquisitor Variss and 3 types of adds that spawn throughout the phase. Your goal is to defeat Variss while keeping Prophet Velen alive, which will then trigger the start of Phase 2.
Prophet Velen is active during both phases of the encounter, and you
need to make sure he stays alive. He will stand still and not move, so take
note of his position. He will sometimes heal you a little bit. Still, generally, his biggest contribution is the ![]() Holy Ward Orbs he spawns
roughly every 30 seconds. These orbs can be triggered by walking over them. They
will instantly heal you to full health while disorienting and interrupting
all enemies for 5 seconds.
Holy Ward Orbs he spawns
roughly every 30 seconds. These orbs can be triggered by walking over them. They
will instantly heal you to full health while disorienting and interrupting
all enemies for 5 seconds.
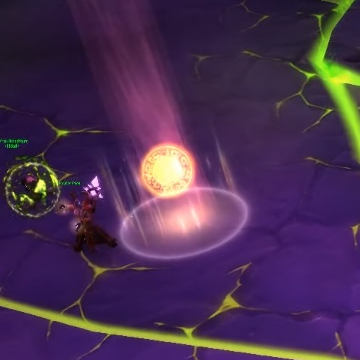
Generally, the ![]() Holy Ward Orbs are best used depending on the
circumstances. You do not need to use them as soon as they spawn, as they will
only disappear after roughly 2 minutes. This means that you can have multiple
orbs up at any given moment. Try to have multiple orbs up once Phase 2
starts to make the transfer easier to manage. Some of the more critical
uses of the orbs are listed below.
Holy Ward Orbs are best used depending on the
circumstances. You do not need to use them as soon as they spawn, as they will
only disappear after roughly 2 minutes. This means that you can have multiple
orbs up at any given moment. Try to have multiple orbs up once Phase 2
starts to make the transfer easier to manage. Some of the more critical
uses of the orbs are listed below.
- Healing yourself while you are on low health
- Interrupting
 Drain Life from Inquisitor Variss if you do not
have anything else available
Drain Life from Inquisitor Variss if you do not
have anything else available - When overwhelmed by enemies and in need of time to stabilize the situation
Inquisitor Variss
Inquisitor Variss is your main enemy in Phase 1. He will constantly
be casting ![]() Mind Rend that deals some magic damage, and
Mind Rend that deals some magic damage, and ![]() Drain Life,
which heals him if not interrupted. He also has an
Drain Life,
which heals him if not interrupted. He also has an ![]() Aura of Decay around him, which puts a stacking debuff on you as long as you stay inside the area. The debuff
reduces your maximum health, so be sure to keep an eye on it and get out at around
5 stacks to be safe.
Aura of Decay around him, which puts a stacking debuff on you as long as you stay inside the area. The debuff
reduces your maximum health, so be sure to keep an eye on it and get out at around
5 stacks to be safe.
| Add name | Ability name | Short information | Countermeasures |
|---|---|---|---|
| Inquisitor Variss | Pool around Variss; debuffs you when in its area, reducing your maximum health | Pay attention to the stacks; the safest bet is to walk away at around 5 and let them reset | |
| Inquisitor Variss | Channel that heals Variss | IMPORTANT — Use your interrupt or any CC to stop the cast from going through | |
| Inquisitor Variss | Constantly casting this deals Shadow damage | Interrupts and CC abilities will stop this, but it is not important to interrupt as the damage it deals is minimal |
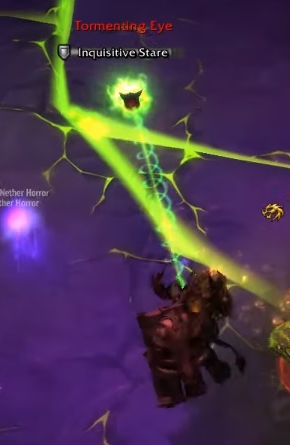
Tormenting Eye
Multiple Tormenting Eyes will spawn throughout Phase 1. They will
channel ![]() Inquisitive Stare at you, which will knock you away if you are not
facing them at the end of the cast. They have very low health, so you can kill
them fairly easily. If you cannot kill them all, then try to kill the ones that are
not as grouped up with the rest, so all the Inquisitive Stares come from
the same direction and are easier to face.
Inquisitive Stare at you, which will knock you away if you are not
facing them at the end of the cast. They have very low health, so you can kill
them fairly easily. If you cannot kill them all, then try to kill the ones that are
not as grouped up with the rest, so all the Inquisitive Stares come from
the same direction and are easier to face.
If you are playing this challenge as a Guardian Druid or Blood Death Knight then the Tormenting Eyes are IMMUNE to Physical damage.
| Add name | Ability name | Short information | Countermeasures |
|---|---|---|---|
| Tormenting Eye | Channel that is targeted at you; if you do not face the channel when the cast ends, you are knocked away | Either kill the Tormenting Eye or face the Eye as the channel ends to avoid the knockback |
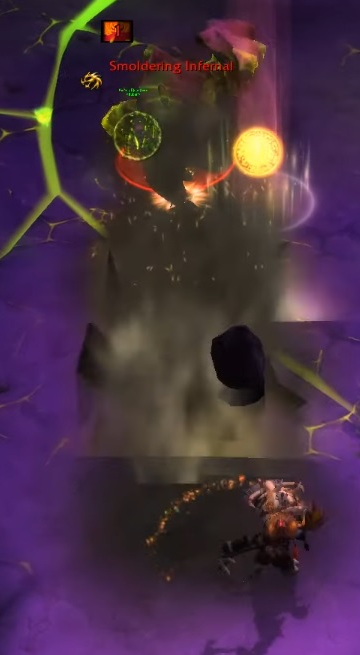
Smoldering Infernal
Multiple Smoldering Infernals will spawn and then constantly
resurrect throughout the encounter. They have a debuff on themselves, continuously damaging them, so you do not need to focus
on them actively. Every time they die, they start "respawning" at the same position,
eventually returning to life. The main thing they do is ![]() Smash; this is a straight-line knockback targeted at you. If you get hit by it,
you are knocked back by a fair amount, most likely off the platform ending the
encounter. It is important to sidestep it. If you do get hit, you can use
Smash; this is a straight-line knockback targeted at you. If you get hit by it,
you are knocked back by a fair amount, most likely off the platform ending the
encounter. It is important to sidestep it. If you do get hit, you can use
![]() Goblin Glider Kit or any charge/leap abilities to get you back on the platform.
Goblin Glider Kit or any charge/leap abilities to get you back on the platform.
| Add name | Ability name | Short information | Countermeasures |
|---|---|---|---|
| Smoldering Infernal | Casts in a straight line; if you get hit by it, you get knocked back | Step aside from the line before it is cast; if you do get hit, use
|
|
| Smoldering Infernal | Deals damage to enemies nearby at the cost of its health | Mostly ignorable; pay attention when they are low health to finish them off quicker |
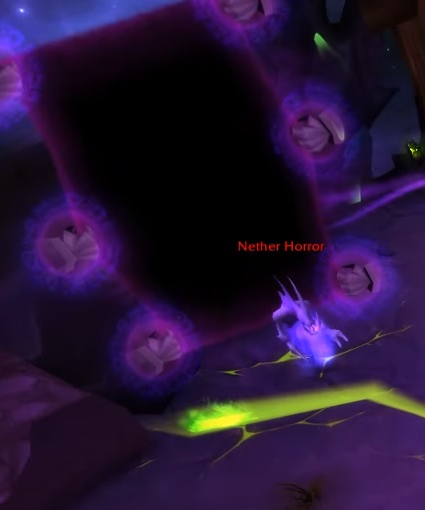
Nether Horror
Four Nether Horrors will continuously spawn from gates throughout the encounter. When they spawn, they will most likely go straight to Prophet Velen, so grab threat on them as fast as possible to avoid Velen dying. They have very little health so you can cleave them down relatively fast with your abilities.
| Add name | Ability name | Short information | Countermeasures |
|---|---|---|---|
| Nether Horror | Their melee attacks debuff you with |
They have very little health so you can cleave them down fast before the debuff can stack | |
| Nether Horror | Inflicts magic damage to enemies | Interrupt or CC, kill the adds as soon as possible |
Phase 1 strategy
The best way to deal with Phase 1 is by managing the adds that spawn properly.
In the beginning, rush on Inquisitor Variss and damage him until you have
around 5 stacks of ![]() Aura of Decay, after that start dealing with the
adds that have spawned. Once the adds have died, or you no longer have a stack
of Aura of Decay, you can go back on Variss.
Aura of Decay, after that start dealing with the
adds that have spawned. Once the adds have died, or you no longer have a stack
of Aura of Decay, you can go back on Variss.
- Damage Inquisitor Variss until you have around 5 stacks of the
 Aura of Decay debuff
- Be sure to interrupt or CC Drain Life
- Do not waste your interrupts on
 Mind Rend, use
defensives if you need to
Mind Rend, use
defensives if you need to - Face Tormenting Eyes as they finish their cast of
 Inquisitive Stare
 - Keep an eye on Smoldering Infernal
 Smash casts and
sidestep them
Smash casts and
sidestep them - Pick up any Nether Horrors that spawn so they do not kill Velen
- Be sure to interrupt or CC
- Once you have around 5 stacks of Aura of Decay, walk out of
Variss' aura and start dealing with the adds
- Tormenting Eyes and Nether Horrors have really low health so you can most likely cleave them down without having to hard swap
- You do not need to focus hard on Smoldering Infernal as they will
slowly die from
 Fel Resonation
- Use Velen's
 Holy Ward Orbs to heal you or to interrupt any
casts as needed
Holy Ward Orbs to heal you or to interrupt any
casts as needed - After the debuff from Variss' aura has worn off, go back to damaging him and repeat the steps above until he is dead
Phase 2 of the encounter
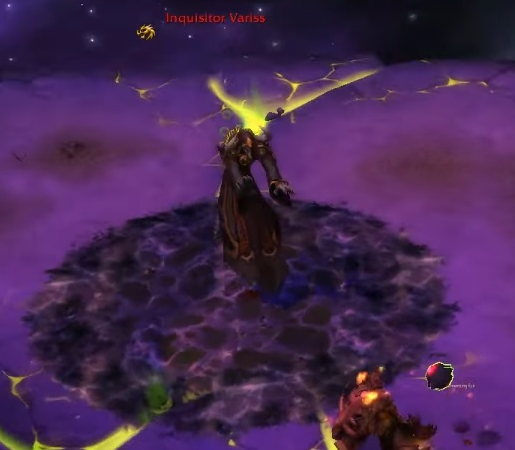
After you kill Inquisitor Variss Phase 2 will start. Highlord Kruul
will fly down and become the active boss. Use ![]() Feral Hide Drums
during this Phase. Nether Horrors and Smoldering Infernals
will continue to spawn throughout this phase, in addition to some
new abilities you need to look out for. Tormenting Eyes no
longer spawn, so you do not need to worry about them.
Feral Hide Drums
during this Phase. Nether Horrors and Smoldering Infernals
will continue to spawn throughout this phase, in addition to some
new abilities you need to look out for. Tormenting Eyes no
longer spawn, so you do not need to worry about them.
One of the new abilities to look out for are the purple beams that periodically move through the encounter area. These beams slow and push you back if you happen to be hit by them. You can use movement speed abilities to walk through them; otherwise, try to avoid them, or you will be pushed off the platform.
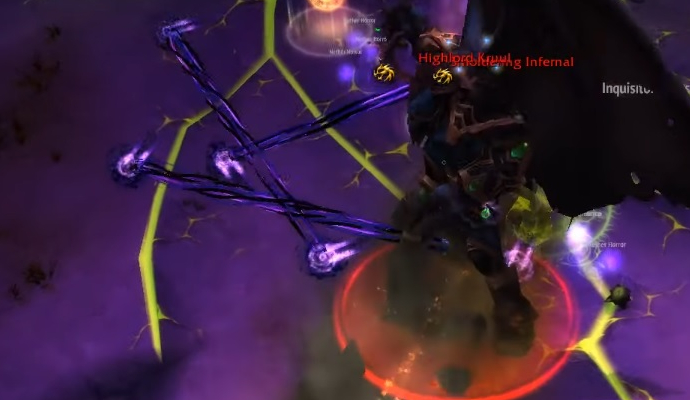
Highlord Kruul
Highlord Kruul has various abilities that he will cast on you, but
the most important of them is ![]() Twisted Reflection. This cast
needs to be interrupted as if it goes through, it will keep healing the
boss, and the fight will become impossible to finish.
Twisted Reflection. This cast
needs to be interrupted as if it goes through, it will keep healing the
boss, and the fight will become impossible to finish. ![]() Annihilate is
a simple Physical damage nuke that stacks a debuff on you, which increases the
damage taken from him. At first, this is not that deadly, but you need to use stronger cooldowns to survive as the debuffs stack up.
Annihilate is
a simple Physical damage nuke that stacks a debuff on you, which increases the
damage taken from him. At first, this is not that deadly, but you need to use stronger cooldowns to survive as the debuffs stack up.
| Add name | Ability name | Short information | Countermeasures |
|---|---|---|---|
| Highlord Kruul | Hard-hitting Physical damage ability that debuffs the target, increasing damage taken | Use your main mitigation tool and start using bigger cooldowns as the debuffs stack | |
| Highlord Kruul | Leap attack that deals damage knocks targets back and leaves a hard-hitting felfire puddle on the ground | Move out of the leap area and felfire puddle as soon as possible | |
| Highlord Kruul | Cast that will heal the Kruul and put a debuff on the target, which also heals Kruul every time he attacks | Interrupt/CC it every time; if this goes through the fight is lost |
Phase 2 strategy
Phase 2 is all about managing your cooldowns for ![]() Annihilate,
interrupting
Annihilate,
interrupting ![]() Twisted Reflection and avoiding being knocked off by the
Smoldering Infernals'
Twisted Reflection and avoiding being knocked off by the
Smoldering Infernals' ![]() Smash or by the new purple lines
moving across the platform. Think ahead about how you will use your
cooldowns to prevent getting one-shot by
Smash or by the new purple lines
moving across the platform. Think ahead about how you will use your
cooldowns to prevent getting one-shot by ![]() Annihilate when it has
multiple stacks.
Annihilate when it has
multiple stacks.
- Start focusing down Highlord Kruul and put as much damage into him
as you can
- Be sure to interrupt
 Twisted Reflection or it will be a wipe
 - Use a combination of defensives for
 Annihilate as the stacks
start to go higher
Annihilate as the stacks
start to go higher - Avoid the felfire pools that are left behind by
 Nether Storm
- Be sure to interrupt
- Pick up any Nether Horrors that spawn and cleave them down with Kruul so Prophet Velen is not in danger of dying
- Avoid Smash from Smoldering Infernals by sidestepping it
- Use the Holy Ward Orbs to heal you or to help you stabilize
the add situation — the disorient also works on Kruul
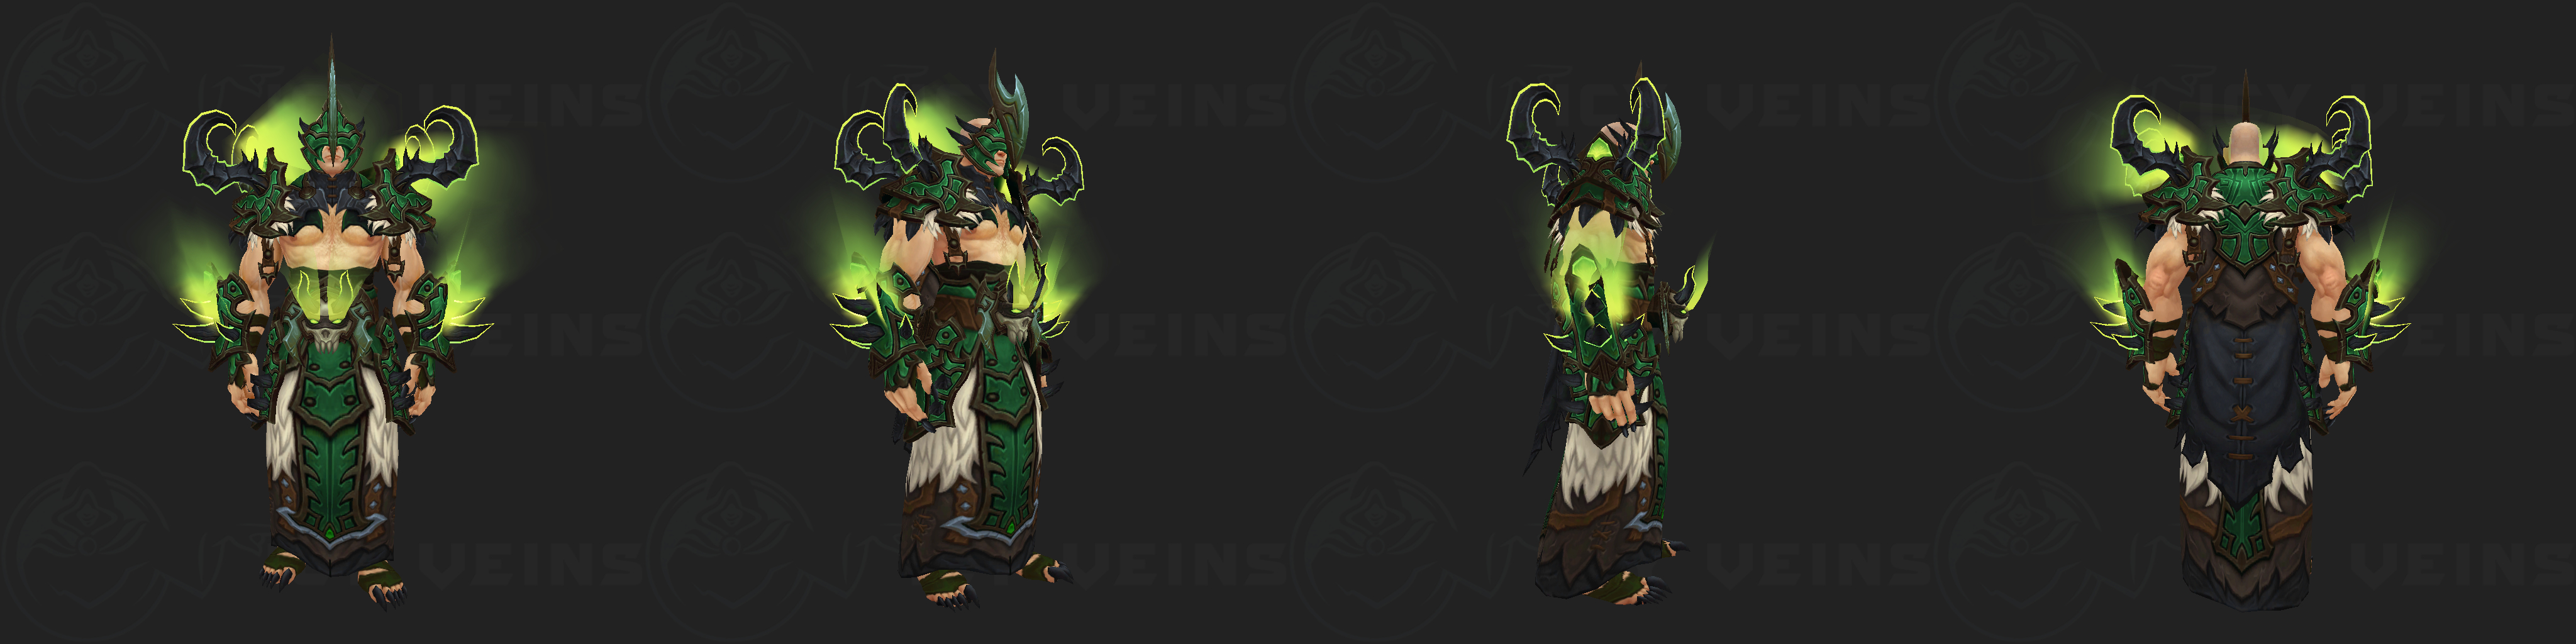
Rewards for the Tank Mage Tower Challenge
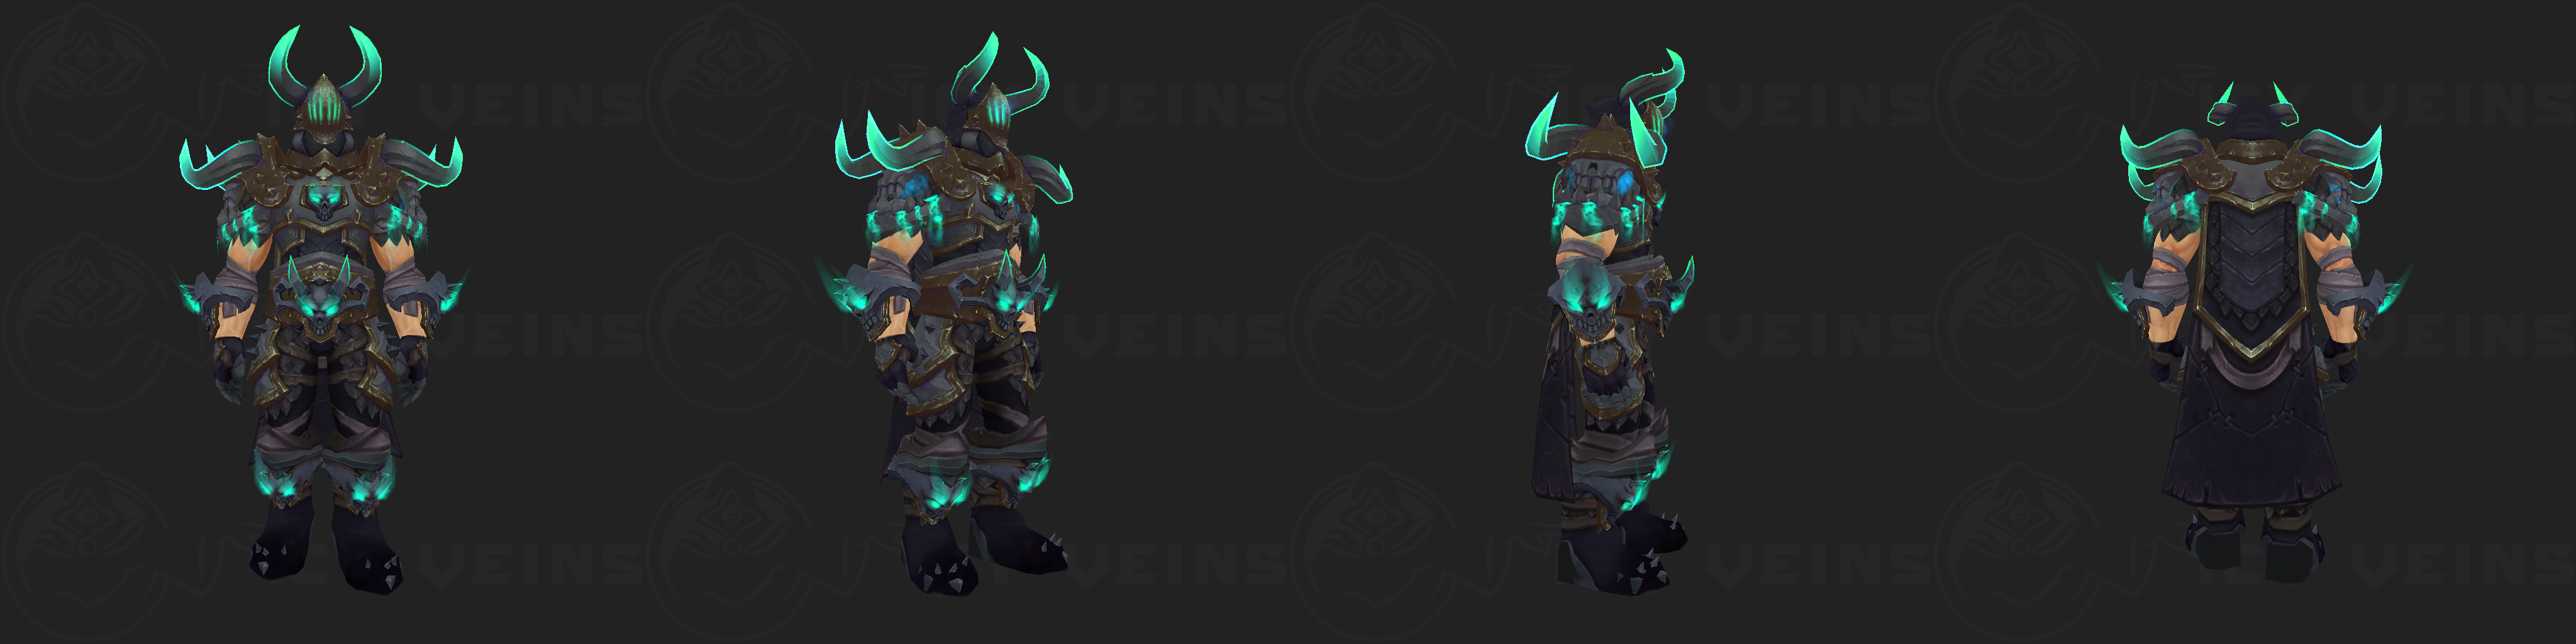
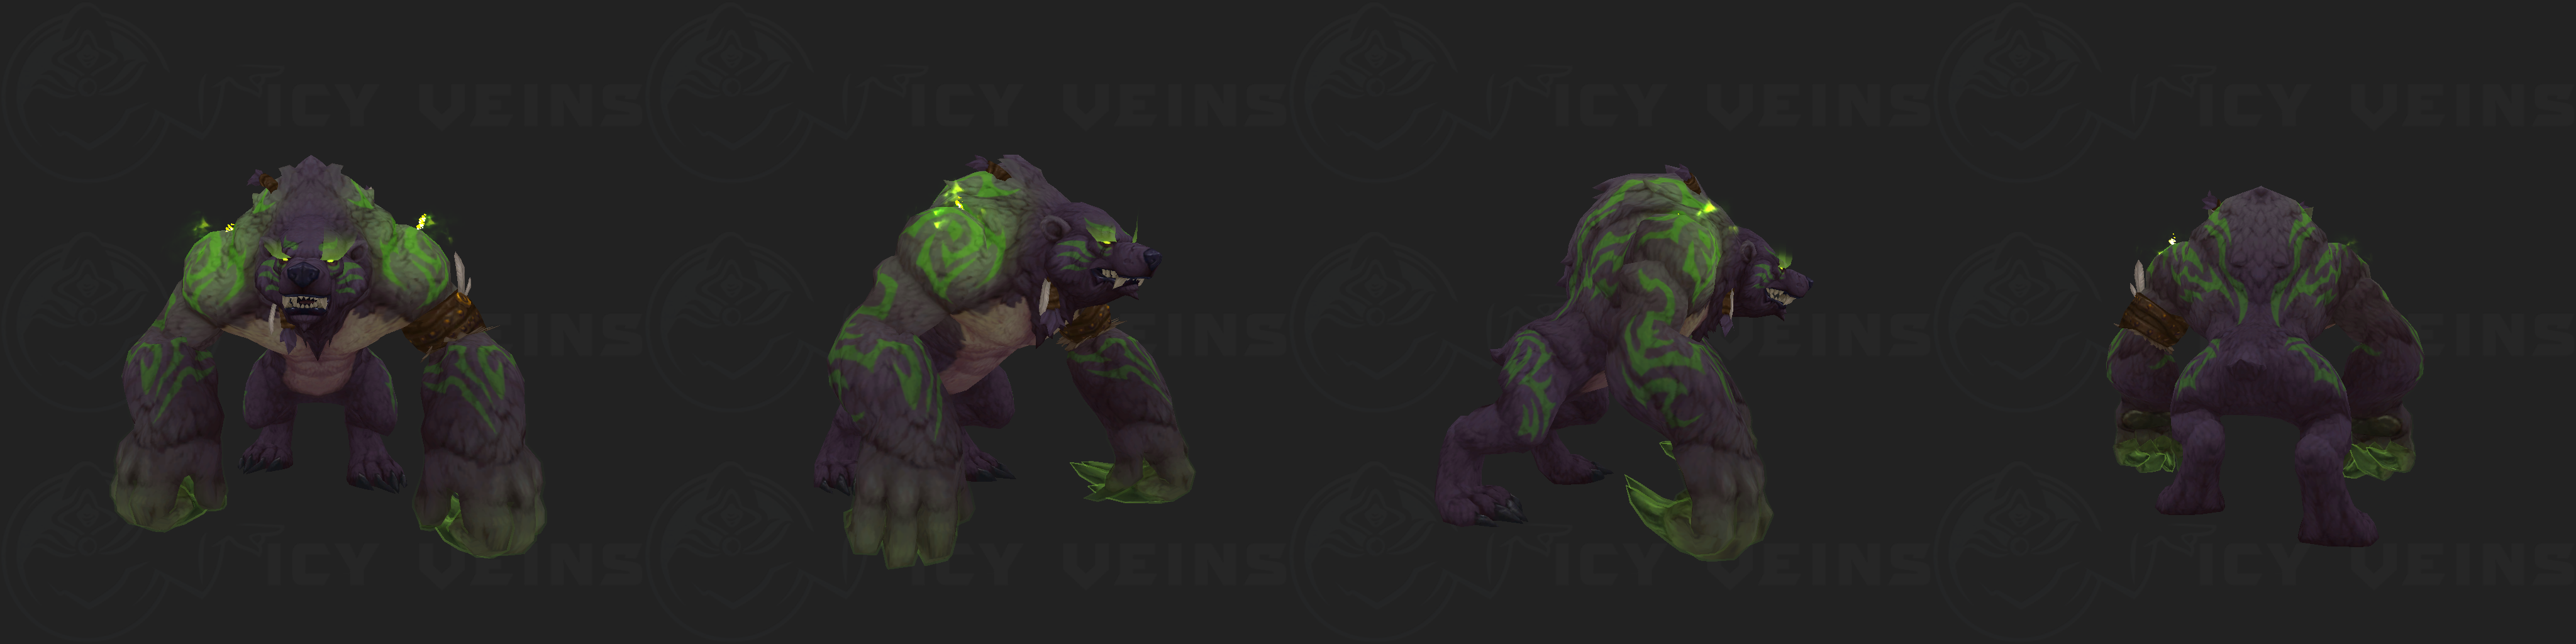
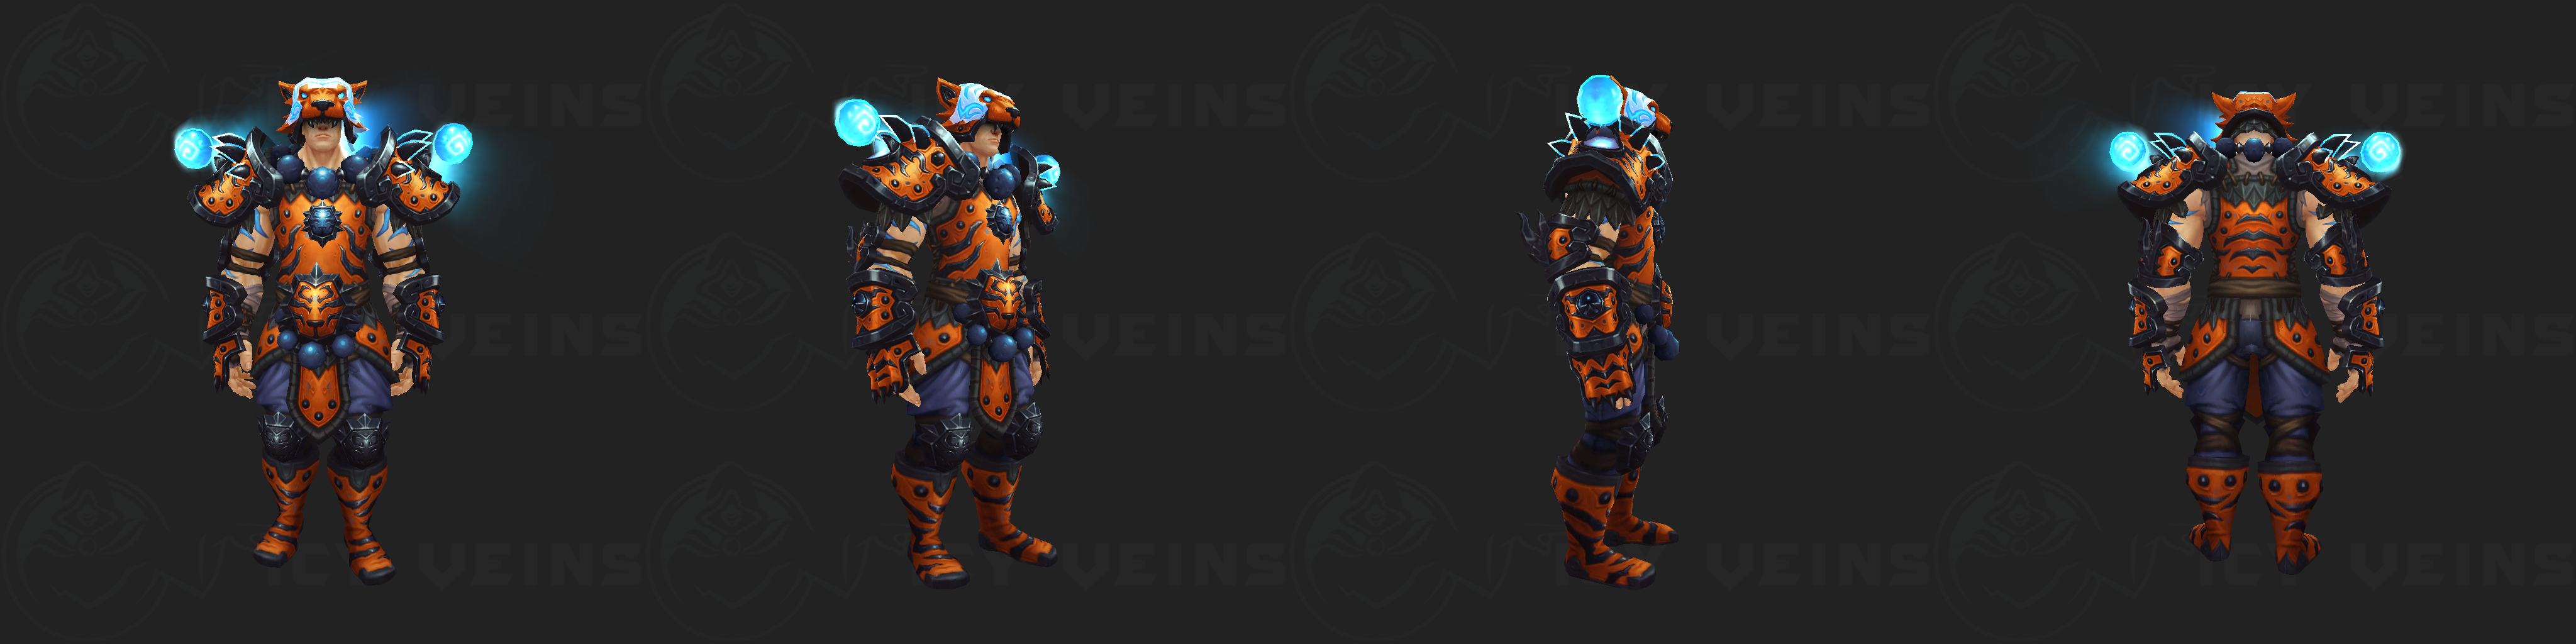
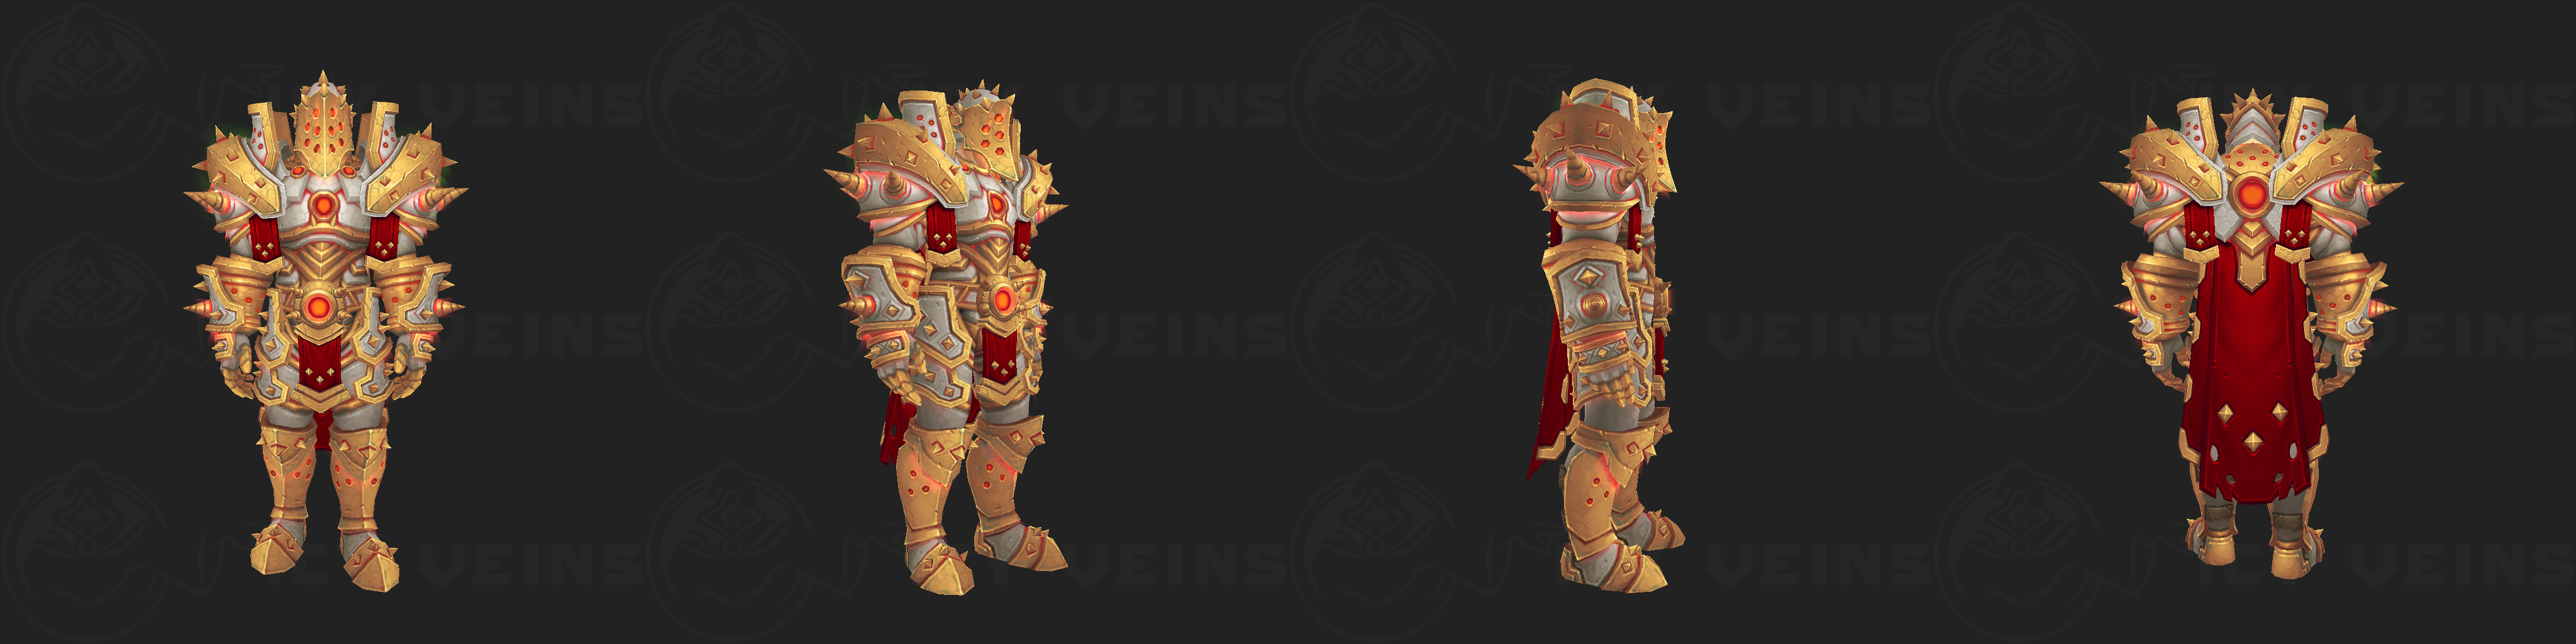
Once you complete the Challenge, you will be rewarded with a transmog set which is a re-color of your class Tier 20 (Tomb of Sargeras) set.
Demon Hunter
Death Knight
Druid
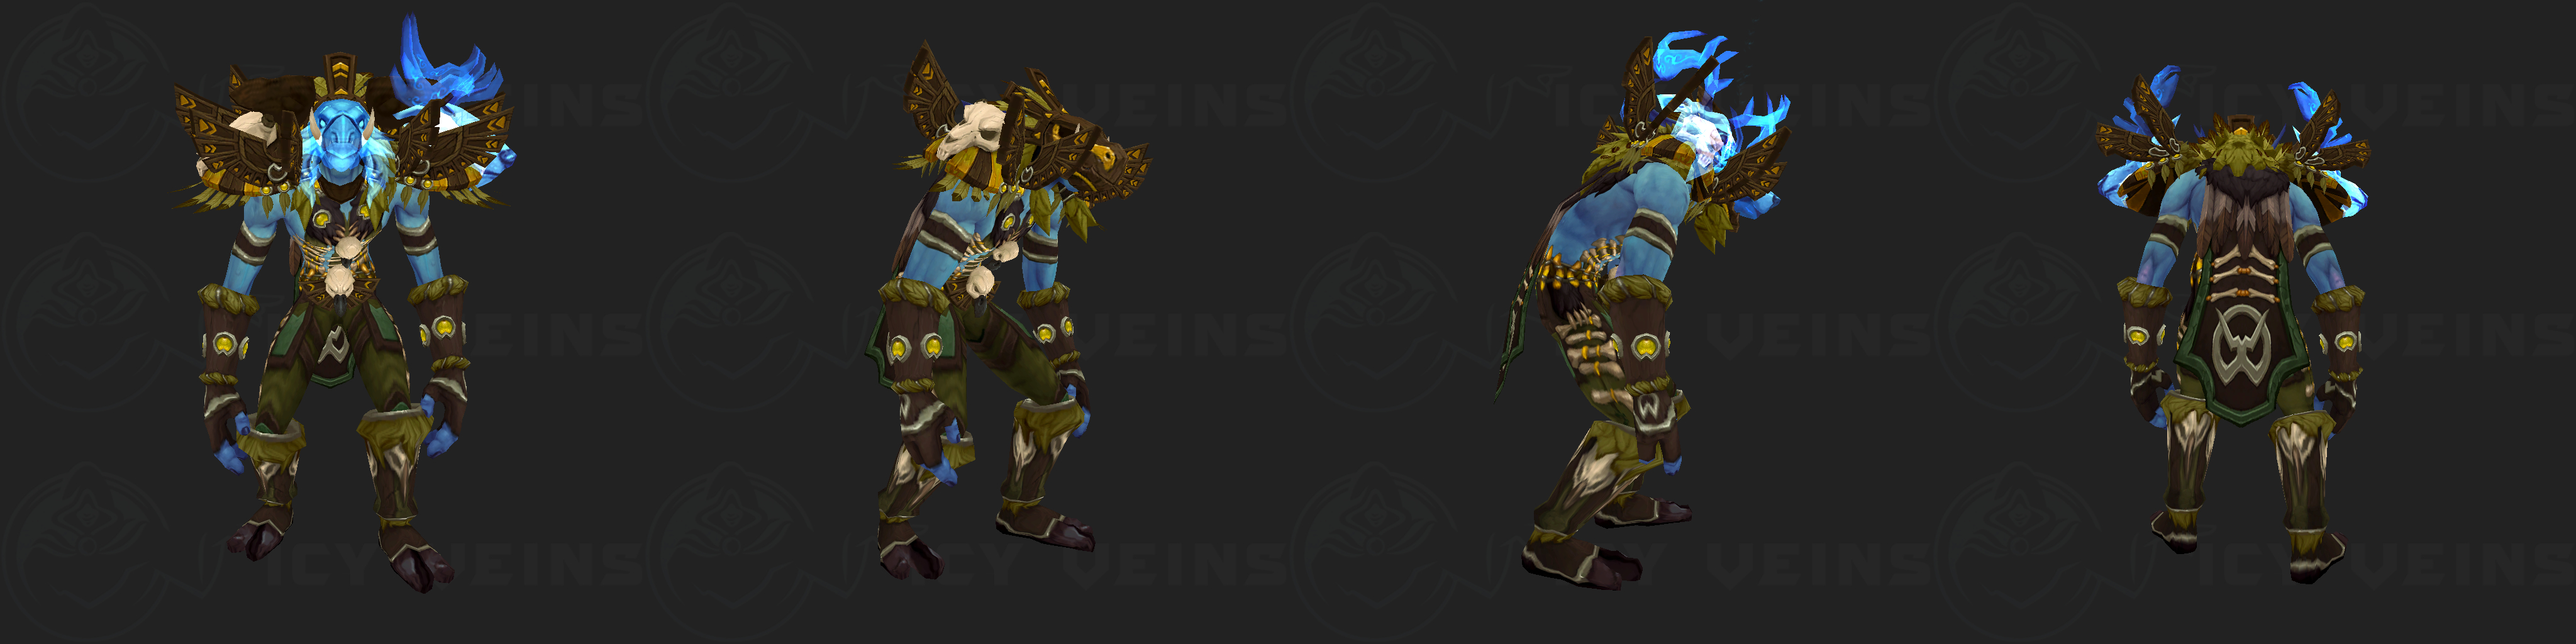
If you complete the Challenge as a Guardian Druid, you will also obtain the special fel variant of the "werebear" shapeshift form.
Monk
Paladin
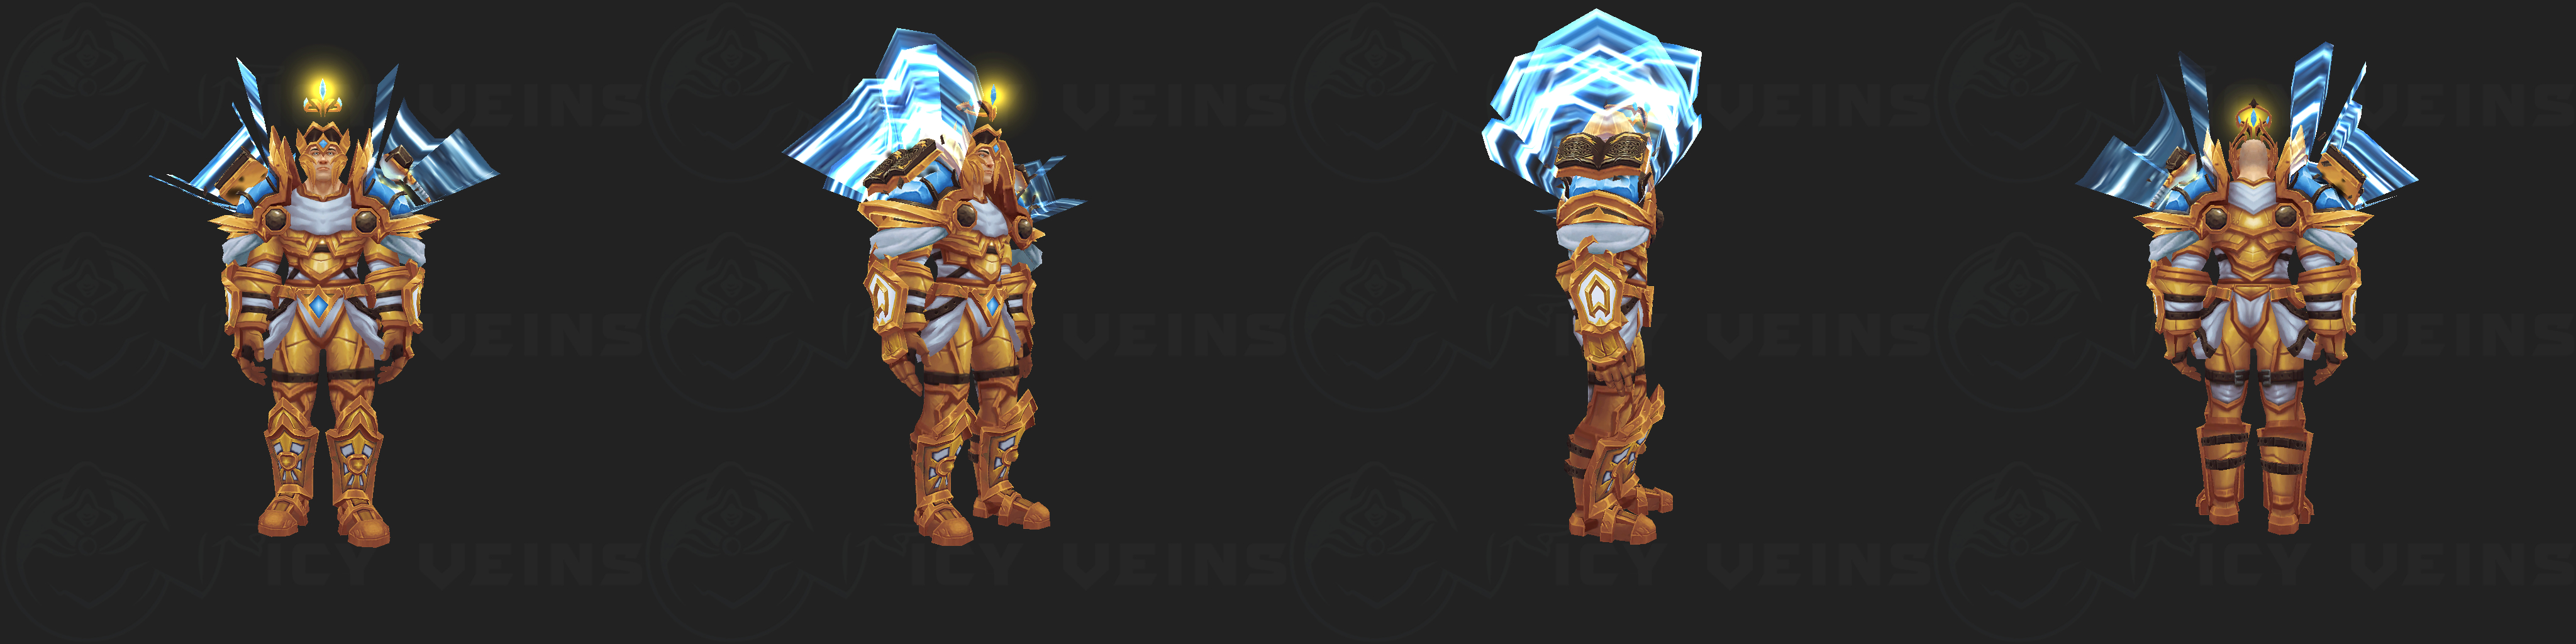
Warrior
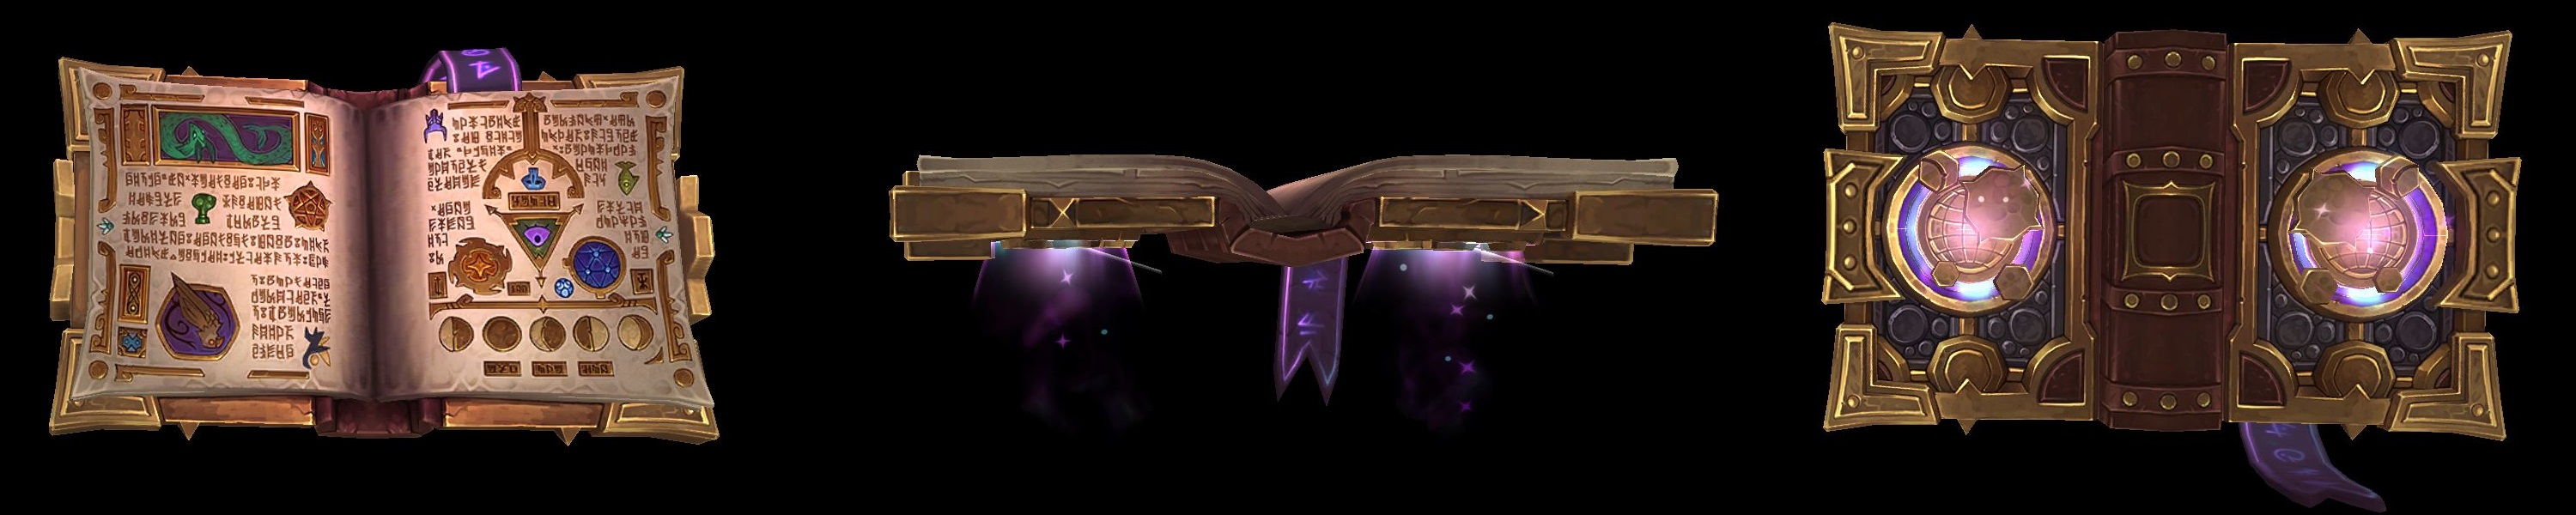
Additional obtainable rewards
If you manage to complete all 7 of the Timewalking Mage Tower Challenges at least once, you will also be rewarded with a mount: the Soaring Spelltome
If you wish to obtain additional mounts, you can look at our Mount guide to help you get started collecting all the various mounts.
There is also the achievement ![]() Tower Overwhelming which will be rewarded
to you, if you manage to complete the Timewalking Mage Tower Challenge on all 36
specializations.
Tower Overwhelming which will be rewarded
to you, if you manage to complete the Timewalking Mage Tower Challenge on all 36
specializations.
Changelog
- 17 Feb. 2023: Updated for Dragonflight Patch 10.0.5
- 07 Dec. 2021: Added extra sources of viable timewalking gear.
- 01 Dec. 2021: Guide added.