

Thwarting the Twins: a Legion Timewalking Mage Tower Guide for DPS
This Mage Tower Challenge for many Ranged DPS Specializations — Affliction Warlock, Balance Druid, Frost Mage, Marksmanship Hunter, and Shadow Priest — is focused on burst DPS, cooldown timings, interrupting, and a little bit of add management.
You will be fighting the two brothers Karam Magespear and Raest Magespear, as well as unique adds they spawn that must be dealt with.
This guide will explain everything you need to know to improve your chances of success at Thwarting the Twins, including a strategy on the encounter itself, and how to best prepare your character.
Thwarting The Twins (Raest and Karam Magespear) Guide
Welcome to our strategy guide for the Mage Tower challenge Thwarting the Twins. On this page, we will tell you everything you need to know about the encounter, and how to defeat it. If you are not playing the specs listed below,check out one of our other Mage Tower guides for your spec.
Thwarting the Twins Mage Tower Rewards
Completing this Mage Tower Challenge will unlock a unique recolor of the Tier
20 Raid Set from Tomb of Sargeras. Completing all 7 of the Mage Tower
challenges will unlock the ![]() Mage-Bound Spelltome Mount.
Mage-Bound Spelltome Mount.
How To Start Thwarting The Twins
This Mage Tower challenge has been open as of Patch 10.0.5 and should be doable until the end of the expansion. We will update this page in case this changes! This guide is for the 'Thwarting of the Twins' Challenge, available to the specs listed below.:
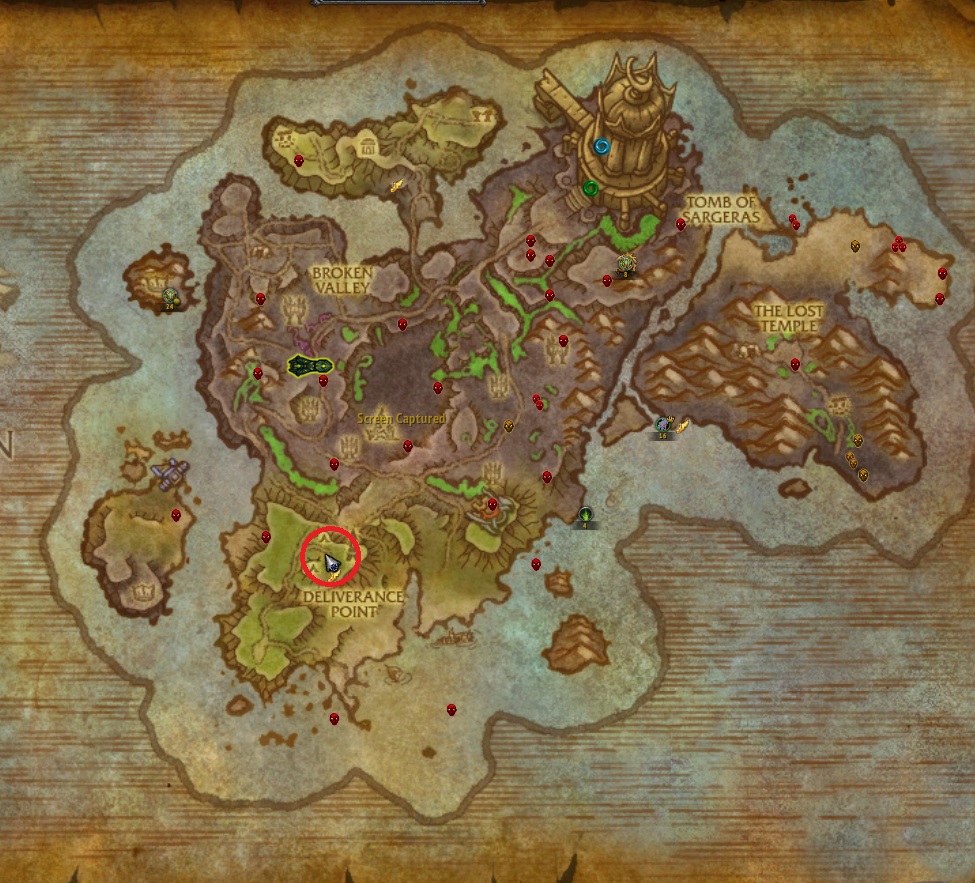
To begin this challenge, you need to visit War Councilor Victoria on
the Broken Shore (coords. 45, 62). If you have your ![]() Dalaran Hearthstone,
you can get there very easily. If you do not have your Dalaran Hearthstone, go
to Orgrimmar/Stormwind and take the portal to Azsuna to fly to the Broken Shore.
Dalaran Hearthstone,
you can get there very easily. If you do not have your Dalaran Hearthstone, go
to Orgrimmar/Stormwind and take the portal to Azsuna to fly to the Broken Shore.
Gear Considerations for the Mage Tower
The effects below will not function within the Timewalking Mage Tower event:
- Dragonflight Embellishments
- Any Covenant-related effects (Covenant Ability, Signature Ability, Soulbinds, Conduits)
- Legendary Powers from Shadowlands or Legion (the items will still provide stats, their equip effects will not)
- Legendary items from Questlines (
 Ashjra'kamas, Shroud of Resolve,
Warlords of Draenor Legendary Rings,
Ashjra'kamas, Shroud of Resolve,
Warlords of Draenor Legendary Rings,  Dragonwrath, Tarecgosa's Rest,
  Val'anyr, Hammer of Ancient Kings)
 - Any Shards of Domination
- Any Battle for Azeroth systems (Azerite Gear, Traits, Essences)
- Any tier set bonuses
- Mists of Pandaria Legendary Meta Gems
You should also keep in mind that all items are scaled to item level 120 in the Mage Tower. This means that your item level is completely irrelevant, and that all that matters is the quality of the items you are bringing. This also means that sockets have exceptional value in Mage Tower Challenges.
BiS List for Legion Timewalking/Mage Tower Challenges
Since many specs can do this challenge, we can not offer an individual BiS list for every single spec. However, the sources for nearly all BiS items are the same.
| Slot | Item | Source |
|---|---|---|
| Helm | Any 2-Socket Helm | Throne of Thunder/Siege of Orgrimmar |
| Necklace | Battle for Azeroth Main Storyline/Legion Archaeology | |
| Shoulders | Any 2-Socket Shoulders (enchant with
|
Throne of Thunder/Siege of Orgrimmar/Dragon Soul |
| Cloak | MoP Legendary Cloak (enchant with |
No Longer Obtainable - MoP Legendary Cloak Questline |
| Cloak Alternative | Patch 8.3 'Through the Darkness' Questline (starts at Magni in the Chamber of Heart) | |
| Chest | Any 3-Socket Chest (enchant with
|
Throne of Thunder/Siege of Orgrimmar |
| Bracers | Any 2-Socket Bracers (enchant with
|
Cataclysm Tailoring/Leatherworking |
| Gloves | Any 2-Socket Gloves/ |
Throne of Thunder/Siege of Orgrimmar/Legion Legendary |
| Belt | Any 2-Socket Belt | Throne of Thunder/Siege of Orgrimmar or Pandaria
Tailoring/Leatherworking. Add extra socket with
|
| Legs | Any 3-Socket Legs (enchant with
|
Throne of Thunder/Siege of Orgrimmar or Pandaria Tailoring/Leatherworking |
| Boots | Any 2-Socket Boots/ |
Throne of Thunder/Dragon Soul/Legion Legendary |
| Rings | WoD Pre-Legendary Ring (for example, Spellbound Runic Band of Unrelenting Slaughter) (enchant with Accord, or Binding of Haste/Mastery/Crit/Vers depending on iLvl and spec) | WoD Legendary Ring Questline |
| Rings (alternatives) | Operation: Mechagon | |
| Trinkets | Supreme Lord Kazzak World Boss/Gruul's Lair/Hellfire Citadel | |
| Weapon (Hunter) | Siege of Orgrimmar Heirlooms (unobtainable)/The Eternal Palace | |
| Weapon (Caster) | Icecrown Citadel |
There are also potentially better weapons from utilizing Chromie Time, but they require a leveled character on a second account and so are not within the scope of this guide.
If you prefer not to farm old raids for gear, you can use Crafted Dreadful
Gladiator's pieces as an alternative. These can be crafted by all the primary
gear crafting Professions, and you will want to use the ![]() Relic of the Past V
Optional Reagent to upgrade their item level when crafting. These items have
plentiful sockets, socket bonuses, and can fill gaps in your gear.
Relic of the Past V
Optional Reagent to upgrade their item level when crafting. These items have
plentiful sockets, socket bonuses, and can fill gaps in your gear.
Best Gems and Consumables for Mage Tower Challenges
Gems
- Meta Gems:
 Burning Primal Diamond for Casters
and Agile Primal Diamond for Agility users
Burning Primal Diamond for Casters
and Agile Primal Diamond for Agility users - Intellect: 1x
 Timeless Tanzanite and rest
 Brilliant Queen's Garnet
 - Agility: 1x
 Nightmare Tear and rest
Delicate Queen's Garnet
Nightmare Tear and rest
Delicate Queen's Garnet
Flasks
 Greater Flask of the Currents/
 Greater Flask of Endless Fathoms
Potions
 Potion of Unbridled Fury
Food
- Any Main Stat Feast/Optimal Secondary Stat Food
Thwarting the Twins Mage Tower Strategy Guide
The fight is split into two primary phases. Each time the fight cycles and you begin Phase 1 again, you will meet a new ability.
Phase 1: Karam Magespear
From the beginning of the fight, a ![]() Possessed Karam Magespear
will chase you around. He must be kept constantly slowed with abilities like
Possessed Karam Magespear
will chase you around. He must be kept constantly slowed with abilities like
![]() Concussive Shot/
Concussive Shot/![]() Frost Bolt, or otherwise CC'd with abilities
like
Frost Bolt, or otherwise CC'd with abilities
like ![]() Typhoon. He will get faster the longer the phase goes on. We
recommend kiting him in a circle around the room. He will regularly knock you
back if you are within 10 yards using
Typhoon. He will get faster the longer the phase goes on. We
recommend kiting him in a circle around the room. He will regularly knock you
back if you are within 10 yards using ![]() Rising Dragon.
Rising Dragon.
You will also need to dodge purple pools on the ground.
At 35% health, the phase ends with Karam gaining the ![]() Purgatory
buff as Phase 2 begins.
Purgatory
buff as Phase 2 begins.
Phase 2: Raest Magespear
You will now face Raest Magespear in the middle of the room. He
constantly casts ![]() Shadow Bolt, along with spawning Shadowy Fiend and
Shadowy Vestige adds near him through
Shadow Bolt, along with spawning Shadowy Fiend and
Shadowy Vestige adds near him through ![]() Tear Rift that must
be killed. We recommend standing near Raest during this phase so that you can
cleave the adds more effectively, but only if you can survive it. If you have
AoE slows, it may be more effective to stand far away and cleave them from range.
Kiting them is also an effective strategy if you are a mobile spec.
Tear Rift that must
be killed. We recommend standing near Raest during this phase so that you can
cleave the adds more effectively, but only if you can survive it. If you have
AoE slows, it may be more effective to stand far away and cleave them from range.
Kiting them is also an effective strategy if you are a mobile spec.
The fight is over once Raest dies, but you only have 30 seconds to attack him
until he becomes immune from ![]() Shadowy Energies. This means that you will
need multiple cycles of the fight to bring Raest to 0% HP.
Shadowy Energies. This means that you will
need multiple cycles of the fight to bring Raest to 0% HP.
If after 30 seconds you have not killed Raest, Phase 1 begins anew with a new mechanic.
Phase 1.2: Karam Magespear's Hand Phase
The second round of Phase 1 is the same as the first, with the addition of a new mechanic.
Every so often, Karam will spawn a Hand from Beyond at a random location in
the room. This mob does not move, but will start a 10-second cast called
![]() Grasp from Beyond which must be interrupted. Failing to interrupt it will
cause a wipe unless you can immune the cast with
Grasp from Beyond which must be interrupted. Failing to interrupt it will
cause a wipe unless you can immune the cast with ![]() Aspect of the Turtle or
Aspect of the Turtle or
![]() Ice Block. The mob has a low amount of HP and should be killed as soon
as possible. If you can kill it before having to interrupt its cast, that is even
better.
Ice Block. The mob has a low amount of HP and should be killed as soon
as possible. If you can kill it before having to interrupt its cast, that is even
better.
Phase 2.2: Raest Magespear's Rune Phase
This is the same as Phase 2, with the addition of ![]() Rune of Summoning, a
purple rune on the ground which must be soaked by standing in it. Failing to
soak it will spawn a powerful Thing of Nightmare add that will almost
certainly kill you.
Rune of Summoning, a
purple rune on the ground which must be soaked by standing in it. Failing to
soak it will spawn a powerful Thing of Nightmare add that will almost
certainly kill you.
After 30 seconds, Phase 1 will begin, but Raest will remain active. Your task is to end Raest as soon as possible before you become overwhelmed by Karam and Raest's combined abilities.
General Tips for Thwarting the Twins
- The fight is ultimately limited by how quickly you can burst down Raest Magespear, but remember that Karam gets faster the longer his phase goes on. It is optimal to try and save your strong DPS cooldowns for Phase 2, but you will have to hit a balancing act of doing Phase 1 quickly enough that you do not get overwhelmed, while still being able to comfortably kill Raest in roughly 2 phases of 30 seconds each.
- Using a mouseover or focus target slow macro for Karam is helpful, as you need to keep him slowed while killing the Hand from Beyond.
Changelog
- 15 Feb. 2023: Updated for Dragonflight Patch 10.0.5.
- 01 Dec. 2021: Guide added.