An Impossible Foe: a Legion Timewalking Mage Tower Guide for DPS
Last Updated:Feb 17, 2023 - 11:20 PM
(3y ago)
Panthea
This Mage Tower challenge is for the Elemental Shaman,
Feral Druid,
Fire Mage,
Fury Warrior,
Outlaw Rogue,
and Unholy Death Knight DPS specializations. It is a
long encounter where your focus is divided between the boss and plethora of adds.
You will be facing the Imp Mother, Agatha, on the Broken Shore along
with her minions. This encounter will focus on your survivability and add
management. If you stay on top of all of the conflicting priorities in this
encounter you will guarantee your success.
This guide will explain the encounter in detail and strategies you can employ
for success. These challenges are intended to be difficult so you may not succeed
on your first attempt but keep practicing, get used to the enemy abilities, and
eventually claim your much-deserved reward!
How to find the An Impossible Foe Mage Tower Challenge
Patch 10.0.5 has re-opened the Mage Tower Challenge, meaning you can once
again complete and collect the various rewards offered! As it stands, the Mage
Tower will remain open until the end of the expansion, so there should be plenty
of time.
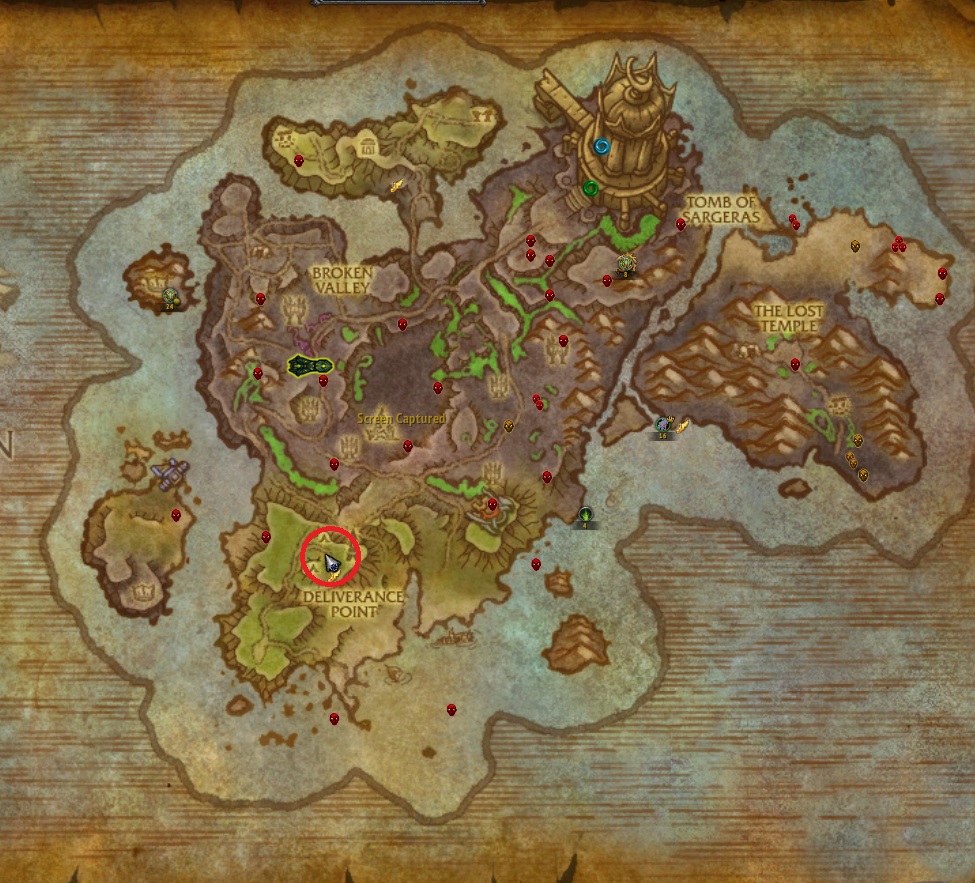
In order to reach this NPC, you can take a portal from Orgrimmar or Stormind's
portal room to Azsuna and then fly or take the flight path to the Broken Shore
hub, Deliverance Point, or use your Dalaran Hearthstone and fly.
2.
An Impossible Foe (Agatha) Challenge Overview
In this challenge you will need to defeat Agatha the Imp Mother
whilst not getting overwhelmed by the adds in all phases and meteors in Phase
2/3.
Everything on this encounter spawns on a set timer so cooldown management is
a must for success. These will be detailed in the strategy section below.
3.
Recommended Gear for the Challenge
Inside the Timewalking Mage Tower Challenge, you will be scaled down to Level
45 and have your gear scaled to item level 120. You should focus on items containing sockets, as these are still active (but scaled down) in the Mage Tower.
Additionally, all challenges can be completed with current gear, but you can optimize
gear sets to gain even more power. A complete list of Best in Slot gear for
every class can be found on the Timewalking Discord.
Legendary Powers from Shadowlands or Legion (the
items will still provide stats, their equip effects will not)
Legendary items from Questlines (Ashjra'kamas, Shroud of Resolve,
Warlords of Draenor Legendary Rings, Dragonwrath, Tarecgosa's Rest, Val'anyr, Hammer of Ancient Kings)
Any Battle for Azeroth systems (Azerite Gear, Traits, Essences)
Any tier set bonuses
Mists of Pandaria Legendary Meta Gems
Lightblood Elixir
With the current tuning of the Timewalking Challenges optimising your gear
is not required by any means.
3.2.
Legion Gear for Timewalking
A quick and easy way to obtain item level 50 gear is to run through Legion
raids. These items can also randomly roll with a socket on them which can give
you additional stats and are eligible for old enchants.
3.3.
Chromie Time Gear for Timewalking
If you have a friend who is Level 44/45 or a second account with a character
that is Level 44/45 you are able to make full use of Chromie Time to get even
better gear for the Timewalking Mage Tower.
You will run dungeons with that Level 44/45 character and when they loot an
item you need, they will trade it to you.
You will want to target items with a high amount of sockets as gems do not
scale down and legacy gems from the TBC/Wrath era contain primary stats which
significantly outweigh the value of item level in many cases.
3.4.
Crafted Gear for Timewalking
Crafting Mists of Pandaria Dreadful gear with Relic of the Past IV or
Relic of the Past V is a very good alternate source of Timewalking gear as
it will have sockets and will be of a low enough item level to receive legacy
gems/enchants.
3.5.
Enchants for Timewalking Gear
Disclaimer: The below table are for Timewalking gear pieces only. If you are
using Dragonflight armor the enchants listed will not work and you should instead
use your regular Dragonflight enchants; a majority of these enchants will not work
if your gear is above item level 120.
To begin, please select an option below enable tips, enchants, and gem
recommendations for your specialization:
Elemental Shaman
Feral Druid
Fire Mage
Fury Warrior
Outlaw Rogue
Unholy Death Knight
Slot
Option 1
Option 2
Neck
Enchant Neck - Mark of the Hidden Satyr
Enchant Neck - Mark of the Claw / Enchant Neck - Mark of the Trained Soldier
Shoulder
Greater Tiger Fang Inscription
Secret Tiger Fang Inscription (if Scribe)
Cloak
Enchant Cloak - Minor Power
Enchant Cloak - Fortified Leech
Chest
Enchant Chest - Eternal Stats
Enchant Chest - Glorious Stats
Bracers
Enchant Bracer - Exceptional Strength
Gloves
Enchant Gloves - Eternal Strength
Belt
Living Steel Belt Buckle
Ebonsteel Belt Buckle / Eternal Belt Buckle
Legs
Angerhide Leg Armor
Boots
Enchant Boots - Greater Assault
Enchant Boots - Pandaren's Step
Rings
Accord of Haste/Versatility/Critical Strike/Mastery
Weapon
Enchant Weapon - Dancing Steel
Enchant Weapon - Crusader
Slot
Option 1
Option 2
Neck
Enchant Neck - Mark of the Hidden Satyr
Enchant Neck - Mark of the Claw / Enchant Neck - Mark of the Trained Soldier
Shoulder
Greater Tiger Claw Inscription
Secret Tiger Claw Inscription (if Scribe)
Cloak
Enchant Cloak - Minor Power
Enchant Cloak - Fortified Leech
Chest
Enchant Chest - Eternal Stats
Enchant Chest - Glorious Stats
Bracers
Enchant Bracer - Greater Agility
Gloves
Enchant Gloves - Major Agility
Belt
Living Steel Belt Buckle
Ebonsteel Belt Buckle / Eternal Belt Buckle
Legs
Shadowleather Leg Armor
Boots
Enchant Boots - Eternal Agility
Rings
Accord of Haste/Versatility/Critical Strike/Mastery
Weapon
Enchant Weapon - Dancing Steel
Slot
Option 1
Option 2
Neck
Enchant Neck - Mark of the Hidden Satyr
Enchant Neck - Mark of the Claw / Enchant Neck - Mark of the Trained Soldier
An honorable mention for the above gems are that Queen's Garnets can be easily
obtained via the Auction house and from the Dragon Soul raid which can be used to
craft +4 Primary Stat gems.
3.7.
Trinkets for Timewalking
While you can get away with nearly any combination of trinkets for this
challenge, there are a few noteworthy ones from content outside of the Shadowlands
which may be worth acquiring for your specialization.
Pocket-Sized Computation Device
(Mechagon) with the Cyclotronic Blast red card inside provides a high
amount of burst damage.
Pocket-Sized Computation Device
(Mechagon) with the Cyclotronic Blast red card inside provides a high
amount of burst damage.
Unstable Arcanocrystal
(Withered J'im Legion World Boss) / Chipped Soul Prism (Supreme Lord Kazzak
Warlords of Draenor World Boss) both provide a high amount of stats if you have them.
Unstable Arcanocrystal
(Withered J'im Legion World Boss) / Chipped Soul Prism (Supreme Lord Kazzak
Warlords of Draenor World Boss) both provide a high amount of stats if you have them.
Gronntooth War Horn
(Heirloom Trinket) will have a high chance to proc an,d as all of the enemies
are Demons you gain +10% damage.
Gronntooth War Horn
(Heirloom Trinket) will have a high chance to proc, and as all of the enemies
are Demons you gain +10% damage.
Decanter of Anima-Charged Winds
deals a very large amount of damage in timewalking.
Decanter of Anima-Charged Winds
deals a very large amount of damage in timewalking.
Pocket-Sized Computation Device
(Mechagon) with the Cyclotronic Blast red card inside provides a high
amount of burst damage.
Pocket-Sized Computation Device
(Mechagon) with the Cyclotronic Blast red card inside provides a high
amount of burst damage.
Unstable Arcanocrystal
(Withered J'im Legion World Boss) / Chipped Soul Prism (Supreme Lord Kazzak
Warlords of Draenor World Boss) both provide a high amount of stats if you have them.
Unstable Arcanocrystal
(Withered J'im Legion World Boss) / Chipped Soul Prism (Supreme Lord Kazzak
Warlords of Draenor World Boss) both provide a high amount of stats if you have them.
Decanter of Anima-Charged Winds
deals a very large amount of damage in timewalking.
Decanter of Anima-Charged Winds
deals a very large amount of damage in timewalking.
Pocket-Sized Computation Device
(Mechagon) with the Cyclotronic Blast red card inside provides a high
amount of burst damage.
Pocket-Sized Computation Device
(Mechagon) with the Cyclotronic Blast red card inside provides a high
amount of burst damage.
Unstable Arcanocrystal
(Withered J'im Legion World Boss) / Chipped Soul Prism (Supreme Lord Kazzak
Warlords of Draenor World Boss) both provide a high amount of stats if you have them.
Unstable Arcanocrystal
(Withered J'im Legion World Boss) / Chipped Soul Prism (Supreme Lord Kazzak
Warlords of Draenor World Boss) both provide a high amount of stats if you have them.
Unblinking Gaze of Sethe
(Shadow-Lord Iskar from Hellfire Citadel) has a high proc rate and can deal a
respectable amount of damage.
Unblinking Gaze of Sethe
(Shadow-Lord Iskar from Hellfire Citadel) has a high proc rate and can deal a
respectable amount of damage.
3.8.
Flasks for Timewalking
Whilst it may be tempting to use Shadowlands flasks in the Timewalking Mage
Tower, when you are scaled down to level 45 so are the effects of the flasks.
For comparison, a flask from Battle for Azeroth will give you +31 Primary Stat,
a flask from Legion will give you +21 Primary Stat, and a flask from Shadowlands
will give you +20 Primary Stat. Because of this, it is recommended for you to
use your specialization's primary stat flask from Battle for Azeroth.
4.
Strategy for An Impossible Foe (Agatha)
4.1.
Phase 1
During this phase the boss will remain stationary and spawn adds periodically.
This is where you should just focus on DPS and not focus on getting used to the
add patterns.
Agatha has four main mechanics during this phase:
Shadow Stab is a the main spell Agatha will cast. It cannot be
interrupted and will deal a small amount of Shadow damage.
Agatha's Fury. When an Imp dies Agatha will fire a projectile to this
location. Failing to avoid the impact point of the projectile will result in
a moderate burst of Shadow damage.
Dark Fury — Every 50 seconds Agatha will shield herself and
cast Dark Fury. Dark Fury will deal stacking damage over time and can only be
interrupted once the shield has broken.
Every time an imp is spawned Agatha will gain a stack of Agatha's Vengeance
which increases her damage dealt by 3% per stack. Taking too long with this
encounter will lead to the damage becoming overwhelming and wiping.
Smoldering Imps will spawn every minute and die pretty quickly.
They will also cast Fire Bolt on you dealing a small amount of Fire
damage, however each successful cast increases the damage from the Smoldering
Imp by 50%. If too many casts go through it can be lethal.
Bladestorm
lines up with Smoldering Imp spawns.
Spell Reflection
when they spawn to reflect all of their first casts.
Stormkeeper
lines up with the spawns of Smoldering Imps.
Blade Flurry
should be used to AoE these down.
Imp Servants will spawn 15 seconds into the encounter and every 45
seconds thereafter. They will run towards the boss and Funnel Energy,
healing her. You want to avoid allowing them to channel into the boss as this
will make the encounter significantly harder. If you stop their heal by means of
displacement or crowd control, they will not channel again immediately but
instead move around a bit and then rechannel, buying you some extra time and
preventing potential healing on Agatha.
Heroic Leap and
Piercing Howl the Imp Servants.
You can Blind
one and leave it in CC in a pinch.
Entangling Roots
can be used to keep one of these stationary whilst you deal with the other.
Mighty Bash
can be used to stop them from healing.
Frost Nova these
when they spawn to keep them away and work on them one by one.
Dragon's Breath
can be used if they start to Funnel Energy on Agatha to stop the heal.
Death Grip these
together so you cleave both down at the same time.
Umbral Imps will spawn 1 minute into the encounter and each minute
thereafter. Whilst any Umbral Imps are alive Agatha will be immune to all damage
due to Shadow Shield. Kill these ASAP and be aware that they may move
around with Translocate.
A Fuming Imp will spawn 30 seconds into the encounter and every 55
seconds thereafter. They will cast Plague Zone which leaves a permanent
puddle on the ground which slows and deals damage to you if you are inside of it.
However they will only start this cast once you are in melee range of it. Once a
cast has started it can only be stopped with stuns/fears.
You can stop this cast
with Intimidating Shout if needed.
You can stop this with
Asphyxiate if needed.
You can stop this with
Dragon's Breath if needed.
Each add you kill will
trigger Victory Rush giving you lots of free healing when required.
Each add you kill will
trigger Dark Succor giving you lots of free damage & healing when
required.
The Predator
talent will be strong in this challenge due to the high number of adds you
will be killing.
4.2.
Phase 2
When Agatha reaches 50% she will teleport to the upper end of the room and
Phase 2 will begin. During this phase Agatha gains two new abilities:
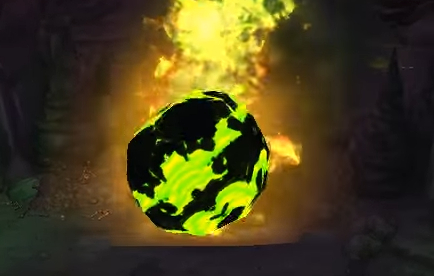
Smoldering Boulders will spawn from the upper side of the room and
roll to the opposite side. If you are hit by one of these by either being in their
path or in their spawn location you will be stunned and take a large amount of damage.
Fel Lava Blast is a new spell Agatha will repeatedly cast.
This will create a small pool of fire at the location targeted. Standing in it
will deal a moderate amount of Fire damage every second.
You will need to maintain your add dps priorities from Phase 1, however the
Imp Servants will now spawn on the ramp and Smoldering Imps
spawn near the boss and potentially under the Boulder spawn locations.
4.3.
Phase 3
When Agatha reaches 33% she will teleport to the lower side of the room and this
will be a repeat of Phase 2, however she will now teleport to the opposite
side roughly every minute.
5.
Rewards for An Impossible Foe Mage Tower Challenge
Your reward for completing the challenge is a transmog set of armor which is a
recolored version of the Tomb of Sargeras set for your class.
If you can manage to do all of the 7 different challenges at least once, you will
obtain the Mage-Bound Spelltome mount and the A Tour of Towers
achievement. Completing every challenge across all classes and specializations
awards the Tower Overwhelming Feat of Strength.
You can learn more about this mount and all the others added in Patch 9.1/9.1.5
below.


 Ashjra'kamas, Shroud of Resolve,
Warlords of Draenor Legendary Rings,
Ashjra'kamas, Shroud of Resolve,
Warlords of Draenor Legendary Rings,  Dragonwrath, Tarecgosa's Rest,
  Val'anyr, Hammer of Ancient Kings)
 Lightblood Elixir
 Shadow Stab is a the main spell Agatha will cast. It cannot be
interrupted and will deal a small amount of Shadow damage.
Shadow Stab is a the main spell Agatha will cast. It cannot be
interrupted and will deal a small amount of Shadow damage. Agatha's Fury. When an Imp dies Agatha will fire a projectile to this
location. Failing to avoid the impact point of the projectile will result in
a moderate burst of Shadow damage.
Agatha's Fury. When an Imp dies Agatha will fire a projectile to this
location. Failing to avoid the impact point of the projectile will result in
a moderate burst of Shadow damage. Dark Fury — Every 50 seconds Agatha will shield herself and
cast Dark Fury. Dark Fury will deal stacking damage over time and can only be
interrupted once the shield has broken.
Dark Fury — Every 50 seconds Agatha will shield herself and
cast Dark Fury. Dark Fury will deal stacking damage over time and can only be
interrupted once the shield has broken. Agatha's Vengeance
which increases her damage dealt by 3% per stack. Taking too long with this
encounter will lead to the damage becoming overwhelming and wiping.
Agatha's Vengeance
which increases her damage dealt by 3% per stack. Taking too long with this
encounter will lead to the damage becoming overwhelming and wiping.