Welcome to our guide to the Uldaman: Legacy of Tyr dungeon in the Dragonflight World of Warcraft expansion. This guide will cover everything you need to know about the dungeon, including how to get to it, its layout, the trash and boss mechanics within, and its loot. This dungeon is part of the Season 2 Dragonflight dungeon selection.
Getting Into Uldaman: Legacy of Tyr
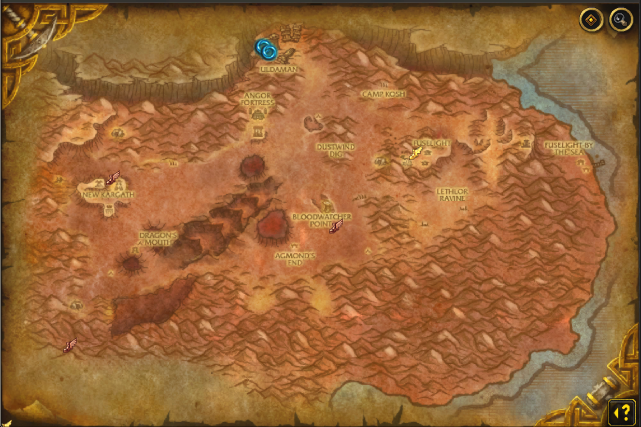
Uldaman: Legacy of Tyr is a dungeon located in the Badlands,
with its entrance just above the original Uldaman dungeon.
The guide will focus on an extensive dungeon overview, providing vital information
to complete it across all difficulties (Normal, ![]() Heroic, and
Heroic, and ![]() Mythic). We will
cover all 5 boss fights, along with the most notable trash enemies in the
dungeon and their abilities. If you would like to learn about the other
Season 4 dungeons or the upcoming Mythic+ season instead, please see our
overviews linked below. Otherwise, without further ado, let us begin!
Mythic). We will
cover all 5 boss fights, along with the most notable trash enemies in the
dungeon and their abilities. If you would like to learn about the other
Season 4 dungeons or the upcoming Mythic+ season instead, please see our
overviews linked below. Otherwise, without further ado, let us begin!
Uldaman: Legacy of Tyr Layout
Unlockable Checkpoints Throughout the Dungeon
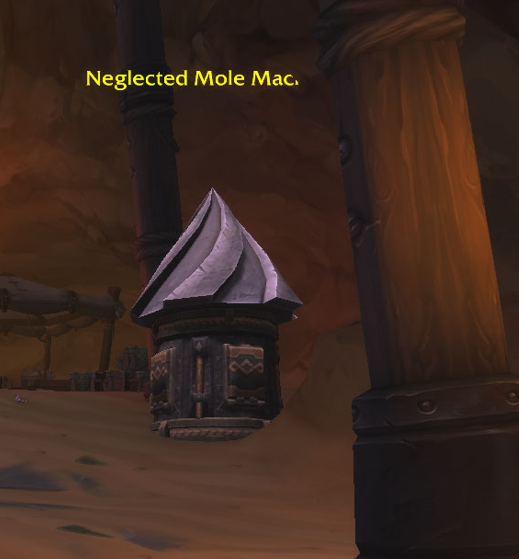 Uldaman: Legacy of Tyr offers 3 unique checkpoints,
each of them triggered by activating a Neglected Mole Machine. When you
die and Release Spirit, just on the right as you respawn, you will see the
initial Neglected Mole Machine; the further you progress into the dungeon,
the more teleport options you can have. Here is how to unlock them
and their location on the maps below (each marked with a red dot):
Uldaman: Legacy of Tyr offers 3 unique checkpoints,
each of them triggered by activating a Neglected Mole Machine. When you
die and Release Spirit, just on the right as you respawn, you will see the
initial Neglected Mole Machine; the further you progress into the dungeon,
the more teleport options you can have. Here is how to unlock them
and their location on the maps below (each marked with a red dot):
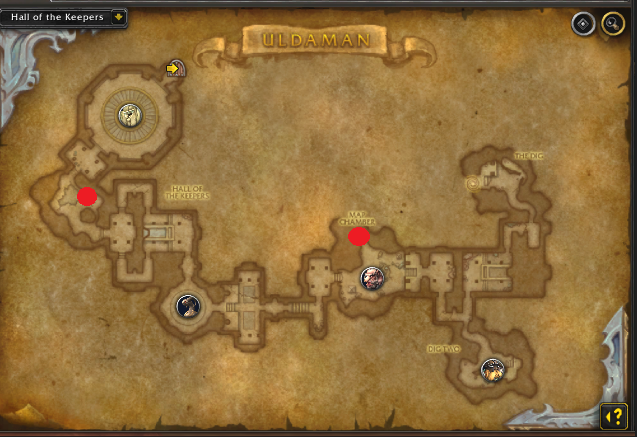
- Upon defeating Bromach, just to the right, you will see the first checkpoint, named "Alpha".
- The second checkpoint will be available after defeating Emberon; it is located inside the cave that you have previously "cleared" of Skittering Crawlers and Cavern Seekers, named "Beta.
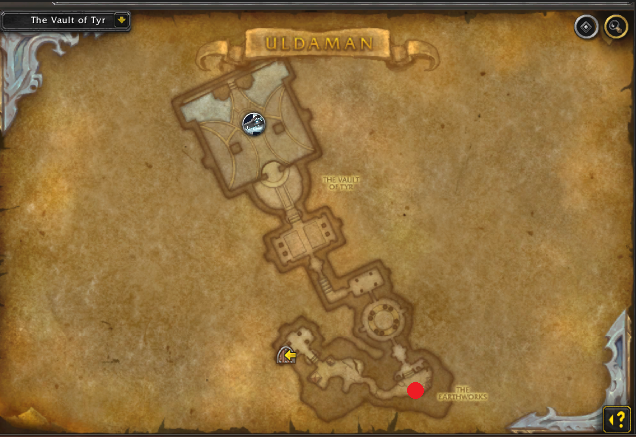
- The last checkpoint will be located at the end of The Earthworks area, just before entering toward the last pack of Ebonstone Golem. The teleport does not activate until you first pull Chrono-Lord Deios.
Profession Bonuses
Mining Bonus
There is an Mining profession bonus in this dungeon granting you ![]() Lost Tome of Tyr
stackable buff that persists through death. There are 3 tomes, and they are located
throughout the whole dungeon. Below you can find more information on how you can acquire
it and where exactly it is located:
Lost Tome of Tyr
stackable buff that persists through death. There are 3 tomes, and they are located
throughout the whole dungeon. Below you can find more information on how you can acquire
it and where exactly it is located:
- There are 3x Crumbling Rock Vein in the whole dungeon (see the yellow marks in the map above). One at the start of the dungeon, one just right from the first boss, and the last one to the left of the second boss.
- First, you must have at least 25 skill in Dragon Isles Mining to "mine" the Crumbling Rock Vein (look at the rock above).
- Only one member from your team is required to interact with Crumbling Rock Vein, after which you will be able to loot the Lost Tome of Tyr, which will grant you a 10% out-of-combat movement speed STACKABLE buff.
- The buff will save you time throughout the whole key, as mounts cannot be used here.
The Dig and The Lost Dwarves
Notable Trash Before The Lost Dwarves
- Beware of Stonevault Geomancers, as the
 Stone Spike and
 Chain Lightning (much more important) must be interrupted.
 - Vicious Basilisk is a simple mob, yet dangerous enough not to
be underestimated. Their signature-ability — the (non-interruptible)
 Chomp —
goes on the highest threat target and leaves a
Chomp —
goes on the highest threat target and leaves a  Bleed effect on them. You cannot
out-range it as it will recast, so take it and use mitigation. It is important
to stop the
Bleed effect on them. You cannot
out-range it as it will recast, so take it and use mitigation. It is important
to stop the  Spiked Carapace cast, as it reflects damage once they
have the buff. You can use any
Spiked Carapace cast, as it reflects damage once they
have the buff. You can use any  Purge effects on it to remove it otherwise.
 - Finally, HulkingBerserker, will occasionally cast
 Diseased Bite
on the highest threat target (removable with any
Diseased Bite
on the highest threat target (removable with any  Disease Dispel), which will
reduce the target's movement speed by 30%. The mob will also cast
Disease Dispel), which will
reduce the target's movement speed by 30%. The mob will also cast
 Brutal Slam, stunning all enemies within 7 yards for 1.5
seconds and dealing damage. It is best to step out of the melee and avoid this at all
costs. Last but not least, when the HulkingBerserker goes down to
40% it will cast
Brutal Slam, stunning all enemies within 7 yards for 1.5
seconds and dealing damage. It is best to step out of the melee and avoid this at all
costs. Last but not least, when the HulkingBerserker goes down to
40% it will cast  Reckless Rage, which makes them take 20%
more damage, but also they do 20% more damage, so be careful!
Reckless Rage, which makes them take 20%
more damage, but also they do 20% more damage, so be careful!
The Lost Dwarves Boss Guide
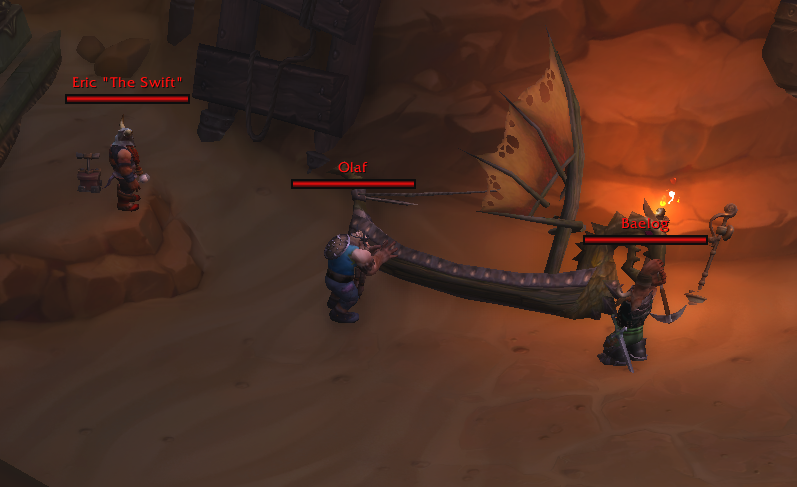
Throughout the whole encounter, you will deal with the 3 Dwarves simultaneously, each of them having unique abilities. Here is what you should do:
All Roles
- Pay attention for Olaf's
 Ricocheting Shield, as it targets a random player and deals Physical damage.
It will ricochet up to 5 players within 5 yards, so keep a safe
distance from each other at all times!
Ricocheting Shield, as it targets a random player and deals Physical damage.
It will ricochet up to 5 players within 5 yards, so keep a safe
distance from each other at all times! - Eric 'The Swift' will occasionally cast
 Skullcracker,
inflicting Physical damage to players within 5 yards. Be pre-spread
and avoid the ground animation.
Skullcracker,
inflicting Physical damage to players within 5 yards. Be pre-spread
and avoid the ground animation.  Defensive Bulwark is another ability you should pay attention to
coming out from Olaf; it provides 75% damage reduction within the
"bubble," and it is interruptible. It is important to note that during the whole
duration of the Bulwark, Olaf does NOT cast any other spells or auto-attack.
Defensive Bulwark is another ability you should pay attention to
coming out from Olaf; it provides 75% damage reduction within the
"bubble," and it is interruptible. It is important to note that during the whole
duration of the Bulwark, Olaf does NOT cast any other spells or auto-attack.- The fight goes on like this until the Dwarfs reach low health, after which
they begin
 Longboat Raid!, casting Searing Cannonfire at
a target's location. You must be stacked at this point and move slowly together to
"save" space as the Searing Cannonfire will leave
Longboat Raid!, casting Searing Cannonfire at
a target's location. You must be stacked at this point and move slowly together to
"save" space as the Searing Cannonfire will leave  Burning Pitch
behind it, which will last for 30 seconds.
Burning Pitch
behind it, which will last for 30 seconds. - Finally, focusing on one boss at a time might be beneficial, as
 Hasty Rearming
will increase the rating of which Searing Cannonfire is firing. The more Dwarfs
there are, the more frequently this will be cast.
Hasty Rearming
will increase the rating of which Searing Cannonfire is firing. The more Dwarfs
there are, the more frequently this will be cast.
Tank
- Baelog will occasionally cast
 Wild Cleave; this is
a good time to use active mitigation. In addition, the ability "cleaves" any
players in front of him within 10 yards, hence why it is important never to face your party to avoid casualties.
Wild Cleave; this is
a good time to use active mitigation. In addition, the ability "cleaves" any
players in front of him within 10 yards, hence why it is important never to face your party to avoid casualties. - Throughout the whole fight, you will also need to pay attention to
Baelog's (non-interruptible)
 Heavy Arrow. It fires in a straight line,
damaging the player and knocking them back upon inflicting damage. It always goes
where you are facing the boss, so keep it away from your party to avoid
unnecessary deaths.
Heavy Arrow. It fires in a straight line,
damaging the player and knocking them back upon inflicting damage. It always goes
where you are facing the boss, so keep it away from your party to avoid
unnecessary deaths.
Healer
- Beware of Eric 'The Swift' casting his (non-interruptible)
 Dagger Throw
at a random player, top them up quickly.
Dagger Throw
at a random player, top them up quickly. - You will have to think about
 Fiery Surge.
Each time the boss fires Searing Cannonfire, the entire party
will be damaged!
Fiery Surge.
Each time the boss fires Searing Cannonfire, the entire party
will be damaged!
Map Chamber and Bromach
Notable Trash Before Bromach
The distance from The Lost Dwarves to Bromach is quite short, hence why there are few trash enemies to deal with. Here is only one mob type that you must focus on:
- Burly Rock-Thrower is the only new mob that will appear here.
They will occasionally cast
 Throw Rock, which is a non-interruptible
— though you can use other disruption effects to stop it, however, —
ground-animation cast that you can avoid by stepping aside.
Throw Rock, which is a non-interruptible
— though you can use other disruption effects to stop it, however, —
ground-animation cast that you can avoid by stepping aside.
Bromach Boss Guide
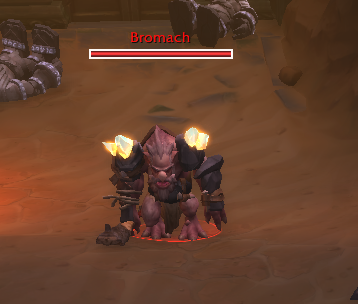
All Roles
- A few seconds into the fight Bromach will cast
 Call of the Deep
summoning Stonevault Geomancer (the same mobs you have previously fought
to get to the boss) and Stonevault Ambusher. It is important to note that due
to the Stonevault Geomancer being a caster, they will stay far away
while casting spells on you. The best way to deal with them is to line-of-sight
so they can come close to the tank or use interrupt/knockback abilities so you
"lock" them out of casting and make them move closer to you.
Call of the Deep
summoning Stonevault Geomancer (the same mobs you have previously fought
to get to the boss) and Stonevault Ambusher. It is important to note that due
to the Stonevault Geomancer being a caster, they will stay far away
while casting spells on you. The best way to deal with them is to line-of-sight
so they can come close to the tank or use interrupt/knockback abilities so you
"lock" them out of casting and make them move closer to you. -
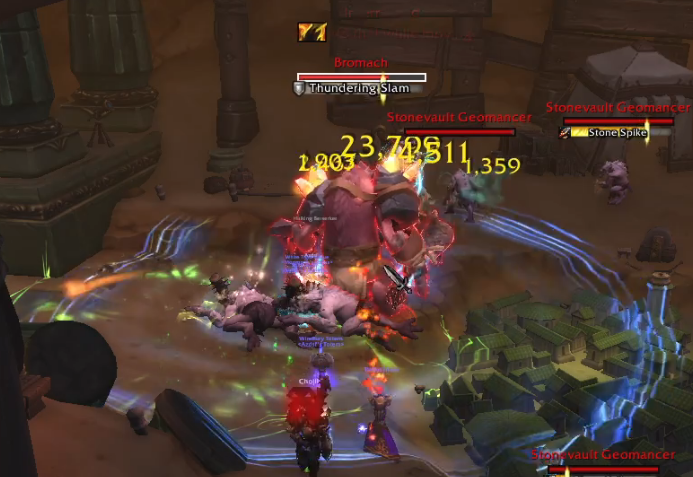 Occasionally, the boss will also cast
  Thundering Slam, which you
should avoid at all costs, though the time to react is plenty.
Thundering Slam, which you
should avoid at all costs, though the time to react is plenty. - Here is the tricky part, as soon as the boss casts
 Quaking Totem, you
have to shift your focus and kill it instantly. While the Quaking Totem
is active, the entire party will take
Quaking Totem, you
have to shift your focus and kill it instantly. While the Quaking Totem
is active, the entire party will take  Shocking Quake damage, so it is
crucial to nuke it quickly. Upon destroying the Quaking Totem,
it will cause
Shocking Quake damage, so it is
crucial to nuke it quickly. Upon destroying the Quaking Totem,
it will cause  Tremor, stunning all Stonevault Troggs within 8 yards.
While stunned, their damage taken is increased by 200% for 10 seconds.
Tremor, stunning all Stonevault Troggs within 8 yards.
While stunned, their damage taken is increased by 200% for 10 seconds. - Finally, pay attention when he casts
 Bloodlust; you will not
be able to interrupt it, but you can
Bloodlust; you will not
be able to interrupt it, but you can  Enrage Dispel as soon as you see it. Stunning
him during the cast with the Tremor will also stop the effect.
Enrage Dispel as soon as you see it. Stunning
him during the cast with the Tremor will also stop the effect.

Tank
- As soon as Call of the Deep has been cast, establish threat on the
nearby Stonevault Ambusher and Stonevault Geomancer.
- Make sure to stack the existing mobs under the Quaking Totem, as well as
Bromach him, so as soon as you kill it, every NPC alive will be
affected by Tremor, essentially speeding up the boss fight.
Healer
- Use healing cooldowns when the Quaking Totem appears; your
the team will take massive damage from Shocking Quake the longer the
totem stays alive.
Hall of The Keepers and Sentinel Talondras
Notable Trash Before Sentinel Talondras
- Pay attention to Earthen Custodian's frontal Cleave.
As a tank, you must be positioned away from any melee members. In addition,
their auto-attacks will also apply
 Rending Slash, a Bleed
damage-over-time effect. It is best to use mitigation at this point.
Rending Slash, a Bleed
damage-over-time effect. It is best to use mitigation at this point. - Refti Custodian sticks alongside Earthen Custodian
but it is a lot less dangerous. You only need to pay attention to
 Jagged Bite, which is a non-interruptible cast (though it can be disrupted)
that applies a Bleed damage-over-time effect on your tank.
Jagged Bite, which is a non-interruptible cast (though it can be disrupted)
that applies a Bleed damage-over-time effect on your tank.
Sentinel Talondras Boss Guide
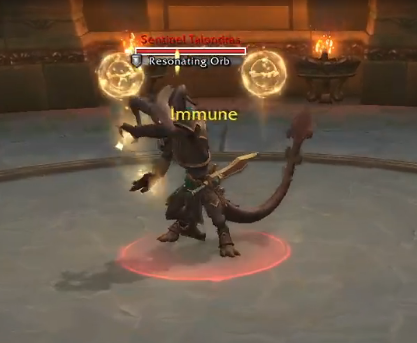
All Roles
- It is important to understand how
 Ancient Dynamo works. In the
beginning of the fight, the boss will have 2 stacks of
Ancient Dynamo works. In the
beginning of the fight, the boss will have 2 stacks of  Inexorable,
which gives her immunity to stun effects. This is important because
later on, you must stun her with
Inexorable,
which gives her immunity to stun effects. This is important because
later on, you must stun her with  Resonating Orb (spawning 3 in total on
the player's locations) or any other stun effects before the boss casting
Resonating Orb (spawning 3 in total on
the player's locations) or any other stun effects before the boss casting
 Titanic Empowerment.
 - Occasionally, Sentinel Talondras will cast
 Crushing Stomp,
knocking players away, interrupting their cast, and also dealing Physical damage
to all of them.
Crushing Stomp,
knocking players away, interrupting their cast, and also dealing Physical damage
to all of them. - The boss gains
 Unrelenting stacks everytime it gets stunned.
Tank
- The boss will cast Titanic Empowerment once she reaches 100
Energy. It is important to clear her 2 stacks of Inexorable
with the Resonating Orb before she gets close to 100 Energy
so later on you can stun her on the Titanic Empowerment cast.
Healer
- When the boss casts Crushing Stomp, be prepared to top up
your party quickly.
- Use healer cooldowns when the Earthen Shards Bleed effect is going
out (it casts on random party members). This is a good time to suggest to your party
members to use their defenses. Several spells can completely
mitigate the Earthen Shards effect, such as with the Dwarf
 Stoneform
racial or a Paladin's
Stoneform
racial or a Paladin's  Blessing of Protection; there are more,
but these are two of the most common.
Blessing of Protection; there are more,
but these are two of the most common.
Hall of the Keepers and Emberon
Notable Trash Before Emberon
Upon defeating Sentinel Talondras, you will be heading toward the second to last boss in this dungeon — Emberon. You will face several new mob types, each increasing the dungeon's difficulty. Here are the most notable ones:
- Earthen Weaver is a dangerous caster mob that has two important
abilities to pay attention to a single-target spell —
 Stone Bolt,
which must be interrupted, and a Hail of Stone channel on a random player,
which is unable to be interrupted, but you can use disruption effects or combat-dropping
abilities to stop it such as
Stone Bolt,
which must be interrupted, and a Hail of Stone channel on a random player,
which is unable to be interrupted, but you can use disruption effects or combat-dropping
abilities to stop it such as  Feign Death,
  Vanish,
  Shadowmeld, and
 Greater Invisibility.
 - Beware of Runic Protector and its
 Fissuring Slam ability,
which leaves a lingering pool. Because it does damage, do your best to avoid
it and never step in it. The mob will occasionally cast
Fissuring Slam ability,
which leaves a lingering pool. Because it does damage, do your best to avoid
it and never step in it. The mob will occasionally cast  Earthquake,
which does AoE damage. Since the damage cannot be line-of-sighted, this is
the best time to use personal defensives.
Earthquake,
which does AoE damage. Since the damage cannot be line-of-sighted, this is
the best time to use personal defensives. - Earthen Warder can be a tricky mob. Make sure you interrupt
or Purge
 Earthen Ward, as they will put it on a random
enemy target. The most important cast to interrupt
or Decurse will be
Earthen Ward, as they will put it on a random
enemy target. The most important cast to interrupt
or Decurse will be  Curse of Stone. If you do not, any party member will be stunned for 5 seconds, making this a crucial ability.
Finally, they will also cast Stone Bolt, which can hurt you again if it goes through but is an overall highly important non-boss-enemy to defeat first!
Curse of Stone. If you do not, any party member will be stunned for 5 seconds, making this a crucial ability.
Finally, they will also cast Stone Bolt, which can hurt you again if it goes through but is an overall highly important non-boss-enemy to defeat first! - Skittering Crawler will randomly cast
 Pounce on your
party members, so it is best to pre-defensive if you are low on health. Their
auto-attacks also apply a
Pounce on your
party members, so it is best to pre-defensive if you are low on health. Their
auto-attacks also apply a  Poison effect on your tank, so if
you hold a Poison Dispel, this is the perfect scenario to use it.
Poison effect on your tank, so if
you hold a Poison Dispel, this is the perfect scenario to use it. - The last important mob type you should pay attention to is the
Cavern Seeker; this bat will occasionally cast
 Sonic Burst,
a spell that will interrupt and spell lock you if you are caught mid-cast.
Sonic Burst,
a spell that will interrupt and spell lock you if you are caught mid-cast.
Emberon Boss Guide

Upon engaging Emberon he will cast ![]() Activate Keepers,
with each of them spawning a
Activate Keepers,
with each of them spawning a ![]() Seeking Flame. You cannot
attack them until the boss is "phased." It is crucial to dodge
these Flames at all costs, but they do rotate slowly. In case you cannot, using
an immunity to soak an orb also works, such as a Rogue's
Seeking Flame. You cannot
attack them until the boss is "phased." It is crucial to dodge
these Flames at all costs, but they do rotate slowly. In case you cannot, using
an immunity to soak an orb also works, such as a Rogue's ![]() Cloak of Shadows.
Cloak of Shadows.
All Roles
- Periodically, Emberon will also cast
 Unstable Embers on all players, so it is crucial to be spread and never overlap each other
with the surrounding circle. This is a great place to use your defenses.
Unstable Embers on all players, so it is crucial to be spread and never overlap each other
with the surrounding circle. This is a great place to use your defenses.
-
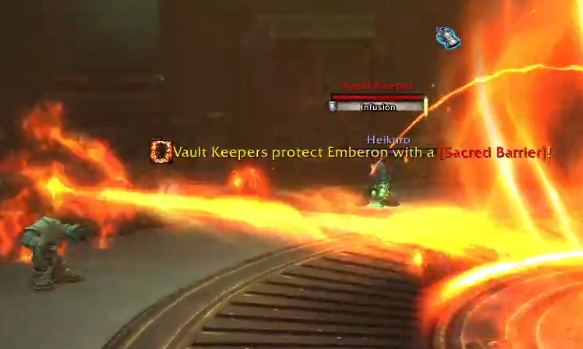 The boss enters an "intermission phase" once he reaches maximum energy. During this phase,
he will have a
The boss enters an "intermission phase" once he reaches maximum energy. During this phase,
he will have a  Sacred Barrier aura, preventing you from damaging him.
Make sure not to stay in the middle where the boss is because you risk
being hit by
Sacred Barrier aura, preventing you from damaging him.
Make sure not to stay in the middle where the boss is because you risk
being hit by  Heat Engine! The phase will end once you defeat the
4 Keepers, but the tricky part is that every 3 seconds of the intermission,
the boss will cast
Heat Engine! The phase will end once you defeat the
4 Keepers, but the tricky part is that every 3 seconds of the intermission,
the boss will cast  Fire Wave. Assigning each Keeper to a specific party member is crucial so you can defeat them faster.
 - Last but not least, a Lava Beam will be present during the intermission phase.
It will probably turn lethal if you cross it unless you have
immunity, so do not risk going through. You can use
 Blink-like methods
of going through it if necessary but do so at your own risk.
Blink-like methods
of going through it if necessary but do so at your own risk.

Tank
- Aim the
 Searing Clap frontal away from any party members.
Healer
- Be ready to dispel the
 Burning Heat.
 - Do your best to heal everyone around you during the fight intermission.
Fire Wave will go as long as the phase lasts.
The Vault of Tyr and Chrono-Lord Deios
Notable Trash Before Chrono-Lord Deios
Before engaging the last boss of the dungeon, Chrono-Lord Deios, there are a few critical trash enemies that you must face:
- Ebonstone Golem is an important trash mob to which your healer
must pay utmost attention. It has only one important ability, and that is
 Thunderous Clap, dealing AoE damage to everyone around the area.
If you are a ranged player, you can out-range it
(staying at least 30 yards away is safe enough).
Thunderous Clap, dealing AoE damage to everyone around the area.
If you are a ranged player, you can out-range it
(staying at least 30 yards away is safe enough). - Another mob type you should pay attention to is Earthen Guardian.
It is a dangerous mob because it casts
 Blessing of Tyr,
the cast is non-interruptible, and the aura bolsters the damage of any nearby enemies
that are inside the "aura," hence why your tank must "kite" the mobs away from it
immediately. Finally, your tank must pay attention to
Blessing of Tyr,
the cast is non-interruptible, and the aura bolsters the damage of any nearby enemies
that are inside the "aura," hence why your tank must "kite" the mobs away from it
immediately. Finally, your tank must pay attention to  Bulwark Slam, a
heavy-hitting single-target ability.
Bulwark Slam, a
heavy-hitting single-target ability. - The last non-boss-enemy you should pay attention to is Infinite Timereaver.
It applies the
 Stolen Time
  Magic debuff that stacks,
dealing Arcane damage and reducing your Haste by 2% per stack
while they gain 2% Haste. The most important note here is that the debuff stack
has an aura effect, meaning they do not have to auto-attack anyone to apply it but
rather just be around the party members, and everyone gets it. Be careful how many
of you pull; things can go out of hand if you pull multiple. One way
to prevent the debuff from triggering is if they are under the influence of a stun effect!
Magic debuff that stacks,
dealing Arcane damage and reducing your Haste by 2% per stack
while they gain 2% Haste. The most important note here is that the debuff stack
has an aura effect, meaning they do not have to auto-attack anyone to apply it but
rather just be around the party members, and everyone gets it. Be careful how many
of you pull; things can go out of hand if you pull multiple. One way
to prevent the debuff from triggering is if they are under the influence of a stun effect!
Chrono-Lord Deios Boss Guide
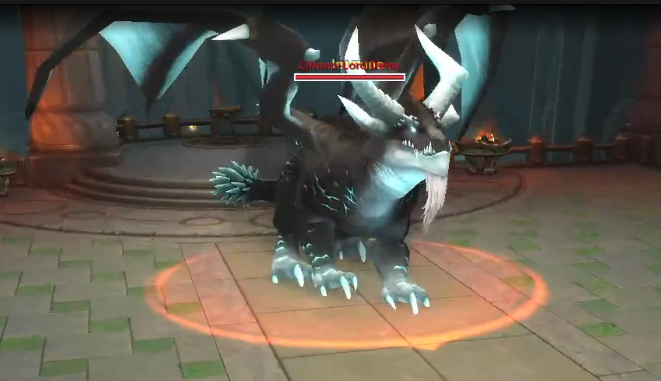
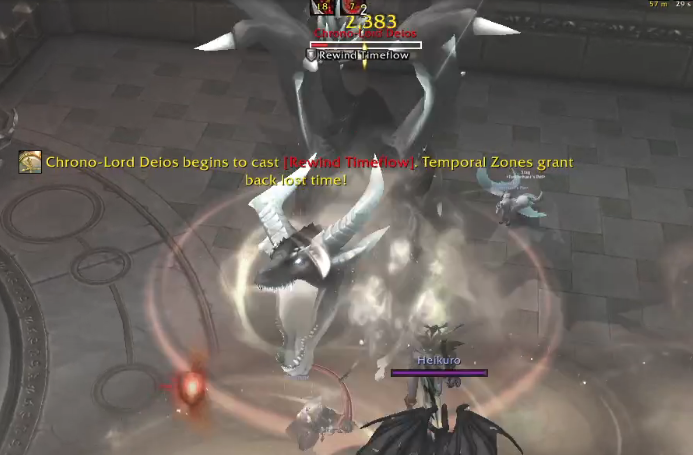 Chrono-Lord Deios is a straightforward boss fight with an "intermission," as
periodically his energy will decay from 100 to 0 throughout 5 ticks, losing
20 per each tick, upon which
Chrono-Lord Deios is a straightforward boss fight with an "intermission," as
periodically his energy will decay from 100 to 0 throughout 5 ticks, losing
20 per each tick, upon which ![]() Rewind Timeflow begins. Stay in all
Rewind Timeflow begins. Stay in all
![]() Temporal Zones before they disappear, as this grants you
30% Haste for the remaining duration. Upon the boss reaching 100
Energy again,
Temporal Zones before they disappear, as this grants you
30% Haste for the remaining duration. Upon the boss reaching 100
Energy again, ![]() Rewind Timeflow ends.
Rewind Timeflow ends.
All Roles
- Periodically Chrono-Lord Deios will cast
 Eternity Orb. Do your
best to dodge the ground animation since it spawns
Eternity Orb. Do your
best to dodge the ground animation since it spawns  Eternity Zone.
 - Beware of
 Wing Buffet, as it will not only interrupt your cast, but it will
knock you back, causing you to take Physical damage; make sure there is no
Eternity Zone behind you. You can also pre-immunity it (if your class
has one) or use Blessing of Protection to mitigate the damage
and the knockback effect.
Wing Buffet, as it will not only interrupt your cast, but it will
knock you back, causing you to take Physical damage; make sure there is no
Eternity Zone behind you. You can also pre-immunity it (if your class
has one) or use Blessing of Protection to mitigate the damage
and the knockback effect.
Tank
 Sand Breath must be tanked away from the group, as it is a frontal
cone ability that targets only you until the cast is finished.
Sand Breath must be tanked away from the group, as it is a frontal
cone ability that targets only you until the cast is finished.
Healer
- The boss will periodically cast
 Time Sink. This Magic debuff
goes on a random member of your party and, upon dispelling,
will trigger Time Eruption. It is best to wait until the target is
"safe" to be dispelled.
Time Sink. This Magic debuff
goes on a random member of your party and, upon dispelling,
will trigger Time Eruption. It is best to wait until the target is
"safe" to be dispelled. - Use healing cooldowns when
 Rewind Timeflow begins. It will last for
12 seconds.
Rewind Timeflow begins. It will last for
12 seconds.
Uldaman: Legacy of Tyr Loot Table
The Lost Dwarves
| Type | Item | Stats |
|---|---|---|
| Leather Feet | Mastery/Crit | |
| Plate Head | Haste/Crit | |
| Trinket | Agi/Str | |
| Mail Wrist | Haste/Mastery | |
| Shield | Crit/Mastery | |
| Cloth Waist | Mastery/Haste |
Bromach
| Type | Item | Stats |
|---|---|---|
| Plate Wrist | Haste/Crit | |
| Leather Waist | Crit/Vers | |
| Mail Hands | Vers/Haste | |
| Neck | Haste/Mastery | |
| Dagger | Agi, Vers/Haste | |
| Cloth Legs | Crit/Mastery |
Sentinel Talondras
| Type | Item | Stats |
|---|---|---|
| Polearm | Agi, Vers/Mastery | |
| Ring | Crit/Haste | |
| Leather Shoulder | Mastery/Crit | |
| Cloth Feet | Haste/Crit | |
| Trinket | Str |
Emberon
| Type | Item | Stats |
|---|---|---|
| Plate Hands | Crit/Mastery | |
| Leather Legs | Vers/Haste | |
| Mail Waist | Crit/Vers | |
| 1H Mace | Agi, Vers/Mastery | |
| Gun | Haste/Mastery | |
| Cloth Wrist | Crit/Haste |
Chrono-Lord Deios
| Type | Item | Stats |
|---|---|---|
| Leather Head | Haste/Mastery | |
| Mail Chest | Crit/Vers | |
| Trinket | Int | |
| Staff | Int, Haste/Crit | |
| Cloth Legs | Haste/Vers | |
| Plate Shoulder | Crit/Haste |
Uldaman: Legacy of Tyr Achievements
There are 7 total achievements to obtain in Uldaman: Legacy of Tyr:
| Achievement | Criteria |
|---|---|
| Defeat Chrono-Lord Deios in Uldaman: Legacy of Tyr. | |
| Defeat Chrono-Lord Deios in Uldaman: Legacy of Tyr
on |
|
| Defeat Chrono-Lord Deios in Uldaman: Legacy of Tyr
on |
|
| Defeat Sentinel Talondras after simultaneously stunning both
Sentinel Talondras and all party members in Uldaman: Legacy of Tyr
on |
|
| Defeat Chrono-Lord Deios after catching every |
|
| Defeat Bromach while 10 or more Stonevault Troggs are still alive
in Uldaman: Legacy of Tyr on |
|
| Complete Uldaman: Legacy of Tyr at Mythic Level 20 or higher, within the time limit. |
Changelog
- 23 Apr. 2024: Guide updated for Season 4.
- 10 Jul. 2023: No further changes required for the 10.1.5 Patch.
- 17 Apr. 2023: Guide Updated for Season 2 of Mythic+.
- 14 Nov. 2022: Guide added.