Brewmaster Monk Tank Easy Mode — 12.0.5
On this page, we explain how to easily play Brewmaster Monk in World of Warcraft — 12.0.5, using the simplest rotation, talent tree, stat priority, gear setup, etc., without sacrificing performance.
Foreword
This section is intended for players who are new to the game or Monk
class, have no intentions of raiding ![]() Mythic difficulty, or simply want a more
straightforward way to play their specialization without being overwhelmed
by the numerous priorities and active abilities that need to be taken into
consideration for more optimal play. While it also assumes that your gearing is fairly
minimal, your set bonus effects may be considered. However, they are entirely passive
and will not meaningfully alter your rotation or talent choices.
Mythic difficulty, or simply want a more
straightforward way to play their specialization without being overwhelmed
by the numerous priorities and active abilities that need to be taken into
consideration for more optimal play. While it also assumes that your gearing is fairly
minimal, your set bonus effects may be considered. However, they are entirely passive
and will not meaningfully alter your rotation or talent choices.
The Basics of Brewmaster Monks
Brewmaster Monks are some of the sturdiest brawlers out there, capable of
shrugging off even the deadliest attacks with ease while offering plenty of
options for mobility and defense. With the help of ![]() Stagger, there is
next to nothing that can outright kill you in one hit, which makes for a
more predictable damage intake to heal.
Stagger, there is
next to nothing that can outright kill you in one hit, which makes for a
more predictable damage intake to heal.
As a Brewmaster, your main resource to manage is Energy, which you will spend
on abilities that reduce the cooldown of your Brews and act as a way to decrease
the damage you are taking from your ![]() Stagger. The better you are at
converting your Energy to Brew usage, the easier it will be to stay alive. Other
keys to survival will involve taking advantage of your abilities that do not
cost Energy, along with your cooldowns and utility.
Stagger. The better you are at
converting your Energy to Brew usage, the easier it will be to stay alive. Other
keys to survival will involve taking advantage of your abilities that do not
cost Energy, along with your cooldowns and utility.
Beginner's Guide to Brewmaster Monk in Midnight
Beginner Single-Target Talents for Brewmaster Monk
Below is a "default" talent tree containing many of the most standard and
common talent choices for you to select in beginner-level content while having
the flexibility to adjust a few points as necessary for different scenarios.
If you desire an even more simplified experience, then it is recommended to switch
the choice node of ![]() Blackout Combo at the bottom of the
specialization tree to
Blackout Combo at the bottom of the
specialization tree to ![]() Press the Advantage. Remember that you can easily
import the talent tree below into the game with the "Export Talents" button!
Press the Advantage. Remember that you can easily
import the talent tree below into the game with the "Export Talents" button!
If you are interested in knowing when to use some of the more situational talent choices or learn more about Brewmaster Hero Talents, take a look at our full talent analyses below.
Beginner Single-Target Hero Talents for Brewmaster Monk
Brewmasters have access to two unique sets of Hero Talents, with the
 Shado-Pan tree focusing on delivering bursts of
 ![]() Flurry Strikes
and the
Flurry Strikes
and the  Master of Harmony tree revolving around building and spending
vitality as an
 ![]() Aspect of Harmony. Fortunately, these talents are
almost entirely passive, allowing you to easily switch between them without any
major impact on your general gameplay.
Aspect of Harmony. Fortunately, these talents are
almost entirely passive, allowing you to easily switch between them without any
major impact on your general gameplay.
With that being said, we recommend making use of the  Master of Harmony
talents in single-target as a beginner due to how they help with empowering your defensive abilities.
You can certainly still try the
  Shado-Pan talents instead if you would
like to, and you may even find them helpful for their more passive style of defense.
Beginner AoE and Mythic+ Talents for Brewmaster Monk
Brewmaster Monk is a somewhat unique specialization in that there
are few, if any changes to be made in your talent selection when fighting in
single-target or AoE. The most noteworthy talents to mention are ![]() Chi Burst, which
becomes better than
Chi Burst, which
becomes better than ![]() Chi Wave against 2 or more targets, and the inclusion
of
Chi Wave against 2 or more targets, and the inclusion
of ![]() Fuel on the Fire to further enhance your AoE damage with every use of
Fuel on the Fire to further enhance your AoE damage with every use of
![]() Exploding Keg. Otherwise, your talent switching will be based
around matters of both personal preference and whatever utilities you require
for the content you are taking on. This also includes your Hero Talents, where
the passive AoE damage of
Exploding Keg. Otherwise, your talent switching will be based
around matters of both personal preference and whatever utilities you require
for the content you are taking on. This also includes your Hero Talents, where
the passive AoE damage of ![]() Shado Over the Battlefield on the
Shado Over the Battlefield on the  Shado-Pan
can make for an easier time in managing threat. Of course, the
  Master of Harmony
talents also include a similar option in
 ![]() Overwhelming Force; feel free
to experiment!
Overwhelming Force; feel free
to experiment!
If you are interested in knowing when to use some of the more situational talent choices or learn more about Brewmaster Hero Talents, take a look at our full talent analyses below.
Beginner AoE Hero Talents for Brewmaster Monk
Brewmasters have access to two unique sets of Hero Talents, with the
 Shado-Pan tree focusing on delivering bursts of
 ![]() Flurry Strikes
and the
Flurry Strikes
and the  Master of Harmony tree revolving around building and spending
vitality as an
 ![]() Aspect of Harmony. Fortunately, these talents are
almost entirely passive, allowing you to easily switch between them without any
major impact on your general gameplay.
Aspect of Harmony. Fortunately, these talents are
almost entirely passive, allowing you to easily switch between them without any
major impact on your general gameplay.
With that being said, we recommend making use of the  Shado-Pan
talents as a beginner specifically in AoE due to how they passively grant AoE
damage, defense, and enhance your most important damaging abilities. You can certainly still try the
 Master of Harmony talents instead if you would like to, and you may even
find them helpful for reinforcing how to play defensively.
Basic Rotation for Brewmaster Monks
When performing the Brewmaster rotation, it may be helpful to think in terms of
![]() Blackout Kick's cooldown. It will always be 4 seconds, and your
global cooldown will always be exactly one second. This means you will often
be using your abilities in sequences of
Blackout Kick>ability1>ability2>ability3>Blackout Kick. By breaking
things down to only four abilities at a time, you may have an easier time
following the flow of being a Brewmaster.
Blackout Kick's cooldown. It will always be 4 seconds, and your
global cooldown will always be exactly one second. This means you will often
be using your abilities in sequences of
Blackout Kick>ability1>ability2>ability3>Blackout Kick. By breaking
things down to only four abilities at a time, you may have an easier time
following the flow of being a Brewmaster.
- Throw
 Keg Smash when available. It will also turn into free casts
of
  Empty Barrel by using "Brew" abilities thanks to your Apex Talent:
 Bring Me Another.
 - Use
 Blackout Kick when available.
 - Cast
 Breath of Fire when you can; its cooldown will be fully reset every
time you use
  Keg Smash!
 - Activate
 Invoke Niuzao, the Black Ox when fighting for a long time.
 - Cast
 Chi Burst when available.
 - Throw
 Exploding Keg when available. Afterward, you can reactivate the
ability to trigger
  Empty the Cellar for bonus damage.
 - Use
 Tiger Palm when there is no other ability available. If fighting
multiple targets, you will still often use Tiger Palm instead of
  Spinning Crane Kick.
 - Cast
 Expel Harm if you are dropping in health. You can also instantly
cast
  Vivify for healing once every time you use
  Keg Smash, thanks
to
  Vivacious Vivification. Do not try to cast Vivify if it is not buffed by the talent.
 - Activate
 Fortifying Brew when in an emergency situation.
You should make sure not to spend so much Energy on ![]() Spinning Crane Kick
or
Spinning Crane Kick
or ![]() Tiger Palm that you cannot cast
Tiger Palm that you cannot cast ![]() Keg Smash when it is available.
Following these steps will make sure you do as much damage as you can and have
enough Brews to maintain a solid defense.
Keg Smash when it is available.
Following these steps will make sure you do as much damage as you can and have
enough Brews to maintain a solid defense.
Apex Talents for Brewmaster Monk
All specializations have access to a unique 4-part effect in Midnight known as their
Apex Talent. For Brewmasters, this Apex Talent is called Bring Me Another,
and it works to passively empower the ![]() Keg Smash ability. By using your defensive
abilities of
Keg Smash ability. By using your defensive
abilities of ![]() Purifying Brew,
Purifying Brew, ![]() Celestial Infusion, and
Celestial Infusion, and ![]() Fortifying Brew,
your Keg Smash will often have its cooldown reset and replaced with the
Fortifying Brew,
your Keg Smash will often have its cooldown reset and replaced with the ![]() Empty Barrel
ability. This ability has no Energy cost and deals a large amount of bonus damage,
while also providing you with a heal in the form of
Empty Barrel
ability. This ability has no Energy cost and deals a large amount of bonus damage,
while also providing you with a heal in the form of ![]() Refreshing Drink. Aim
to use these triggers of Empty Barrel as soon as you can!
Refreshing Drink. Aim
to use these triggers of Empty Barrel as soon as you can!
Season 1 Tier Set Bonus for Brewmaster Monk
As you obtain gear in Season 1 of Midnight, you may gradually encounter
tier pieces that unlock unique bonuses to your specialization when two or four
pieces of them are equipped. For Brewmasters, this includes damage buffs to your
![]() Keg Smash and
Keg Smash and ![]() Breath of Fire abilities, as well as a passive reduction
to Keg Smash's Energy cost and bonus Fire damage when striking targets ignited by
your Breath of Fire (shown as
Breath of Fire abilities, as well as a passive reduction
to Keg Smash's Energy cost and bonus Fire damage when striking targets ignited by
your Breath of Fire (shown as ![]() Extra Kick). However, these bonuses do not
change your rotation in any way, nor do they adjust your priority of abilities. Simply
enjoy the free damage!
Extra Kick). However, these bonuses do not
change your rotation in any way, nor do they adjust your priority of abilities. Simply
enjoy the free damage!
Combat Rotation Assistant for Brewmaster Monks
If you would like a more convenient option when first gaining the feel for the
Brewmaster Monk rotation, there is also a Combat Assistant available from
the spellbook. This assistant can perform a simplified version of the damage rotation
and only requires you to use a single keybind. However, making use of this assistant
comes at the cost of an increased cooldown between abilities on every press. Fortunately,
this penalty is not too great a cost to your overall damage, and can
likely still be a net improvement if you are inexperienced with a "fully manual"
playstyle. In fact, you may want to consider taking on more advanced talents such
as ![]() Rushing Jade Wind right away as the assistant can handle the extra rotational
complexity for you! Likewise, if you may be interested in the simplicity of
Rushing Jade Wind right away as the assistant can handle the extra rotational
complexity for you! Likewise, if you may be interested in the simplicity of
![]() Press the Advantage, you'll likely perform better with the assistant handling
Blackout Combo for you.
Press the Advantage, you'll likely perform better with the assistant handling
Blackout Combo for you.
Note, however, that even with this assistant's help, you must still use
your defensive abilities manually, as well as your key offensive cooldown of
![]() Invoke Niuzao, the Black Ox.
Invoke Niuzao, the Black Ox.
Brewmaster Mitigation: Shuffle and Brew Usage
When playing a Brewmaster Monk, it is very important to always
have the ![]() Shuffle buff present. This results in your damage taken being
spread out over a longer period of time due to how it improves your
Shuffle buff present. This results in your damage taken being
spread out over a longer period of time due to how it improves your ![]() Stagger
passive. You gain time on Shuffle by casting
Stagger
passive. You gain time on Shuffle by casting ![]() Keg Smash,
Keg Smash, ![]() Blackout Kick,
and
Blackout Kick,
and ![]() Spinning Crane Kick. If you are using the default UI, you can
easily monitor the time left on your Shuffle by looking at the icon outlined in purple:
Spinning Crane Kick. If you are using the default UI, you can
easily monitor the time left on your Shuffle by looking at the icon outlined in purple:
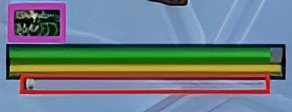
Next, you make use of ![]() Purifying Brew to get rid of damage you have
Purifying Brew to get rid of damage you have
![]() Staggered. The level of Stagger on the default UI is shown above
and outlined in red. The more the bar is filled, the more damage you are
taking. Remember, though, it is equally important to maintain uptime on
Staggered. The level of Stagger on the default UI is shown above
and outlined in red. The more the bar is filled, the more damage you are
taking. Remember, though, it is equally important to maintain uptime on
![]() Shuffle so that your damage taken stays smooth as you purify what you
can.
Shuffle so that your damage taken stays smooth as you purify what you
can.
In addition to ![]() Shuffle and
Shuffle and ![]() Purifying Brew, you also can use
the
Purifying Brew, you also can use
the ![]() Celestial Infusion ability to absorb a large amount of damage taken
for a decent length of time.
Celestial Infusion ability to absorb a large amount of damage taken
for a decent length of time.
Defensive Spells for Brewmaster Monk
In addition to the basic mitigation tools above, Brewmasters have access to one main defensive cooldown through talents. It is the following:
 Fortifying Brew — Your "biggest" cooldown; this temporarily
increases your health and reduces all damage taken. You can further customize it
to enhance its strength or lower its baseline cooldown, and your rotation will also
grant cooldown reduction to it and your other "Brew" abilities!
For a better understanding of what your abilities do to contribute to your performance, along with many more not covered here, it is highly recommended to glance at the Spell List/Glossary page linked just below.
Best Talents for Brewmaster Monk in Midnight
While the talent and rotation guidance above is excellent for starting out as a Brewmaster Monk, it is recommended to eventually look into our full talent and rotation guides to get a better grasp of how the abilities interact with each other and their other quirks.
Stat Choice for Brewmaster Monks
When gearing a Brewmaster Monk, you should prioritize item level above all else, as Agility, Armor, and Stamina are very valuable. Do not bother to drop item levels to avoid a piece that has Haste.
While the stat priority for Brewmasters is normally the same for both the Beginner Mode page and our full guide, there can be major differences depending on if you desire to be more offensive or defensive as a tank. If you want to see the full explanation of the stat priority, as well as the absolute top choices for what you want to prioritize, head to our full stats page.
Changelog
- 20 Apr. 2026: Reviewed for Patch 12.0.5.
- 16 Mar. 2026: Added Season 1 set bonus discussion.
- 26 Feb. 2026: Talent Trees and rotation updated for Midnight launch.
- 10 Feb. 2026: Updated Talent trees for changes to class-gate unlock.
- 19 Jan. 2026: Updated for Midnight Pre-Patch.
- 30 Nov. 2025: Reviewed for Patch 11.2.7.
- 05 Oct. 2025: Reviewed for Patch 11.2.5.
- 04 Aug. 2025: Talent builds and rotation updated for Patch 11.2.0.
- 17 Jun. 2025: Adjusted talent build to account for Combat Assistant enforcing Blackout Combo; rephrased Combat Assistant discussion due to hotfixing.
- 15 Jun. 2025: Added discussion of the Combat Rotation Assistant in Patch 11.1.7 and its viability for a Brewmaster.
- 21 Apr. 2025: Reviewed for Patch 11.1.5.
- 24 Feb. 2025: Slightly modified suggested talent build to include Lighter Than Air.
- 15 Dec. 2024: Ability priority further simplified.
- 21 Oct. 2024: Formatting updated; beginner talent build adjusted, defaulting to Weapons of Order.
- 09 Sep. 2024: Updated for The War Within Season 1.
- 21 Aug. 2024: Added Hero talent discussion; updated recommended talent build for The War Within launch.
- 23 Jul. 2024: Updated for The War Within Pre-Patch.
- 07 May 2024: Reviewed for 10.2.7.
- 22 Apr. 2024: Page reviewed for Dragonflight Season 4.
- 19 Mar. 2024: Added additional rotational guidance; page reviewed for Patch 10.2.6.
- 15 Jan. 2024: Page reviewed for Patch 10.2.5.
- 10 Nov. 2023: Added a suggestion to try out Weapons of Order; swapped recommended talented class cooldowns.
- 06 Nov. 2023: Reworded the usage of Spinning Crane Kick with Press the Advantage talented.
- 04 Sep. 2023: Adjusted one talent recommendation for more beginner-focused content.
- 10 Jul. 2023: Recommended build and stats updated due to new talents in Patch 10.1.5.
- 01 May 2023: Page reviewed for Patch 10.1. No changes necessary due to no Brewmaster Monk updates.
- 20 Mar. 2023: Updated for Patch 10.0.7.
- 24 Jan. 2023: Talents adjusted to account for changes in Patch 10.0.5.
- 11 Dec. 2022: Updated for Dragonflight Season 1.
- 28 Nov. 2022: Updated for Dragonflight launch.
- 25 Oct. 2022: Updated for Dragonflight pre-patch.
More Monk Guides
Guides from Other Classes
This guide has been written by Sinzhu, a Mythic raider on US-Kiljaeden who has passionately played Brewmaster for the past ten years. He also contributes to the Peak of Serenity and is a Moderator of the Monk Class Discord.
- Zoom Into Patch 12.0.7 With the New Goblin Rocket Mounts
- This Affix Is Killing Your Mythic+ Runs in WoW Midnight Season 1
- Did Blizzard Just Quietly Invite Creators to Play WoW Classic’s Next Chapter?
- Dragonflight Timewalking is Coming in Patch 12.0.7 – Dungeons and Rewards Preview
- Turbulent Timeways Returns with a New Mount: Spawn of Vyranoth
- Two Bosses in Voidspire and March Get Nerfs: Raid Tuning, May 5th
- Class Fixes, Leash and Sound Reductions: Midnight 12.0.5 Hotfixes, May 1st
- ALL Classes Get Changes: Massive 12.0.5 Class Tuning Pass, May 5th