Sire Denathrius Strategy Guide for Castle Nathria
Sire Denathrius is the last boss of the Castle Nathria raid in the first patch of Shadowlands. This boss becomes accessible after defeating the Stone Legion Generals.
On this page, you will find the strategy guide video from Ready Check Pull, as well as their written strategy guide and the encounter journal from the game.
Strategy Guide
Quick Version
Phase One:
- Split your raid in half and alternate which half gets hit by each frontal from
the boss (
 Cleansing Pain).
 - Quickly nuke the adds from each frontal.
- Get Denathrius to 70% health after the 6th frontal, but before the last red cone.
- On Heroic, soak the two lines on random players (
 Night Hunter).
Intermission:
- Run toward the boss in order to make it into his circle fast enough to survive the transition to phase two.
Phase Two:
- Kill the Cabalist adds.
- The tanks need to taunt swap on the boss and sword after each cast of
Wracking Pain, and try to aim the boss at the adds when possible.
- When Denathrius pulls everyone to him, quickly run away or run into a nearby
mirror (
 Hand of Destruction).
 - Dodge the swords by staying out of their lines on the ground.
Phase Three:
- The tanks need to keep the boss toward the middle of the room and taunt swap
at as low stacks of
 Scorn as possible.
 - Everyone needs to stay close to the boss in order to avoid getting knocked off
the platform by
 Shattering Pain.
 - When Denathrius pulls everyone to him, quickly run away ( Hand of Destruction).
- Spread out with the red circles (
 Fatal Finesse), and on Heroic,
soak the red orbs (
Fatal Finesse), and on Heroic,
soak the red orbs ( Smoldering Ire).
Full Guide
The Sire Denathrius encounter is a three phase fight that has hard DPS checks in the first and last phase. Each phase is very different, but you fight Denathrius directly the entire time.
We recommend saving ![]() Bloodlust/
Bloodlust/![]() Heroism for the last phase, because
it is likely the most difficult phase and there is also a high DPS requirement.
Heroism for the last phase, because
it is likely the most difficult phase and there is also a high DPS requirement.
Phase One:
- Everyone starts off with 5 stacks of a permanent debuff (4 on Normal), and the
goal of the phase is for everyone to remove enough stacks of this debuff so that
they can survive the transition into the next phase (
 Burden of Sin). 3 stacks
need to be removed on Heroic, while only 2 need to be removed on Normal. The strategy
is the same for either difficulty, so this guide will focus on Heroic for simplicity.
Burden of Sin). 3 stacks
need to be removed on Heroic, while only 2 need to be removed on Normal. The strategy
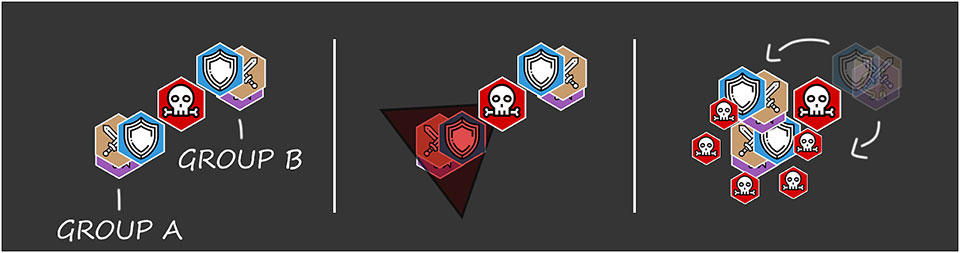
is the same for either difficulty, so this guide will focus on Heroic for simplicity. - Before pulling the boss, split the entire raid into two halves with a tank in each group.
- The tank in Group A should taunt the boss first, while the rest of Group A stacks
up tightly on the tank and Group B stacks behind the boss. Everyone in Group A will
then get hit by the boss's frontal cast, Cleansing Pain. It removes a
Burden of Sin stack from everyone it hits, but it also spawns a bunch of adds
that do a ton of raid damage. These adds need to be immediately nuked down.
- On Heroic, while killing these adds, two players will be targeted with
a line ( Night Hunter). These players need to stand slightly away from the raid, while everyone else
stands in the lines in order to reduce the damage the targeted players take from
Night Hunter. Never stand in both lines at the same time, and never stand
on top of the targeted players. On Normal, the lines are not there, so the
targeted players just need to move away from the raid (
 Feeding Time).
 - After all that, the boss will cast
 Blood Price. This cast stuns everyone,
picks everyone up, and knocks everyone away, while also doing a ton of raid damage
based on how many players have the same number of Burden of Sin stacks.
Blood Price. This cast stuns everyone,
picks everyone up, and knocks everyone away, while also doing a ton of raid damage
based on how many players have the same number of Burden of Sin stacks. - Immediately after that, the tank in Group B needs to taunt the boss, while the rest of Group B stacks on their tank and Group A stacks behind the boss. Group B will get hit by the frontal cast this time, which spawns adds again that everyone needs to nuke down while also soaking the lines on two players.
- And finally, everyone then needs to quickly move out of a huge red cone that
is cast from the center of the room toward the boss (
 Ravage), which also
leaves a red zone on the ground that does damage to players and makes them unhealable
(
Ravage), which also
leaves a red zone on the ground that does damage to players and makes them unhealable
( Desolation).
 - Then you do that exact same sequence of mechanics two more times:
Group A frontal, Blood Price, Group B frontal, red cone. However, on the third round,
you need to make sure to get Denathrius to 70% health after the Group B frontal,
but before the red cone. This last frontal is needed to remove Burden of Sin
stacks, but the last red cone leaves the entire room covered in the bad red stuff.
If you do this right, everyone will have 2 stacks of the debuff when Denathrius
starts the transition to phase 2.
 Cleansing Pain
Transition to Phase Two (![]() March of the Penitent):
March of the Penitent):
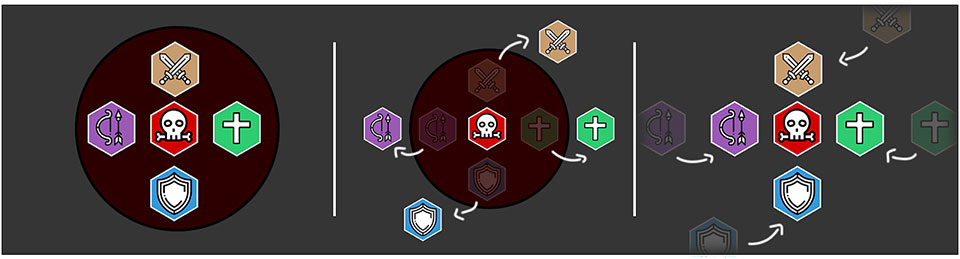
- Denathrius teleports to the middle of the room, pulls everyone to him, and then
knocks everyone away in random directions. For each player to make it to phase two,
they have to run back to the center of the room before Denathrius finishes his cast.
Simple enough, except you cannot use abilities while running toward him and you are
slowed based on the number of Burden of Sin stacks you have left. This is
why everyone needs to remove at least 3 stacks during phase one, because otherwise
they will be too slow to get to the middle of the room in time and will die from
the fall to phase two.
Phase Two:
- Now you are down on a new platform. This phase is more straightforward: killing adds, dodging mechanics, and getting Denathrius to 40% health. But now you are also fighting Remornia, his floating sword.
- One tank should taunt Denathrius while the other tank taunts the sword. Start out by moving to the north side of the platform, where the first set of adds spawn.
- Two Crimson Cabalist adds spawn on on the main platform, and two spawn on the side platforms that are detached. Ranged DPS will need to focus down the adds on the side platforms, unless you have melee that have ways of getting there and back. These adds channel ticking damage on the raid, so should kill them quickly to help the healers out. On Heroic, when they die, they also spawn a bunch of red swirlies under random players' feet. These swirlies do damage and can knock you off the platform, so definitely watch your feet when these adds are dying.
- The tanks need to taunt swap on Denathrius and Remornia every time Denathrius
casts his new frontal, Wracking Pain, because it applies a debuff that increases
all damage taken by 50% for several seconds. This frontal can also hit the adds,
so the tanks should try to aim it toward the adds when possible, but it is much more
important that no other players get hit by it. The sword also applies a stacking
bleed to its target (
 Carnage), so swapping like this effectively deals with both debuffs.
 - Remornia effectively shares health with Denathrius, so it is best to keep them stacked together as much as possible for cleave damage.
- Remornia occasionally marks random players with red arrows on the ground and
then charges through them all after a few seconds (
 Impale). The marked
players and anyone hit along the way will take a ton of damage, and on Heroic,
anyone hit also drops a red pool on the ground that does damage to players. So the
marked players should move to one of the edges of the platform and everyone else
should move out of the arrows on the ground to avoid being hit.
Impale). The marked
players and anyone hit along the way will take a ton of damage, and on Heroic,
anyone hit also drops a red pool on the ground that does damage to players. So the
marked players should move to one of the edges of the platform and everyone else
should move out of the arrows on the ground to avoid being hit. - Denathrius occasionally pulls everyone to him and starts casting Hand of Destruction,
which does a crazy amount of raid damage, but gets reduced the further you are away
from him. You can just run away from this with movement abilities, but we recommend
using the mirrors in the room. If you run into the big red mirror on the north side
of the room, it instantly teleports you to the one on the south side of the room,
and vice-versa. So if the tanks keep Denathrius close to a mirror, you can get super
far away from that cast in no time, take almost no damage from the cast, and then
easily stop back into the mirror again to teleport back if you want to. The bosses
teleport to their target if they are out of range too, so you do not have to worry
about them slowly running around. This mirror strategy is particularly good for
the second Hand of Destruction cast, because the second set of adds spawn
on the south side of the room shortly afterward, and you can just stay where you
are after the first teleport.
- And finally, Remornia casts
 Massacre at full energy. The sword disappears
and a ton of giant swords spawn on the side of the platforms, which slice through
the platform in random directions for a few seconds. However, the swords show you
a line on the ground where they are going to go, so just quickly move out of the
lines.
Massacre at full energy. The sword disappears
and a ton of giant swords spawn on the side of the platforms, which slice through
the platform in random directions for a few seconds. However, the swords show you
a line on the ground where they are going to go, so just quickly move out of the
lines. - When Denathrius gets to 40% health, he starts the third and final phase. Any
remaining adds teleport to the inner platform and reduce healing on the raid per
add (
 Dusk Elegy), so definitely make sure they are all dead before phasing.
 Hand of Destruction
Phase Three:
- Denathrius blocks off the outside of the room (
 Indignation), so you
only have a small inner circle to work with, and he wields Remornia himself.
Sections of the room slowly become blocked as well, similar to phase one, so you
only have a certain amount of time to kill Denathrius before you run out of room.
Indignation), so you
only have a small inner circle to work with, and he wields Remornia himself.
Sections of the room slowly become blocked as well, similar to phase one, so you
only have a certain amount of time to kill Denathrius before you run out of room. - The tanks should keep Denathrius toward the middle of the room, and the tanks
need to taunt swap in this phase because the boss's melee swings apply a stacking
DoT debuff ( Scorn). The taunt swap should happen every time the debuff
falls off of one of the tanks. However, Denathrius also occasionally casts a new
tank ability, Shattering Pain. This cast hits the current tank with three
quick melee swings, and then finishes with a raid-wide blast that does damage to
everyone and knocks everyone away. The current tank needs to use a big defensive
every time this is cast, and everyone should position themselves to avoid getting
knocked off the platform by the final hit.
- Denathrius also occasionally marks random players and causes short-range AoE
damage on each of them after a few seconds, as well as applying a heavy DoT to
anyone hit ( Fatal Finesse). These players need to quickly spread out while
everyone else moves away from them. On Heroic, a red orb is left behind from
each marked player which explodes on the raid after a few seconds ( Smoldering Ire).
These orbs need to be soaked in order to reduce the damage of the explosions,
but soaking them does a ton of damage as well. So everyone needs to quickly help
soak them up.
- Denathrius occasionally casts the same Hand of Destruction ability as
in phase two. He pulls everyone to him and then explodes, but in this phase you
cannot use the mirrors to get away, so everyone just has to run as far away as
possible.
- And finally, the giant telegraphed swords from phase two will continue to spawn
occasionally, as well as the huge red cone from phase one. There is a lot of movement
required in this phase, and some very difficult overlaps of these relatively
simple abilities. The biggest threats seem to be avoiding getting knocked off by
the tank ability, having somewhere to run after getting pulled in, and the hard
enrage of running out of room from the red cones. Execute damage is going to be
massively helpful in this phase, as well as
 Bloodlust/
 Heroism.
Encounter Journal
We have encounter journal pages for each of the four difficulties, which you can access by clicking the links below.
Class Advice for Sire Denathrius
For each class, we provide advice on how to tackle the Sire Denathrius encounter, complete with actual tips, but also recommendations for talents and Legendary Powers.
Changelog
- 23 Nov. 2020: Added Ready Check Pull video.
- 19 Nov. 2020: Strategy added.
- 07 May 2020: Guide added.
This guide has been written by Zaxachi, a top US mythic raider currently in xD. He is a co-founder of Ready Check Pull, a top-tier WoW resource and YouTube channel. You can watch his stream on Twitch, join the Ready Check Pull Discord, and follow Ready Check Pull on Twitter.
- Warcraft Returns! 10th Anniversary Edition SteelBook Now Available for Pre-Order
- Insane Solo Ritual Site Farm Is Printing Hero Crests in WoW Right Now
- This Bonus Roll Hack Could Boost Your BiS Chances in WoW This Week
- Class Fixes and Dungeon Tuning: Midnight 12.0.5 Hotfixes, April 28th
- Updating Quel’Thalas: New Blizzard Video on Rebuilding the Zone for Midnight
- How to Obtain All Collectibles From the Broken Throne Ritual Site
- Where Does Your Class Rank in DPS? 12.0.5’s Winners and Losers Are Clear
- WoW Patch 12.0.7 Is Already in Internal Testing and Adds Another One-Boss Raid