

Huntsman Altimor Strategy Guide for Castle Nathria

Nathria Guides
Huntsman Altimor is one of the early bosses of the Castle Nathria raid in the first patch of Shadowlands. This boss becomes accessible right after defeating the first boss, Shriekwing.
On this page, you will find the strategy guide video from Ready Check Pull, as well as their written strategy guide and the encounter journal from the game.
Ready Check Pull Video
Strategy Guide
Quick Version
Throughout the fight:
- Fan out around Altimor to reduce damage taken from
 Spreadshot.
 - Do not get hit by another player's red arrow on the ground
(
 Sinseeker).
When Margore is active:
- The tanks should taunt swap on Margore at as low bleed stacks as possible
(
 Jagged Claws).
 - Help soak the red circle that goes on a random player
(
 Vicious Lunge).
When Bargast is active:
- Move Bargast away from Altimor for the
 Rip Soul cast, and heal the
soul to full before it gets to Altimor.
Rip Soul cast, and heal the
soul to full before it gets to Altimor. - Crowd control the Shades of Bargast for a while and then kill them quickly.
When Hecutis is active:
- When the raid is healthy, keep Hecutis moving near Altimor to drop his
stacks of
 Crushing Stone.
 - If you get a brown circle around you, run it out far away from the raid
(
 Petrifying Howl).
Full Guide
The Huntsman Altimor encounter is a three-phase fight where you deal with
Altimor the entire time, but you will also have to deal with his three hounds,
one for each phase of the fight. After you have killed one hound, the next one
becomes active, and all three of them have totally different abilities. Altimor
effectively shares health with the hounds too, so all damage is good damage
(![]() Huntsman's Bond).
Huntsman's Bond).
The fight starts out with Altimor and the first hound, Margore. You can use
![]() Bloodlust/
Bloodlust/![]() Heroism on pull, or you can save it for another
phase that you find more challenging.
Heroism on pull, or you can save it for another
phase that you find more challenging.
Phase One (Margore):
- On the pull, one tank should taunt Altimor while the other taunts Margore,
and they should be kept stacked together for more cleave damage. Everyone else
should fan out around the boss in a circle, in order to reduce the raid
damage taken by Altimor's random unavoidable cone cast, Spreadshot. He
casts this in every phase of the fight, so get used to staying fanned out.
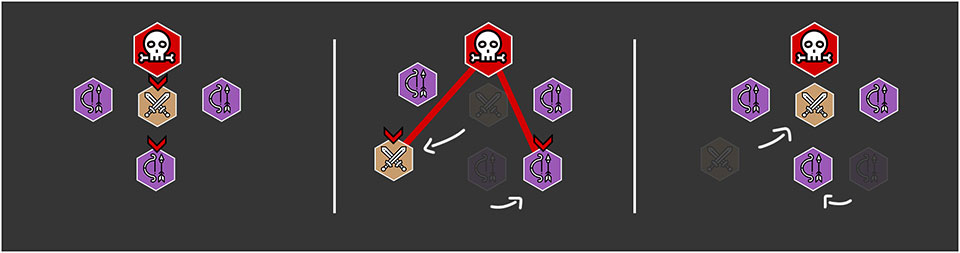
- Altimor also occasionally marks three players with red arrows on the
ground ( Sinseeker).
- These players need to quickly move out of each other's arrow and then stop moving, while everyone else moves out of the arrows as well.
- After a few seconds, Altimor shoots in each player's direction, hitting everyone standing along each arrow. This does a ton of instant damage and applies a heavy DoT that lasts 30 seconds, so it is very important that only the marked players get hit by this cast.
- Altimor casts this in every phase of the fight, so always be on the lookout for these arrows.
- The tanks should taunt swap on Margore after the first cast of
Jagged Claws and again every time the bleed debuff falls off of either
tank.
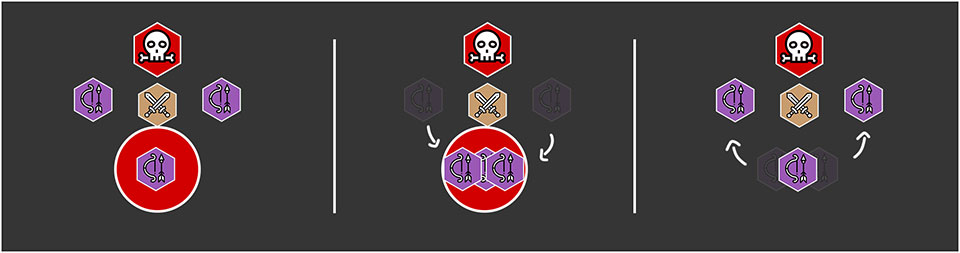
- Occasionally, Margore marks a random player with a red circle and then
leaps to them after a few seconds ( Vicious Lunge). A couple other
players should move into this circle to help split the damage from the
leap.
- On Heroic, the leap will also put a short bleed on all of the players it hits, so you do not want too many people soaking it.
- When Margore dies, the next hound, Bargast, comes out.
 Sinseeker
 Vicious Lunge
Phase Two (Bargast):
- One of the tanks should move Altimor to the middle of the room, while the other tank initially keeps Bargast away from Altimor. Everyone else should reposition to continue to fan out around Altimor.
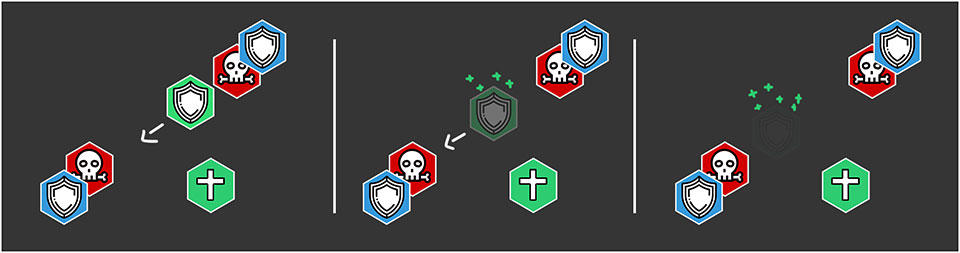
- The first ability Bargast casts is Rip Soul. It is a big magic hit
on the tank that spawns a friendly soul that walks toward Altimor.
- Your healers need to focus heal it to full health to despawn it before it
gets to Altimor, or else you will likely wipe from the buff he gets from the soul,
 Devour Soul.
 - The soul spawns with the same health percentage as the tank after the
magic hit. And on Heroic, the soul will pulse heavy raid-wide damage until it
despawns (
 Unstable Soul).
 - The best way to deal with this is by having a tank move Bargast away from Altimor before each cast and use a big defensive cooldown, and then have your healers spam heal the soul to full.
- Bargast casts this every 30 seconds, so you should be able to stack Bargast with Altimor between the casts for some extra cleave damage.
- Your healers need to focus heal it to full health to despawn it before it
gets to Altimor, or else you will likely wipe from the buff he gets from the soul,
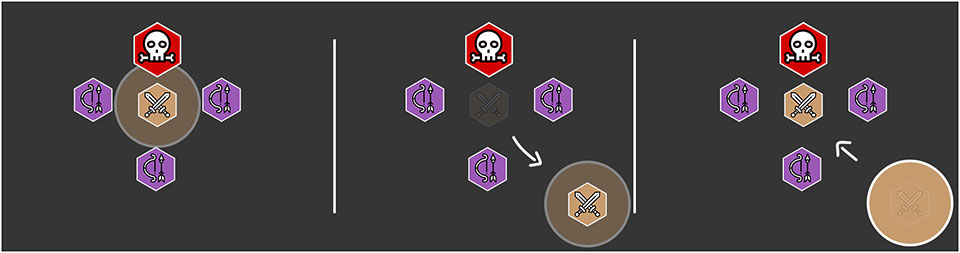
- After every other Rip Soul cast (1st, 3rd, 5th, etc.), Bargast will
immediately follow up with
 Shades of Bargast.
- It spawns two adds that need to be immediately crowd-controlled with things
like
 Polymorph,
  Freezing Trap, etc.
 - These adds spam cast
 Deathly Roar, which is very deadly and
uninterruptible, and they have a ridiculous amount of health. However, while
crowd-controlled, they slowly gain a stacking debuff that increases their
damage taken (
Deathly Roar, which is very deadly and
uninterruptible, and they have a ridiculous amount of health. However, while
crowd-controlled, they slowly gain a stacking debuff that increases their
damage taken ( Destabilize). So after a while you will be able to
break them out of the crowd-control and kill them almost instantly.
Destabilize). So after a while you will be able to
break them out of the crowd-control and kill them almost instantly. - We recommend waiting until after the next Rip Soul cast to kill them, but
you definitely want to do it before the next Shades of Bargast cast,
which happens about every 60 seconds. They become immune to crowd-control after a certain amount of time, so you cannot just crowd-control them forever.
- Be careful not to break the crowd-controls early, and definitely do not let their cast get off. You can even use stuns and fears if you need to stop a cast.
- It spawns two adds that need to be immediately crowd-controlled with things
like
- When Bargast dies, the last hound, Hecutis, comes out.
 Rip Soul
Phase Three (Hecutis):
- Keep Altimor in the middle of the room, and have the other tank taunt Hecutis and bring him into cleave range of Altimor.
- Every time Hecutis melee swings, he gets a stack of a buff that increases
his melee damage by 50% and reduces his movement speed
( Crushing Stone). He loses stacks whenever he is moving, but each
stack removed triggers significant raid-wide damage. So the best way to deal
with this is by constantly moving Hecutis around Altimor, steadily dropping his stacks, and only ever stopping if the raid is low on health. If you do ever
have to stop, his melee damage will quickly get out of hand, so the tanks
should have defensive cooldowns ready for this just in case.
- Hecutis will also occasionally cast Petrifying Howl, which puts
brown circles around random players.
- These players need to quickly run away from the group by the time their
circle expires, because it leaves a permanent zone of rocks on the ground that
hurts anyone standing in it (
 Stone Shards).
 - Over time, these zones will fill up more and more of the room, so the further away you drop them, the more time you will have to kill the boss.
- These players need to quickly run away from the group by the time their
circle expires, because it leaves a permanent zone of rocks on the ground that
hurts anyone standing in it (
- Once Hecutis dies, you just need to finish off Altimor on his own, with
whatever little health he has left. He also gains a debuff that doubles his
damage taken, so it won't take too long (
 Broken Bond).
 Petrifying Howl
Encounter Journal
We have encounter journal pages for each of the four difficulties, which you can access by clicking the links below.
Class Advice for Huntsman Altimor
For each class, we provide advice on how to tackle the Huntsman Altimor encounter, complete with actual tips, but also recommendations for talents and Legendary Powers.
Changelog
- 04 Dec. 2020: Added visuals.
- 25 Nov. 2020: Added Ready Check Pull video.
- 02 Nov. 2020: Added Strategy section.
- 15 Jun. 2020: Guide added.