

Sludgefist Strategy Guide for Castle Nathria

Nathria Guides
Sludgefist is one of the later bosses of the Castle Nathria raid in the first patch of Shadowlands. This boss becomes accessible after defeating both Lady Inerva Darkvein and The Council of Blood.
On this page, you will find the strategy guide video from Ready Check Pull, as well as their written strategy guide and the encounter journal from the game.
Ready Check Pull Video
Strategy Guide
Quick Version
- The tanks need to stay tightly stacked for
 Giant Fists and keep the
boss away from the pillars.
Giant Fists and keep the
boss away from the pillars. - If you get chained to someone, stay very close to them (
 Chain Link).
If you move too far away from each other, you will both die.
Chain Link).
If you move too far away from each other, you will both die. - When a tank gets marked for the charge, they need to make sure it hits a pillar
(
 Hateful Gaze).
 - Everyone needs to quickly move out of the
 Destructive Stomp around the
boss and dodge the random brown swirlies on the ground (
Destructive Stomp around the
boss and dodge the random brown swirlies on the ground ( Falling Rubble).
 - On Heroic, a couple players need to help soak the red circle on a random
player (
 Chain Slam).
Full Guide
The Sludgefist encounter is a single phase fight that centers around getting the boss's charge to hit the four pillars in the room. The fight is very simple, but very punishing, and requires a high amount of throughput from all roles.
We recommend using ![]() Bloodlust/
Bloodlust/![]() Heroism on pull, because this fight
has a hard-enrage that you need to beat. Alternatively, you can save it for the
last 20% of Sludgefist's health where he gains an enrage that increases his damage
and attack speed (
Heroism on pull, because this fight
has a hard-enrage that you need to beat. Alternatively, you can save it for the
last 20% of Sludgefist's health where he gains an enrage that increases his damage
and attack speed (![]() Gruesome Rage).
Gruesome Rage).
- The key mechanic in this fight is a charge that Sludgefist casts when his rage
bar is full, Hateful Gaze. He marks the current tank and then charges in
their direction after a few seconds, killing anyone in the way and only stopping
when he runs into a pillar or a wall. If he hits a wall, it will almost instantly
wipe the raid. So the tank absolutely needs to aim him at a pillar every time by
simply running behind one when marked by the charge. When Sludgefist runs into a
pillar, it gets destroyed, and he gets stunned and takes double damage for a few
seconds. There are only four pillars in the room, so the fifth charge is guaranteed
to hit a wall and wipe the raid, acting as the hard-enrage of the fight.
 Hateful Gaze
- On pull, tank Sludgefist where he spawns. This is a good place to start because
he occasionally casts a 20-yard AoE stomp that does a ton of damage to players and
destroys pillars within its circle ( Destructive Stomp). So the tanks need
to make sure he is always over 20 yards away from any pillars, and everyone needs
to quickly move out of the stomp.
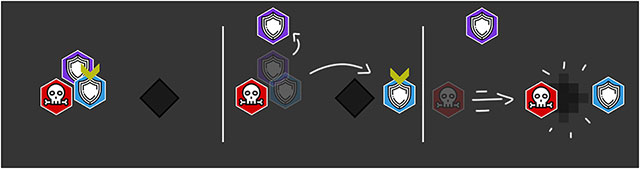
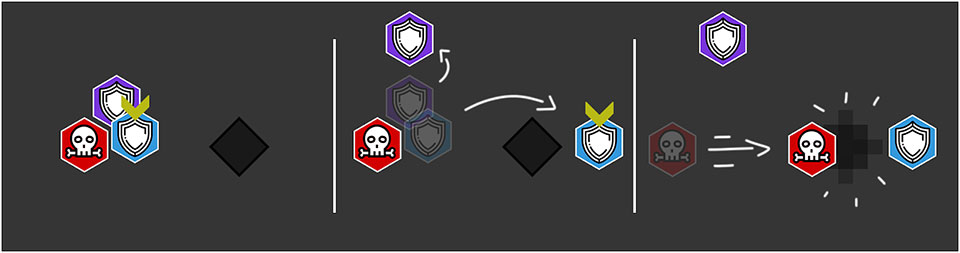
- The tanks also need to stay tightly stacked with each other, because all of
the boss's melee swings get copied onto the next closest player within five yards of
the current tank ( Giant Fists). If no one else is in five yards, the current
tank will take both melee swings at once, and this boss hits really hard so that
would probably not end well. This also means everyone else needs to stay away from
the tanks.
- This fight also has one of the most punishing mechanics of all time, Chain Link.
It marks two random players and chains them together after a few seconds. If the
chained players move further away than 12 yards from each other, they both instantly
die. So anyone who gets chained needs to be extremely careful about moving around
with their partner. This chain lasts almost an entire minute and gets recast several
times in the fight, so you will need to get very used to it. Ranged players should
generally stay near each other throughout the fight so that they do not have to move
as much to get to their partner initially.
- All of the other mechanics are relatively minor:
- There are randomly spawning brown swirlies on the ground to dodge, which leave
permanent zones of rocks that do damage to players ( Falling Rubble).
- Sludgefist occasionally casts a roar that does damage to everyone and pushes
everyone away from him (
 Colossal Roar).
 - And on Heroic, Sludgefist occasionally marks a random players with a
red arrow and red circle, roots them for a couple seconds, and then pulls everyone
in that circle to him and casts a slam that does split damage to those players ( Chain Slam).
Three or four players need to stand in the circle in order to split the damage
enough to survive.
- There are randomly spawning brown swirlies on the ground to dodge, which leave
permanent zones of rocks that do damage to players (
- Sludgefist's abilities are on a strict timer, and he casts them in the same
order between every charge, so this fight is all about getting used to the flow
of the abilities. For instance, after the second Destructive Stomp he almost
immediately casts his charge on the tank, so the tanks can just move out of that
stomp toward the next pillar and already be standing behind it for the charge.
- Destroying each pillar adds a stack of a permanent DoT debuff to the raid, so
the healing required will get tougher over the course of the fight (
 Crumbling Foundation).
And when Sludgefist gets to 20% health, he gains an enrage that increases his damage
and attack speed (
Crumbling Foundation).
And when Sludgefist gets to 20% health, he gains an enrage that increases his damage
and attack speed ( Gruesome Rage). So the end of the fight is very hard on
the tanks and healers specifically.
Gruesome Rage). So the end of the fight is very hard on
the tanks and healers specifically.
Encounter Journal
We have encounter journal pages for each of the four difficulties, which you can access by clicking the links below.
Class Advice for Sludgefist
For each class, we provide advice on how to tackle the Sludgefist encounter, complete with actual tips, but also recommendations for talents and Legendary Powers.
Changelog
- 04 Dec. 2020: Added visuals.
- 11 Nov. 2020: Added strategy.
- 07 May 2020: Guide added.