

Nathria Guides
Stone Legion Generals is the second-to-last boss of the Castle Nathria raid in the first patch of Shadowlands. This boss becomes accessible after defeating Sludgefist.
On this page, you will find the strategy guide video from Ready Check Pull, as well as their written strategy guide and the encounter journal from the game.
Ready Check Pull Video
Strategy Guide
Quick Version
Throughout the fight:
- The two players that get marked with red arrows need to quickly move off to
one side of the boss and fan out, while everyone else dodges the blade from the
boss (
 Wicked Blade).
 - The player that gets a brown circle around them needs to quickly move slightly
away from the raid, while players with a bleed move into the circle (
 Crystalize).
Then everyone else needs to move into the yellow circle that follows to soak the
meteor (
Crystalize).
Then everyone else needs to move into the yellow circle that follows to soak the
meteor ( Pulverizing Meteor).
 - The tanks need to get aggro on the Goliath add that occasionally spawns, and everyone should focus it down.
- During the intermissions, gather red orbs and bring them to Prince Renethal in the back of the room.
In the first phase (General Kaal):
- The tanks should taunt swap for every Crystalize cast and use it to
remove their bleed debuff (
 Serrated Tear).
 - Healers need to dispel players that get
 Heart Rend and focus heal them.
In the second phase (General Grashaal):
- The tanks should taunt swap at as low stacks of
 Stone Fist as possible.
 - The player that gets targeted by Reverberating Eruption needs to quickly
take it out of the raid, and each zone of rocks left behind needs to be soaked by
a player every time this ability is cast.
- Everyone needs to dodge stone spikes on the ground for a few seconds during
(
 Seismic Upheaval).
In the third phase (both bosses):
- All of the abilities from phase one and two need to be handled at the same time.
- Try to kill the bosses at the same time.
Full Guide
The Stone Legion Generals encounter is a pretty unique two-boss fight. There are essentially three phases in the fight, with a couple short intermissions between them. You fight each boss individually, and then fight them together in the last phase.
We recommend saving ![]() Bloodlust/
Bloodlust/![]() Heroism for the last phase, as
it is easily the most challenging part of the fight.
Heroism for the last phase, as
it is easily the most challenging part of the fight.
Phase One (General Kaal):
- On pull, General Grashaal immediately flies away, leaving General Kaal by herself. A tank needs to taunt Kaal, bring her toward the middle of the room, and face her back toward where she spawns. Everyone else should stack up on her right side.
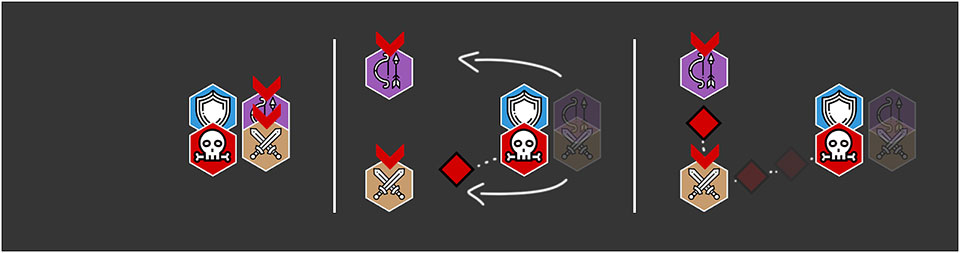
- Two players occasionally get marked with red arrows above their head. These
players need to immediately move off to Kaal's left side and fan out from each other.
After a couple seconds, Kaal will throw her Wicked Blade that goes from her,
to each marked player, and then back to her, exploding on the marked players and
anyone else it hits along the way ( Wicked Blade). This short-range explosion
does instant damage, but it also applies a permanent bleed debuff to everyone it
hits (
 Wicked Laceration). This ability can wipe you very quickly,
so make sure the marked players move off the correct side as soon as possible.
Melee especially need to be sure that they are not standing in the direction of the
blade.
Wicked Laceration). This ability can wipe you very quickly,
so make sure the marked players move off the correct side as soon as possible.
Melee especially need to be sure that they are not standing in the direction of the
blade. - The only way to remove the permanent bleed is with the Crystalize
ability that Grashaal occasionally casts. He marks a random player with a brown
circle; and after a few seconds everyone in the circle takes damage, gets stunned,
and gets all of their bleed debuffs removed. So the player with the circle should
move slightly away from the raid, and everyone with a bleed debuff should quickly
move into the brown circle. Immediately after those players get stunned, several
other players need to move into a yellow circle that replaces the brown circle in
order to help split the damage from Grashaal's Pulverizing Meteor.
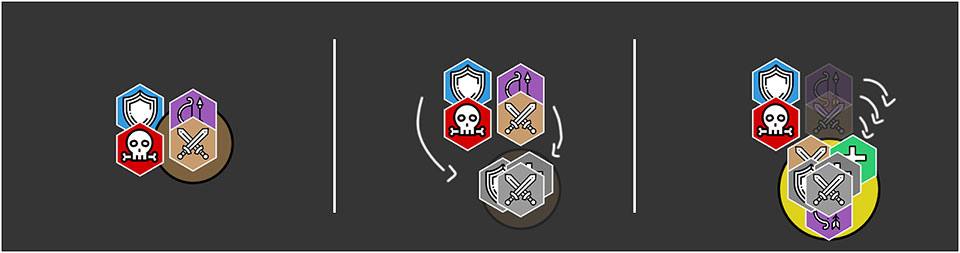
- The tanks also have to use Crystalize to remove the tank-specific
bleed. Kaal frequently hits the current tank with
 Serrated Swipe, which applies
a permanent bleed that also increases damage taken from further Serrated Swipes
( Serrated Tear). So every time Crystalize is being cast, there
needs to be a taunt swap so that the current tank can step into the circle and
safely clear their bleed stacks.
Serrated Swipe, which applies
a permanent bleed that also increases damage taken from further Serrated Swipes
( Serrated Tear). So every time Crystalize is being cast, there
needs to be a taunt swap so that the current tank can step into the circle and
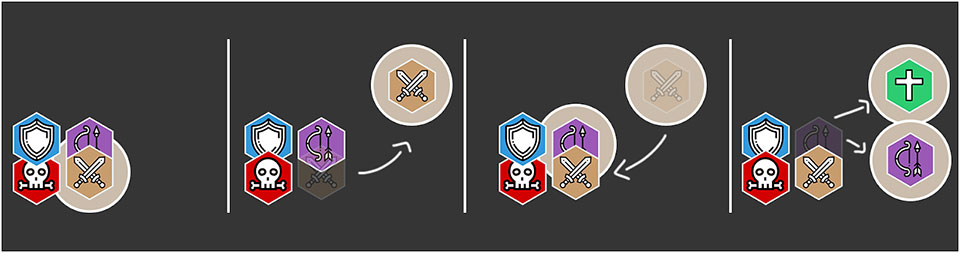
safely clear their bleed stacks. - The last ability Kaal has is a long DoT debuff, Heart Rend, that goes on
up to four random players, based on raid size. This debuff needs to be dispelled,
but removing it applies a short DoT debuff,
 Heart Hemorrhage. This DoT hits
really hard, so healers need to focus heal these players after they are dispelled.
Heart Hemorrhage. This DoT hits
really hard, so healers need to focus heal these players after they are dispelled. - During all of this, there is also a Goliath add that spawns shortly after the
pull and also when Kaal has 75% health remaining. This add needs to be tanked and
focused down quickly, because it reduces everyone's healing taken when it gets below
20% health (
 Soultaint Effigy).
 Wicked Blade
 Crystallize
First Intermission:
- When Kaal gets to 50% health, she starts the intermission, where she gains a buff that reduces her damage taken by 95%. The goal of the intermission is to collect red anima orbs that spawn around the room and bring them to Prince Renethal in the back of the room, in order to restore his mana. When the Prince gets to full mana from the orbs, he blasts away Kaal's buff, which starts Phase Two.
- All of the abilities from Phase One are still happening in the intermission,
so make sure to be ready for them while bringing the orbs to the Prince. There are
also some big red swirlies on the ground to dodge as well (
 Cluster Bombardment).
 - Another Goliath add spawns at the beginning of the intermission as well. This Goliath drops a larger red orb when it dies, so focus it down and bring that orb to the Prince as well.
- When the Prince blasts the boss's buff away, it also knocks everyone away from him, so be careful not to get knocked off the platform.
Phase Two (General Grashaal):
- After the blast, Kaal flies away and Grashaal takes her place. You can keep the same positioning as in Phase One, with the raid stacked on the boss's side.
- In this phase, you are still dealing with Kaal's Wicked Blade, but now
it is coming from the front of the room where she is flying. So players marked for
the blade still need to move to the other side of the boss and fan out accordingly.
And now you have to deal with all of Grashaal's abilities.
- He continues to cast Crystalize, which is handled the same way as in
Phase One.
- His tank ability is called Stone Fist. It is a big physical hit that
knocks the current tank back and applies a debuff that increases damage taken by
further Stone Fists. The tanks need to make sure not to get knocked off the platform,
and also need to taunt swap at as low stacks of the debuff as possible.
- Grashaal occasionally casts Seismic Upheaval, which marks random players
and spawns spikes at their feet for a few seconds. These players need to keep moving
to avoid the spikes, while everyone else also dodges their spikes.
- And last but definitely not least, Grashaal occasionally targets a random player
and casts Reverberating Eruption. This player needs to immediately move away
from the raid before the cast ends, because it will do damage to anyone in 8 yards
and spawn a permanent zone of rocks. Every time this is cast, each zone of rocks
explodes, which does damage to the entire raid unless it is soaked. And you have
to drop each new zone of rocks in a new spot, because the cast, as well as the explosion,
applies a short debuff that massively increases the damage you take from other explosions.
Put simply: drop the zones away from the raid and make sure to have players soak
each of the explosions.
 Reverberating Eruption
Second Intermission:
- When Grashaal gets to 50% health, he starts another intermission and gains a buff that reduces his damage taken by 95%. This intermission is the same as the first one, except you have to deal with Grashaal's abilities during it instead.
- Kill the add, dodge the red swirlies, and bring all the orbs to the Prince.
Phase Three (both bosses):
- After the blast from the Prince, General Kaal returns and now it is time to fight both bosses at the same time. You can still keep the same positioning as the first two phases, with the bosses stacked and the raid on their side.
- Both taunt swap mechanics happen in this phase, but it should work out to where
the tanks can just swap for every Crystalize cast and both mechanics will
be dealt with.
- Then everyone else needs to focus on the Wicked Blades, the Crystalize-meteor combo, the Reverberating Eruption explosions, and the Seismic Upheaval spikes. And the healers need to focus on dispelling and focus healing the players with Heart Rend.
- And lastly, try to kill the generals at the same time. Killing one boss gives
the other boss
 Soldier's Oath, which triples their damage dealt.
Encounter Journal
We have encounter journal pages for each of the four difficulties, which you can access by clicking the links below.
Class Advice for Stone Legion Generals
For each class, we provide advice on how to tackle the Stone Legion Generals encounter, complete with actual tips, but also recommendations for talents and Legendary Powers.

Changelog
- 04 Dec. 2020: Added visuals.
- 13 Nov. 2020: Strategy added.
- 07 May 2020: Guide added.