

Hungering Destroyer Strategy Guide for Castle Nathria

Nathria Guides
Hungering Destroyer is one of the early bosses of the Castle Nathria raid in the first patch of Shadowlands. This boss becomes accessible right after defeating Huntsman Altimor.
On this page, you will find the strategy guide video from Ready Check Pull, as well as their written strategy guide and the encounter journal from the game.
Ready Check Pull Video
Strategy Guide
Quick Version
- Before pulling, assign five players to each of the two leech debuffs that will go
out on random players (
 Gluttonous Miasma). They will stack with each debuffed
player to keep them alive.
Gluttonous Miasma). They will stack with each debuffed
player to keep them alive. - The tanks should taunt swap after every
 Overwhelm cast.
 - Players marked with a blue arrow should quickly move to either side of the boss
and fan out from each other (
 Volatile Ejection).
 - Everyone should quickly spread out when the entire raid gets a circle around
them (
 Expunge).
 - When the boss starts pulling everyone in, run far away until the channel is
over (
 Consume).
Full Guide
The Hungering Destroyer encounter is a single phase fight that is centered around its unique mechanic: a leech debuff that makes players unhealable. The only way for these players to stay alive is by leeching health from other players, but leeching from too many players at once will put unnecessary stress on the healers. Finding the balance between these two factors is key.
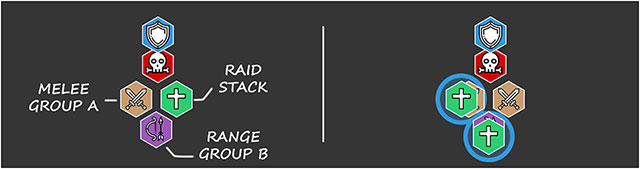
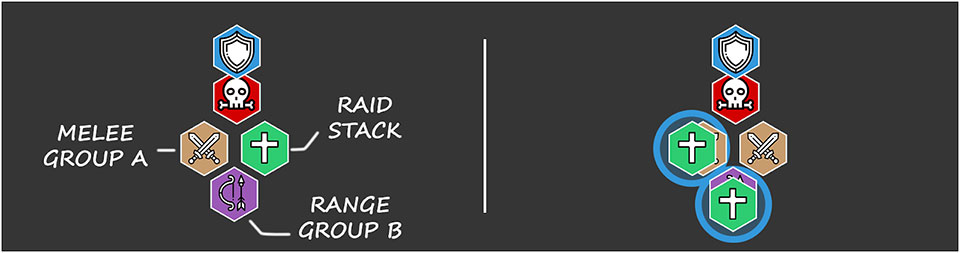
- Before pulling, assign groups of five players to each of the two leech debuffs
that will go out on random players. One of the groups will be in melee, but the
other group will be at range, so one of the groups should be entirely made up of
ranged specializations. During the fight, the raid should stack up directly behind
the boss' right foot, while the melee group stacks up behind his left foot and the
ranged group stacks behind the melee group. You can place world markers down to
help with positioning, but you will stay in this position for most of the fight,
just moving out and back for the other mechanics.
- Use
 Bloodlust/
 Heroism on pull and face the boss away from the raid. Everyone
else should immediately get into their assigned positions.
Heroism on pull and face the boss away from the raid. Everyone
else should immediately get into their assigned positions. - Two random players will get the Gluttonous Miasma debuff, which puts
a light blue circle around them. Each player with the debuff will be unhealable
and take constant ticking damage. Every time this ticking damage happens, they
will also leech health from anyone within the debuff's circle. You need at least
three people in the circle to out-leech the ticking damage the debuffed player
takes. We recommend assigning five players to each debuff to also account for the
other damage that happens in the fight. The leech debuffs will change regularly
throughout the fight, so continue moving one debuff on each assigned group and you
should be good to go.
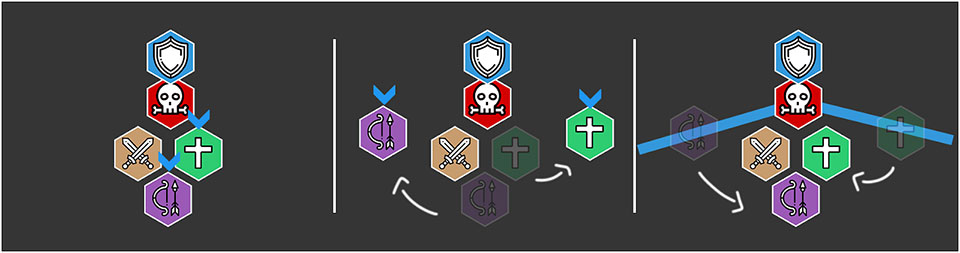
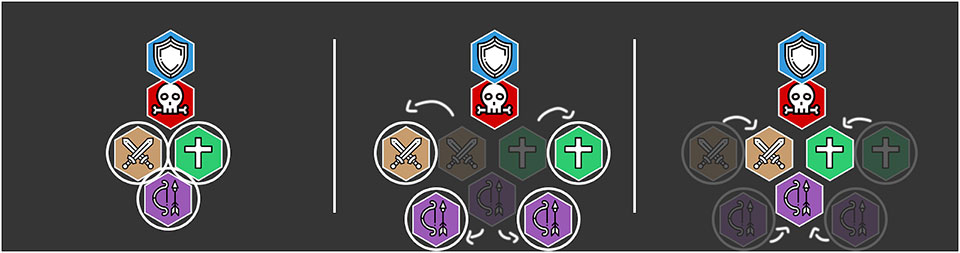
- The boss occasionally marks a few players with a blue arrow above their head
( Volatile Ejection). These players need to quickly run off to either side
of the boss and fan out from each other because, after a few seconds, the boss will
cast an unavoidable beam in each player's direction that does damage to anyone it
hits. Getting hit by one beam is a pretty small amount of damage, but it gives you
a debuff that makes it so getting hit by another beam does way more damage. It is
very important that you never get hit by someone else's beam.
- The boss also occasionally casts
 Expunge. It puts a circle around every
player in the raid that does damage to anyone in each circle after a few seconds.
When this is cast, everyone needs to quickly spread out, making sure to not be in
anyone else's circle. It will help to have your mobile classes go further away,
allowing slower classes to move less. The healers are going to need to pay attention
to the Expunge timer, because each circle gets bigger based on the player's missing
health. The raid needs to be close to topped off before this cast to keep the circles
manageable. After the circles explode, everyone needs to quickly return to their
assigned positions to heal the leeching players back up.
Expunge. It puts a circle around every
player in the raid that does damage to anyone in each circle after a few seconds.
When this is cast, everyone needs to quickly spread out, making sure to not be in
anyone else's circle. It will help to have your mobile classes go further away,
allowing slower classes to move less. The healers are going to need to pay attention
to the Expunge timer, because each circle gets bigger based on the player's missing
health. The raid needs to be close to topped off before this cast to keep the circles
manageable. After the circles explode, everyone needs to quickly return to their
assigned positions to heal the leeching players back up.- On Heroic, Expunge will also leave an orb on the ground that does damage to the first person that runs into it. These orbs persists throughout the fight if they are not soaked, but there are a few ways to manage them. You can have each player, if healthy, run into their own orb; or you could have players with immunities run through and soak as many orbs as they can; or simply have the tanks run into the orbs when they are not actively tanking. Just make sure to deal with any orbs that are closer to the boss first.
- The tanks have two other mechanics to worry about as well. There is
Overwhelm, which is just an occasional big hit on the current tank. And
there is a stacking leech buff that the boss gets every time it melees, which only
gets removed whenever it switches targets (
 Growing Hunger). The tanks need
to taunt swap often to avoid the stacks getting too high. Swapping after every
Overwhelm cast is a good rule of thumb.
Growing Hunger). The tanks need
to taunt swap often to avoid the stacks getting too high. Swapping after every
Overwhelm cast is a good rule of thumb. - When the boss gets to full energy, it will cast Consume. This cast
pulls everyone toward the boss and leeches a ton of health from all players. However,
the leech is massively reduced the further players are from the boss. Big raid
mobility cooldowns should be used for this, like Stampeding Roar, Wind Rush, or
even a Demonic Gateway to help everyone get as far away as possible.
- Other than all that, the boss just does unavoidable damage to the raid every
once in a while with
 Desolate.
 Volatile Ejection
 Expunge
Encounter Journal
We have encounter journal pages for each of the four difficulties, which you can access by clicking the links below.
Class Advice for Hungering Destroyer
For each class, we provide advice on how to tackle the Hungering Destroyer encounter, complete with actual tips, but also recommendations for talents and Legendary Powers.
Changelog
- 04 Dec. 2020: Added visuals.
- 25 Nov. 2020: Added Ready Check Pull video.
- 02 Nov. 2020: Added Strategy section.