This page gives an overview of the various covenant related dungeon buffs in Shadowlands. Within, you will find all of the information we currently know from the Shadowlands Beta on where to find these buffs, how to unlock them and what you gain from them.
Covenant Dungeon Buffs
By being a member of the various Covenants, you can unlock unique buffs for your party when doing the dungeons of your Covenant's zone.
These buffs are also available in the Mythic+ (Keystone) version of the dungeons.
This is a summary of the available buffs:
| Zone | Covenant | Dungeon | Buff |
|---|---|---|---|
| Bastion | Kyrian | The Necrotic Wake | |
| Bastion | Kyrian | Spires of Ascension | |
| Revendreth | Venthyr | Halls of Atonement | Ally NPC and |
| Revendreth | Venthyr | Sanguine Depths | |
| Maldraxxus | Necrolord | Plaguefall | |
| Maldraxxus | Necrolord | Theater of Pain | |
| Ardenweald | Night Fae | Mists of Tirna Scithe | |
| Ardenweald | Night Fae | De Other Side |
Learn more on how to activate them and what each provides below.
Necrotic Wake Dungeon Buff
The Necrotic Wake is located in Bastion, the zone of the Kyrian Covenant.
Having a Kyrian Covenant member within your party is extremely valuable in The Necrotic Wake, as they are able to reactivate friendly Malfunctioning Goliath NPCs throughout the dungeon.
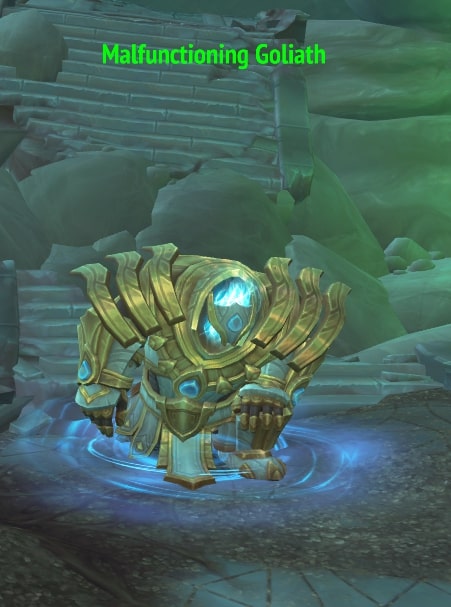
With the help of your ![]() Summon Steward ability and selecting the
"Can you reactivate this Goliath" dialogue option, it will spawn 5 Orbs.
Summon Steward ability and selecting the
"Can you reactivate this Goliath" dialogue option, it will spawn 5 Orbs.
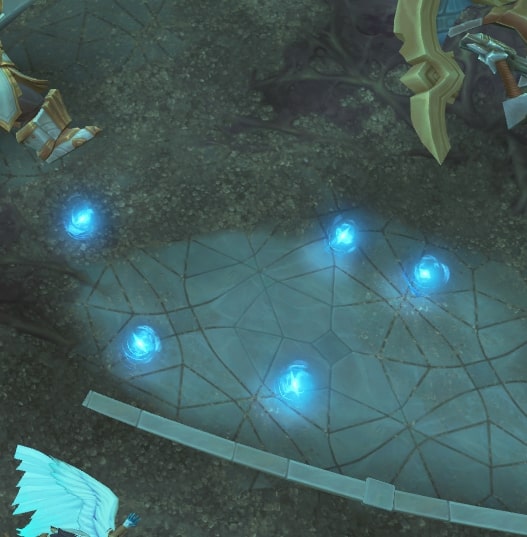
Upon walking on one of these orbs you will gain an ![]() Anima Exhaust buff for
60 seconds, which increases your movement speed by 20% as well as granting you bonus
AoE damage to all enemies within melee range and healing toward allies every 4 seconds.
Anima Exhaust buff for
60 seconds, which increases your movement speed by 20% as well as granting you bonus
AoE damage to all enemies within melee range and healing toward allies every 4 seconds.
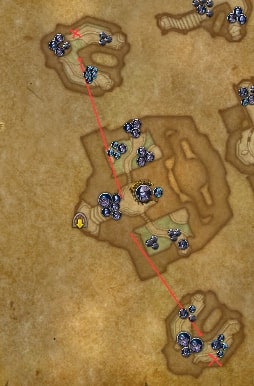
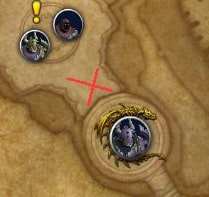
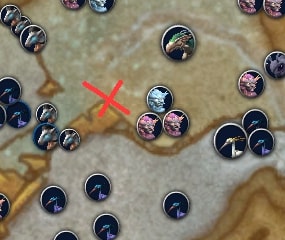
There are 3 Malfunctioning Goliaths across the whole dungeon. The first one is located just right of the first boss, Blightbone. The second one is located left from the top of the stairs after defeating Blightbone, and the last one is located left after crossing the bridge leading towards Amarth The Harvester. A map of these locations is shown below.
Spires of Ascension Dungeon Buff
The Spires of Ascension dungeon is located in Bastion, the zone of the Kyrian Covenant.
In Spires of Ascension, having a party member of the Kyrian
covenant can prove quite useful, as they are allowed to pick up a
![]() Spear of Destiny. If picked up, the Spear will appear as an Extra Action
Button until used (which persists through death).
Spear of Destiny. If picked up, the Spear will appear as an Extra Action
Button until used (which persists through death).
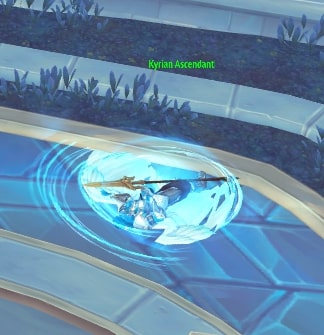
This Spear stuns all nearby enemies within the circle of the Spear for 10 seconds and increases their damage taken by 20%.
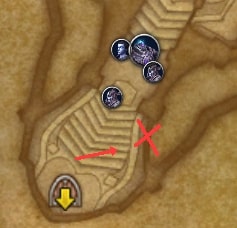
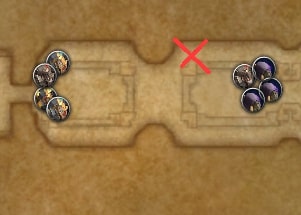
There are 3 spears located throughout the whole dungeon. Two of them are located in the Garden of Repose, by choosing either the left or right side upon defeating the first boss of the dungeon: Kin-Tara.
The last one is located in the Font of Fealty, to the right of stairs. You can hold one spear at a time, so make sure to use it prior to obtaining another one.
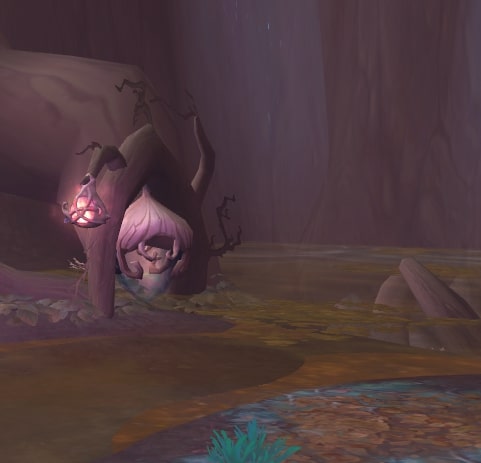
Halls of Atonement Dungeon Buff
The Halls of Atonement are located in Revendreth, the zone of the Venthyr Covenant.
Halls of Atonement is a dungeon where having a Venthyr within your party members can save you tons of time. Once you are near a Loyal Stoneborn mob, an extra action button will appear on your screen allowing you to control it for 45 seconds.
The Loyal Stoneborn deals massive single-target damage and also
grants the whole party a ![]() Stoneborn Boon buff, which provides 10% Damage
Reduction for those 45 seconds.
Stoneborn Boon buff, which provides 10% Damage
Reduction for those 45 seconds.
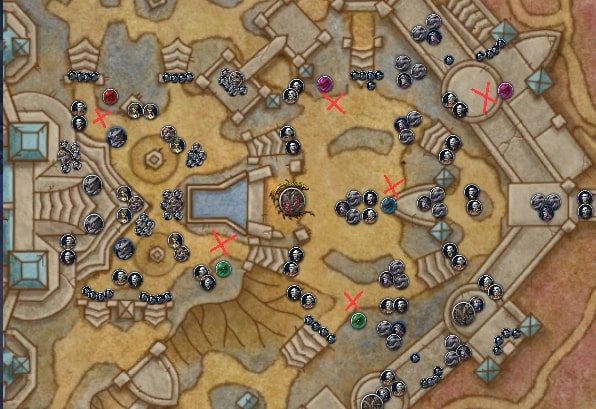
This is extremely useful versus boss encounters or a dangerous pack of mobs, so use it accordingly. There are total of 8 Loyal Stoneborn located in the dungeon: 6 of them are in the first part of the instance and the last two are located prior to engaging High Adjudicator Aleez.
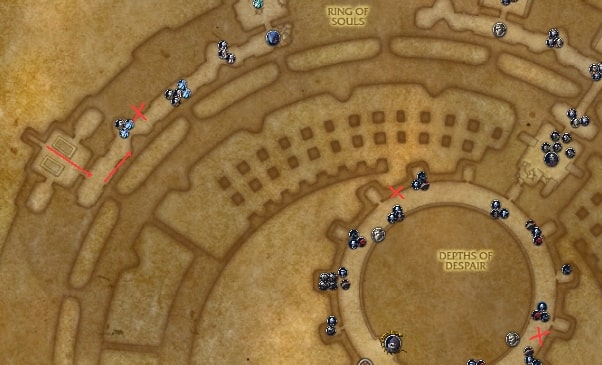
Sanguine Depths Dungeon Buff
The Sanguine Depths are located in Revendreth, the zone of the Venthyr Covenant.
Having a party member of the Venthyr Covenant in the Sanguine Depths
will allow you to use the Anima Cages throughout the dungeon, which grant
5% damage and healing done per stack of ![]() Sinfall Boon for 75 seconds.
Sinfall Boon for 75 seconds.
You obtain a stack of the buff for each mob you kill
within the Anima Cage radius, up to 10 stacks, and for each one the ![]() Sinfall Boon buff
gets refreshed so you can create some great strategies around it!
Sinfall Boon buff
gets refreshed so you can create some great strategies around it!
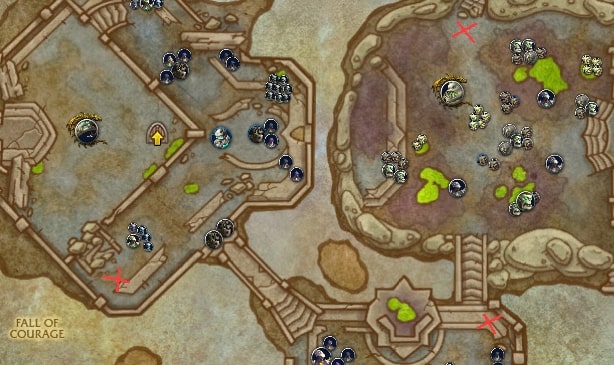
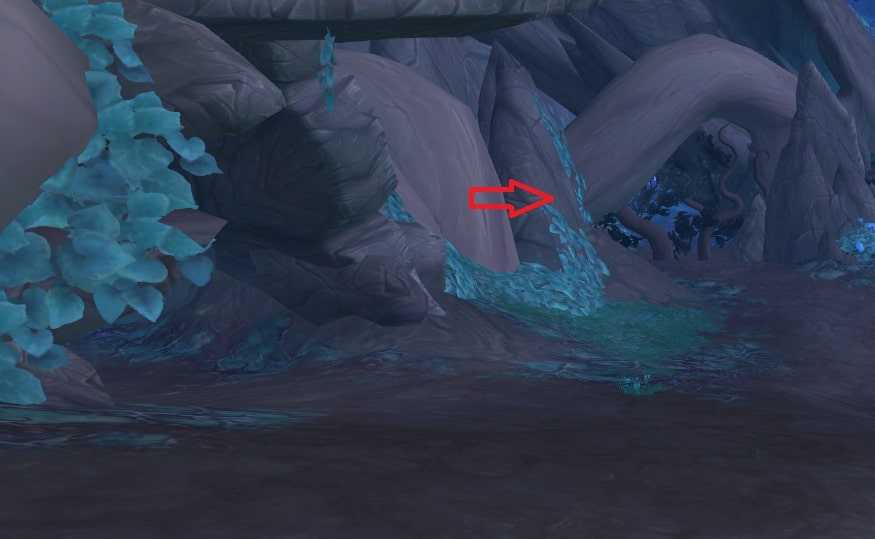
There are several placements of these Anima Cages throughout the dungeon, shown on the maps below:
Plaguefall Dungeon Buff
Plaguefall is located in Maldraxxus, the zone of the Necrolord Covenant.
In Plaguefall, you can use ![]() Fleshcraft on
the corpses of 3 types of slimes to obtain 3 different buffs. Allies within 10 yards
of the Necrolord player will also benefit from these buffs.
Fleshcraft on
the corpses of 3 types of slimes to obtain 3 different buffs. Allies within 10 yards
of the Necrolord player will also benefit from these buffs.
Using the ![]() Fleshcraft channel on Gushing Slime will grant you
the aura
Fleshcraft channel on Gushing Slime will grant you
the aura ![]() Corrosive Gunk, which has a chance to proc and deal
AoE damage to enemy mobs and lasts for 3 minutes.
Corrosive Gunk, which has a chance to proc and deal
AoE damage to enemy mobs and lasts for 3 minutes.
Using ![]() Fleshcraft on the Pestilence Slime corpse will grant you
Fleshcraft on the Pestilence Slime corpse will grant you
![]() Rapid Infection, also a 3-minute aura, that increases Haste by 15%.
Rapid Infection, also a 3-minute aura, that increases Haste by 15%.
Lastly, using Fleshcraft on the corpse of Congealed Slime will grant you
a ![]() Congealed Contagion, an aura buff that provides a 10% damage taken reduction
for 3 minutes.
Congealed Contagion, an aura buff that provides a 10% damage taken reduction
for 3 minutes.
Theater of Pain Dungeon Buff
The Theater of Pain is located in Maldraxxus, the zone of the Necrolord covenant.
In Theater of Pain you can obtain the ![]() Necrolord's Command
buff by activating the banners located throughout the dungeon.
Necrolord's Command
buff by activating the banners located throughout the dungeon.
The buff lasts for 5 minutes and increases your party's Versatility and Movement Speed by 10%. There are 3 banners located throughout the dungeon.
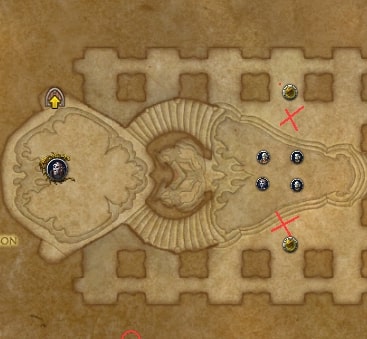
The first one is located in the Altars of Agony, just before engaging the first group of Shackled Soul.

The second one is located in the upper Barrow of Carnage, specifically the back right corner after defeating all the enemies within the first room.
The last one is in the Chamber of Conquest, obtainable after defeating the chosen duelist.
In addition to this, this buff persists through death so worry not if your team wipes; you will still have the aura.
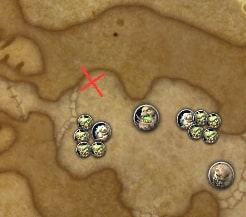
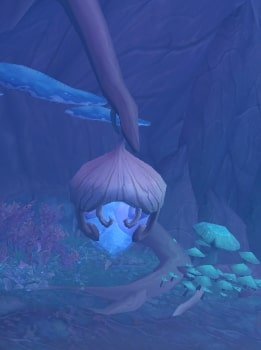
Mists of Tirna Scithe Dungeon Buff
The Mists of Tirna Scithe are located in Ardenweald, the zone of the Night Fae Covenant.
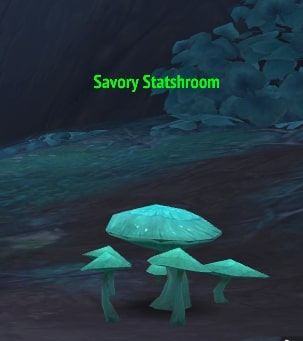
In Mists of Tirna Scithe, there are tons of benefits from having a member of the Night Fae Covenant in your party. First, you can decide to skip the first handful of mob packs by activating the Overgrown Roots, just left from the entrance of the dungeon.
Then, you have the option to remove another set of Overgrown Roots just
before entering the room leading toward Ingra Maloch. This secret room
has two types of mushroom: ![]() Savory Statshroom, which increases your
Strength, Agility, and Intellect by 10% for 10 minutes, and
Savory Statshroom, which increases your
Strength, Agility, and Intellect by 10% for 10 minutes, and
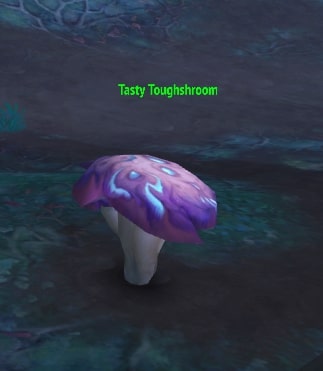
![]() Tasty Toughshroom which increases your Stamina by 10% for 10 minutes.
Note that you can only take one of the mushroom buffs, and when you take a
mushroom buff, you are healed to full health.
Tasty Toughshroom which increases your Stamina by 10% for 10 minutes.
Note that you can only take one of the mushroom buffs, and when you take a
mushroom buff, you are healed to full health.
It is important to note that these mushroom buffs do not persist through death, so be cautious if you want to keep up your buff!
In addition, Night Fae players can use the Depleted Anima Seed, which works as a checkpoint upon death for the entire party instead of respawning at the beginning of the dungeon.
The first seed is located just after defeating Ingra Maloch, on left of the path leading to the maze part of the dungeon.
The second seed is located near the waterfall, just after defeating Mistcaller.
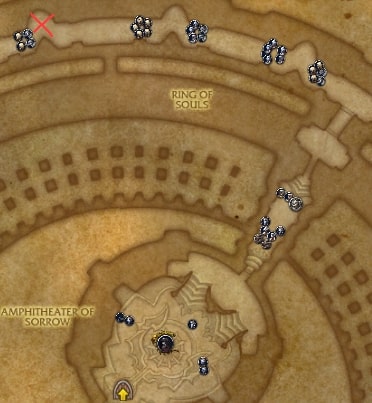
De Other Side Dungeon Buff
De Other Side is located in Ardenweald, the zone of the Night Fae Covenant.
In De Other Side, a Night Fae player can activate ![]() Haunted Urn
which stuns all enemies in a 30-yard radius around the Urn for 10 seconds.
Haunted Urn
which stuns all enemies in a 30-yard radius around the Urn for 10 seconds.
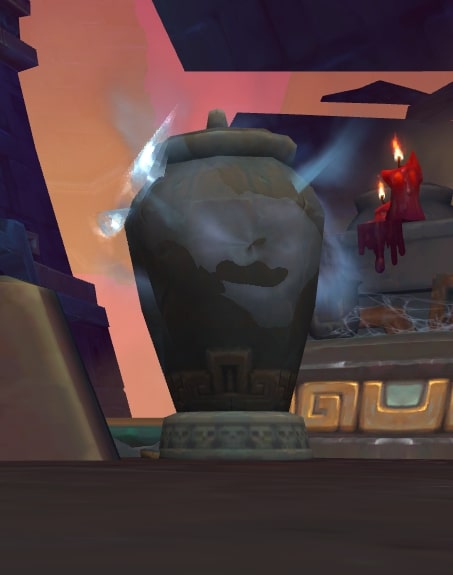
There are total of 4 urns located throughout the dungeon. The first two are in the main area where Mueh'zala is, the third one is located in the corridor of Zul'Gurub area leading towards the Hakkar the Soulflayer, and the last one is located in the Ardenweald area.
It is important to note that the stun effect goes through ![]() Inspiring
and is not affected by the diminishing returns from any previous stun effects.
Inspiring
and is not affected by the diminishing returns from any previous stun effects.
Changelog
- 07 Mar. 2021: Page overhauled with additional info and images.
- 11 Sep. 2020: Updated with the new Necrotic Wake buff.
- 03 Sep. 2020: Updated with the new values of dungeon buffs.
- 26 Aug. 2020: Updated Plaguefall buff to 5% (was 25%) on the new Beta build.
- 23 Aug. 2020: Added a note on how these buffs are present in Mythic+ dungeons.
- 18 Aug. 2020: Page added.