
On this page, you will find tips, tricks, and strategies tailored to your Discipline Priest for each boss of the following raid: Crucible of Storms. All our content is updated for World of Warcraft Patch Dragonflight 10.2.5.
As Crucible of Storms is a new raid, the current information is based on theorycrafting using Warcraft Logs, information present in the dungeon journal, as well as personal experience within the raid itself.
Talent Cheatsheet for Discipline Priest in Crucible of Storms
The Restless Cabal
Damage Patterns and Cooldown Usage
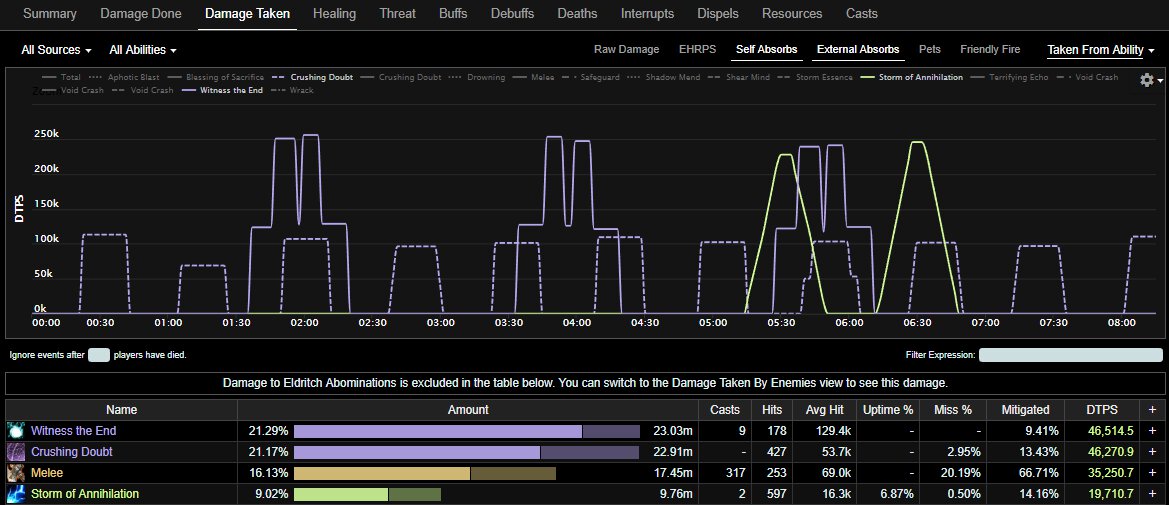
![]() Storm of Annihilation,
Storm of Annihilation, ![]() Witness the End, and
Witness the End, and ![]() Crushing Doubt
will be your primary targets for cooldowns. Depending on the strategy your guild
uses, you can abuse
Crushing Doubt
will be your primary targets for cooldowns. Depending on the strategy your guild
uses, you can abuse ![]() Rapture to assist in keeping players alive with
nine stacks of
Rapture to assist in keeping players alive with
nine stacks of ![]() Promises of Power through the damage from
Promises of Power through the damage from ![]() Crushing Doubt.
This allows your group to achieve a much higher uptime on Promises of Power
compared to a group that does not have this option. As seen above, Crushing
Doubt is 45 seconds apart, which means you will have Rapture available for every
other cast. The first cast, however, no raid member will have high enough stacks
of Promises of Power to warrant using Rapture. Aim to use Rapture on Crushing
Doubt casts 2, 4, 6, 8, 10, etc. Where exactly you use
Crushing Doubt.
This allows your group to achieve a much higher uptime on Promises of Power
compared to a group that does not have this option. As seen above, Crushing
Doubt is 45 seconds apart, which means you will have Rapture available for every
other cast. The first cast, however, no raid member will have high enough stacks
of Promises of Power to warrant using Rapture. Aim to use Rapture on Crushing
Doubt casts 2, 4, 6, 8, 10, etc. Where exactly you use ![]() Evangelism and
Evangelism and
![]() Shadowfiend is going to depend on your specific guild's strategy, but
try to ensure you have them both available for the Crushing Doubt, Witness the
End, Storm of Annihilation overlap, as it is the most deadly point of the fight.
Shadowfiend is going to depend on your specific guild's strategy, but
try to ensure you have them both available for the Crushing Doubt, Witness the
End, Storm of Annihilation overlap, as it is the most deadly point of the fight.
Tips
General Tips
- Run away from the raid with
 Crushing Doubt.
 - Stay away from the player that has aggro on Zaxasj.
- Soak
 Void Crash after it lands and reduces in size twice.
 - Avoid
 Cerebral Assault.
Healing Tips
- In this encounter, there are three relics of power that the bosses will activate upon reaching 75%, 50%, and 25% health.
- The debuff
 Embrace of the Void does not affect absorbs.
 - Ensure no raid members are low health when
 Witness the End is
about to finish casting.
Witness the End is
about to finish casting.  Promises of Power does grant extra damage and this is a
buff that should not be immediately dispelled from all raid members. Coordinate
dispelling of this debuff with your raid team to ensure appropriate uptime
without risking any deaths. Dispelling it will also deal damage to the player
dispelling it, so make sure you are healthy before dispelling it.
Promises of Power does grant extra damage and this is a
buff that should not be immediately dispelled from all raid members. Coordinate
dispelling of this debuff with your raid team to ensure appropriate uptime
without risking any deaths. Dispelling it will also deal damage to the player
dispelling it, so make sure you are healthy before dispelling it.- Tempest Caller creates
 Storm of Annihilation, which will deal
ticking Nature damage for 15 seconds to the entire raid, and kills anyone who
drops below 25% with
Storm of Annihilation, which will deal
ticking Nature damage for 15 seconds to the entire raid, and kills anyone who
drops below 25% with  Annihilate. You should be trying to use
 Evangelism and
  Shadowfiend during this ability.
Uu'nat, Harbinger of the Void
Damage Patterns and Cooldown Usage
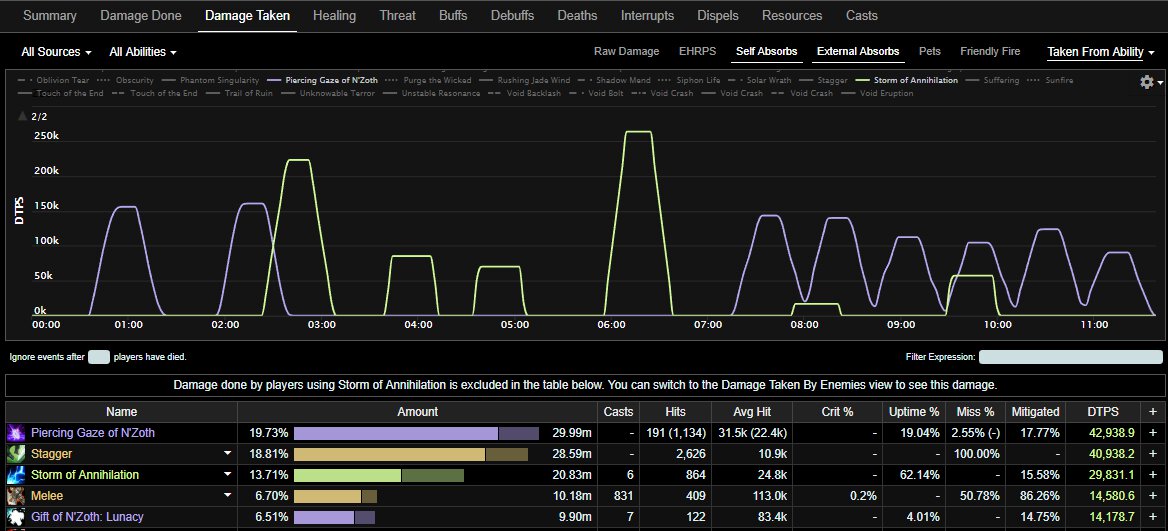
![]() Piercing Gaze of N'Zoth and
Piercing Gaze of N'Zoth and ![]() Storm of Annihilation are
by far the primary sources of damage in this fight. Ensure you have
Storm of Annihilation are
by far the primary sources of damage in this fight. Ensure you have ![]() Evangelism
or
Evangelism
or ![]() Rapture for as many of these casts as possible.
Rapture for as many of these casts as possible.
Tips
General Tips
- Do not come into contact with
 Oblivion Tears until the Void
Stone relic is used.
Oblivion Tears until the Void
Stone relic is used. - Attempt to spawn Oblivion Tears near the edges of the play
area by standing out of the center.
- When
 Piercing Gaze of N'Zoth appears, allow one beam to hit you,
wait for the debuff this applies to expire, and then let the other beam hit you.
Piercing Gaze of N'Zoth appears, allow one beam to hit you,
wait for the debuff this applies to expire, and then let the other beam hit you. - Stay inside the safe area when
 Gift of N'Zoth: Obscurity occurs.
 - During Phase Two, attempt to kill all of the adds with the Tempest
Caller relic before
 Gift of N'Zoth: Hysteria occurs.
 - During Phase Two, beware of Unknowable Terror. The
danger zone for this ability is very large.
- During Phase Three, stand near players with
 Insatiable Torment
to allow them to heal from
Insatiable Torment
to allow them to heal from  Feed on the Unworthy.
Healing Tips
- Tempest Caller creates Storm of Annihilation, which will deal
ticking Nature damage for 15 seconds to the entire raid, and kills anyone who
drops below 25% with Annihilate. You should be trying to use
Evangelism and Shadowfiend during this ability.
- During Phase 3, Uu'nat will cast
 Gift of N'Zoth: Lunacy at 100
energy. This prevents healing done to allies for the duration and you should aim
to have your raid healthy before it happens. Keep in mind that the healing
reduction does not affect shields. If you find yourself losing players during
this event often, consider saving rapture for this period.
Gift of N'Zoth: Lunacy at 100
energy. This prevents healing done to allies for the duration and you should aim
to have your raid healthy before it happens. Keep in mind that the healing
reduction does not affect shields. If you find yourself losing players during
this event often, consider saving rapture for this period.
Changelog
- 24 Jun. 2019: This page has been reviewed for the release of Patch 8.2 and no changes are necessary.
- 12 May 2019: Updated guide with Live data instead of PTR testing. .
- 16 Apr. 2019: Guide added.

