

High Tinker Mekkatorque Strategy Guide in Battle of Dazar'alor Raid

Welcome to our guide for High Tinker Mekkatorque, a Horde-only encounter in the Battle of Dazar'alor raid. Here, you will first find a quick breakdown by role following by a detailed strategy to defeat High Tinker Mekkatorque.
Lore
High Tinker Mekkatorque is a three phase encounter that requires precise movement and positioning, as well as excellent communication between raiders.
Unrivaled in their ingenuity, Gelbin Mekkatorque's inventions have been instrumental to the Alliance's attack on Dazar'alor. His state-of-the-art armor is outfitted with the latest--and deadliest-- ordnance that gnomish engineering can offer.
TL;DR
Tanks
- Tank the boss near the center of the play area.
- Taunt the boss at 10 stacks of
 Electroshock Amplification.
 - Tanks can be targeted by
 Gigavolt Charge and
 World Enlarger; be prepared to occasionally take significantly higher
stacks than normal unless you are using 3 tanks.
World Enlarger; be prepared to occasionally take significantly higher
stacks than normal unless you are using 3 tanks.
Healers
 Crash Down will cause a spike of raid damage.
- Top off players with Gigavolt Charge before they have to line of
sight you.
- Be prepared for high tank damage in Phase Three.
DPS
- Ranged DPS spread out around the boss.
- Spark Bots take 99% less damage; only attack them if you gain single target damage by doing so.
Everyone
- Line of sight the raid using rocks or buildings before
Gigavolt Charge expires.
- Side-step away from
 Buster Cannon if targeted.
 - Beware of Crash Down; standing within the radius will be
lethal.
- If you become
 Shrunk during Phase One or Three, enter a
Spark Bot and prepare to exchange shutdown codes with the other players
in Spark Bots.
Shrunk during Phase One or Three, enter a
Spark Bot and prepare to exchange shutdown codes with the other players
in Spark Bots. - During Phase Two, avoid being near Shrunk players while
dodging Explosive Sheep.
Positioning
- During Phase One and Three, the boss should be near the center of the room and the raid should attempt to spread evenly around the boss.
- When affected by Gigavolt Charge, stay within sight of healers
until your debuff is close to expiring, then exit line of sight.
- During Phase Two, Shrunk players should congregate in a
separate area to avoid being
 Trampled.
Bloodlust/Heroism/Time Warp
We advise you to use ![]() Bloodlust/
Bloodlust/![]() Heroism/
Heroism/![]() Time Warp
at the start of Phase Three, as there is no benefit to pushing Phase One
faster, and Phase Three is harder on tanks.
Time Warp
at the start of Phase Three, as there is no benefit to pushing Phase One
faster, and Phase Three is harder on tanks.
Abilities
Phase one: For Gnomeregan!
Phase One will last until High Tinker Mekkatorque reaches 40% health.
Electroshock Strikes
![]() Electroshock Strikes is an ability that makes each of Mekkatorque's
melee attacks deal additional Nature damage and apply
Electroshock Strikes is an ability that makes each of Mekkatorque's
melee attacks deal additional Nature damage and apply
![]() Electroshock Amplification to his target. This stacks and increases the
damage of Electroshock Strikes by 15% per stack. Electroshock Amplification
stacks will drop if Mekkatorque attacks a different target.
Electroshock Amplification to his target. This stacks and increases the
damage of Electroshock Strikes by 15% per stack. Electroshock Amplification
stacks will drop if Mekkatorque attacks a different target.
Buster Cannon
Mekkatorque will target a random player and fire his ![]() Buster Cannon
at them. Buster Cannon travels in a straight line towards the target, dealing
heavy damage to any players struck. Additionally, it will apply a moderate DoT
and reduce the player's Haste by 100% for 8 seconds.
Buster Cannon
at them. Buster Cannon travels in a straight line towards the target, dealing
heavy damage to any players struck. Additionally, it will apply a moderate DoT
and reduce the player's Haste by 100% for 8 seconds.
Blast Off/Crash Down
Approximately every 60 seconds, Mekkatorque targets a ranged player and
begins to cast ![]() Blast Off. Blast Off has a 3 second cast time and will
deal heavy damage to any player within 10 yards. Mekkatorque will then fly into
the air briefly, and
Blast Off. Blast Off has a 3 second cast time and will
deal heavy damage to any player within 10 yards. Mekkatorque will then fly into
the air briefly, and ![]() Crash Down on the targeted location. Crash Down
will deal lethal damage to any player within the 12 yard radius, and moderate
damage to all players in the raid.
Crash Down on the targeted location. Crash Down
will deal lethal damage to any player within the 12 yard radius, and moderate
damage to all players in the raid.
Gigavolt Charge
Approximately every 40 seconds, Mekkatorque will apply
![]() Gigavolt Charge to 3 random players, dealing minor damage over 15
seconds. When Gigavolt Charge expires, it will trigger
Gigavolt Charge to 3 random players, dealing minor damage over 15
seconds. When Gigavolt Charge expires, it will trigger ![]() Gigavolt Blast,
applying a 30-second DoT to any player in line of sight of the player with
Gigavolt Charge.
Gigavolt Blast,
applying a 30-second DoT to any player in line of sight of the player with
Gigavolt Charge.
Wormhole Generator
![]() Wormhole Generator is an ability Mekkatorque uses to mark a random
player; after 5 seconds all players are teleported to the marked player.
Wormhole Generator is an ability Mekkatorque uses to mark a random
player; after 5 seconds all players are teleported to the marked player.
World Enlarger
![]() World Enlarger is an ability Mekkatorque uses to shrink 3 random
players for 30 seconds, allowing them to tamper with Spark Bots (more
on this below).
World Enlarger is an ability Mekkatorque uses to shrink 3 random
players for 30 seconds, allowing them to tamper with Spark Bots (more
on this below).
![]() Shrunk players deal 99% reduced damage. If a player unaffected by
World Enlarger steps on a Shrunk player, the Shrunk player will be
Shrunk players deal 99% reduced damage. If a player unaffected by
World Enlarger steps on a Shrunk player, the Shrunk player will be
![]() Trampled, suffering heavy
damage and will be stunned for 1 second.
Trampled, suffering heavy
damage and will be stunned for 1 second.
Deploy Spark Bot
Approximately every 20 seconds, Spark Bots will be deployed. Spark
Bots move randomly while repeatedly casting ![]() Spark Pulse, which deals
moderate damage and stuns all players within 8 yards. Additionally, Spark Pulse
deals minor damage to several random players. Spark Bots do not attack and do
not need to be tanked. They take 99% reduced
damage, but can be tampered with by
Spark Pulse, which deals
moderate damage and stuns all players within 8 yards. Additionally, Spark Pulse
deals minor damage to several random players. Spark Bots do not attack and do
not need to be tanked. They take 99% reduced
damage, but can be tampered with by ![]() Shrunk players.
Shrunk players.
Players entering Spark Bots will need to enter the correct shutdown
code in the special action bar they are provided with in order to destroy the
bot. The shutdown code can not be seen by the player inside the bot, only by
other players (in Heroic mode, only players in a Spark Bot can see codes of
other Spark Bots, but not of their own Bot). If the shutdown code is entered
incorrectly, the player will suffer ![]() Anti-Tampering Shock, which applies
a 12-second stun and a heavy damage over time effect, also knocking the player
out of the Bot.
Anti-Tampering Shock, which applies
a 12-second stun and a heavy damage over time effect, also knocking the player
out of the Bot.
The shutdown code is comprised of a sequence of 3 symbols (out of several on the action bar).
Phase Two: Evasive Maneuvers!
During Phase Two, Mekkatorque lifts off and assaults players from the air.
During this phase, ![]() Gigavolt Charge and
Gigavolt Charge and ![]() World Enlarger will
still occur. The phase ends after a certain amount of time, but we are not
yet sure how long this is yet.
World Enlarger will
still occur. The phase ends after a certain amount of time, but we are not
yet sure how long this is yet.
Signal Exploding Sheep
![]() Signal Exploding Sheep calls down a herd of Explosive Sheep,
covering the majority of the platform. The sheep begin to cast
Signal Exploding Sheep calls down a herd of Explosive Sheep,
covering the majority of the platform. The sheep begin to cast
![]() Critter Explosion; when the 3-second cast finishes, the sheep will deal
lethal damage to any players within 8 yards. Additionally, they will fire
Critter Explosion; when the 3-second cast finishes, the sheep will deal
lethal damage to any players within 8 yards. Additionally, they will fire
![]() Sheep Shrapnel in every direction, inflicting heavy damage and applying
a minor damage over time effect to any players struck.
Sheep Shrapnel in every direction, inflicting heavy damage and applying
a minor damage over time effect to any players struck.
The Sheep do not need to be tanked or killed, as they will disappear when they explode.
Phase Three: Hyperdrive!
Mekkatorque returns to the ground during this phase, and continues to use
all the abilities from Phase One, as well as ![]() Signal Exploding Sheep, in
addition to one new ability.
Signal Exploding Sheep, in
addition to one new ability.
Hyperdrive
During Phase Three, Mekkatorque is consistently buffed with
![]() Hyperdrive, increasing his attack speed by 30% and periodically
launching Hyperdrive Discharge at random players, inflicting minor
damage.
Hyperdrive, increasing his attack speed by 30% and periodically
launching Hyperdrive Discharge at random players, inflicting minor
damage.
Strategy
Phase One
During Phase One, you will want to tank the boss in the center of the play
area. Ranged should attempt to spread evenly around the boss to prepare for
![]() Gigavolt Charge. Gigavolt Charge requires specific placements to avoid
harming the rest of the group. The image below indicates where the safest
placements are.
Gigavolt Charge. Gigavolt Charge requires specific placements to avoid
harming the rest of the group. The image below indicates where the safest
placements are.

The brown objects are structures within the play area that can be used for line of sight. The blue circle indicates where a player could stand, and the arrows indicate where the player's explosion would affect. Generally, you will want to place them behind the rocks, as that leaves the least potential for other players to be affected.
Players targeted by ![]() Buster Cannon need to quickly side-step to avoid
the blast. Players
Buster Cannon need to quickly side-step to avoid
the blast. Players ![]() Shrunk by
Shrunk by ![]() World Enlarger will need to
swiftly get inside a Spark Bot; other players should stop moving if
possible to allow the Shrunk players safe passage to the Spark Bot. On Normal,
difficulty any player can tell the players inside the Spark Bots which shutdown
code to use. On Heroic difficulty, only the other player inside a Spark Bot can
see the other Spark Bot's code. The code will appear above the Spark Bot's head,
as seen below.
World Enlarger will need to
swiftly get inside a Spark Bot; other players should stop moving if
possible to allow the Shrunk players safe passage to the Spark Bot. On Normal,
difficulty any player can tell the players inside the Spark Bots which shutdown
code to use. On Heroic difficulty, only the other player inside a Spark Bot can
see the other Spark Bot's code. The code will appear above the Spark Bot's head,
as seen below.

This example is where the player would tell this Spark Bot player to press the first keybind of the special action bar (alternatively often referred to by color, red in this case). Each Spark Bot will need to correctly enter 3 shutdown codes before shutting down.
On Normal difficulty, there will be 2 Spark Bots and any player outside of
the bot can see the code. To handle this, we recommend you assign one reliable
player to tell both ![]() Shrunk players what their code is from the
outside. Additionally, you will want to assign one more player as a backup in
case the primary caller is Shrunk.
Shrunk players what their code is from the
outside. Additionally, you will want to assign one more player as a backup in
case the primary caller is Shrunk.
On Heroic difficulty, there will be 3 Spark Bots and only players within other Spark Bots will be able to see shutdown codes. To handle this, we recommend assigning one player out of the three Shrunk players to call shutdown codes for both other players. One of the other players will need to call codes for the assigned player before leaving their bot.
Phase Two
During Phase Two, players will still be getting affected by
![]() World Enlarger and will still need to shut down Spark Bots. Players
need to dodge the
World Enlarger and will still need to shut down Spark Bots. Players
need to dodge the ![]() Sheep Shrapnel and
Sheep Shrapnel and ![]() Critter Explosions, while
being careful not to
Critter Explosions, while
being careful not to ![]() Trample
Trample ![]() Shrunk players.
Shrunk players should try to get into Spark Bots as soon as possible to allow
regular sized players to move freely. Ideally, the raid could designate an area
for the Shrunk players to go, allowing unrestricted movement for all players.
Players will need to avoid the corners, as
Shrunk players.
Shrunk players should try to get into Spark Bots as soon as possible to allow
regular sized players to move freely. Ideally, the raid could designate an area
for the Shrunk players to go, allowing unrestricted movement for all players.
Players will need to avoid the corners, as ![]() Gigavolt Charge will still
be going out as well. The boss is immune to damage while in the air, so
strictly focus on surviving during this phase.
Gigavolt Charge will still
be going out as well. The boss is immune to damage while in the air, so
strictly focus on surviving during this phase.
Phase Three
During Phase Three, ![]() Shrunk players will need to move to their
Spark Bots very quickly, as
Shrunk players will need to move to their
Spark Bots very quickly, as ![]() Signal Exploding Sheep occurring can
force other players to move. Players will need to be very careful not to take
unnecessary damage. Due to
Signal Exploding Sheep occurring can
force other players to move. Players will need to be very careful not to take
unnecessary damage. Due to ![]() Hyperdrive, tanks will be taking
significantly more damage, making healing much tighter.
Hyperdrive, tanks will be taking
significantly more damage, making healing much tighter.
Tank Concerns
During Phases One and Three, tanks should try to assure the boss remains
near the center of the room. Tanks should ideally drop
![]() Electroshock Amplification stacks at around 10. Try not to let this get
too high, as tanks can be targeted by
Electroshock Amplification stacks at around 10. Try not to let this get
too high, as tanks can be targeted by ![]() World Enlarger and
World Enlarger and
![]() Gigavolt Charge. While one tank is away, the other may need to suddenly
take significantly higher stacks than normal. Because of this, you may want to
consider 3 tanks for this encounter.
Gigavolt Charge. While one tank is away, the other may need to suddenly
take significantly higher stacks than normal. Because of this, you may want to
consider 3 tanks for this encounter.
Healing Concerns
There will be occasional spikes of damage from ![]() Crash Down, or if a
player failed to line of sight with
Crash Down, or if a
player failed to line of sight with ![]() Gigavolt Charge. However, the
majority of damage on this boss is avoidable, so most healing output needed
should be on tanks. In Phase Three especially, tanks will likely need large
amounts of healing. Players with Gigavolt Charge will need to line of sight you
so be sure they are topped early to prevent them from dying while behind the
wall.
Gigavolt Charge. However, the
majority of damage on this boss is avoidable, so most healing output needed
should be on tanks. In Phase Three especially, tanks will likely need large
amounts of healing. Players with Gigavolt Charge will need to line of sight you
so be sure they are topped early to prevent them from dying while behind the
wall.
Mythic Mode
Abilities
Mythic introduces a few new mechanics to the Mekkatorque encounter, as well as heavily altering many of the Normal/Heroic mechanics.
Gigavolt Radiation Zone
A zone of ![]() Gigavolt Radiation Zone spawns in the location
Gigavolt Radiation Zone spawns in the location ![]() Gigavolt Blast
was dropped. Standing in a Gigavolt Radiation Zone will apply Gigavolt Radiation, a
30-second debuff inflicting heavy damage every 2 seconds. The zone lasts 3 minutes.
Gigavolt Blast
was dropped. Standing in a Gigavolt Radiation Zone will apply Gigavolt Radiation, a
30-second debuff inflicting heavy damage every 2 seconds. The zone lasts 3 minutes.
Wormhole Generator
Similar to Heroic, ![]() Wormhole Generator picks one player and, after a
short time, every player in the raid will teleport to the selected player.
Additionally, three players will be knocked into the air, due to
Wormhole Generator picks one player and, after a
short time, every player in the raid will teleport to the selected player.
Additionally, three players will be knocked into the air, due to
![]() Miscalculated Teleport, and three players will be polymorphed, due to
Miscalculated Teleport, and three players will be polymorphed, due to
![]() Discombobulation.
Discombobulation.
Spark Shield
![]() Spark Shield causes Spark Bots to take 99% reduced damage, as well as
reflect moderate Nature damage to all attackers.
Spark Shield causes Spark Bots to take 99% reduced damage, as well as
reflect moderate Nature damage to all attackers.
World Enlarger
Similar to Heroic, ![]() World Enlarger will cause players to become
World Enlarger will cause players to become
![]() Shrunk. However, on Mythic, one player will also become
Shrunk. However, on Mythic, one player will also become ![]() Enormous,
dealing 10% more damage. Enormous players will
Enormous,
dealing 10% more damage. Enormous players will ![]() Trample normal-sized
players, stunning them for 1 second and inflicting heavy damage. If an Enormous
player steps on a Shrunk player, the Shrunk player will instantly die.
Trample normal-sized
players, stunning them for 1 second and inflicting heavy damage. If an Enormous
player steps on a Shrunk player, the Shrunk player will instantly die.
Anti-Tampering Protocol
On Mythic difficulty, the maximum time spent inside a Spark Bot is reduced to 25 seconds (45 on Heroic).
Strategy
The strategy for Mythic is similar to Heroic, however it will require perfect execution.
Phases 1 and 3
We recommend positioning as the graphic below illustrates:
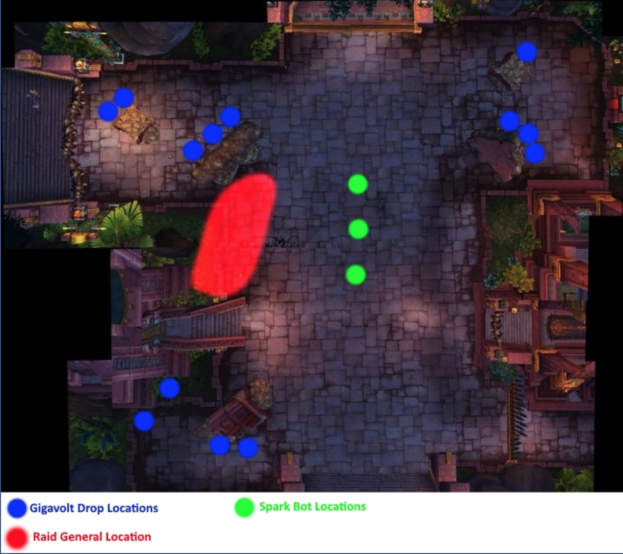
Each blue dot indicates a location players can drop ![]() Gigavolt Charge
without hitting the raid, given the raid is properly stacked in the red area.
Ideally, Spark Bots can be moved to a clean line near the center of the room
(indicated by green dots) and rooted in place.
Gigavolt Charge
without hitting the raid, given the raid is properly stacked in the red area.
Ideally, Spark Bots can be moved to a clean line near the center of the room
(indicated by green dots) and rooted in place.
Dropping ![]() Gigavolt Charges properly will be critical to success in the
fight.
Gigavolt Charges properly will be critical to success in the
fight. ![]() Gigavolt Radiation Zone lasts 3 minutes and you will consistently get 4
total sets of Gigavolt Charge before the radiation from the first set disappears.
Players will need to ensure they do not drop in locations that prevent
additional drops out of line of sight. For example, if a Gigavolt Radiation was
between the two blue dots on the top left rock, that would invalidate both drop
locations, forcing the 4th set to drop in an unconventional location. As long
as drops are cleanly placed, you will never run out of space.
Gigavolt Radiation Zone lasts 3 minutes and you will consistently get 4
total sets of Gigavolt Charge before the radiation from the first set disappears.
Players will need to ensure they do not drop in locations that prevent
additional drops out of line of sight. For example, if a Gigavolt Radiation was
between the two blue dots on the top left rock, that would invalidate both drop
locations, forcing the 4th set to drop in an unconventional location. As long
as drops are cleanly placed, you will never run out of space.
Handling Spark Bots is another critical factor to defeating this
boss. We recommend bringing two Death Knights and two Druids to this encounter.
Death Knights can alternate ![]() Death Grips to place Spark Bots in the
designated locations. The two Druids can alternate
Death Grips to place Spark Bots in the
designated locations. The two Druids can alternate ![]() Mass Entanglement
to keep the Spark Bots rooted in place. You could get by without two Death
Knights by using knockbacks to position the bots, but we see two Druids as being
essential to defeating this encounter.
Mass Entanglement
to keep the Spark Bots rooted in place. You could get by without two Death
Knights by using knockbacks to position the bots, but we see two Druids as being
essential to defeating this encounter.
Due to the reduced duration of ![]() Anti-Tampering Protocol, Spark Bot call
outs will need to be quite organized in order to complete the shutdown codes in
time. We recommend assigning one Spark Bot to be the “alpha” of the call outs.
The “alpha” quickly calls both other bots, then before leaving the bot, one of
the others calls the “alpha”. Our “alpha” bot was the bot positioned in the
center of the bot clump; this allowed players who were not comfortable rapidly
calling out to get in a side bot instead, and the confident
players went for the center bot. We recommend against using markers to call
shutdown codes, instead using player names. For example, instead of calling
“Purple red, blue blue,” which could become very confusing, we called
“Sham red, Vyn blue.” To simplify this further, there are WeakAuras available
that cause
Anti-Tampering Protocol, Spark Bot call
outs will need to be quite organized in order to complete the shutdown codes in
time. We recommend assigning one Spark Bot to be the “alpha” of the call outs.
The “alpha” quickly calls both other bots, then before leaving the bot, one of
the others calls the “alpha”. Our “alpha” bot was the bot positioned in the
center of the bot clump; this allowed players who were not comfortable rapidly
calling out to get in a side bot instead, and the confident
players went for the center bot. We recommend against using markers to call
shutdown codes, instead using player names. For example, instead of calling
“Purple red, blue blue,” which could become very confusing, we called
“Sham red, Vyn blue.” To simplify this further, there are WeakAuras available
that cause ![]() Shrunk players to repeatedly yell their character name in
game.
Shrunk players to repeatedly yell their character name in
game.
One of the most punishing mechanics on Mythic difficulty is
![]() Wormhole Generator. Due to the timing of the
Wormhole Generator. Due to the timing of the ![]() Miscalculated Teleport,
some classes will simply be unable to survive on their own. Each player affected
will need a displacement ability, such as
Miscalculated Teleport,
some classes will simply be unable to survive on their own. Each player affected
will need a displacement ability, such as ![]() Shimmer or
Shimmer or ![]() Heroic Leap.
Falling speed reductions, such as
Heroic Leap.
Falling speed reductions, such as ![]() Levitate, can also work if used quickly.
Classes without any abilities like these, such as Shamans or Death Knights, will
require external help. Horde players can take advantage of the Goblin racial
Levitate, can also work if used quickly.
Classes without any abilities like these, such as Shamans or Death Knights, will
require external help. Horde players can take advantage of the Goblin racial
![]() Rocket Jump, while others will need help from other players. The way we
recommend handling this is to have the players who can not save themselves
verbally call for a
Rocket Jump, while others will need help from other players. The way we
recommend handling this is to have the players who can not save themselves
verbally call for a ![]() Leap of Faith or
Leap of Faith or ![]() Blessing of Protection if
needed.
Blessing of Protection if
needed.
In Phase 3, there will be 4 Spark Bots for every ![]() World Enlarger,
causing you to gradually fall behind. Due to the 99% damage reduction
World Enlarger,
causing you to gradually fall behind. Due to the 99% damage reduction
![]() Shrunk players suffer, you will still want to send DPS into Spark Bots.
There is no healing reduction, so if healers are struggling to keep up,
you may want to consider leaving healers who become Shrunk out of bots to
continue healing. Additional bots should still be
Shrunk players suffer, you will still want to send DPS into Spark Bots.
There is no healing reduction, so if healers are struggling to keep up,
you may want to consider leaving healers who become Shrunk out of bots to
continue healing. Additional bots should still be ![]() Death Griped towards
the center of the room and rooted in place with the other bots.
Death Griped towards
the center of the room and rooted in place with the other bots.
Phase 2
Phase 2 is very similar to Heroic and we recommend designating a location for
![]() Shrunk players to congregate to. We set up the normal raid stack as
the Shrunk player area and had the rest of the players move away from them.
Shrunk players to congregate to. We set up the normal raid stack as
the Shrunk player area and had the rest of the players move away from them.
Bloodlust/Heroism/Time Warp
Similar to Heroic, we recommend that you use ![]() Bloodlust/
Bloodlust/![]() Heroism/
Heroism/![]() Time Warp
at the start of Phase 3.
Time Warp
at the start of Phase 3.
Class-specific Advice for High Tinker Mekkatorque
Changelog
- 29 Mar. 2019: Added Mythic mode.
- 23 Jan. 2019: Updated the guide a bit following live experience, especially with regard to Spark Bots.
- 18 Jan. 2019: Added TL;DR and Strategy sections and expanded the guide greatly.
- 23 Oct. 2018: Guide added.