

Lady Jaina Proudmoore Strategy Guide in Battle of Dazar'alor Raid

Welcome to our guide for Lady Jaina Proudmoore, a Horde-only encounter in the Battle of Dazar'alor raid. Here, you will first find a quick breakdown by role following by a detailed strategy to defeat Lady Jaina Proudmoore.
Fight Overview
The fight against Jaina is a 3-phase encounter that requires management of area denial, debuffs, and priority burst windows. It is the final boss in the Battle of Dazar'alor raid instance.
TL;DR
Tanks
- Clear poorly positioned patches of
 Searing Pitch with
 Avalanche or
  Freezing Blast.
 - Taunt swap in order to drop stacks of
 Ice Shard at around 10
stacks.
Ice Shard at around 10
stacks. - During Phase One, be sure to tank the boss near the ballista, but avoid being directly on one. The off tank should be prepared to use ballistas on the Kul Tiran Corsair ship.
- During Phase Two, tank the boss away from the center of the room, but within range of the next Unexploded Ordnances you intend to kill.
- During Phase Three, be sure to face the boss away from the raid and
towards a wall for
 Crystalline Dust.
Healers
 Ring of Ice will cause players to become rooted and take heavy
damage over time.
Ring of Ice will cause players to become rooted and take heavy
damage over time.- Be sure to dispel players affected by
 Grasp of Frost and
Hand of Frost as quickly as possible.
Grasp of Frost and
Hand of Frost as quickly as possible. - Players targeted by
 Siegebreaker Blast will take heavy damage when
it detonates.
Siegebreaker Blast will take heavy damage when
it detonates. - Help deal damage during the
 Flash Freeze Intermission and Phase
Three, if possible.
Flash Freeze Intermission and Phase
Three, if possible.
DPS
- Kill Ice Blocks to free players who become Frozen Solid.
- During Phase One, focus damage on the Kul Tiran Marines.
- During Phase Two, kill one Unexploded Ordnance at a time to
benefit from
 Warmth.
 - During Phase Three, quickly kill
 Prismatic Images.
 - Save DPS cooldowns for the end of Phase Two in order to swiftly kill the Ice Wall.
Everyone
- During Phase One
- Clear stacks of
 Chilling Touch by stepping in patches of
Searing Pitch.
Chilling Touch by stepping in patches of
Searing Pitch. - Stand outside the Ring of Ice when it detonates.
- Clear poorly positioned patches of Searing Pitch with
Avalanche.
- Stand in Searing Pitch if possible as Ring of Ice detonates, to immediately remove the root.
- Throw munition barrels off of the ship before they detonate.
- Clear stacks of
- During Phase Two, stand near Burning Barrels in order to clear
stacks of Chilling Touch, but be sure to move away before the barrel
explodes.
Positioning
- During Phase One, ranged should be spread between the boss and the back of the boat.
- During Phase Two, the raid should stay close to the boss if
possible, moving towards burning barrels for Warmth when able to.
- During Phase Three, the raid should begin on an Ordnance on the far side of the room, and end on the Ordnance near the entrance, as that is where Ice Wall will spawn.
- During Phase Three, the tank should face the boss away from the raid, and the raid should loosely stack behind the boss.
Bloodlust/Heroism/Time Warp
Due to the length of this fight, we advise you to use
![]() Bloodlust/
Bloodlust/![]() Heroism/
Heroism/![]() Time Warp during Phase Three, as it
can quickly become overwhelming.
Time Warp during Phase Three, as it
can quickly become overwhelming.
Abilities
Chilling Touch
Being affected by any of Jaina's Frost spells reduces movement speed by 3%
and inflicts minor Frost damage every 1 second, through an effect called
![]() Chilling Touch. This effect is present throughout the entire fight, and
it stacks. If this reaches 20 stacks and the player's health drops below 80%,
the player will become
Chilling Touch. This effect is present throughout the entire fight, and
it stacks. If this reaches 20 stacks and the player's health drops below 80%,
the player will become ![]() Frozen Solid, leaving them stunned for 30
seconds or until the Ice Block in which he is frozen is killed by other
players. Frozen players suffer increased Frost damage every second. The
duration of Chilling Touch is unlimited, but can be removed by burning barrels
and
Frozen Solid, leaving them stunned for 30
seconds or until the Ice Block in which he is frozen is killed by other
players. Frozen players suffer increased Frost damage every second. The
duration of Chilling Touch is unlimited, but can be removed by burning barrels
and ![]() Searing Pitch (explained below).
Searing Pitch (explained below).
Phase One: Burning Seas
During phase one, players will engage Jaina on her ship. Phase One ends when Jaina reaches 60% health.
Kul Tiran Corsair
During Phase One, after 15 seconds and every 60 seconds after that, another
boat (a Kul Tiran Corsair) will approach from either the left (port) or the
right (starboard) side of the ship. The enemy boat will summon two
Kul Tiran Marines (described below) and will ![]() Bombard your ship,
leaving behind patches of
Bombard your ship,
leaving behind patches of ![]() Searing Pitch. In order to stop the Kul Tiran
Corsairs you must use the ballista on the correct side of your ship to fire at
their ship.
Searing Pitch. In order to stop the Kul Tiran
Corsairs you must use the ballista on the correct side of your ship to fire at
their ship.
Each Kul Tiran Marine will fixate a random player and
![]() Set Charge, placing a munitions barrel on the ground. Munitions barrels
will explode after 40 seconds, inflicting heavy damage to all players unless it
is thrown off the ship. If a munitions barrel explodes it will also leave a
patch of
Set Charge, placing a munitions barrel on the ground. Munitions barrels
will explode after 40 seconds, inflicting heavy damage to all players unless it
is thrown off the ship. If a munitions barrel explodes it will also leave a
patch of ![]() Searing Pitch behind.
Searing Pitch behind.
Searing Pitch
Patches of ![]() Searing Pitch will form in locations struck by
Searing Pitch will form in locations struck by
![]() Bombard, or where a munitions barrel has exploded. Players can stand
in Searing Pitch to remove
Bombard, or where a munitions barrel has exploded. Players can stand
in Searing Pitch to remove ![]() Chilling Touch, but players also take Fire
damage while in the Searing Pitch.
Chilling Touch, but players also take Fire
damage while in the Searing Pitch.
Ice Shard
Jaina fires an ![]() Ice Shard at her target, inflicting moderate Physical
damage and increasing the damage of consecutive Ice Shards by 5% for 10
seconds. Ice Shard will always target the active tank; it has a 1.5-second cast
time and cannot be interrupted.
Ice Shard at her target, inflicting moderate Physical
damage and increasing the damage of consecutive Ice Shards by 5% for 10
seconds. Ice Shard will always target the active tank; it has a 1.5-second cast
time and cannot be interrupted.
Avalanche
Jaina hurls ice at the target's location every 1 second for 5 seconds,
inflicting moderate Frost damage if struck. ![]() Avalanche can be dodged by
continuing to move throughout the duration. Avalanche will always target the
active tank, and 2 additional members of the raid at random. Players can use
Avalanche to remove patches of Searing Pitch.
Avalanche can be dodged by
continuing to move throughout the duration. Avalanche will always target the
active tank, and 2 additional members of the raid at random. Players can use
Avalanche to remove patches of Searing Pitch.
Time Warp
Jaina casts ![]() Time Warp when she reaches 80% health, increasing
her Haste by 30% for 40 seconds.
Time Warp when she reaches 80% health, increasing
her Haste by 30% for 40 seconds.
Grasp of Frost
Approximately every 20 seconds, Jaina will cast ![]() Grasp of Frost on
approximately 15% of the raid at random, inflicting moderate damage, rooting the players, and applying a
stack of
Grasp of Frost on
approximately 15% of the raid at random, inflicting moderate damage, rooting the players, and applying a
stack of ![]() Chilling Touch every 2 seconds. This ability
can be dispelled.
Chilling Touch every 2 seconds. This ability
can be dispelled.
Ring of Ice
Every 60 seconds, Jaina will cast ![]() Ring of Ice, creating a large
circle, extending 30 yards in all directions. Players within the circle when
the cast finishes will take heavy damage and become
Ring of Ice, creating a large
circle, extending 30 yards in all directions. Players within the circle when
the cast finishes will take heavy damage and become ![]() Frozen Solid.
Players outside of the circle when the cast finishes will take minor damage and
become rooted in place. Additionally, the root can be dispelled, and will deal
damage over time while it lasts.
Frozen Solid.
Players outside of the circle when the cast finishes will take minor damage and
become rooted in place. Additionally, the root can be dispelled, and will deal
damage over time while it lasts.
Ice Block (Undocumented)
It appears that when the raid uses
![]() Bloodlust/
Bloodlust/![]() Heroism/
Heroism/![]() Time Warp, Jaina will enter an Ice
Block, rendering her invulnerable for 20 seconds. During Ice Block she also
will not use any of her abilities.
Time Warp, Jaina will enter an Ice
Block, rendering her invulnerable for 20 seconds. During Ice Block she also
will not use any of her abilities.
First Intermission: Howling Winds
When reaching 60% health, Jaina blinks away and conjures a powerful storm,
restricting the vision of all raid members. Additionally, she continually
assaults players with large ![]() Glacial Shards. Players must navigate their
way to Jaina's new position with limited visibility.
Glacial Shards. Players must navigate their
way to Jaina's new position with limited visibility.
The phase ends when players reach Jaina and interrupt her
![]() Howling Winds cast.
Howling Winds cast.
Glacial Shards
Coming into contact with ![]() Glacial Shards will inflict minor Frost
damage, and the player will become
Glacial Shards will inflict minor Frost
damage, and the player will become ![]() Frozen Solid.
Frozen Solid.
Blistering Tornado
Tornados litter the path to Jaina's new position, and coming into contact
with a ![]() Blistering Tornado inflicts heavy Frost damage and knocks
players away from the tornado.
Blistering Tornado inflicts heavy Frost damage and knocks
players away from the tornado.
Phase Two: Frozen Wrath
Phase Two lasts until Jaina reaches 30% health.
Throughout Phase Two, players will periodically gain a stack of
![]() Chilling Touch. Additionally, Jaina's frost spells leave pools of
Chilling Touch. Additionally, Jaina's frost spells leave pools of
![]() Arctic Ground, which increases the rate of Chilling Touch applications
to players standing in them.
Arctic Ground, which increases the rate of Chilling Touch applications
to players standing in them.
During this phase, Jaina will continue using ![]() Ice Shard and
Ice Shard and
![]() Avalanche (the latter with a few differences), as during Phase
One. In addition to this, there are several new abilities.
Avalanche (the latter with a few differences), as during Phase
One. In addition to this, there are several new abilities.
Broadside
Every 30 seconds, Jaina marks 3 players with ![]() Broadside, dealing
minor Arcane damage every 1 second for 10 seconds. When Broadside expires,
cannons will fire on the players' positions. If struck by the cannon, players
will take heavy damage.
Broadside, dealing
minor Arcane damage every 1 second for 10 seconds. When Broadside expires,
cannons will fire on the players' positions. If struck by the cannon, players
will take heavy damage.
Siegebreaker Blast
Approximately every 60 seconds, Jaina marks 1 player with
![]() Siegebreaker Blast. After 8 seconds, a powerful Arcane salvo is
launched towards the player dealing heavy Arcane damage to all players in its
path and knocking them back. The salvo will land 3 seconds after locking on,
and the damage is reduced the further players are from the detonation.
Siegebreaker Blast. After 8 seconds, a powerful Arcane salvo is
launched towards the player dealing heavy Arcane damage to all players in its
path and knocking them back. The salvo will land 3 seconds after locking on,
and the damage is reduced the further players are from the detonation.
Unexploded Ordnance
There are 3 undetonated munitions barrels in the Phase Two arena that can be used to your advantage, as explained below.
The 3 munition barrels are affected by ![]() Refractive Ice, causing the
barrels to take 99% reduced damage. Being struck by
Refractive Ice, causing the
barrels to take 99% reduced damage. Being struck by ![]() Broadside will
remove the ice.
Broadside will
remove the ice.
Upon reaching 1 health, unexploded ordinances will become burning barrels,
which create ![]() Warmth (which removes
Warmth (which removes ![]() Chilling Touch from players
within 20 yards and prevents further applications) and cannot be killed by
players. After 15 seconds the barrel explodes, inflicting heavy damage and
knocking back all players within 20 yards.
Chilling Touch from players
within 20 yards and prevents further applications) and cannot be killed by
players. After 15 seconds the barrel explodes, inflicting heavy damage and
knocking back all players within 20 yards.
Avalanche
![]() Avalanche is slightly changed from Phase One. In addition to
targeting the tank as before, with each Avalanche cast 3 claws of Frost fire
outward, inflicting moderate Frost damage and rooting players struck by this.
The root applies 1 stack of
Avalanche is slightly changed from Phase One. In addition to
targeting the tank as before, with each Avalanche cast 3 claws of Frost fire
outward, inflicting moderate Frost damage and rooting players struck by this.
The root applies 1 stack of ![]() Chilling Touch every 1 second, and can be
dispelled (the claws are technically
Chilling Touch every 1 second, and can be
dispelled (the claws are technically ![]() Hand of Frost).
Hand of Frost).
Glacial Ray
Approximately every 50 seconds, Jaina fires a ![]() Ray of Frost in a
random direction, dealing massive damage and applying
Ray of Frost in a
random direction, dealing massive damage and applying ![]() Arctic Ground in
a straight line across the platform.
Arctic Ground in
a straight line across the platform.
Icefall
Approximately every 60 seconds, Jaina calls down a large comet in a random
location dealing massive damage to players struck. Additionally, the comet
fires two additionally comets in a straight line dealing moderate Frost damage
to players in the way. The smaller comets also apply ![]() Arctic Ground.
Arctic Ground.
Second Intermission: Flash Freeze
Upon reach 30% health, Jaina teleports to the center of the arena and
channels ![]() Flash Freeze. We are currently unsure if she only channels
this for 60 seconds after which the Phase ends, or if the end of the phase is
linked to the death of Jaina's Tide Elemental (discussed below), but
we will update the guide as we know more.
Flash Freeze. We are currently unsure if she only channels
this for 60 seconds after which the Phase ends, or if the end of the phase is
linked to the death of Jaina's Tide Elemental (discussed below), but
we will update the guide as we know more.
Flash Freeze
![]() Flash Freeze is a slowly-expanding
ring of frost that takes about 20 seconds to reach the edges of the fighting
area. Anyone that comes into contact with this ring of frost is
Flash Freeze is a slowly-expanding
ring of frost that takes about 20 seconds to reach the edges of the fighting
area. Anyone that comes into contact with this ring of frost is
![]() Frozen Solid.
Frozen Solid.
Ice Wall
At the start of this phase, Jaina creates an Ice Wall that blocks the
exit from the fighting area. Destroying this Ice Wall (which has a very large
amount of health) allows the raid to escape the radius of
![]() Flash Freeze.
Flash Freeze.
Arcane Barrage
![]() Arcane Barrage bombards the fighting area throughout this phase,
inflicting heavy Arcane damage and knocking back nearby players.
Arcane Barrage bombards the fighting area throughout this phase,
inflicting heavy Arcane damage and knocking back nearby players.
Jaina's Tide Elemental
Upon killing the Ice Wall, you will be met with an add called Jaina's Tide Elemental. This elemental has a few different abilities.
![]() Heart of Frost is a debuff that the elemental places on random
raid members, causing them to burst, dealing minor Frost damage to all nearby
allies.
Heart of Frost is a debuff that the elemental places on random
raid members, causing them to burst, dealing minor Frost damage to all nearby
allies.
![]() Water Bolt Volley deals moderate Frost damage to all players, and
this can be interrupted.
Water Bolt Volley deals moderate Frost damage to all players, and
this can be interrupted.
Finally, the Tide Elemental will cast ![]() Frost Nova when it
reaches 100 Energy. This damages and roots all players in a 12-yard radius.
Frost Nova when it
reaches 100 Energy. This damages and roots all players in a 12-yard radius.
Phase Three: Daughter of the Sea
Please note that prior to the live release of the raid, there is very little information about this stage of the fight, so this section could change drastically once we experience the fight on live servers.
During this phase, players will continue periodically gaining stacks of
![]() Chilling Touch. Additionally, Jaina will continue casting some of her
previous abilities (
Chilling Touch. Additionally, Jaina will continue casting some of her
previous abilities (![]() Broadside,
Broadside, ![]() Siegebreaker Blast,
Siegebreaker Blast,
![]() Ice Shard,
Ice Shard, ![]() Glacial Ray, and
Glacial Ray, and ![]() Icefall, the last two of
which apply
Icefall, the last two of
which apply ![]() Arctic Ground).
Arctic Ground).
In addition to this, Jaina uses 4 new abilities.
Orb of Frost
A large orb fixates on a player; other players coming into contact with the
orb will take moderate Frost damage and reduce the power of the orb. Upon
reaching its target or running out of power, the orb will detonate, dealing
moderate raid-wide Frost damage and applying ![]() Chilling Touch stacks
based the
Chilling Touch stacks
based the ![]() Orb of Frost's remaining power level.
Orb of Frost's remaining power level.
Crystalline Dust
![]() Crystalline Dust is a frontal cone attack dealing heavy Frost
damage.
Crystalline Dust is a frontal cone attack dealing heavy Frost
damage.
Shattering Lance
If a player becomes ![]() Frozen Solid, a lance forms near Jaina. After a
few seconds, the lance fires in a line towards the frozen target, inflicting
moderate Frost damage to all players struck. Frozen targets take triple
damage.
Frozen Solid, a lance forms near Jaina. After a
few seconds, the lance fires in a line towards the frozen target, inflicting
moderate Frost damage to all players struck. Frozen targets take triple
damage.
Prismatic Image
![]() Prismatic Image creates an add that does not need to be tanked and
that, while alive, will mimic Jaina's
Prismatic Image creates an add that does not need to be tanked and
that, while alive, will mimic Jaina's ![]() Icefall,
Icefall, ![]() Glacial Ray,
and
Glacial Ray,
and ![]() Shattering Lance spells, effectively doubling the amount of these
casts while the add is alive.
Shattering Lance spells, effectively doubling the amount of these
casts while the add is alive.
Strategy
Phase One
At the start, the tanks should move Jaina towards the ballistas for ease of access to fire at the Kul Tiran Corsairs.
If ![]() Searing Pitch reaches a ballista, it will catch fire and no
longer work, and you must clear the Searing Pitch in order for it to regain
functionality. The off-tank and a few assigned DPS and healers should focus on using the ballistas on Kul Tiran
Corsair boats. Ranged DPS should try to spread between the boss and the back of
the boat (the location the boss spawned at). When a munitions barrel is placed,
the ranged should generally be the closest to it and they are the ideal players
to throw them overboard.
Searing Pitch reaches a ballista, it will catch fire and no
longer work, and you must clear the Searing Pitch in order for it to regain
functionality. The off-tank and a few assigned DPS and healers should focus on using the ballistas on Kul Tiran
Corsair boats. Ranged DPS should try to spread between the boss and the back of
the boat (the location the boss spawned at). When a munitions barrel is placed,
the ranged should generally be the closest to it and they are the ideal players
to throw them overboard.
When ![]() Ring of Ice is used, this is a good time for melee to clear
their stacks of
Ring of Ice is used, this is a good time for melee to clear
their stacks of ![]() Chilling Touch, and ranged need to make sure they do
not destroy all the patches near the back of the boat. The raid will want to
dip into a patch of
Chilling Touch, and ranged need to make sure they do
not destroy all the patches near the back of the boat. The raid will want to
dip into a patch of ![]() Searing Pitch as Ring of Ice detonates to dispel
the roots.
Searing Pitch as Ring of Ice detonates to dispel
the roots.
If tanks are struggling to survive during Jaina's ![]() Time Warp,
you can consider using
Time Warp,
you can consider using ![]() Bloodlust/
Bloodlust/![]() Heroism/
Heroism/![]() Time Warp
here to force her to Ice Block and lose most of her buff. However, by doing
this, you will very likely not be able to use it again later.
Time Warp
here to force her to Ice Block and lose most of her buff. However, by doing
this, you will very likely not be able to use it again later.
Phase Two
The primary objective of Phase Two is to make the most out of the space you have and of the three Unexploded Ordnances on the platform. The three Unexploded Ordnances will spawn in designated locations. At the end of Phase Two, you will want to be near the area you entered the Phase Two play area from, as that is the location the Ice Wall will spawn in the intermission. In order to do this, follow the image below.
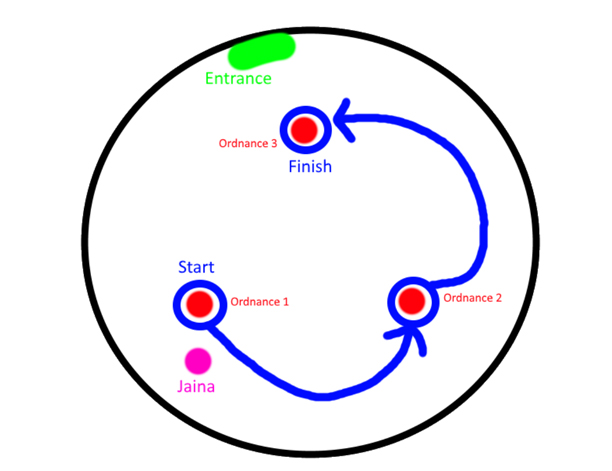
You will enter the area on green, run past the ordnance directly in front of
you to the listed "Ordnance 1" (this will also be the closest ordnance to
Jaina). After using this ordnance to drop your stacks of
![]() Chilling Touch, move to Ordnance 2, then to Ordnance 3. Ideally you
finish the phase around Ordnance 3 and can immediately begin damaging the Ice
Wall that will spawn at the entrance.
Chilling Touch, move to Ordnance 2, then to Ordnance 3. Ideally you
finish the phase around Ordnance 3 and can immediately begin damaging the Ice
Wall that will spawn at the entrance.
While doing this, the raid should be attempting to leave as much of the play
area as clear as possible. The active tank will still be getting
![]() Avalanche, which will now leave
Avalanche, which will now leave ![]() Arctic Ground. Tanking Jaina
near the wall allows the tank to drop Avalanche along the wall to prevent other
raid members from being disrupted by it.
Arctic Ground. Tanking Jaina
near the wall allows the tank to drop Avalanche along the wall to prevent other
raid members from being disrupted by it.
Second Intermission
During this Intermission, you will have 20 seconds to kill the Ice Wall
before the raid becomes ![]() Frozen Solid. DPS will want to save their
cooldowns for this, healers should help deal damage as well. When the Ice Wall
dies, it will open a new path; quickly run through to avoid Flash Freeze. Once
through, focus down Ice Blocked Nathanos to stop the Flash Freeze. After
Nathanos is freed, Jaina will begin casting
Frozen Solid. DPS will want to save their
cooldowns for this, healers should help deal damage as well. When the Ice Wall
dies, it will open a new path; quickly run through to avoid Flash Freeze. Once
through, focus down Ice Blocked Nathanos to stop the Flash Freeze. After
Nathanos is freed, Jaina will begin casting ![]() Arcane Barrage.
Arcane Barrage.
You will need to interrupt Jaina's ![]() Arcane Barrage in order to
move on to Phase Three. However, before interrupting you should attempt to
bring Jaina's Tide Elemental back to Jaina and kill it first. While
killing it, beware of Arcane Barrage, attempt to interrupt every
Arcane Barrage in order to
move on to Phase Three. However, before interrupting you should attempt to
bring Jaina's Tide Elemental back to Jaina and kill it first. While
killing it, beware of Arcane Barrage, attempt to interrupt every
![]() Water Bolt Volley and spread out with
Water Bolt Volley and spread out with ![]() Heart of Frost. Just
before Jaina's Tide Elemental reaches 100 Energy, try to be 12 or more yards
away from it to avoid
Heart of Frost. Just
before Jaina's Tide Elemental reaches 100 Energy, try to be 12 or more yards
away from it to avoid ![]() Frost Nova.
Frost Nova.
Phase Three
During Phase Three, your primary concern will be ![]() Chilling Touch
stacks. There is no way to drop or prevent the stacks from accumulating, so
every player is likely to become
Chilling Touch
stacks. There is no way to drop or prevent the stacks from accumulating, so
every player is likely to become ![]() Frozen Solid at some point. Since you
are unable to prevent, this you want to coordinate it. You should split the
raid in to groups to soak
Frozen Solid at some point. Since you
are unable to prevent, this you want to coordinate it. You should split the
raid in to groups to soak ![]() Orb of Frost, as players soaking that will
gain stacks of Chilling Touch quite quickly. The orb moves fairly slowly so
players can follow it to soak it multiple times. Players with immunities such
as
Orb of Frost, as players soaking that will
gain stacks of Chilling Touch quite quickly. The orb moves fairly slowly so
players can follow it to soak it multiple times. Players with immunities such
as ![]() Ice Block and
Ice Block and ![]() Divine Shield can drop their Chilling Touch
stacks, so they are good candidates to repeatedly soak the same orb.
Divine Shield can drop their Chilling Touch
stacks, so they are good candidates to repeatedly soak the same orb.
Ideally you can leave a few specs with exceptional AoE burst out of the
soaking groups, then cause up to half the raid to become Frozen Solid at once
and quickly burst the Ice Blocks down. Players approaching 20 stacks of
![]() Chilling Touch should make a greater effort to remain within cleave
range of the boss at all times.
Chilling Touch should make a greater effort to remain within cleave
range of the boss at all times.
Throughout the phase, you will want to be near the edge of the room; tanks
should face Jaina towards the wall while the raid loosely stacks behind her.
Only ![]() Glacial Ray and
Glacial Ray and ![]() Icefall will cause
Icefall will cause ![]() Arctic Ground
in this phase, so movement is relatively light. When a player becomes
Arctic Ground
in this phase, so movement is relatively light. When a player becomes
![]() Frozen Solid, other players should attempt to break the Ice Block
before
Frozen Solid, other players should attempt to break the Ice Block
before ![]() Shattering Lance hits; if they fail to do so the player will
likely die unless they are full health.
Shattering Lance hits; if they fail to do so the player will
likely die unless they are full health.
You will likely need to use ![]() Bloodlust/
Bloodlust/![]() Heroism during Phase Three; you could do so when a large amount of players become Frozen Solid, when
Heroism during Phase Three; you could do so when a large amount of players become Frozen Solid, when ![]() Prismatic Image spawns, or even near the end to burn the boss and
ignore a Prismatic Image.
Prismatic Image spawns, or even near the end to burn the boss and
ignore a Prismatic Image.
Tank Concerns
Tank concerns on this boss are primarily going to be about positioning. The boss being properly positioned is hugely influential to the success of the raid.
During Phase One, the off-tank should be attempting to handle as many
mechanics as possible while waiting for their ![]() Ice Shard stacks to
drop.
Ice Shard stacks to
drop.
During Phase Two, the active tank needs to bring the boss around the room as
the raid goes through ordnances together. Additionally, the tank needs to be
careful where they drop their ![]() Avalanche.
Avalanche.
During Phase Three, the tanks need to be very cautious with
![]() Crystalline Dust. The tanks also need to be sure they do not both
become
Crystalline Dust. The tanks also need to be sure they do not both
become ![]() Frozen Solid at the same time, even if they must force one tank
to become frozen to do so.
Frozen Solid at the same time, even if they must force one tank
to become frozen to do so.
Healing Concerns
Due to the sheer length of this fight, the primary concern for healers is generally going to be Mana efficiency. However, there are some mechanics that cause the raid to take fairly heavy damage.
During Phase One, the most troubling mechanic will be ![]() Ring of Ice.
Ring of Ice will cause the raid to take moderate damage and also become rooted.
Healers will need to dispel as quickly as possible to avoid high stacks of
Ring of Ice.
Ring of Ice will cause the raid to take moderate damage and also become rooted.
Healers will need to dispel as quickly as possible to avoid high stacks of
![]() Chilling Touch, and to allow the raid to get back to their normal
positions.
Chilling Touch, and to allow the raid to get back to their normal
positions.
During Phase Two, healers should be prepared to spot heal players with
![]() Siegebreaker Blast, and to some extent
Siegebreaker Blast, and to some extent ![]() Broadside. During the
Broadside. During the
![]() Flash Freeze intermission, healers should be contributing as much
damage as they can to help the raid kill the Ice Wall in time.
Flash Freeze intermission, healers should be contributing as much
damage as they can to help the raid kill the Ice Wall in time.
During Phase Three, healers will likely be dealing with constant attrition
as well as occasional bursts of damage via ![]() Orb of Frost. This phase will
become significantly harder as it progresses, so if possible healers should be
doing damage as well.
Orb of Frost. This phase will
become significantly harder as it progresses, so if possible healers should be
doing damage as well.
Class-specific Advice for Lady Jaina Proudmoore
Changelog
- 30 Jan. 2019: Updated the page following live experience.
- 18 Jan. 2019: Added TL;DR and Strategy sections and greatly expanded ability section.
- 23 Oct. 2018: Guide added.