
On this page, you will find tips, tricks, and strategies tailored to your Discipline Priest for each boss of the following raid: Ny'alotha. All our content is updated for World of Warcraft Patch Dragonflight 10.2.5.
Introduction
In this section, you will find information and guidance for healing each boss individually in the Ny'alotha raid as a Discipline Priest. These are not complete encounter guides, but rather provide specific tips for healing the bosses as a Discipline Priest.
The tips on this page are based on PTR testing alone and may not reflect the state of encounters on live servers. This page will be updated with new information once the encounters have been experienced and killed on their respective difficulties.
Talent and Essence Cheatsheet
Wrathion, the Black Emperor
For more general fight tips, refer to our Wrathion, the Black Emperor guide.
Damage Analysis
Damage Type: Scripted Burst and Ramping Sustained
Damage Pattern Example:
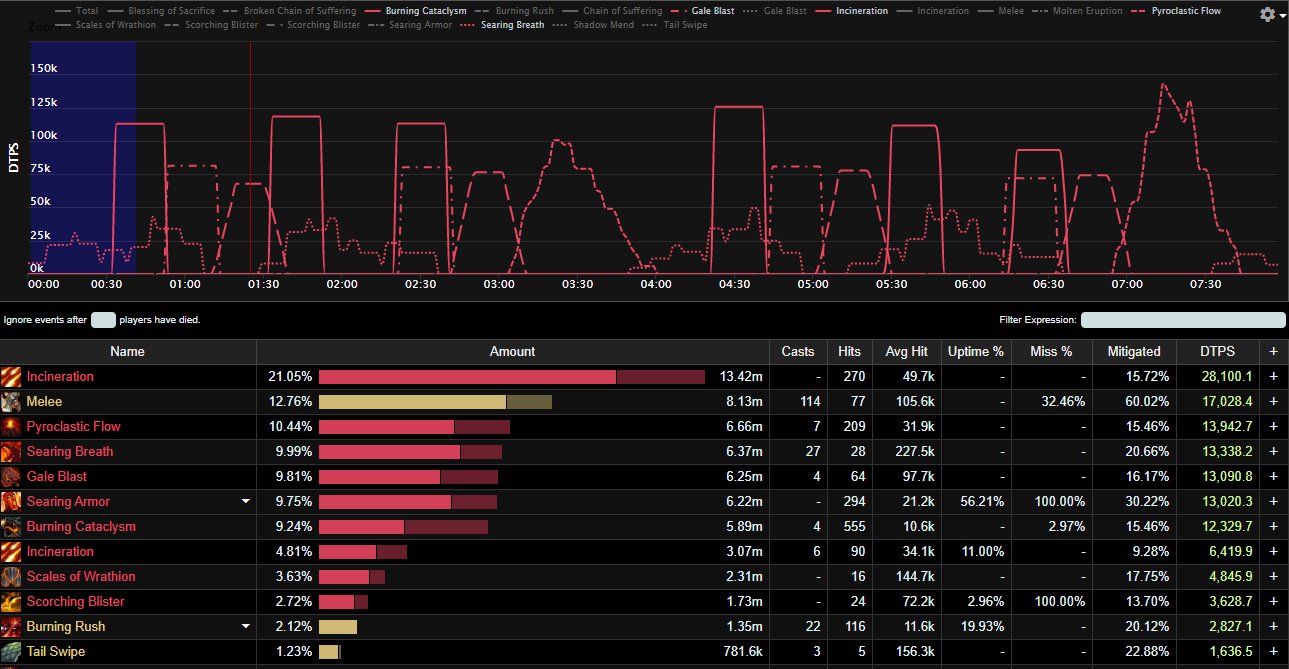
Important Abilities:
| Ability Name | Ability Description | Frequency/Trigger |
|---|---|---|
| Incineration | Ignites random targets, inflicting Fire damage every 2 seconds for 8 seconds. Upon expiration, the target explodes, inflicting Fire damage to all players. Damage decreases the further targets are from the point of impact | Every 40-60 seconds during Phase 1 |
| Gale Blast | After 4 seconds, Unleashes a gale blast, inflicting fire damage, and knocking players back within 30 yards, as well as inflicting less fire damage to all players outside of 30 yards. Afterwards, launches fire balls at random enemy destinations that inflict fire damage to enemies within 5 yards of impact | Every minute and a half during Phase 1 |
| Rising Heat | As lava pillars consume the space, heat rising inflicting fire damage every 1 second for the duration of the encounter. | All pillars should be cleared during intermission on Normal and Heroic difficulties. On Mythic, not all pillars will be destroyed, so Rising Heat damage will increase for each intermission phase |
Talents and Essences
Talents
Essences
We advise you to use the following essences against Wrathion, the Black Emperor.
- Major Slot
- The Ever-Rising Tide — Rank 3:
 Overcharge Mana +
  The Ever-Rising Tide
- The Ever-Rising Tide — Rank 3:
- Minor Slots
- Memory of Lucid Dreams — Rank 3:
 Lucid Dreams
 - Conflict and Strife — Rank 3:
 Strife
 - Unwavering Ward — Rank 3:
 Unwavering Ward
- Memory of Lucid Dreams — Rank 3:
Ramp Timings, Setup, and Fight Tips
Ramp Timings
You are primarily going to focus your cooldowns around the Incineration and Gale Blast casts during Phase 1.
Keep in mind the targets that receive the Incineration debuff are going to take heavy single-target damage, so atone them first, especially since they will be running out of the group and could potentially mess with your ramp if you accidentally cast a Radiance on them. The raid wide damage from these debuffs come when the debuff expires on the target, so ensure you don't ramp for the debuffs being applied and instead ramp for when they run out.
As with the Incineration debuff, Gale Blast damage will occur after the associated cast time, so ramp accordingly.
Boss Timer Setup
You should track the following abilities on the boss timers of your choice
- Incineration
- Gale Blast
- Burning Cataclysm
Raid Frame Setup
You should be tracking the following abilities on your frames if using custom raid frames
- Incineration - Debuff - Spell ID 306111
- Burning Madness - Debuff - Spell ID 307013
Tips
- Make sure you don't cast
 Power Word: Radiance on a target that
has run out for Incineration
Power Word: Radiance on a target that
has run out for Incineration - Each phase 1 will have an overlap of Gale Blast and Incineration around the same time. This is a great place for barrier and other cooldowns.
Maut
For more general fight tips, refer to our Maut guide.
Damage Analysis
Damage Type:Sustained with Bursts
Damage Pattern Example:
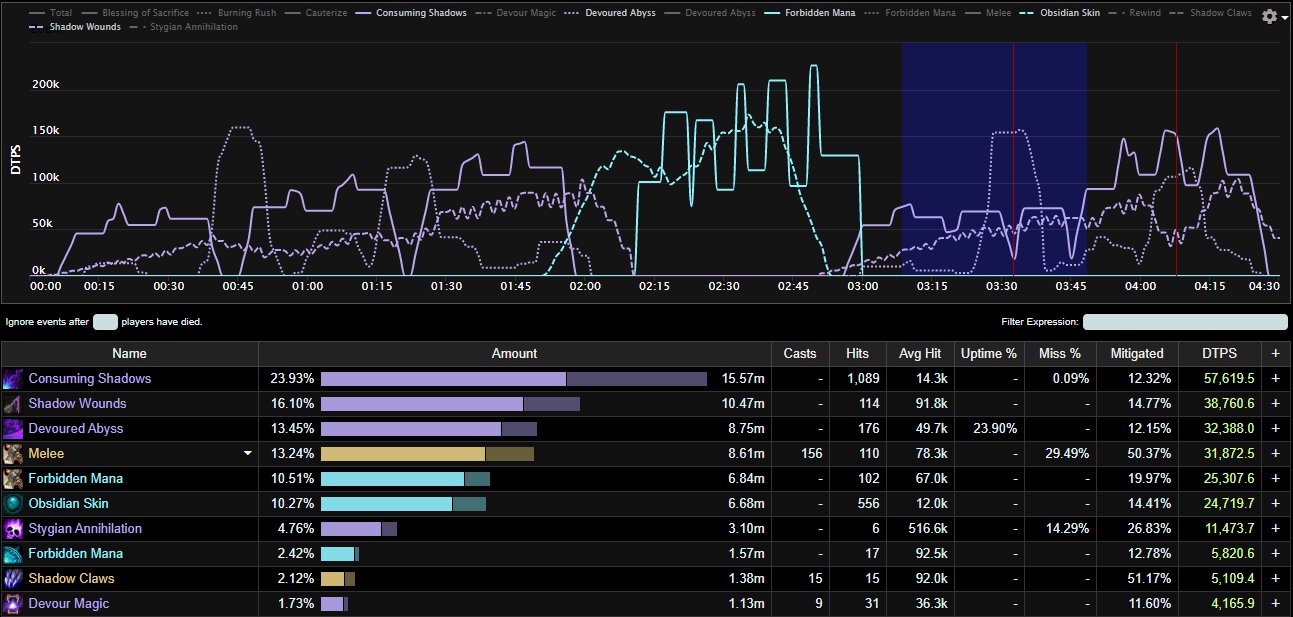
Important Abilities:
| Ability Name | Ability Description | Frequency/Trigger |
|---|---|---|
| Consuming Shadows | Maut periodically inflicts Shadow damage to all players after 1 second for 3 seconds. Shadow damage increases as Maut gains mana. | Present at all times during phase 1 |
| Devour Magic | Maut marks several players and after 6 seconds consumes all magic around them, gaining mana for every player within 9 yards and inflicting Shadow damage to all players hit. | Every 25 seconds |
| Obsidian Skin | Maut Transforms into an obsidian statue protected by a mana shield. While the shield lasts, Maut loses mana instead of health and inflicts 100% of incoming damage back on attackers as arcane damage. | Present at all times during phase 2 |
| Consumed Magic | Maut consumes 10% mana every 6 seconds to permanently increase all magic damage done by 1%. This effect stacks. | Stacks during p2 and never clears. Pseudo-enrage mechanic |
Talents and Essences
Talents
Essences
We advise you to use the following essences against Maut.
- Major Slot
- The Ever-Rising Tide — Rank 3: Overcharge Mana + The Ever-Rising Tide
- The Ever-Rising Tide — Rank 3:
- Minor Slots
- Vitality Conduit — Rank 3:
 Transference
 - Conflict and Strife — Rank 3: Strife
- Unwavering Ward — Rank 3: Unwavering Ward
- Vitality Conduit — Rank 3:
Ramp Timings, Setup, and Fight Tips
Ramp Timings
You should attempt to play phase 1 for ![]() Power Word: Radiance efficiency
and just cycle through your other cooldowns ensuring that everything is
available for phase 2.
Power Word: Radiance efficiency
and just cycle through your other cooldowns ensuring that everything is
available for phase 2.
Phase 2 you'll want to time your cooldowns around one of the Forbidden Mana
orb explosions. The damage will ramp up throughout the phase. You'll have
![]() Shadowfiend and
Shadowfiend and ![]() Power Word: Barrier available for each phase 2.
Power Word: Barrier available for each phase 2.
Boss Timer Setup
You should track the following abilities on the boss timers of your choice
- Stygian Annihilation
Raid Frame Setup
You should be tracking the following abilities on your frames if using custom raid frames
- Devour Magic - Debuff - Spell ID 307805
- Shadow Wounds - Debuff - Spell ID 307399
- Drain Essence - Debuff - Spell ID 314992
Tips
- You'll phase into phase 2 faster if the raid messes up. Be prepared to make adjustments on the fly
- Phase 2 begins when Maut's mana bar is full and ends when it is empty
The Prophet Skitra
For more general fight tips, refer to our The Prophet Skitra guide.
Damage Analysis
Damage Type:Scripted Burst alternating with Heavy Sustained
Damage Pattern Example:
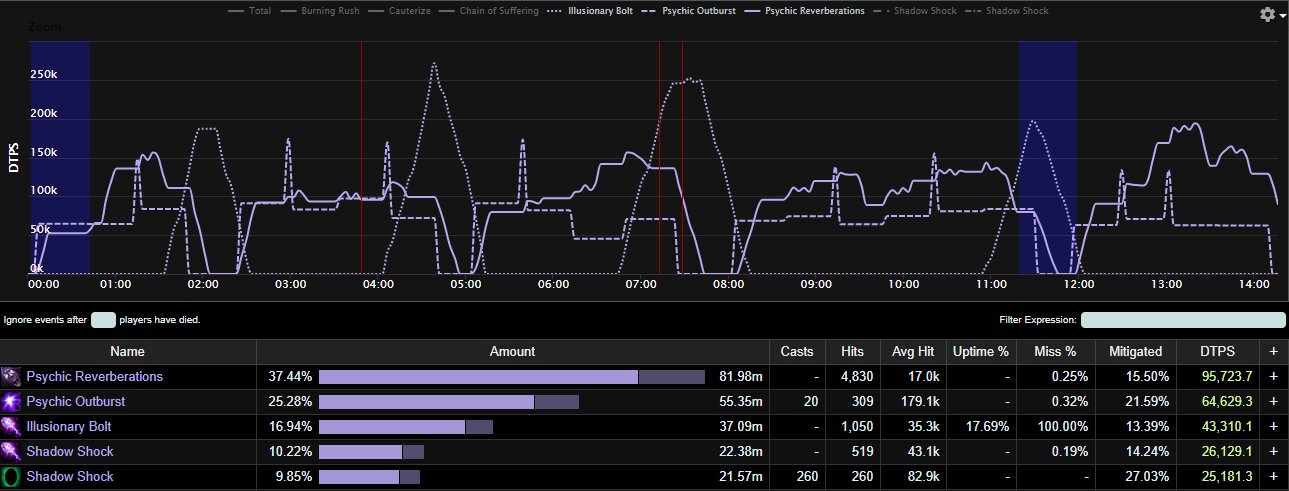
Important Abilities:
| Ability Name | Ability Description | Frequency/Trigger |
|---|---|---|
| Psychic Outburst | The remnant of the player's shredded psyche lashes out, exploding for Shadow damage to all players. Damage decreases the further players are from the point of impact. Afterwards, the Shredded Psyche continues to cause Psychic Reverberations until defeated. | Approximately every 34 seconds during phase 1 |
| Illusionary Bolt | The prophet's illusions inflict shadow damage to players every 2 seconds. | Constant during phase 2 and ever increasing due to stacking damage taken increase. |
Talents and Essences
Talents
Essences
We advise you to use the following essences against The Prophet Skitra.
- Major Slot
- The Ever-Rising Tide — Rank 3: Overcharge Mana + The Ever-Rising Tide
- The Ever-Rising Tide — Rank 3:
- Minor Slots
- Memory of Lucid Dreams — Rank 3: Lucid Dreams
- Conflict and Strife — Rank 3: Strife
- Unwavering Ward — Rank 3: Unwavering Ward
- Memory of Lucid Dreams — Rank 3:
Ramp Timings, Setup, and Fight Tips
Ramp Timings
Your cooldowns will be focused around the two primary sources of damage: Psychic Outburst/Psychic Reverberations in Phase 1 and Illusionary Bolt in Phase 2.
Boss Timer Setup
You should track the following abilities on the boss timers of your choice
- Shred Psyche
Raid Frame Setup
You should be tracking the following abilities on your frames if using custom raid frames
- Shred Psyche - Debuff - Spell ID 307937
- Shadow Shock - Debuff - Spell ID 307977
Tips
- Your overall fight timings will depend on how fast you complete phase 2
- Phase 2 begins every 20% of the bosses hp
Dark Inquisitor Xanesh
For more general fight tips, refer to our Dark Inquisitor Xanesh guide.
Damage Analysis
Damage Type:Sustained with minor bursts
Damage Pattern Example:
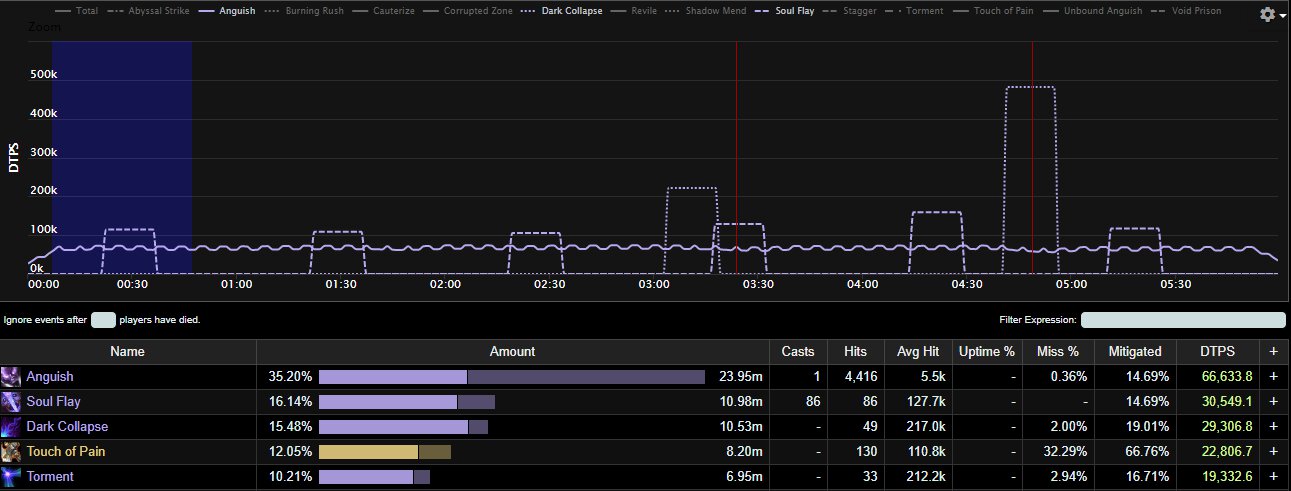
Important Abilities:
| Ability Name | Ability Description | Frequency/Trigger |
|---|---|---|
| Soul Flay | Xanesh flays the souls of several players, after 10 seconds the souls explode inflicting shadow damage to the affected player. This damage is reduced the further away players are from their flayed soul. | Approximately every minute |
| Anguish | Queen Azshara's suffering causes her to radiate void energy, inflicting shadow damage to enemy players every 2 seconds. | Constant throughout the encounter |
Talents and Essences
Talents
Essences
We advise you to use the following essences against Dark Inquisitor Xanesh.
- Major Slot
- Memory of Lucid Dreams — Rank 3: Memory of Lucid Dreams + Lucid Dreams
- Memory of Lucid Dreams — Rank 3:
- Minor Slots
- Vision of Perfection — Rank 3:
 Strive for Perfection
 - Conflict and Strife — Rank 3: Strife
- Unwavering Ward — Rank 3: Unwavering Ward
- Vision of Perfection — Rank 3:
Ramp Timings, Setup, and Fight Tips
Ramp Timings
You will mostly be playing for efficiency here with cooldowns focused around soul flay when possible.
Boss Timer Setup
You should track the following abilities on the boss timers of your choice
- Soul Flay
- Void Ritual
Raid Frame Setup
You should be tracking the following abilities on your frames if using custom raid frames
- Void-Touched - Debuff - Spell ID 313198
- Soul Flay - Debuff - Spell ID 306228
- Abyssal Strike - Debuff - Spell ID 311551
Tips
- Make sure you are keeping atonement on targets affected by Soul Flay and any target with the Void-Touched debuff on them as a result of taking part in the Void Ritual
The Hivemind
For more general fight tips, refer to our The Hivemind guide.
Damage Analysis
Damage Type:Scripted Burst
Damage Pattern Example:

Important Abilities:
| Ability Name | Ability Description | Frequency/Trigger |
|---|---|---|
| Devouring Frenzy | The hive goes into a Frenzy, inflicting Nature damage to all players every .5 seconds for 12 seconds. Each time Devouring Frenzy is triggered, the damage it deals is increased by 20%. | Approximately every 1 minute and 10 seconds throughout the fight. |
| Psionic Resonance | Inflicts Shadow damage to all players and shifts to a new location. | Will occur whenever Aqir Darters are alive and not crowed controlled. |
Talents and Essences
Talents
Essences
We advise you to use the following essences against The Hivemind.
- Major Slot
- The Ever-Rising Tide — Rank 3: Overcharge Mana + The Ever-Rising Tide
- The Ever-Rising Tide — Rank 3:
- Minor Slots
- Memory of Lucid Dreams — Rank 3: Lucid Dreams
- Conflict and Strife — Rank 3: Strife
- Unwavering Ward — Rank 3: Unwavering Ward
- Memory of Lucid Dreams — Rank 3:
Ramp Timings, Setup, and Fight Tips
Ramp Timings
Rotate your cooldowns around the Devouring Frenzy casts and save spare
![]() Power Word: Radiance casts for while the Aqir Darters are up for potential
Psionic Resonance casts.
Power Word: Radiance casts for while the Aqir Darters are up for potential
Psionic Resonance casts.
Boss Timer Setup
You should track the following abilities on the boss timers of your choice
- Tek'ris's Hivemind Control
- Ka'zir's Hivemind Control
Raid Frame Setup
You should be tracking the following abilities on your frames if using custom raid frames
- Ravage - Debuff - Spell ID 313198
- Corrosion - Debuff - Spell ID 306228
- Nullification - Debuff - Spell ID 311551
Tips
- Make sure to maintain atonement on the active tank as the incoming tank damage is fairly decent on this encounter compared to the previous
Shad'har the Insatiable
For more general fight tips, refer to our Shad'har the Insatiable guide.
Damage Analysis
Damage Type:Scripted Burst
Damage Pattern Example:
Important Abilities:
| Ability Name | Ability Description | Frequency/Trigger |
|---|---|---|
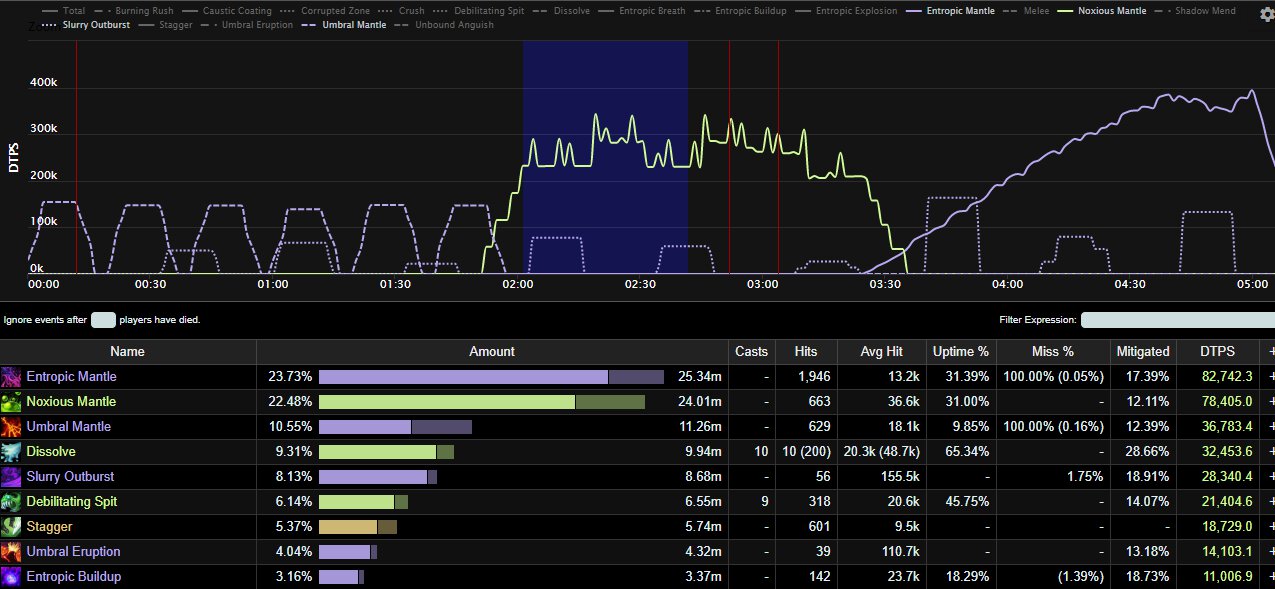
| Debilitating Spit | Covers the target in a vile spit, inflicting Nature damage every 1 second for 5 seconds and initially applying 4 applications. Upon expiration, Debilitating Spit jumps to new targets, giving each new target half the previous target's total amount of stacks. | Approximately every 30-35 seconds |
| Slurry Outburst | The Living Miasma explodes, inflicting Shadow damage to all players. Being farther from the caster reduces the damage taken. | Approximately every 30-35 seconds |
| Umbral Mantle | A dark carapace envelops Shad'har the Insatiable, which explodes every 20 sec, inflicting Shadow damage every 2.5 second to all players for 5 seconds. | Constant during Phase 1 |
| Entropic Mantle | A void-tinged carapace envelops Shad'har the Insatiable, inflicting Shadow damage every 2 seconds to all players for 20 seconds. This effect stacks. | Constant during Phase 2 |
| Noxious Mantle | A noxious carapace envelops Shad'har the Insatiable, inflicting Nature damage to all players every 3 seconds. | Constant during Phase 3 |
Talents and Essences
Talents
Essences
We advise you to use the following essences against Shad'har the Insatiable.
- Major Slot
- Memory of Lucid Dreams — Rank 3: Memory of Lucid Dreams + Lucid Dreams
- Memory of Lucid Dreams — Rank 3:
- Minor Slots
- Vision of Perfection — Rank 3: Strive for Perfection
- Conflict and Strife — Rank 3: Strife
- Unwavering Ward — Rank 3: Unwavering Ward
- Vision of Perfection — Rank 3:
Ramp Timings, Setup, and Fight Tips
Ramp Timings
Time your cooldowns for the Slurry Outburst explosion as best as possible.
Outside that, play for ![]() Power Word: Radiance efficiency and use your
cooldowns as close to on cooldown as possible.
Power Word: Radiance efficiency and use your
cooldowns as close to on cooldown as possible.
Boss Timer Setup
You should track the following abilities on the boss timers of your choice
- Debilitating Spit
- Living Miasma
Raid Frame Setup
You should be tracking the following abilities on your frames if using custom raid frames
- Dissolve - Debuff - Spell ID 307472
- Debilitating Spit - Debuff - Spell ID 307358
- Entropic Buildup - Debuff - Spell ID 308177
- Slimy Residue - Debuff - Spell ID 312332
- Fixate - Debuff - Spell ID 307260
Tips
- Slurry Outburst damage occurs when the add reaches its target, not when the add spawns. Keep this in mind if you are ramping for this mechanic.
Drest'agath
For more general fight tips, refer to our Drest'agath guide.
Damage Analysis
Damage Type:Scripted Burst
Damage Pattern Example:
Important Abilities:
| Ability Name | Ability Description | Frequency/Trigger |
|---|---|---|
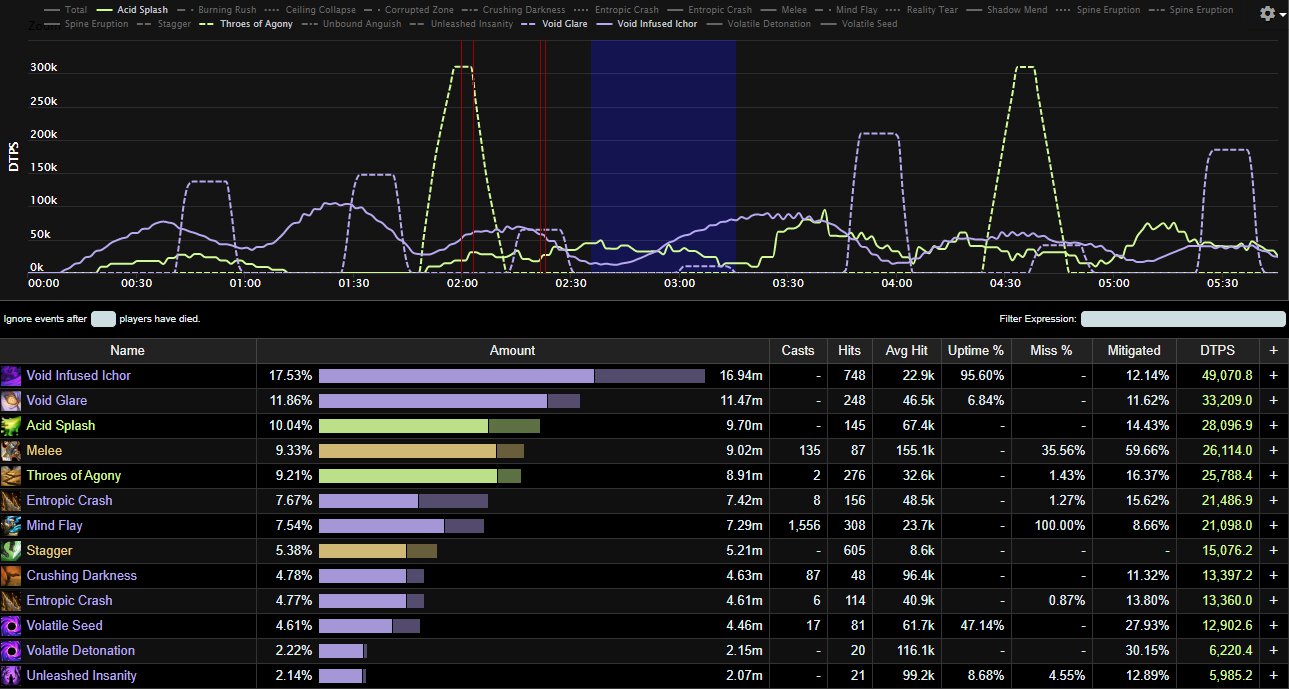
| Entropic Crash | Drest'agath collapses reality around it, inflicting Shadow damage to all enemies. Damage is reduced the further you are from the center. | Approximately every 45 seconds. |
| Volatile Seed | Drest'agath impants a seed of void energy to grow in an enemy, inflicting Shadow damage every 2 seconds for 10 seconds. Volatile Detonation is triggered upon expiration. | Near constantly during the encounter on the tanks. |
| Throes of Agony | Drest'agath begins flailing in agony, inflicting Nature damage every 2 seconds for 10 seconds. | Occurs when Drest'agath's energy hits full. |
| Unleashed Insanity | Drest'agath's whispers of insanity become real, inflicting Shadow damage and Stunning all players within 12 yards. | Approximately every 45-60 seconds. |
Talents and Essences
Talents
Essences
We advise you to use the following essences against Drest'agath.
- Major Slot
- The Ever-Rising Tide — Rank 3: Overcharge Mana + The Ever-Rising Tide
- The Ever-Rising Tide — Rank 3:
- Minor Slots
- Memory of Lucid Dreams — Rank 3: Lucid Dreams
- Conflict and Strife — Rank 3: Strife
- Unwavering Ward — Rank 3: Unwavering Ward
- Memory of Lucid Dreams — Rank 3:
Ramp Timings, Setup, and Fight Tips
Ramp Timings
Focus your big cooldowns around the Throes of Agony casts and then fill the rest in on as many Entropic Crash casts as possible.
Boss Timer Setup
You should track the following abilities on the boss timers of your choice
- Entropic Crash
Raid Frame Setup
You should be tracking the following abilities on your frames if using custom raid frames
- Volatile Seed - Debuff - Spell ID 310277
- Mutterings of Insanity - Debuff - Spell ID 310358
- Mutterings of Insanity - Debuff - Spell ID 310361
- Mind Flay - Debuff - Spell ID 310584
- Void Miasma - Debuff - Spell ID 310478
- Mutterings of Betrayal - Debuff - Spell ID 310563
Tips
- Be sure to dispel Unleashed Insanity on your allies. If multiple people get hit, you can mass dispel them out if there are no Shadow Priests available to do so.
- Despite being able to damage the boss at all times, the damage you do to the boss without the Void Infused Ichor debuff will be healed away near instantly. Try to hit adds when possible so your damage can be relevant, but don't be afraid to hit the boss if you need to be healing even if the damage wont stick.
- Multi dotting with
 Purge the Wicked will be very powerful during
this encounter
Purge the Wicked will be very powerful during
this encounter
Il'gynoth, Corruption Reborn
For more general fight tips, refer to our Il'gynoth, Corruption Reborn guide.
Damage Analysis
Damage Type:Player Controlled Burst
Damage Pattern Example:
Important Abilities:
| Ability Name | Ability Description | Frequency/Trigger |
|---|---|---|
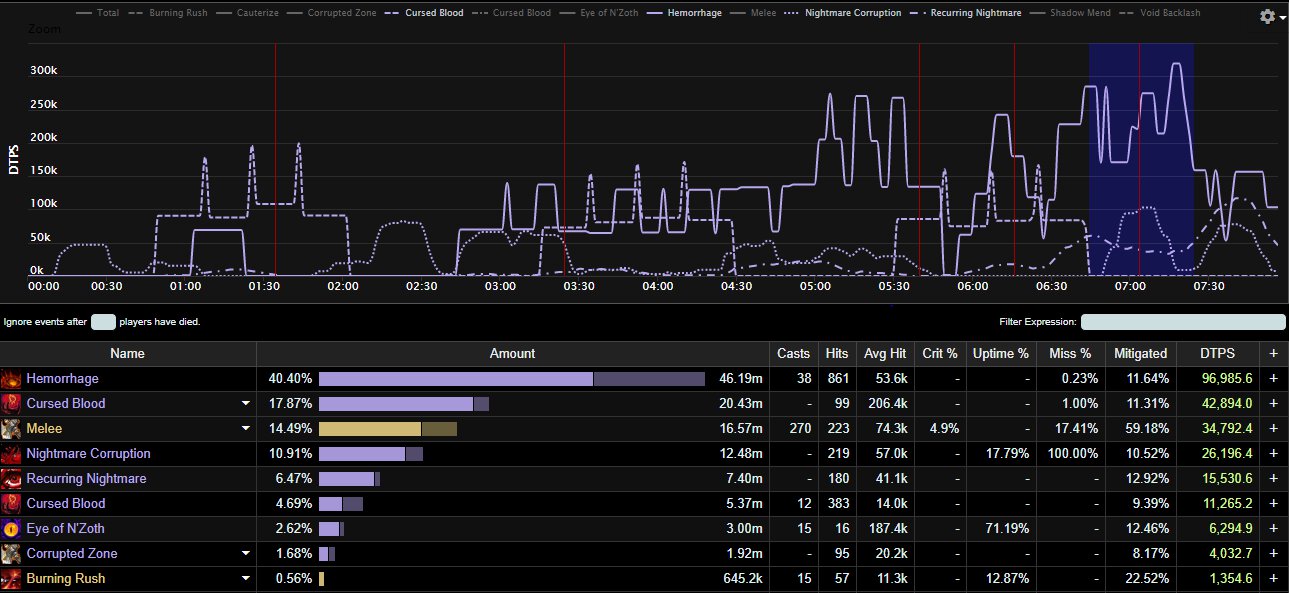
| Cursed Blood | Infects players' blood with nightmare energy, inflicting Shadow damage every 2 seconds for 8 seconds. When this effect ends, the player will detonate, inflicting Shadow damage to players within 11 yards. | Every 15 seconds during phase 2 |
| Cursebreak - Mythic Only | Upon removal, Cursed Blood explodes inflicting Shadow damage to all players based on the size of the curse | Whenever dispelled by the players. |
| Hemorrhage | On death, Blood of Ny'alotha explodes in a spray of gore, inflicting Shadow damage to all players. | On death of a Blood of Ny'alotha |
Talents and Essences
Talents
Essences
We advise you to use the following essences against Il'gynoth, Corruption Reborn.
- Major Slot
- Memory of Lucid Dreams — Rank 3: Memory of Lucid Dreams + Lucid Dreams
- Memory of Lucid Dreams — Rank 3:
- Minor Slots
- Vision of Perfection — Rank 3: Strive for Perfection
- Conflict and Strife — Rank 3: Strife
- Unwavering Ward — Rank 3: Unwavering Ward
- Vision of Perfection — Rank 3:
Ramp Timings, Setup, and Fight Tips
Ramp Timings
Play for ![]() Power Word: Radiance efficiency with
Power Word: Radiance efficiency with ![]() Mindbender on
cooldown as much as possible around Hemorrhage and Cursed Blood.
Mindbender on
cooldown as much as possible around Hemorrhage and Cursed Blood.
Boss Timer Setup
You should track the following abilities on the boss timers of your choice
- Cursed Blood
Raid Frame Setup
You should be tracking the following abilities on your frames if using custom raid frames
- Cursed Blood - Debuff - Spell ID 311159
- Fixate - Debuff - Spell ID 275269
- Recurring Nightmare - Debuff - Spell ID 312486
Tips
- On Mythic, ensure you are dispelling Cursed Blood when the radius of the circle is at the smallest.
- Watch for players getting autoed by the Bloods as they will apply a pretty nasty damage over time.
Vexiona
Coming soon!
Ra-den the Despoiled
Coming soon!
Carapace of N'Zoth
Coming soon!
N'Zoth the Corruptor
Coming soon!
Changelog
- 12 Oct. 2020: Page updated for the Shadowlands pre-patch.