

Ragnaros DPS Strategy Guide (Heroic Mode included)

Introduction
This guide is intended to provide a comprehensive description of the encounter with Ragnaros in Firelands. It is mostly targeted to DPS who desire to have a short but detailed overview of what is expected of them during that fight.
This guide is updated for World of Warcraft WoD 6.1.2.
Ragnaros is the 7th and final boss encounter in the Firelands raid instance. He is, by far, the most complex encounter, and arguably the most difficult one.
DPS players are only faced with two tasks, which they need to perform properly: attacking the boss (and his adds, punctually), and moving to avoid damaging abilities.
Overview of the Fight
The Ragnaros encounter is a complex fight, split into three phases, separated by two transitional phases. For ease of understanding, we will list all of the phases, their triggering and concluding factors, and the names we are going to use for them.
- Phase One lasts from 100% to 70% of Ragnaros' health.
- The First Transition Phase lasts until all the adds spawned during it (Sons of Flame) are dead, but no longer than 45 seconds.
- Phase Two lasts from the end of the First Transition Phase until Ragnaros has 40% health.
- The Second Transition Phase lasts until all Sons of Flame are dead, but no longer than 45 seconds.
- Phase Three lasts from the end of the Second Transition Phase until the boss reaches 10% health, at which point he is defeated.
DPS players need to attack Ragnaros for most of the fight while moving to avoid the many abilities he casts. The only difficulty comes from the fact that failing to properly avoid some abilities can be very unforgiving.
Phase One
Phase One is the easiest phase of the fight. For DPS players it consists in attacking the boss while avoiding two abilities that have clearly visible graphical effects: Sulfuras Smash and Magma Trap.
Positioning
Because of Wrath of Ragnaros, players should spread out 6 yards. That will prevent unnecessary knock up.
Melee DPS should be as close to Ragnaros as possible (without being in the lava, of course), even if, due to Ragnaros' very large hitbox, he can be melee-ed from very far away. Being this close enables melee DPS to safely ignore Ragnaros' deadly Sulfuras Smash ability, which we describe next.
Melee DPS will regularly be knocked back by Hand of Ragnaros. They need to make sure this does not send them in a Sulfuras Smash or a Magma Trap.
Dealing with Sulfuras Smash
Ragnaros regularly casts Sulfuras Smash (approximately every 40 seconds). Ragnaros faces a random raid member and then proceeds to smash his hammer on the area in front of him (always about 10 yards from the edge of his lava pool). Three waves travel outwards from the hammers, as illustrated by the following diagram:
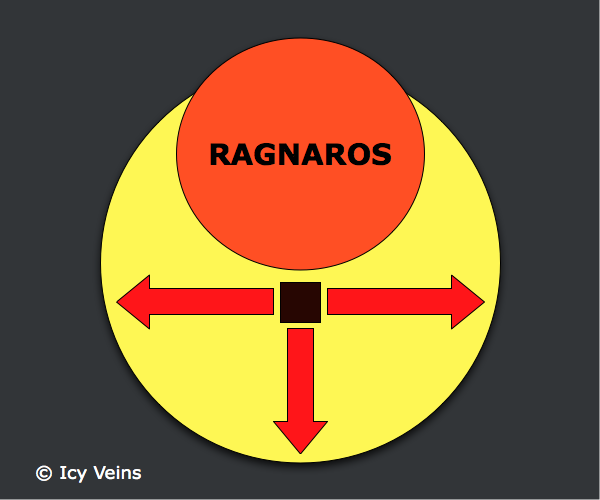
The location where the hammer hits is clearly marked with a fire effect. Anyone standing in it must move out. The three subsequent lava waves also need to be avoided. Getting hit by this ability results in death, getting hit by the subsequent lava waves very often equals to death, therefore, dealing with it properly is imperative.
Dealing with Magma Trap
Magma Traps need to be manually detonated by designated raid members, as otherwise they persist indefinitely and would end up severely limiting raid's movement space.
Specific players should be assigned to detonate Magma Traps, and they should do so only when raid members have sufficient health to take the resulting damage (around 80,000 Fire damage), ideally when everyone is almost topped off. The following classes are ideal for the task, due to their ability to avoid taking fall damage:
- Mages, thanks to
 Blink and
  Slow Fall;
 - Priests, thanks to
 Levitate;
 - Warlocks, thanks to Demonic Circle.
First Transition Phase
Splitting Blow marks the end of Phase One and the beginning of the First Transition Phase. After an 8-second cast, Ragnaros will strike the area indicated by a clearly visible ground effect with his hammer, then he will disappear in his lava pool for the entire duration of the transition phase.
When Ragnaros' hammer strikes the platform, 8 fiery balls travel to locations clearly marked by fire jets (they appear well before the cast finishes). Once a fiery ball arrives at its destination, it transforms into a Son of Flame (125k health in 10-man difficulty and 622k health in 25-man difficulty).
These 8 Sons of Flame travel towards the hammer. They cannot be tanked or taunted and they slow down as their health decreases (Burning Speed). Whenever a Son of Flame reaches the hammer, it triggers Supernova, which will probably wipe the raid. Therefore, these adds must be killed before they can trigger Supernova.
Ideally, the raid leader will have assigned everyone 2 or 3 Sons to focus on. DPS players need to attack and slow their assigned Sons, preferably those closer to the hammer. Unfortunately, Sons are immune to most slow abilities, forcing players to resort to stun and knock back abilities.
Additionally, Ragnaros will regularly target random raid members with Lava Bolt, which cannot be avoided.
Phase Two
Phase Two starts as soon as all the Sons of Flame are dead. If 45 seconds into the First Transition Phase, some Sons are still alive, Phase Two starts anyway.
This phase is very similar to Phase One, with the following differences:
- Wrath of Ragnaros, Hand of Ragnaros, and Magma Trap are no longer cast;
- Molten Seed and Engulfing Flame are new abilities.
Positioning
Without Wrath of Ragnaros and Hand of Ragnaros, there is no knock back/up to expect. However, the 6-yard spacing must still be respected because of Molten Seed, which we detail next.
From time to time, Engulfing Flame will cover part of the platform with fire, forcing everyone to move.
Dealing with Molten Seed
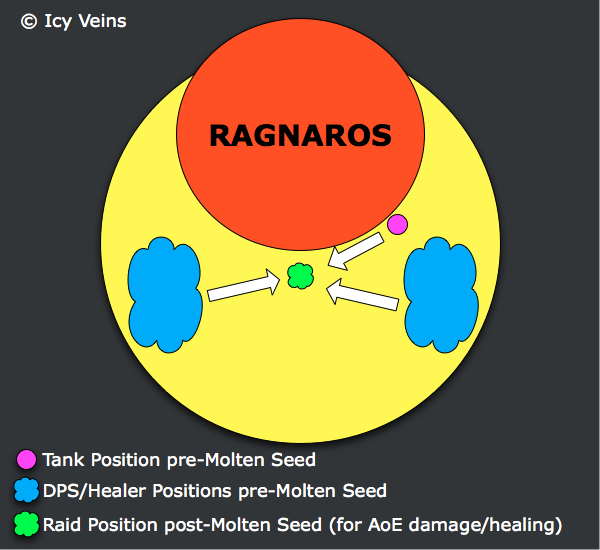
Dealing with Molten Seed requires precise movement from the raid. This ability places a Molten Seed at the feet of 10 players in 10-man difficulty and 20 players in 25-man difficulty. This causes 55,000 Fire damage to all allies within 6 yards (hence why spreading out is important). Ragnaros casts this ability exactly every 60 seconds.
The locations where the Molten Seeds are placed explode after a short while, dealing, dealing 135,000 Fire damage to all raid members. This damage decreases the farther away from the Molten Inferno the player is. For this reason, the raid should prepare for Molten Seed by spreading out on the sides of the platform (on one side in 10-man), and then stack together in the middle (preferably close to the boss to prevent damage from Sulfuras Smash), after Molten Seed has been cast, in order to reduce the damage taken by the explosions (since it is distance-related) and make healing more efficient.
Each explosion spawns a Molten Elemental. These adds do not have normal aggro tables. Instead, they fixate on random raid members. They have low health and do not melee hard. Since the raid is stacked up, the elementals will come to the stacking position and need to be AoE-ed down.
Once the elementals are dead, everyone goes back to their original position.
The diagram below illustrates the necessary movement (note that 10-man groups only need to use one side of the platform):
Dealing with Engulfing Flames
Approximately every minute, Ragnaros chooses a third of his platform to engulf in fire with Engulfing Flame. For this purpose, the platform is divided in three slices, from Ragnaros' position towards the exterior:

Players in the affected part of the platform must move away immediately to avoid taking massive amounts of damage.
This ability can sometimes be cast shortly after Molten Seed, potentially requiring the raid to move their stacking position further from the boss.
Second Transition Phase
The Second Transition Phase is very similar to the First Transition Phase, with one exception. Ragnaros spawns two Lava Scion. These adds are to be picked up by the tanks and regularly afflict a random raid member with Blazing Heat.
Players afflicted by this ability leave a trail of flames behind them. Sons of Flame and Lava Scions passing through the trail get healed. For this reason, anyone afflicted by Blazing Heat needs to run away from the raid towards the edge of the platform in such a way that no Son of Flame or Lava Scion will walk through the trail of flames. Once on the edge of the platform, they need to continue running along the edge until the debuff wears out.
Phase Three
Phase Three starts as soon as all the Sons of Flame are dead. If 45 seconds into the Second Transition Phase, some Sons are still alive, Phase Three starts anyway.
The Lava Scions from the Second Transition Phase need to be killed with the highest priority when Phase Three starts. Only when they are dead should DPS switch back to Ragnaros.
Positioning
From Phase One and Phase Two, Ragnaros only retains Sulfuras Smash and Engulfing Flame. These two abilities still need to be dealt with as previously explained. However, the 6-yard spacing is no longer compulsory.
New adds called Living Meteors appear in Phase Three. They need to be kited by randomly selected players (can be a healer). We detail how these adds must be dealt with in the next section, but to sum things up, players not kiting these adds simply need to move out of their path.
Living Meteors
In addition to these mechanics, Phase Three presents an entirely new mechanic, called Summon Living Meteor.
Roughly every 50 seconds, throughout Phase Three, Ragnaros summons adds called Living Meteors. The location where a Living Meteor is about to spawn is indicated by flames on the ground and anyone within 5 yards of the location will take a large amount of Fire damage. Living Meteors do not have aggro tables, fixate on random raid members and cannot be effectively killed (due to their high health). They must be kited by whoever they fixate on, as contact with the Meteor deals fatal damage. More precisely, if a player comes within 4 yards of a Living Meteor, everyone within 8 yards of the meteor takes 500,000 fire damage (instant death). The effect is called Meteor Impact. Note that the Meteors cannot be kited indefinitely, and they will eventually catch up to their target.
Living Meteors have a buff called Combustible, which enables players to cause the meteor to change target. While this buff is active, an attack made on the Meteor will cause it to be knocked back several yards in the direction that the attacking player is facing. Knocking a Meteor back causes it to pick a different target to fixate on and to lose its Combustible buff for 5 seconds.
Whenever a Living Meteor is about to spawn, all players should move away from the designated location. The player being chased by the Meteor should then kite it, while making sure that it is not guided close to any other raid members.
Once the Meteor is close, the player should attack it, in order to knock it back and reset its fixate target. It is imperative to make sure that the Meteor does not get knocked back into other raid members, and that everyone is prepared to possibly become fixated upon.
Heroic Mode
The heroic mode of the Ragnaros encounter is, by far, the most difficult and challenging encounter in all of Tier 12, especially for DPS players.
The fight will test not only your awareness and reaction skills, but also the sheer amount of DPS you can do, the requirement for which is quite brutal.
Differences From Normal Mode
The fight follows the same format as on normal mode, until the boss reaches 10% health. At this point, after a short intermission, a heroic-only Phase Four begins. Below, we list all the changes to the encounter, phase by phase.
Phase One
- Each time a Magma Trap is detonated, the entire raid is debuffed with Magma Trap Vulnerability. This debuff lasts 45 seconds and it increases the damage taken from Magma Trap Eruption by 50%.
- All abilities in this phase deal considerably more damage, resulting in an extremely high chance of players dying to a quick succession of Magma Trap and Hand/Wrath of Ragnaros, if not topped off.
First Transition Phase
- Son of Flame spawn locations are no longer fixed. Instead, the Sons can spawn in any random formation, and your raid must adapt to this on the fly.
- Sons of Flame have increased health, and all abilities do increased damage.
Phase Two
- Engulfing Flame is replaced by a new ability, called World in Flames. This ability essentially chains 4 Engulfing Flame eruptions together, over the course of around 12 seconds. The eruptions follow the exact same positions as Engulfing Flame, and the order in which these come is completely random.
- Molten Elementals gain a buff called Molten Power, which increases their damage done by 25% for each Molten Elemental in their proximity, and also grants them immunity to snares.
- All abilities in this phase deal considerably more damage, as do the adds. The adds also have increased health.
Second Transition Phase
As with the first transition phase, the spawn locations of Sons of Flame are random. Other than this, and increased health and damage done, there are no changes.
Phase Three
Phase Three is unchanged, with the exception of the fact that World in Flames is present here as well, in place of Engulfing Flame.
This phase is a DPS check, and your raid must bring Ragnaros to 10% health before the 3rd set of Living Meteors.
Phase Four
Phase Four is an entirely new phase, present only in heroic mode. Ragnaros submerges at 10% health, as in normal mode. However, he is shortly afterwards pulled back out by Cenarius, and you have to fight him once more.
At the start of the phase, Ragnaros is healed to 50% health, and he must be brought down to 0% to be killed. During this phase, your raid will have to deal with any Living Meteors which were spawned in Phase Three.
Ragnaros has the following abilities during this phase:
- Dreadflame is essentially fire on the ground. Ragnaros regularly casts this ability at random locations on the platform. The fire deals massive damage to anyone standing in it, and spreads, until it covers the entirety of the platform. Dreadflame fire patches can be extinguished by players affected by Deluge (covered below).
- Empower Sulfuras is an ability Ragnaros uses roughly every 50 seconds, throughout the phase. This ability allows him to imbue his weapon, causing his attacks to deal instant-wipe damage to the entire raid. During this time, he must be kited, which is made easier by Entrapping Roots (covered below).
- Superheated is a stacking debuff which Ragnaros applies on every raid member, for the entire duration of the phase. Each stack deals 4,000 Fire damage per second and increases Fire damage taken by 10%. This debuff can be reset through means of Breadth of Frost (covered below).
- Magma Geyser is an ability which Ragnaros uses to target any group of players which are clumped together (at least 4 players in 10-man and 10 players in 25-man). It deals a high amount of Fire damage, knocks players back and destroys any Breadth of Frost within 5 yards.
During this phase, three friendly NPCs come to your raid's aid: Cenarius, Malfurion Stormrage and Archdruid Hamuul Runetotem. They each provide your raid with various abilities which allow you to defeat Ragnaros.
- Cenarius casts Breadth of Frost about 15 seconds into the phase, and every 45 seconds after that. The first Breadth of Frost will expire as the third is being cast, and so on, such that there will always be, at most, two active at one time. The Breadth of Frost is a patch of ice on the ground. Any Living Meteor that touches the ice becomes stunned and takes 15000% increased damage. This destroys the Breadth of Frost. Breadth of Frost also grants players immunity from Superheated and resets any stacks of Superheated on the players.
- Malfurion Stormrage casts Cloudburst, only once, at the start of the phase. This places an effect on the ground, which allows 1 player in 10-man and 3 players in 25-man to obtain the Deluge buff by coming in close proximity with it. Deluge provides immunity from Dreadflame as well as Superheated. It also allows players to extinguish Dreadflame patches (by running over them). It lasts until the end of the encounter.
- Archdruid Hamuul Runetotem casts Entrapping Roots. This places a green effect on the ground. If dragged over it, Ragnaros becomes entangled and is unable to move. This makes it easy to avoid anyone getting hit by him while Sulfuras is empowered.
Strategy
The strategy for the encounter, up until Phase Four, is very similar to the one used in normal mode. As you can see, each phase is changed only slightly, but this does have some implications on execution.
Phase One
Phase One is not greatly changed. All the abilities present in normal mode are still present here, and they should all be dealt with in the same way. The only change comes from how Magma Traps are handled. Here is what you must know in order to properly handle Magma Traps:
- Magma Trap Eruption deals significantly more damage than in normal mode. Therefore, a trap should never be detonated when players are not topped off, or Hand of Ragnaros/Wrath of Ragnaros are about to be cast.
- Magma Trap Vulnerability severely increases the damage taken from Magma Traps, so traps should never be detonated while this debuff persists.
If you are not assigned to detonating Magma Traps, then simply make sure that you do not trigger them accidentally, and if you are low on health when a trap is about to go off, use your Healthstone or defensive cooldown(s) to survive.
There will, most likely, be between 1 and 3 active Magma Traps at the end of this phase. They will be detonated at a later time, and they are not your concern. Simply adapt your movement and positioning accordingly during the First Transition Phase and Phase Two (by the end of which they will have been detonated).
First Transition Phase
The only change to this phase (and the second transition phase) is that the Sons of Flame can spawn in virtually any location around the platform.
This means that they can spawn spread out, or several of them in a group, and that this group could even be located right next to the hammer location.
This phase is one where your raid will have to adapt quickly, as soon as the beams of light indicate the locations of the Sons of Flame.
The more classes you have which can stun, slow, knock-back or
![]() Death Grip the Sons, the better your chances are to succeed.
Death Grip the Sons, the better your chances are to succeed.
Phase Two
The most important change to strategy, during this phase, comes from the fact that Molten Elementals cannot be allowed to melee any players while they (the Elementals) are stacked together. This is due to Molten Power which buffs the Elementals' damage significantly when they are together.
The best way to handle this phase is to follow these steps:
- Have your raid stack up, in the center of the platform, close to Ragnaros, and wait for Molten Seed to be cast.
- Just as the boss mod timer for Molten Seed is about to expire, have everyone run away from the stacking location. Players should run in any direction that allows them to be spread out (split into two groups, one running to the left and one to the right, or simply free for all) away from the stacking location.
- If you have done the previous two steps correctly, the Molten Elementals
will all spawn in the same location (in the center, and far away from
all of your raid members). For a few short seconds, they will be in the same
place. At this point, you should use any AoE abilities which you have
available, to damage them somewhat before they spread out to go to their
respective targets. Ground-based effects are good for this
(
 Death and Decay,
  Explosive Trap), but anything
else will do.
Explosive Trap), but anything
else will do. - After that, have everyone kill their own Elemental, and stay away from other players so that the Elementals do not buff themselves.
Keep in mind that, while together (so, right after spawning), the Elementals cannot be slowed, stunned or knocked back.
In addition to this, players will have to avoid the damage from World in Flames and, of course, Sulfuras Smash.
Because Phase Three is a massive DPS check, any damage you can do to Ragnaros below 40% of his health, during Phase Two, is of great benefit to you. As such, you should pool resources such as energy/rage/focus and combo points, and use them while he is casting the Splitting Blow.
Second Transition Phase
The Sons of Flame should be handled, in this phase, in the same way as during the first one.
Your raid should delay the last Son of Flame for as long as possible, and get as much damage done on the Lava Scions as they can.
Phase Three
Phase Three is the least changed phase from normal mode. The only difference in mechanics is that World in Flames is present here, as well, in place of Engulfing Flame.
The challenge of this phase comes from the fact that your raid must bring Ragnaros to 10% health (the end of the phase) within 140 seconds (the time until the third set of Living Meteors spawns). This is so because your raid simply cannot handle the gruelling Phase Four with any more than 2 meteors.
To this end, you should save ![]() Heroism/
Heroism/![]() Bloodlust/
Bloodlust/![]() Time Warp
for this phase, as well as any DPS cooldowns, potions and anything else
which can allow you to do more DPS.
Time Warp
for this phase, as well as any DPS cooldowns, potions and anything else
which can allow you to do more DPS.
When Ragnaros reaches 10% health, he submerges, but he is quickly pulled back out of the lava by Cenarius, and Phase Four begins.
Phase Four
In Phase Four, Ragnaros is no longer stationary. He climbs out of the lava and can move anywhere on the platform. He is healed to 50% of his health, all of which must be depleted in order to defeat him.
During this phase, you will have to perform a few tasks, normally. If you are assigned to taking the Deluge buff, refer to the end of this section.
- DPS Ragnaros, while being mindful of your Superheated stacks. You will be assigned to a group of your raid members, which will move onto Breadth of Frost at a designated time. Should you be nearing death before that time, use damage reduction cooldowns or immunities.
- Kite Living Meteors away from the raid, until such a time that it is called for a Living Meteor to be destroyed. At this time, you will need to bring the meteor onto a (designated) Breadth of Frost (by kiting the meteor over it). Obviously, this only affects you if you are currently being pursued by the meteor yourself.
- Make sure that you are not standing in the fire from Dreadflame.
If you are assigned to taking the Deluge buff, then simply move to the Cloudburst, at the start of the phase. Once you have the buff, you will have to spend the phase running around the platform, and putting out fires from Dreadflame (by running over them).
Remember that Dreadflame will spawn at an ever-increasing rate, meaning that, eventually, you will be overwhelmed. At this time, you should aim to keep the area of the platform around the Breadth of Frost currently in use clear of fire. Additionally, you may need to carve out a path to the next Breadth of Frost, though this is likely not going to be possible.
While putting out Dreadflame, you should attempt to also deal damage to Ragnaros, when possible. On 25-man, as there are 3 players using the Deluge buff, you should assign specific areas of the platform for each, so that you can more efficiently do your jobs.