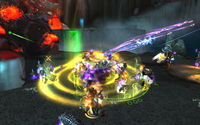
Madness of Deathwing Tank Strategy Guide (Heroic Mode included)
Table of Contents
Introduction
This guide is intended to provide a comprehensive description of the encounter with Madness of Deathwing in Dragon Soul. It is mostly targeted to tanks who desire to have a short but detailed overview of what is expected of them during that fight.
This guide is updated for World of Warcraft WoD 6.1.2.
The Madness of Deathwing encounter contains a large variety of adds, spells, and mechanics, but it is, ultimately, not difficult to understand or execute. All three roles will, at certain times, have a lot of pressure placed on them to perform well.
The five Aspects aid your raid during this encounter, although, as the fight progresses, they become effectively disabled, making it increasingly difficult for your raid. Though, they do come back to help you kill Deathwing, at the very end.
As a tank, you will find the greatest challenge of the encounter to be survival, as there are several highly damaging mechanics that you will be coming your way.
Overview of the Fight
The Madness of Deathwing encounter is a two phase fight.
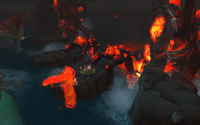 During Phase One,
you will have to defeat 4 of Deathwing's limbs (two wings and two arms).
This part takes place on 4 different platforms, surrounded by water. Each of
Deathwing's limbs rests on one platform, and your raid will have to travel
to every platform and kill all the limbs in order to make it to Phase Two.
During Phase Two, your raid will have to burn Deathwing's head, who will have crashed next to one of the platforms (where the entire phase is spent). At the same time, your raid will have to regularly kill two types of adds. Deathwing's health will initially be at 20% and he will deal increasing raid damage as he nears death.
Aspects and Their Buffs
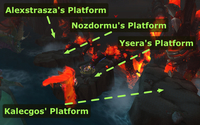 Throughout the fight, your raid will have assistance from the four dragon
Aspects. Each Aspect is flying over one of the four platforms, resulting in
the following naming conventions for the platforms in this guide:
- Leftmost platform: Alexstrasza's Platform;
- Middle-left platform: Nozdormu's Platform;
- Midle-right platform: Ysera's Platform;
- Rightmost platform: Kalecgos' Platform.
Each of the Aspects offers the raid a specific buff (such as increased health) and uses a specific ability.
- In Phase One, once an Aspect's platform has been cleared of Deathwing's limb, that Aspect will cease to assist the raid and focus solely on attacking Deathwing. This means that Phase One becomes increasingly difficult as you progress, and your raid will have to choose the order in which to clear the platform carefully.
- In Phase Two, the Aspects are once again fighting alongside your raid and they resume their assistance.
The Aspects provide the following buffs and abilities:
- Ysera provides the raid with:
 Ysera's Presence: 20% increased healing done;
 Dream: an ability that Ysera grants to all raid members. Players
receive an extra action button, with a 30 second cooldown. Using this ability
grants the player 50% damage reduction for 5 seconds.

- Alexstrasza provides the raid with:
 Alexstrasza's Presence: 20% increased maximum health;
 Cauterize (Phase One): an ability that Alexstrasza uses to
destroy all Blistering Tentacles (adds that spawn at certain times during
Phase One);
 Cauterize (Phase Two): an ability that Alexstrasza uses to
lower the damage done by
  Corrupted Blood (Deathwing's unique ability
during Phase Two).
- Nozdormu provides the raid with:
 Nozdormu's Presence: 20% increased haste;
-

 Time Zone: an ability that places a type of protective bubble on the
platform where the raid is currently fighting. This causes the
Elementium Bolt (a type of projectile NPC that flies towards the raid) to
be greatly slowed down, giving your raid more time to kill it. It also reduces
the attack speed of any enemies within the zone by 50%.
- Kalecgos provides the raid with:
 Kalecgos' Presence: 20% increased damage dealt;
 Spellweaver: causes all attacks to deal 23,000 Arcane
damage to all enemies within 6 yards of the main target (but not to the main
target itself).
Phase One
Phase One consists of clearing all 4 platforms of Deathwing's limbs. You will do this one platform at a time, and a platform is considered cleared when the respective Arm or Wing Tentacle has been killed. For each platform, you will have to defeat a series of adds in a specific order. Fortunately, this is the same for all 4 platforms (with a minor variation), so the strategy remains simple.
Your raid leader will almost certainly clear the platforms in the following order: Ysera > Nozdormu > Alexstrasza > Kalecgos or Ysera > Alexstrasza > Nozdormu > Kalecgos. As such, we will provide you with the strategy only for this sequence.
First Platform
Here, you will have to perform the following tasks:
-
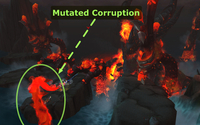
 Pick up and tank the Mutated Corruption (a large tentacle). It spawns
roughly 10 seconds after your raid reaches the platform. This add will deal
massive damage with
  Impale, for which you will have to
use defensive cooldowns. Impale also leaves behind a DoT that increases damage
taken by 100%, so a tank swap is required. Remember that you can make use of
Ysera's
  Dream ability as an extra defensive cooldown.
 -
 When Deathwing casts Elementium Bolt, stand as far away as possible
from its impact location (it is marked by a golden void zone), and use a
defensive cooldown (possibly an external one from a healer) to survive the
massive damage that you will receive from this ability.
 -
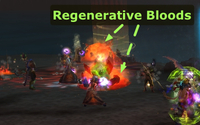
 After the Mutated Corruption has been killed, you will have to pick up and
tank 6 adds called Regenerative Bloods. They will be quickly killed by
your raid.
For the rest of the time, there is nothing for you to tank and you should simply contribute with any DPS that you can on the Arm/Wing Tentacle.
Second Platform
By now, your raid will have lost the 20% increased healing from Ysera as
well as the ![]() Dream ability.
Dream ability.
You should simply repeat the steps from the previous platform.
Third Platform
By now, your raid will have lost either Alexstrasza or Nozdormu's buffs.
In case you have lost Alexstrasza's buffs, you will now have 20% less health,
making it much more difficult to survive ![]() Impale and
Elementium Bolt, but there are no strategy changes whatsoever.
Impale and
Elementium Bolt, but there are no strategy changes whatsoever.
Fourth Platform
Your raid has now lost all but Kalecgos' buffs, meaning that this platform will be the most difficult for your raid to clear. Your own survival as well as the raid's survival will be put to the test, so you should not hesitate to use any cooldowns you have.
Otherwise, there is no strategy change.
Phase Two
During Phase Two, you have a single task as a tank: pick up one of the two
Elementium Terrors that spawn, and tank it inside Nozdormu's
![]() Time Zone until they are killed. These adds stack a very damaging debuff
on their tanks.
Time Zone until they are killed. These adds stack a very damaging debuff
on their tanks.
In all likelihood, 2 or 3 waves of Elementium Terrors will have time to spawn before Deathwing dies.
If you are a Protection Paladin and you are your raid's only tank (in a
single tank strategy), you can use ![]() Divine Shield (followed by a quick
/cancelaura Divine Shield) to get rid of any stacks of the
Divine Shield (followed by a quick
/cancelaura Divine Shield) to get rid of any stacks of the ![]() Tetanus
debuff.
Tetanus
debuff.
Tier 13 4-piece Tank Set Bonuses
You can use your 4-Part tier 13 set bonuses (all of which offer either damage reduction or increased health to the raid) at certain key points, in order to help the healers deal with the high amounts of raid damage. Specifically, these bonuses are of use:
- When an Elementium Bolt is landing (i.e., after Nozdormu's buffs are gone);
- When Blistering Tentacles are active (especially after Alexstrasza's buffs are gone);
- During Phase Two, after Deathwing is below 10% health.
Keep in mind that these cooldowns can only be used at the expense of your own major defensive cooldown (as they are, in fact, one and the same), and as such they may not always be available.
Furthermore, it is ideal that these cooldowns be worked into a cooldown rotation by the raid leader, and not just used freely.
Heroic Mode
The Heroic mode of Madness of Deathwing is a rather difficult and challenging encounter, that will test your abilities as a tank. You will also need to survive some rather extreme amounts of damage.
Differences from Normal Mode
All enemies have increased health, and most abilities do increased damage. The most important damage increases, that are relevant to you as a tank, are:
 Degenerative Bite now deals 1,800 damage per second, per stack in
10-man difficulty and 2,400 damage per second, per stack in 25-man
difficulty, up from 1,500 and 2,000 damage respectively.
 Impale now deals 840,000 damage in 10-man difficulty
and 1,200,000 damage in 25-man difficulty, up from 400,000 in both
difficulties.
 Tetanus now deals 72,000 damage on application and then another
24,000 damage per second, per stack in 10-man difficulty and 96,000 damage
on application and 36,000 damage per second, per stack in 25-man difficulty,
up from 60,000/20,000 and 80,000/30,000 respectively.
In addition to these increases, two new mechanics exist:
-
 Corrupting Parasite is a rather complex mechanic that will occur
twice on every platform during Phase One, once at around the same time that
the Mutated Corruption spawns and once again 60 seconds later.
It begins with
  Corrupting Parasite, a 10-second debuff cast by
Deathwing on a random raid member. This debuff deals increasing Shadow
damage, for a total of roughly 300,000 over the course of its duration. When
the debuff wears off, an NPC with the same name will spawn at the location of
the afflicted raid member.
-
Corrupting Parasite is the enemy NPC that spawns when
 Corrupting Parasite
wears off. The Corrupting Parasite has 3M health in 10-man difficulty and 9M
in 25-man difficulty. It has no aggro table, it does not melee, it can be
killed, and Alexstrasza's
  Cauterize (Phase One) will damage it
for a small amount of its life. When it spawns, it deals 250,000 Fire damage to all raid members
within 10 yards of its location (excluding the raid member who was affected
by the debuff). After this, the Corrupting Parasite will begin channeling
 Unstable Corruption.
-
 Unstable Corruption is a 10 second cast, at the end of which the
Corrupting Parasite will deal 10% of its remaining health as damage to the
entire raid. If the Parasite is inside the Time-Zone provided by Nozdormu, its
cast time is increased by 50%. After casting Unstable Corruption, the
Corrupting Parasite will despawn.
-
-
Corrupting Parasite is the enemy NPC that spawns when
- Congealing Bloods are adds that spawn during Phase Two. They spawn when Deathwing reaches 15%, 10%, and 5% health, but if Deathwing's health does not reach 15% within a minute of entering the phase, or 10% or 5% within a minute of reaching 15% and 10% respectively, the bloods will spawn regardless of his health. Each spawn is comprised of 9 Congealing Bloods. They have 950,000 health each in 10-man difficulty and 3.2M in 25-man difficulty. They perform no action other than slowly moving towards Deathwing. They have no aggro table and they are killable. Deathwing regains 1% of his total health every time a Congealing Blood reaches him.
Strategy
The fight will go on in much the same way as Normal mode, with only a few differences.
Corrupting Parasite
The Corrupting Parasite cannot target you as a tank, so your only concerns regarding it are:
- be 10 yards away from the affected player before the debuff runs out;
- for the second Parasite of each platform, tank the Regenerative Bloods on top of it.
Impale
The ![]() Impale ability now deals significantly more
damage than in Normal mode. On the first platform, you can use
Impale ability now deals significantly more
damage than in Normal mode. On the first platform, you can use ![]() Dream
together with a minor cooldown in order to survive it, while on other
platforms you will always require a major cooldown. Do not hesitate to ask
for help from healers, in the form of a
Dream
together with a minor cooldown in order to survive it, while on other
platforms you will always require a major cooldown. Do not hesitate to ask
for help from healers, in the form of a ![]() Power Word: Shield or an
external cooldown like
Power Word: Shield or an
external cooldown like ![]() Pain Suppression.
Pain Suppression.
Note that ![]() Divine Shield,
Divine Shield, ![]() Ardent Defender or
Ardent Defender or ![]() Guardian Spirit
will not protect you against Impale.
Guardian Spirit
will not protect you against Impale.
Phase Two: Elementium Terrors and Congealing Bloods
The new adds that spawn in Phase Two, the Congealing Bloods, are of no real concern to you. Your DPS players will AoE these down. However, for efficiency purposes, you may be required to tank the Elementium Terrors until the Bloods spawn and then move them on top of the Bloods, so that your raid can AoE them all together.
In any case, you should tank the Elementium Terrors inside the
![]() Time Zone until you have to move them onto the Bloods.
Time Zone until you have to move them onto the Bloods.


- Incredible 2% Difference, 2% Away From a Kill Head-to-Head Between Liquid and Echo on Midnight Falls
- This Housing Decor from Midnight Raids Ports You to Void-Related Places
- Class Fixes, Dungeon Changes, Mind-Seeker Improvement: Midnight Hotfixes, April 3rd
- Big April 7th Class Tuning Pass Detailed: Buffs for Underperformers and Tanks
- This New Addon Lets Players Target The Gear They Need
- WoW Players Can Finally Finish the Voidstorm Set After Bug Fix
- Blindfolded WoW Player Beats Midnight Season 1 Boss After 100 Attempts
- Class and Mythic+ Fixes: Midnight Hotfixes, April 2nd

