Board Clear Puzzles Guide for the Puzzle Lab
Board Clear Puzzles create very complex board-states and challenge you to be able to fully clear the board. The puzzles are very comparable to situations in ranked play where you wish to utilise the Defile spell, with the added condition that you must full clear all minions, including your own and any summoned by Deathrattle effects.
Hints and Solutions for each of the Board Clear Puzzles can be found below.
- 1. Board Clear Puzzles Overview
- 2. Dexter the Dendrologist's Board Clear Puzzle #1
- 3. Dexter the Dendrologist's Board Clear Puzzle #2
- 4. Dexter the Dendrologist's Board Clear Puzzle #3
- 5. Dexter the Dendrologist's Board Clear Puzzle #4
- 6. Dexter the Dendrologist's Board Clear Puzzle #5
- 7. Dexter the Dendrologist's Board Clear Puzzle #6
- 8. Dexter the Dendrologist's Board Clear Puzzle #7
- 9. Dexter the Dendrologist's Board Clear Puzzle #8
- 10. Flobbidinous Floop's Board Clear Puzzle #1
- 11. Flobbidinous Floop's Board Clear Puzzle #2
- 12. Flobbidinous Floop's Board Clear Puzzle #3
- 13. Flobbidinous Floop's Board Clear Puzzle #4
- 14. Flobbidinous Floop's Board Clear Puzzle #5
- 15. Flobbidinous Floop's Board Clear Puzzle #6
- 16. Flobbidinous Floop's Board Clear Puzzle #7
- 17. Demonologist Draan's Board Clear Puzzle #1
- 18. Demonologist Draan's Board Clear Puzzle #2
- 19. Demonologist Draan's Board Clear Puzzle #3
- 20. Demonologist Draan's Board Clear Puzzle #4
- 21. Demonologist Draan's Board Clear Puzzle #5
- 22. Dr. Morrigan's Board Clear Puzzle #1
- 23. Dr. Morrigan's Board Clear Puzzle #2
- 24. Dr. Morrigan's Board Clear Puzzle #3
- 25. Dr. Morrigan's Board Clear Puzzle #4
- 26. Dr. Morrigan's Board Clear Puzzle #5
- 27. Dr. Boom's Final Board Clear Puzzles
Board Clear Puzzles Overview
Dexter the Dendrologist Block
- Dexter the Dendrologist's Board Clear Puzzle 1
- Dexter the Dendrologist's Board Clear Puzzle 2
- Dexter the Dendrologist's Board Clear Puzzle 3
- Dexter the Dendrologist's Board Clear Puzzle 4
- Dexter the Dendrologist's Board Clear Puzzle 5
- Dexter the Dendrologist's Board Clear Puzzle 6
- Dexter the Dendrologist's Board Clear Puzzle 7
- Dexter the Dendrologist's Board Clear Puzzle 8
Flobbidinous Floop
- Flobbidinous Floop's Board Clear Puzzle 1
- Flobbidinous Floop's Board Clear Puzzle 2
- Flobbidinous Floop's Board Clear Puzzle 3
- Flobbidinous Floop's Board Clear Puzzle 4
- Flobbidinous Floop's Board Clear Puzzle 5
- Flobbidinous Floop's Board Clear Puzzle 6
- Flobbidinous Floop's Board Clear Puzzle 7
Demonologist Draan
- Demonologist Draan's Board Clear Puzzle 1
- Demonologist Draan's Board Clear Puzzle 2
- Demonologist Draan's Board Clear Puzzle 3
- Demonologist Draan's Board Clear Puzzle 4
- Demonologist Draan's Board Clear Puzzle 5
Dr. Morrigan
- Dr. Morrigan's Board Clear Puzzle 1
- Dr. Morrigan's Board Clear Puzzle 2
- Dr. Morrigan's Board Clear Puzzle 3
- Dr. Morrigan's Board Clear Puzzle 4
- Dr. Morrigan's Board Clear Puzzle 5
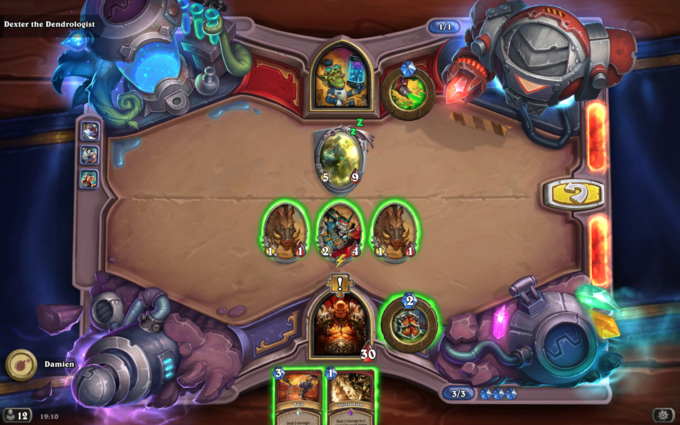
Dexter the Dendrologist's Board Clear Puzzle #1
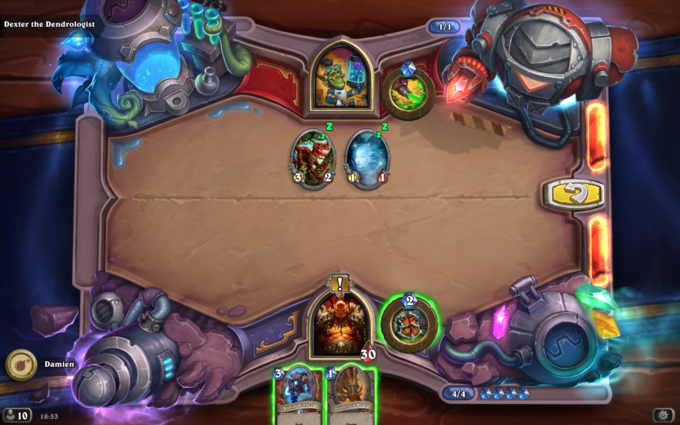
Hints
- All minions must die in Board Clear Puzzles, make sure you trade your minions into the correct targets.
Solution
- Play Stonetusk Boar.
- Trade Stonetusk Boar into the Wisp.
- Play Rabid Worgen.
- Trade Rabid Worgen into the Bloodfen Raptor.
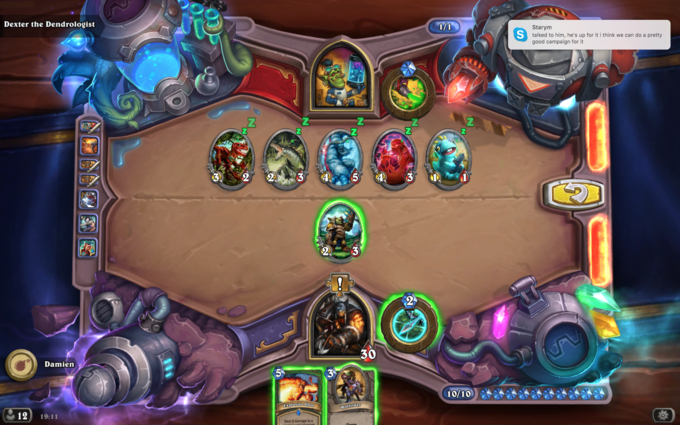
Dexter the Dendrologist's Board Clear Puzzle #2
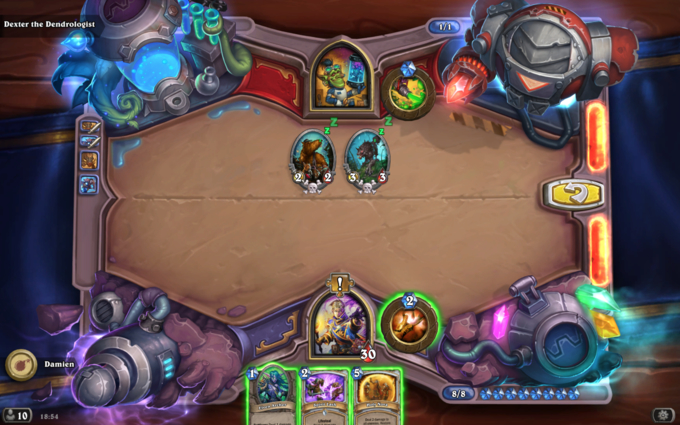
Hints
- Make sure to take into account minions spawned from Deathrattle effects.
Solution
- Use Elven Archer on the Infested Wolf.
- Play Holy Nova.
- Play Spirit Lash.
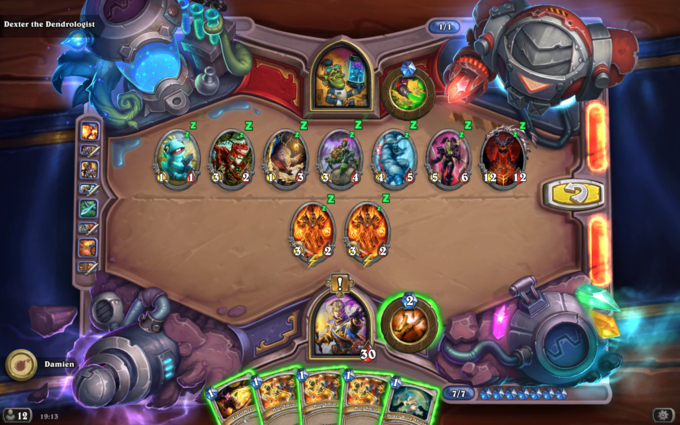
Dexter the Dendrologist's Board Clear Puzzle #3
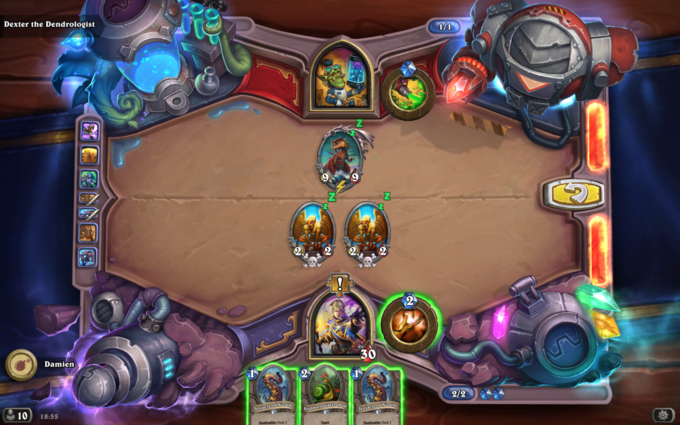
Hints
- Carefully consider sequencing when playing minions to make sure everything dies.
Solution
- Play both copies of Tentacle of N'Zoth.
- Play both copies of The Coin from your Gilded Gargoyles.
- Play Stubborn Gastropod.
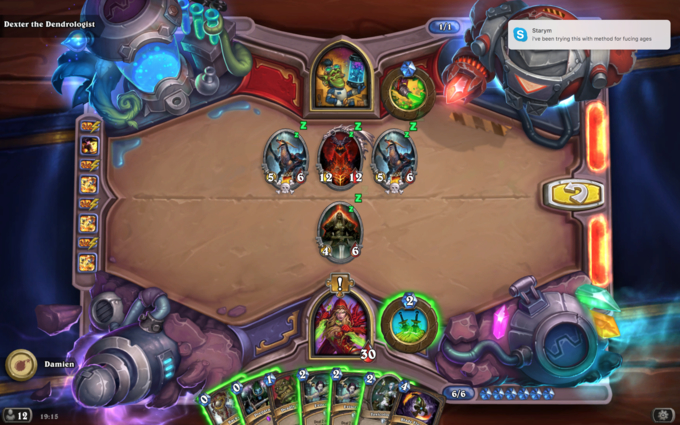
Dexter the Dendrologist's Board Clear Puzzle #4
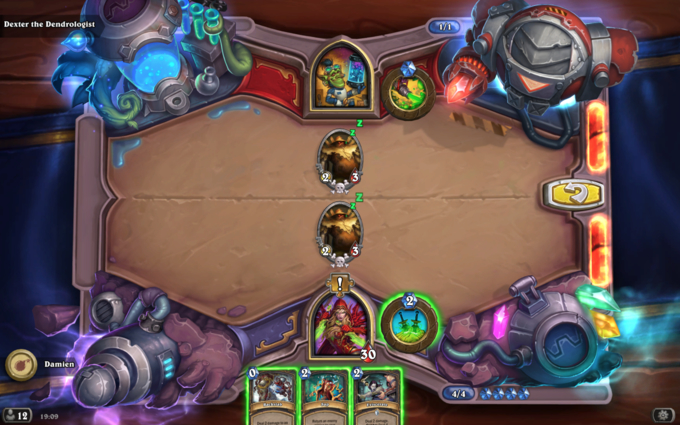
Hints
- Take note of which spells can only be used on specific targets and which can be used on any target.
Solution
- Use Sap on your opponent's Harvest Golem.
- Eviscerate your Harvest Golem.
- Backstab your remaining Damaged Golem.
Dexter the Dendrologist's Board Clear Puzzle #5
Hints
- Casting spells on your own minions is a valid way to boost the attack of your Frothing Berserker.
- Take care with the order you choose to attack with your minions.
Solution
- Use Bash on your Frothing Berserker.
- Attack Soggoth the Slitherer with both Stonetusk Boars.
- Attack Soggoth the Slitherer with your Frothing Berserker.
Dexter the Dendrologist's Board Clear Puzzle #6
Hints
- Think about how the position of minions changes when one of them dies to maximise your damage.
- Your Hero Power will revert back to normal if Steamwheedle Sniper dies.
Solution
- Play Wolfrider.
- Trade Wolfrider into River Crocolisk.
- Use Explosive Shot on Chillwind Yeti.
- Use your Hero Power to kill Murloc Tinyfin.
- Trade your Steamwheedle Sniper into the Toxic Sewer Ooze.
Dexter the Dendrologist's Board Clear Puzzle #7
Hints
- Try to keep a Wild Pyromancer alive as long as possible for maximum damage.
Solution
- Play Power Word: Shield on a Wild Pyromancer.
- Cast Flash Heal on your remaining Wild Pyromancer.
- Cast Holy Smite on Deathwing 3 times.
Dexter the Dendrologist's Board Clear Puzzle #8
Hints
- Your Spiteful Smith cannot attack so you must find a way to kill it off in addition to other minions.
- Do not be afraid to take large amounts of damage from attacking minions with your weapon.
Solution
- Use Backstab on your Spiteful Smith.
- Use your Hero Power.
- Use Deadly Poison.
- Play Toxicologist.
- Play Preparation.
- Attack Deathwing with your weapon.
- Play Blade Flurry.
- Play the 4 copies of The Coin from the Hoarding Dragons.
- Use Eviscerate to kill off your Spiteful Smith.
- Use a second Eviscerate to kill off your Toxicologist.
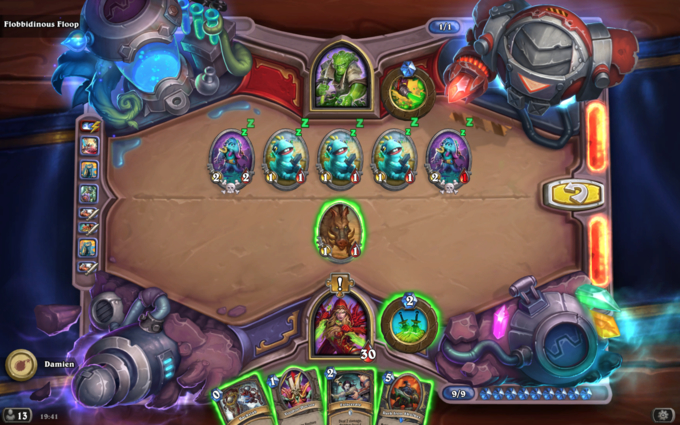
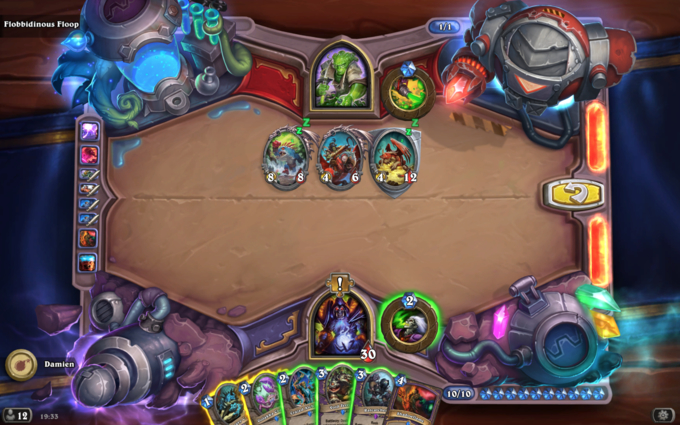
Flobbidinous Floop's Board Clear Puzzle #1

Hints
- Humility and Aldor Peacekeeper can be used to manipulate the outcome of Enter the Coliseum.
- The Deathrattle of Anomalus can greatly help with clearing the board.
- Take into consideration Deathrattle effects before using Enter the Coliseum.
Solution
- Use Humility on Deathwing.
- Use Aldor Peacekeeper on Anomalus.
- Attack Sleepy Dragon with your own Sleepy Dragon.
- Attack Hungry Ettin with your Boulderfist Ogre.
- Play Enter the Coliseum.
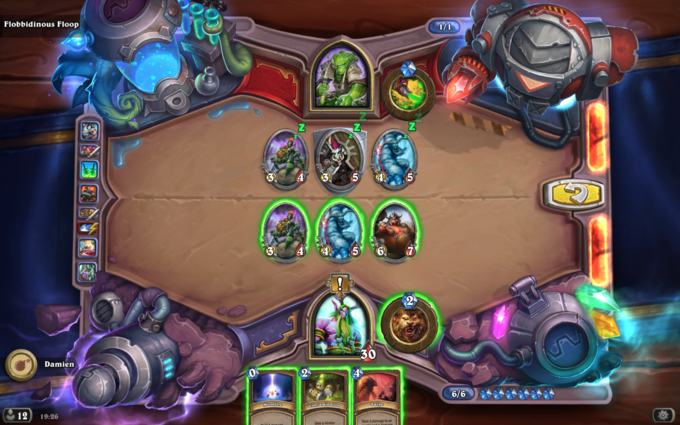
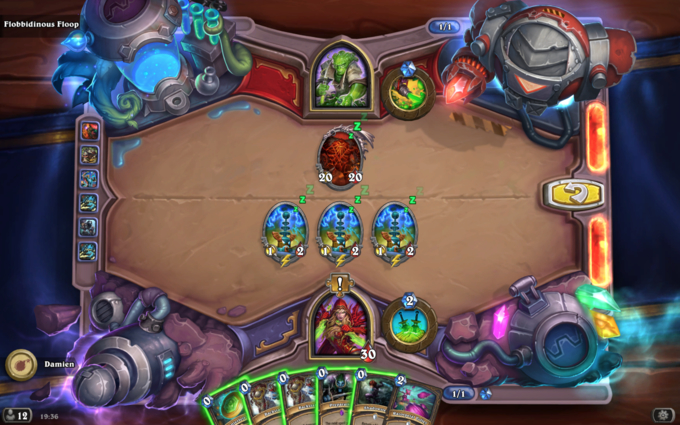
Flobbidinous Floop's Board Clear Puzzle #2
Hints
- Try to kill the whole board simultaneously before the Spawn of N'Zoth buffs take effect.
- Make sure you save a way to kill off your remaining minions.
Solution
- Use Voodoo Doctor on the damaged Spawn of N'Zoth.
- Trade Stonetusk Boar into any Murloc Tinyfin.
- Play Dark Iron Skulker.
- Backstab your Voodoo Doctor.
- Eviscerate your Dark Iron Skulker.
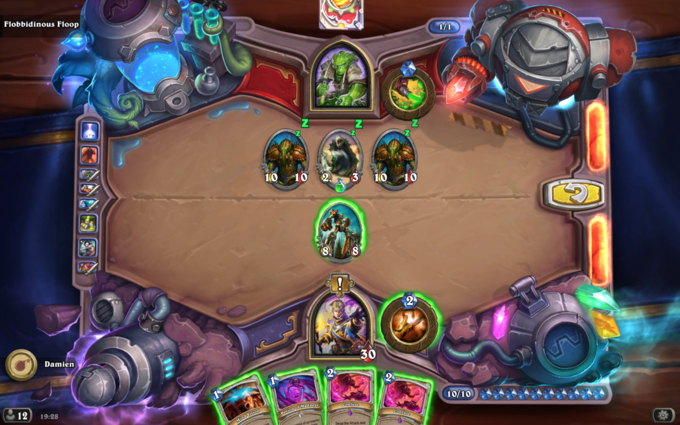
Flobbidinous Floop's Board Clear Puzzle #3
Hints
- Contamination can be used on both friendly and enemy minions.
- Swipe can only target enemy minions.
Solution
- Use Contamination of the Sen'jin Shieldmasta.
- Trade your Boulderfist Ogre into the Sen'jin Shieldmasta.
- Trade your Spider Tank into the enemy Chillwind Yeti.
- Use your Chillwind Yeti to finish off your opponent's Chillwind Yeti.
- Swipe the Spider Tank.
- Use Moonfire to finish off your Chillwind Yeti.
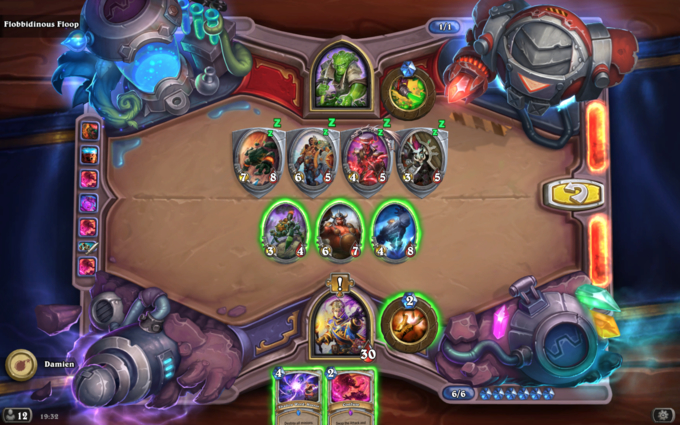
Flobbidinous Floop's Board Clear Puzzle #4
Hints
- Your Mind Vision can be used to steal a copy of Shadowflame.
- Casting Confuse twice is a great way to steal high-Attack minions.
Solution
- Play Mind Vision to steal a copy of Shadowflame.
- Trade your Clockwork Giant into either Faceless Behemoth.
- Cast Confuse.
- Use Potion of Madness to steal the 2-Attack Faceless Behemoth.
- Cast Confuse again.
- Use Shadowflame on your Faceless Behemoth.
Flobbidinous Floop's Board Clear Puzzle #5
Hints
- The combination of Confuse and Shadow Word: Horror effectively removes all minions with 2-Health or less.
- Plan your trades carefully to make sure all minions die.
Solution
- Trade your Stormwatcher into the Sen'jin Shieldmasta and then the Lord of the Arena.
- Trade your Boulderfist Ogre into the Earth Elemental.
- Trade your Spider Tank into the Wrathion.
- Play Confuse.
- Play Shadow Word: Horror.
Flobbidinous Floop's Board Clear Puzzle #6
Hints
- Void Terror and Ratcatcher are great ways to remove your own minions.
- Although you have Hungry Crab and Golakka Crawler available, they may not both be necessary.
- There are many solutions available for this puzzle
Solution
- Use Hungry Crab on Megafin.
- Use Crazed Alchemist on Sleepy Dragon.
- Place your Void Terror between your Hungry Crab and Crazed Alchemist.
- Shadowflame your Void Terror.
Flobbidinous Floop's Board Clear Puzzle #7
Hints
- Calculate the sequencing of your spells carefully to maximise your damage from your Gelbin's Coils.
- You can easily remove your board with Backstabs and Shadowstep.
- There are many solutions available for this puzzle.
Solution
- Play Counterfeit Coin.
- Play Preparation.
- Play Razorpetal Volley.
- Cast 2 copies of Razorpetal on Golemagg.
- Backstab 2 of your Gelbin's Coils.
- Shadowstep your final Gelbin's Coil.
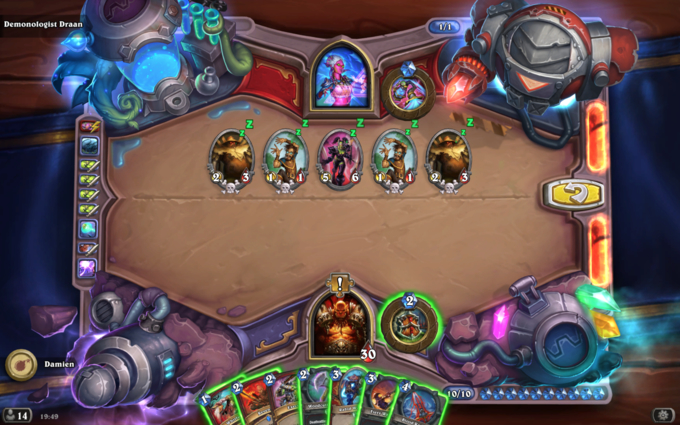
Demonologist Draan's Board Clear Puzzle #1
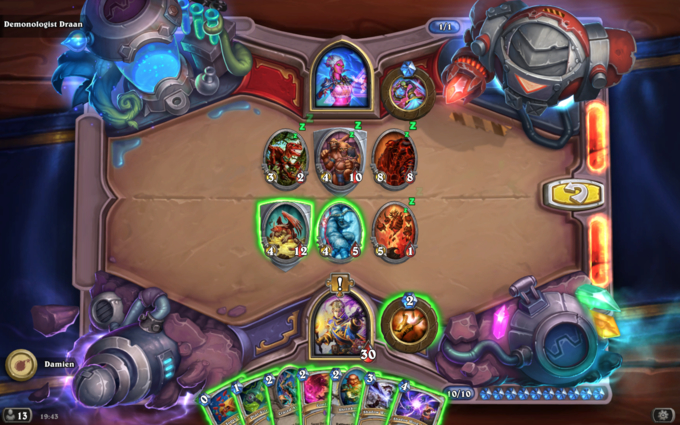
Hints
- Confuse and Shadow Word: Horror is a great combination for finishing off low-Health minions.
- There are many solutions available for this puzzle.
Solution
- Play Topsy Turvy on your Sleepy Dragon.
- Trade your Sleepy Dragon into the Hungry Ettin.
- Use Shadow Word: Death on the Molten Giant.
- Trade your Chillwind Yeti into the Bloodfen Raptor.
- Play Confuse.
- Play Shadow Word: Horror.
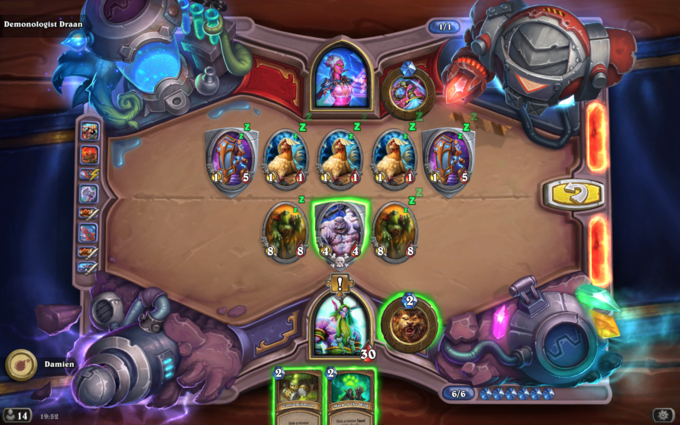
Demonologist Draan's Board Clear Puzzle #2
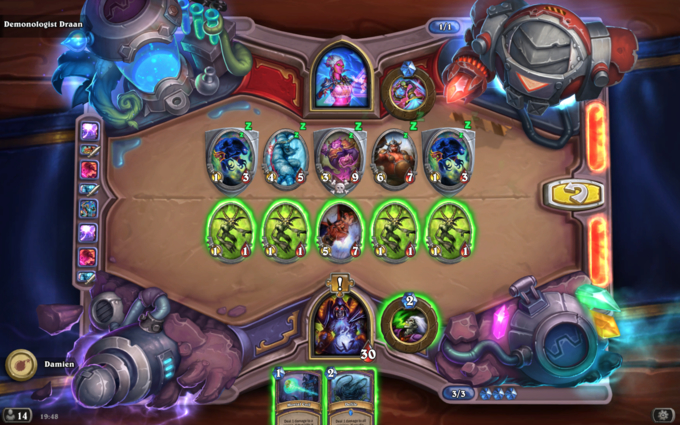
Hints
- Look for a continuous amount of Health between all minions on the board when playing with Defile.
- Mortal Coil is a great tool to help line up Health values of minions before a Defile sequence.
- Remember to consider minions that spawn from Deathrattle effects for your Defile sequence.
Solution
- Use Mortal Coil on the Boulderfist Ogre.
- Hit the Doomguard into the Voidlord.
- Trade a single Imp into a Voidwalker.
- Play Defile.
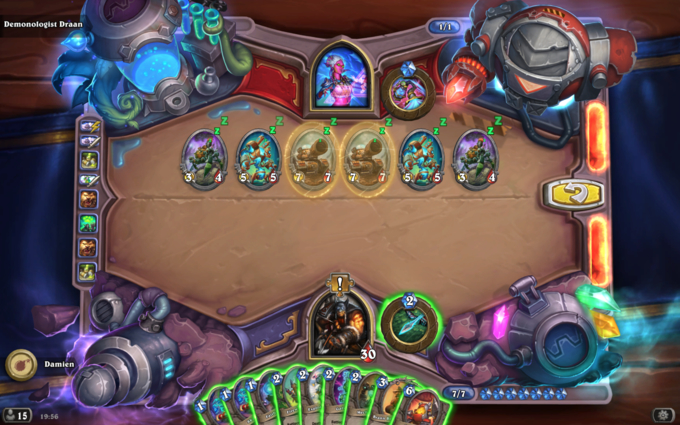
Demonologist Draan's Board Clear Puzzle #3
Hints
- Count the number of Whirlwind effects needed to clear most of the minions on the board, including any Deathrattle spawns.
- Prioritise maximising the Whirlwind effects from your hand and do not get distracted by other cards and their synergies.
Solution
- Play Blood Razor.
- Attack Pit Fighter with your weapon.
- Play Revenge.
- Play Whirlwind.
- Play Woodcutter's Axe to destroy your Blood Razor.
Demonologist Draan's Board Clear Puzzle #4
Hints
- Mark of the Wild can help you attack minions behind Taunt effects.
- Poisonous minions kill minions they damage with all effects, not just direct attacks.
Solution
- Use Mark of the Wild on an Angry Chicken.
- Attack the Angry Chicken with your Hero Power.
- Use Contamination on your Abomination.
- Trade your Abomination into the Angry Chicken.
Demonologist Draan's Board Clear Puzzle #5
Hints
- The combination of Galvanizer and Mechwarper will allow you to play most of your hand.
- Fireworks Tech is very strong in combination with Explosive Sheep.
- Make use of the Skaterbots to deal with bigger minions.
Solution
- Play Brann Bronzebeard.
- Play Galvanizer.
- Play Explosive Sheep.
- Use Faithful Lumi on your Exploding Sheep.
- Use Fireworks Tech on your Exploding Sheep.
- Use Skaterbot's Magnetic buff on your Exploding Sheep.
- Play Mechwarper.
- Use your second Skaterbot's Magnetic buff on your Mechwarper.
- Trade your Mechwarper into a Force-Tank MAX.
- Trade your Exploding sheep into your opponent's other Force Tank MAX.
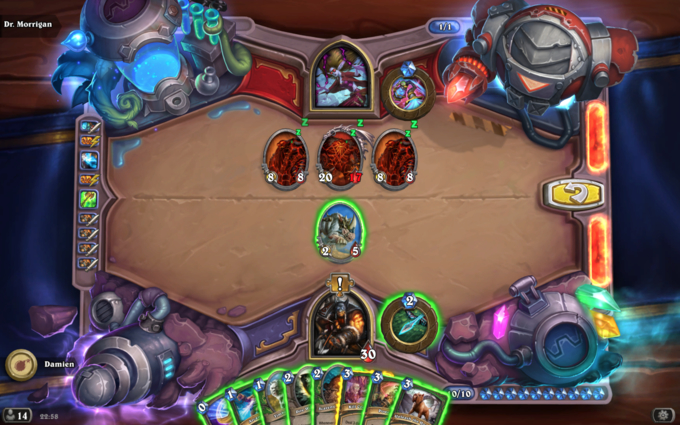
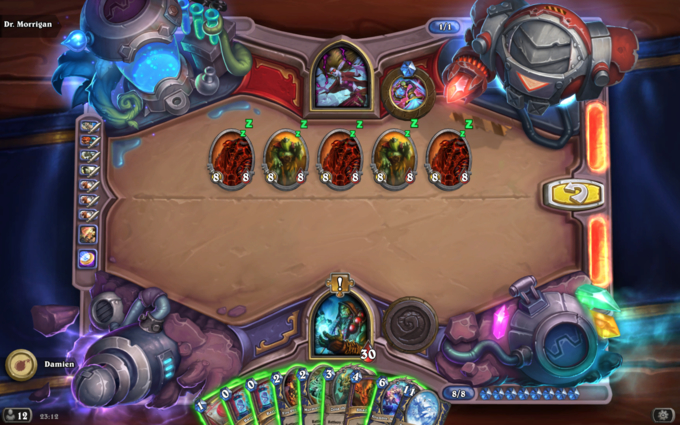
Dr. Morrigan's Board Clear Puzzle #1
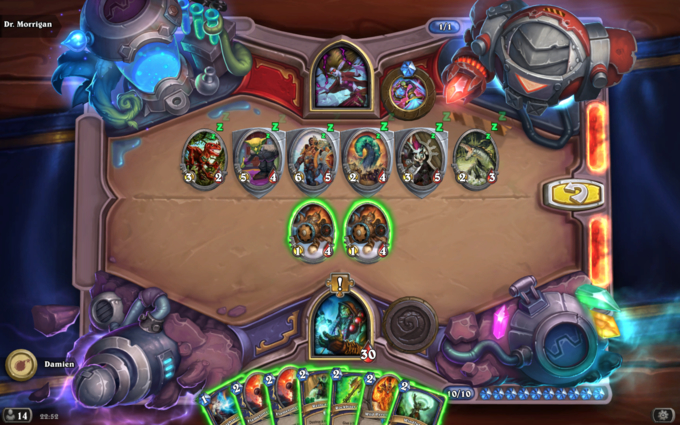
Hints
- Reincarnate can be used to replenish the Health of a Wild Pyromancer.
- There are many solutions to this puzzle. Focus on dealing damage to bigger minions to complement the AoE of your Wild Pyromancer.
Solution
- Play Flametongue Totem between your two Flying Machines.
- Use one Flying Machine to attack the Squirming Tentacle and then the Lord of the Arena.
- Use the second Flying Machine to attack the Sen'jin Shieldmasta and then the Booty Bay Bodyguard.
- Play Wild Pyromancer
- Use Lightning Bolt on the Flametongue Totem.
- Use Rockbiter Weapon on your Hero.
- Attack the remaining River Crocolisk with your Hero.
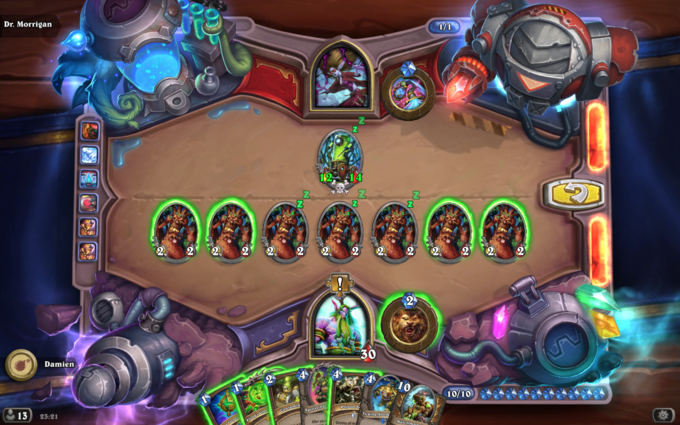
Dr. Morrigan's Board Clear Puzzle #2
Hints
- Take care with your positioning to maximise the damage bonus of Dire Wolf Alpha.
- Sequence your Beasts correctly to maximise the damage of Scavenging Hyena.
Solution
- Play Timber Wolf.
- Play Scavenging Hyena.
- Play Dire Wolf Alpha on the right-hand side of your board.
- Play Unleash the Hounds.
- Play The Coin.
- Play Powershot on Golemagg.
- Attack a Molten Giant with your left-most Hound, that is adjacent to your Dire Wolf Alpha.
- Attack a Molten Giant again with your left-most Hound.
- Attack a Molten Giant a third time left-most Hound.
- Finish off the remaining Molten Giant with your Dire Wolf Alpha.
- Trade your Timber Wolf into Golemagg.
- Trade your Scavenging Hyena into Golemagg.
- Finish off Golemagg with your Tundra Rhino.
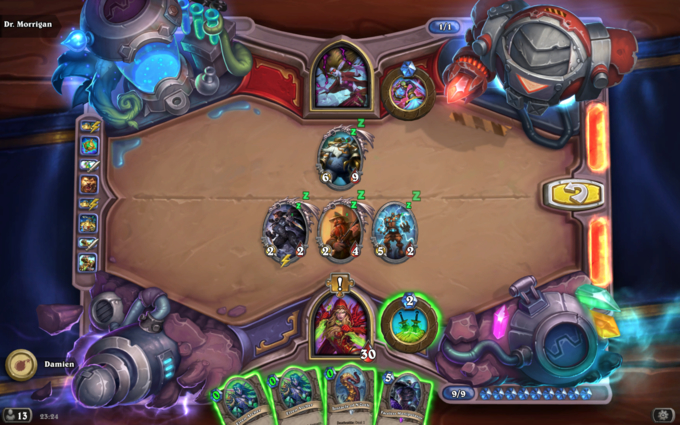
Dr. Morrigan's Board Clear Puzzle #3
Hints
- The only way to deal damage from your hand is with Shadowflame.
- Find a way to play Snowfury Giant to combine with your Shadowflame.
Solution
- Play Murmuring Elemental.
- Play Fire Plume Harbinger.
- Use Zola the Gorgon on Fire Plume Harbinger.
- Play Battery Pack.
- Play another Fire Plume Harbinger.
- Play Grumble, Worldshaker.
- Play another Fire Plume Harbinger.
- Use Zola the Gorgon on Fire Plume Harbinger.
- Play your Murmuring Elemental.
- Play your 0-Mana Fire Plume Harbinger.
- Play your other Fire Plume Harbinger.
- Play Back-up Plan.
- Play Battery Pack.
- Play Snowfury Giant.
- Play Shadowflame.
Dr. Morrigan's Board Clear Puzzle #4
Hints
- There are many combinations for this puzzle, but contamination and Ticking Abomination are easy ways to deal with both sides of the board.
- Floop's Glorious Gloop can yield a lot of Mana due to the Treants on the board.
Solution
- Play Floop's Glorious Gloop.
- Use Contamination on a Treant.
- Trade with the contaminated Treant.
- Trade a second Treant into the Deathrattle spawn.
- Play Spiritsinger Umbra.
- Play Ticking Abomination to wipe your board.
- Use Lesser Jasper Spellstone to finish off your Ticking Abomination.
Dr. Morrigan's Board Clear Puzzle #5
Hints
- The combination of Sonya Shadowdancer and Galvanized Golem can provide an infinite supply of minions.
- Be careful not to let your Sonya Shadowdancer die alone.
- Use Tentacle of N'Zoth to stop your board from getting too full.
Solution
- Copy Sonya Shadowdancer with Faceless Manipulator.
- Kill a copy of Sonya Shadowdancer with an Elven Archer.
- Replay the 1-Cost Sonya Shadowdancer for free.
- Use an Elven Archer to kill an Elven archer to generate 2 more Elven Archers.
- Kill another Elven Archer with an Elven Archer.
- Kill another Elven Archer with an Elven Archer.
- Play Tentacle of N'Zoth.
- Use an Elven Archer to kill the Tentacle of N'Zoth to make room on the board.
- Use 2 Elven Archer Battlecries to damage the Foe Reaper 4000.
- Play another Tentacle of N'Zoth.
- Kill the Tentacle of N'Zoth with an Elven Archer.
- Use another Elven Archer on the Foe Reaper 4000.
- Play 2 copies of Tentacle of N'Zoth.
- Use an Elven Archer Battlecry to kill one of the Tentacles of N'Zoth and clear the board.
Dr. Boom's Final Board Clear Puzzles
Once you have completed all 25 standard Board Clear Puzzles, you will unlock the Board Clear section of Dr. Boom's final challenge. Hints and solutions to these puzzles can be found in the Dr. Boom's Puzzles Guide.
Changelog
- 24 Aug. 2018: Added puzzle images.
- 22 Aug. 2018: Guide added.
This guide is presented to you by Kat, a professional Hearthstone player competing at the highest level since closed beta. She is a consistent legend player in both Wild and Standard with multiple high-rank finishes.
- Hearthstone Brings StarCraft and Major Updates in 2025
- Blizzard at Gamescom 2024
- Icy Veins Seeking Writers for Zenless Zone Zero: Apply Today!
- No BlizzCon in 2024
- Blizzard Games Return to China: New Agreement Signed With NetEase
- Blizzard Reportedly Reuniting with NetEase to Bring Back WoW in China
- Ex-Activision Blizzard CEO Bobby Kotick Shows Interest in Buying TikTok
- Timeline of Blizzard Presidents