Lethal Puzzles Guide for the Puzzle Lab
Lethal Puzzles are very reminiscent of situations that you will find in normal play and require you to find a way to kill your opponent in a single turn with the resources and board state given to you.
Hints and Solutions for each of the Lethal Puzzles can be found below.
Puzzle Lab Guides
TABLE OF CONTENTS OF THIS PAGE
- 1. Lethal Puzzles Overview
- 2. Poisonmaster Pollark's Lethal Puzzle #1
- 3. Poisonmaster Pollark's Lethal Puzzle #2
- 4. Poisonmaster Pollark's Lethal Puzzle #3
- 5. Poisonmaster Pollark's Lethal Puzzle #4
- 6. Poisonmaster Pollark's Lethal Puzzle #5
- 7. Poisonmaster Pollark's Lethal Puzzle #6
- 8. Poisonmaster Pollark's Lethal Puzzle #7
- 9. Poisonmaster Pollark's Lethal Puzzle #8
- 10. Poisonmaster Pollark's Lethal Puzzle #9
- 11. Myra Rotspring's Lethal Puzzle #1
- 12. Myra Rotspring's Lethal Puzzle #2
- 13. Myra Rotspring's Lethal Puzzle #3
- 14. Myra Rotspring's Lethal Puzzle #4
- 15. Myra Rotspring's Lethal Puzzle #5
- 16. Myra Rotspring's Lethal Puzzle #6
- 17. Myra Rotspring's Lethal Puzzle #7
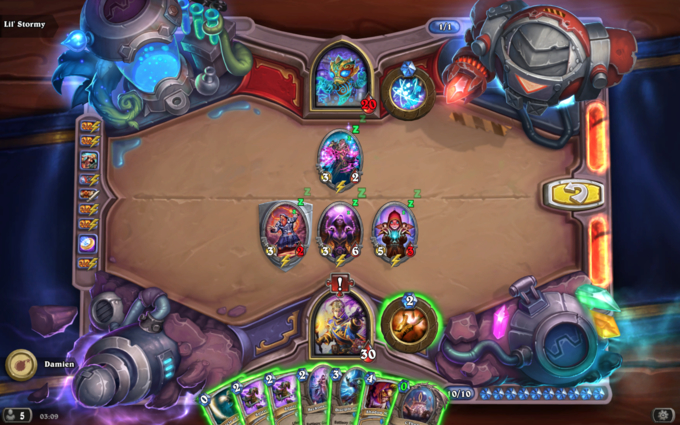
- 18. Lil' Stormy's Lethal Puzzle #1
- 19. Lil' Stormy's Lethal Puzzle #2
- 20. Lil' Stormy's Lethal Puzzle #3
- 21. Lil' Stormy's Lethal Puzzle #4
- 22. Lil' Stormy's Lethal Puzzle #5
- 23. Lil' Stormy's Lethal Puzzle #6
- 24. Lil' Stormy's Lethal Puzzle #7
- 25. Electra Stormsurge's Lethal Puzzle #1
- 26. Electra Stormsurge's Lethal Puzzle #2
- 27. Electra Stormsurge's Lethal Puzzle #3
- 28. Electra Stormsurge's Lethal Puzzle #4
- 29. Electra Stormsurge's Lethal Puzzle #5
- 30. Electra Stormsurge's Lethal Puzzle #6
- 31. Dr. Boom's Final Lethal Puzzles
1.
Lethal Puzzles Overview
1.1.
Poisonmaster Pollark Block
- Poisonmaster Pollark's Lethal Puzzle 1
- Poisonmaster Pollark's Lethal Puzzle 2
- Poisonmaster Pollark's Lethal Puzzle 3
- Poisonmaster Pollark's Lethal Puzzle 4
- Poisonmaster Pollark's Lethal Puzzle 5
- Poisonmaster Pollark's Lethal Puzzle 6
- Poisonmaster Pollark's Lethal Puzzle 7
- Poisonmaster Pollark's Lethal Puzzle 8
- Poisonmaster Pollark's Lethal Puzzle 9
1.2.
Myra Rotspring Block
- Myra Rotspring's Lethal Puzzle 1
- Myra Rotspring's Lethal Puzzle 2
- Myra Rotspring's Lethal Puzzle 3
- Myra Rotspring's Lethal Puzzle 4
- Myra Rotspring's Lethal Puzzle 5
- Myra Rotspring's Lethal Puzzle 6
- Myra Rotspring's Lethal Puzzle 7
1.3.
Lil' Stormy Block
- Lil' Stormy's Lethal Puzzle 1
- Lil' Stormy's Lethal Puzzle 2
- Lil' Stormy's Lethal Puzzle 3
- Lil' Stormy's Lethal Puzzle 4
- Lil' Stormy's Lethal Puzzle 5
- Lil' Stormy's Lethal Puzzle 6
- Lil' Stormy's Lethal Puzzle 7
1.4.
Electra Stormsurge Block
- Electra Stormsurge's Lethal Puzzle 1
- Electra Stormsurge's Lethal Puzzle 2
- Electra Stormsurge's Lethal Puzzle 3
- Electra Stormsurge's Lethal Puzzle 4
- Electra Stormsurge's Lethal Puzzle 5
- Electra Stormsurge's Lethal Puzzle 6
2.
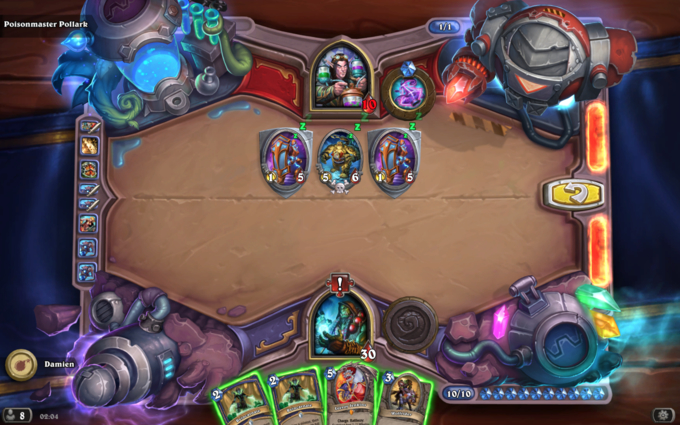
Poisonmaster Pollark's Lethal Puzzle #1

2.1.
Hints
- Remember to activate your Combo effects.
- Take care when sequencing your spells and attacks.
2.2.
Solution
- Use the Dagger Mastery Hero Power.
- Play Deadly Poison.
- Use Cold Blood on Bluegill Warrior
- Attack the enemy Hero with your weapon.
- Attack the enemy Hero with your Bluegill Warrior.
3.
Poisonmaster Pollark's Lethal Puzzle #2
3.1.
Hints
- You do not have enough Mana to play all of your cards.
- Be careful when sequencing your spells and minion attacks.
3.2.
Solution
4.
Poisonmaster Pollark's Lethal Puzzle #3
4.1.
Hints
- You do not have enough Mana to play all of your cards.
- You can deal all the damage with your Stonetusk Boar.
- Windfury can double any Attack buffs you use.
4.2.
Solution
- Play the Stonetusk Boar.
- Cast Windfury on the Boar.
- Use Abusive Sergeant and Rockbiter Weapon on the Boar.
- Attack the enemy Hero Twice with Stonetusk Boar.
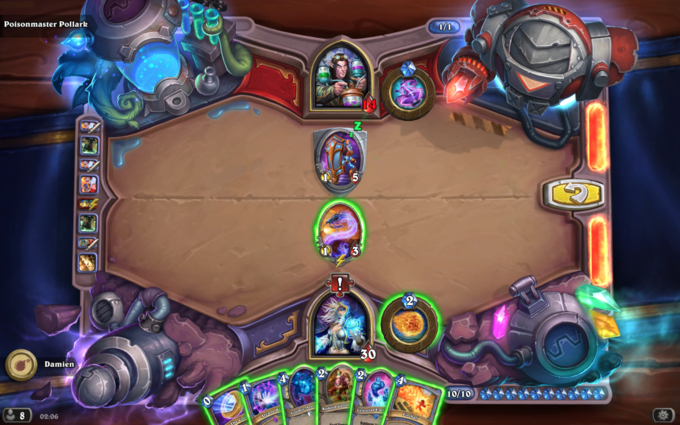
5.
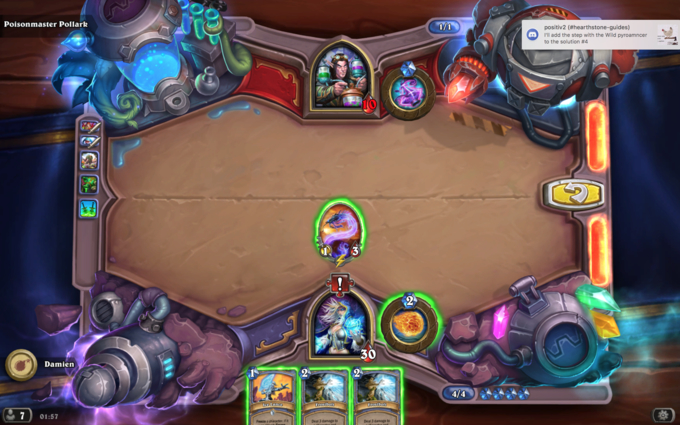
Poisonmaster Pollark's Lethal Puzzle #4
5.1.
Hints
- You have enough Mana to play your entire hand.
- Charge minions can immediately benefit from Flametongue Totem.
- Take care with your minion positioning.
5.2.
Solution
- Trade Stonetusk Boar into Ironfur Grizzly.
- Remove Shieldbearer with Bluegill Warrior.
- Play a Stonetusk Boar next to the Flametongue Totem and attack the enemy Hero.
- Play a second Stonetusk Boar next to the Flametongue Totem and attack the enemy Hero.
- Play Wolfrider next to the Flametongue Totem and attack the enemy Hero.
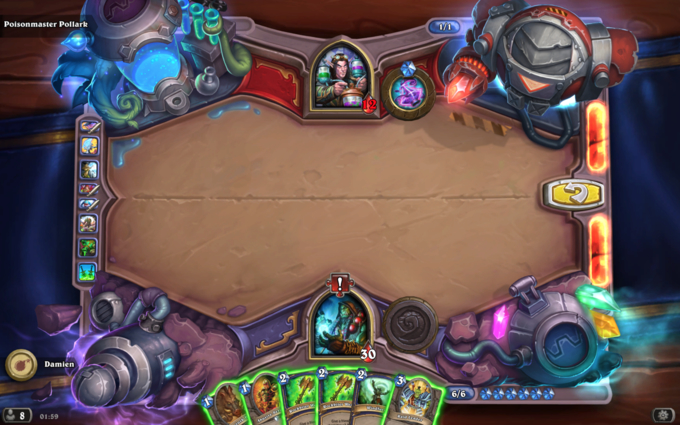
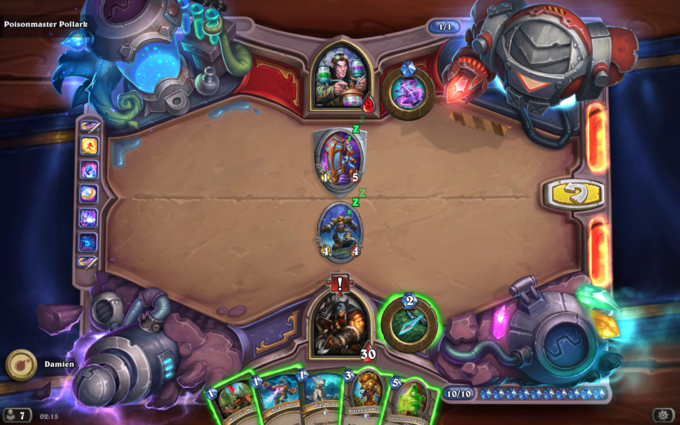
6.
Poisonmaster Pollark's Lethal Puzzle #5
6.1.
Hints
- Make sure you get maximum value from Whirlwind.
- Shield Slam can target friendly minions.
6.2.
Solution
- Play both Rabid Worgens.
- Play Whirlwind.
- Trade both Rabid Worgens into the Ironwood Golem.
- Use your Armor Up! Hero Power.
- Shield Slam your Frothing Berserker.
- Attack the enemy Hero with your Frothing Berserker.
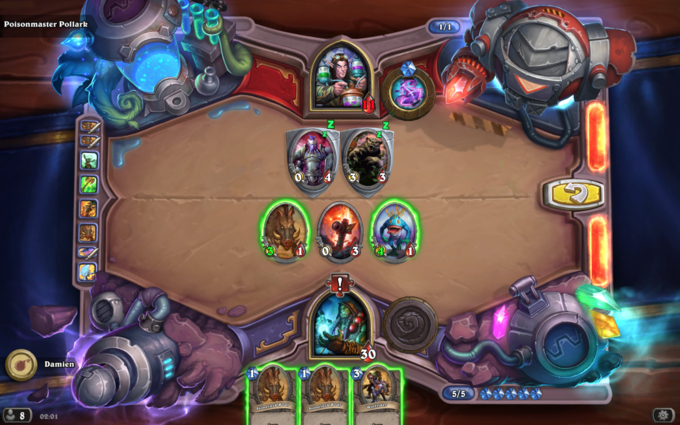
7.
Poisonmaster Pollark's Lethal Puzzle #6
7.1.
Hints
- Take care with your Mana usage.
- Reincarnate can target enemy minions.
- Reincarnate will allow Charge minions to attack again.
7.2.
Solution
- Use Reincarnate on Ticking Abomination to clear the enemy Taunt minions.
- Play Leeroy Jenkins.
- Attack the enemy Hero with Leeroy Jenkins.
- Use Reincarnate on Leeroy Jenkins.
- Attack the enemy Hero with Leeroy Jenkins a second time.
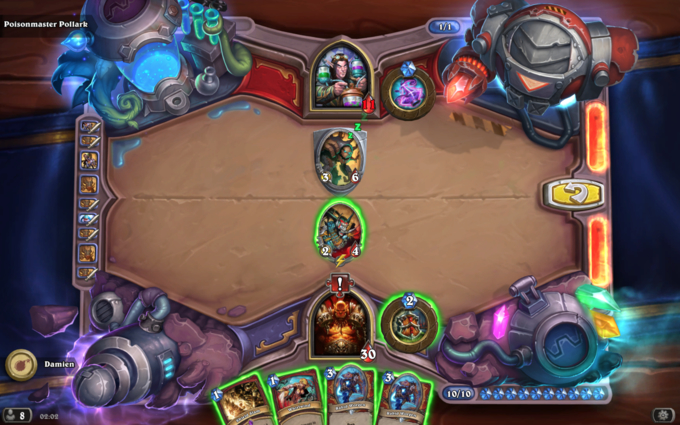
8.
Poisonmaster Pollark's Lethal Puzzle #7
8.1.
Hints
- You do not have enough Mana for everything; make use of your most efficient cards.
- Take care when sequencing Celestial Emissary and The Coin.
- Remember to sequence you spells and minion attacks correctly.
8.2.
Solution
- Play Cosmic Anomaly.
- Use Arcane Blast on Bronze Gatekeeper.
- Play The Coin.
- Play Celestial Emissary.
- Use Fireball on the enemy Hero.
- Attack the enemy Hero with Mana Wyrm.
9.
Poisonmaster Pollark's Lethal Puzzle #8
9.1.
Hints
- Maximising your Hero Power damage is key for this puzzle.
- You do not have enough Mana to play all cards so be careful which ones you choose to use.
- There are many solutions available for this puzzle.
9.2.
Solution
- Use Carnivorous Cube on Clockwork Automaton.
- Use Play Dead on Carnivorous Cube.
- Use Hunter's Mark on Carnivorous Cube.
- Use Arcane Shot on Carnivorous Cube.
- Use the Steady Shot Hero Power.
10.
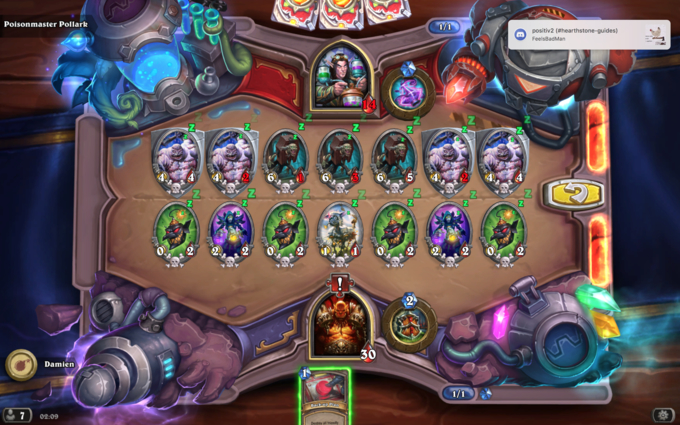
Poisonmaster Pollark's Lethal Puzzle #9
10.1.
Hints
- This puzzle is mostly just for fun.
- You only have one possible action available.
10.2.
Solution
- Play Back-up Plan and enjoy the fireworks!
11.
Myra Rotspring's Lethal Puzzle #1
11.1.
Hints
- Minions can be unfrozen with Silence effects.
- All your Beasts will have Charge due to Tundra Rhino.
11.2.
Solution
- Use Ironbeak Owl on Stranglethorn Tiger.
- Attack the enemy Hero with Tundra Rhino.
- Attack the enemy Hero with Ironbeak Owl.
- Attack the enemy Hero with Stranglethorn Tiger.
- Use the Steady Shot Hero Power.
12.
Myra Rotspring's Lethal Puzzle #2
12.1.
Hints
- Shadow Word: Death can target friendly minions.
- You do not have enough Mana to play all of your cards.
- Remember to attack with your minions before you kill them.
12.2.
Solution
- Use Potion of Madness on a Frostwolf Grunt.
- Trade the stolen Frostwolf Grunt into the other Frostwolf Grunt.
- Attack the enemy Hero with Sylvanas Windrunner.
- Use Shadow Word: Death on Sylvanas to steal King Krush.
- Attack the enemy Hero with King Krush.
- Play Mind Blast.
- Use Holy Smite on the enemy Hero.
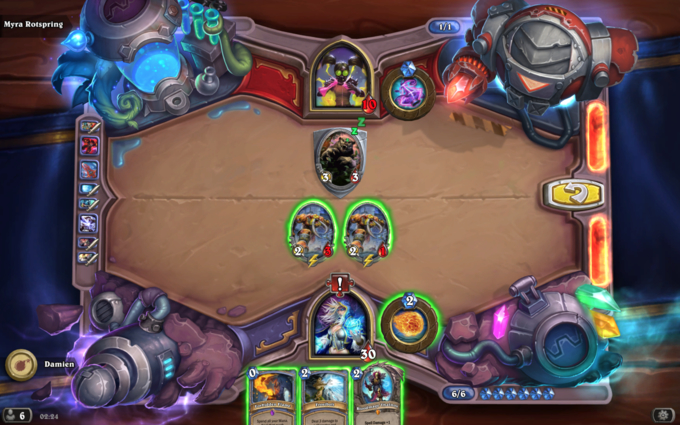
13.
Myra Rotspring's Lethal Puzzle #3
13.1.
Hints
- You do not have to kill your opponent directly.
- Spud M.E. will change side every time it takes damage, so plan your damage carefully.
13.2.
Solution
- Attack Spud M.E. with your Wisp.
- Play Blood Razor.
- Use Inner Rage on your Frothing Berserker.
- Remove Spud M.E. with your Frothing Berserker to kill your opponent.
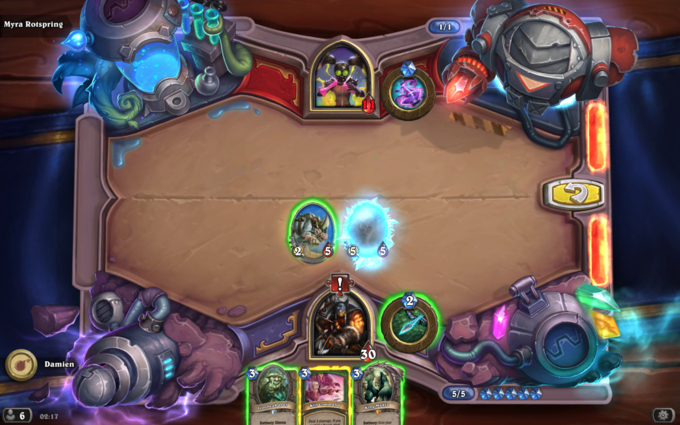
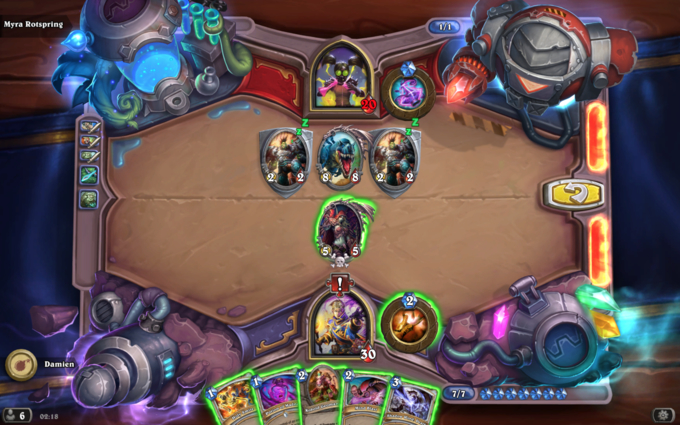
14.
Myra Rotspring's Lethal Puzzle #4
14.1.
Hints
- Forbidden Flame will still be applied Spell Damage when used with 0 Mana.
- Gurubashi Berserker can easily turn 1 damage into 3.
14.2.
Solution
- Play Bloodmage Thalnos.
- Use Frostbolt on Ironfur Grizzly.
- Use your Fireblast Hero Power on your 2/3 Gurubashi Berserker.
- With 0 Mana, use Forbidden Flame on your 5/2 Gurubashi Berserker.
- Attack the enemy Hero with your 2/1 Gurubashi Berserker.
- Attack the enemy Hero with your 8/1 Gurubashi Berserker.
15.
Myra Rotspring's Lethal Puzzle #5
15.1.
Hints
- You do not have enough Mana to use every card in your hand.
- Attack with minions where possible before using Shadowstep.
- Silenced minions will regain their abilities if Shadowstepped.
15.2.
Solution
- Use Backstab on Pompous Thespian.
- Attack the enemy Hero with Magma Rager.
- Attack the enemy Hero with Kobold Geomancer.
- Shadowstep and replay Kobold Geomancer.
- Play Sinister Strike.
- Use Razorpetal on the enemy Hero.
- Play Leper Gnome.
- Use Backstab on the Leper Gnome.
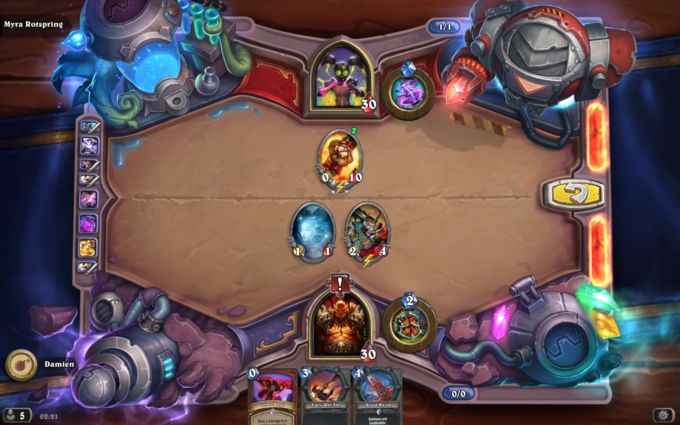
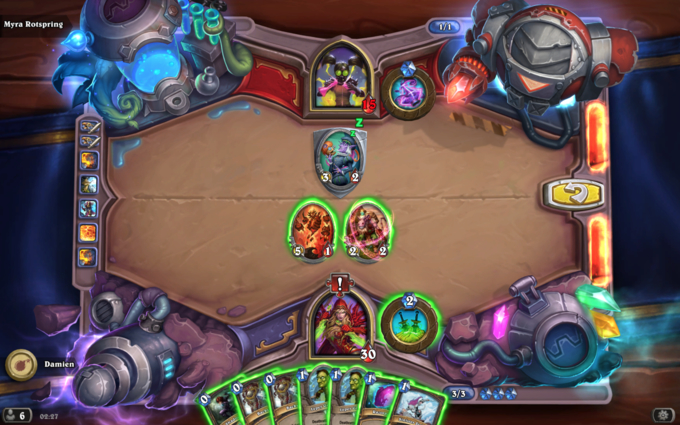
16.
Myra Rotspring's Lethal Puzzle #6
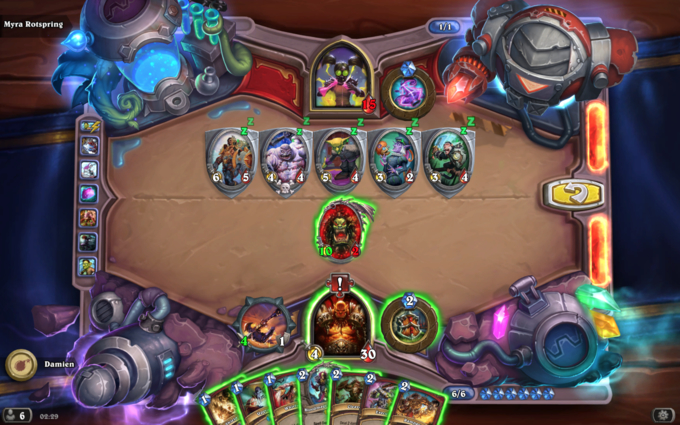
16.1.
Hints
- You do not have enough Mana to play all of your cards, choose carefully.
- The enemy Abomination will do 2 damage to both Heroes.
- Rampage can provide a great boost in Health.
16.2.
Solution
- Use Rampage on Grommash Hellscream.
- Attack the enemy Abomination with your weapon.
- Execute the enemy Lord of the Arena.
- Play Cleave to remove the final 2 Taunt minions.
- Attack the enemy Hero with Grommash Hellscream.
17.
Myra Rotspring's Lethal Puzzle #7
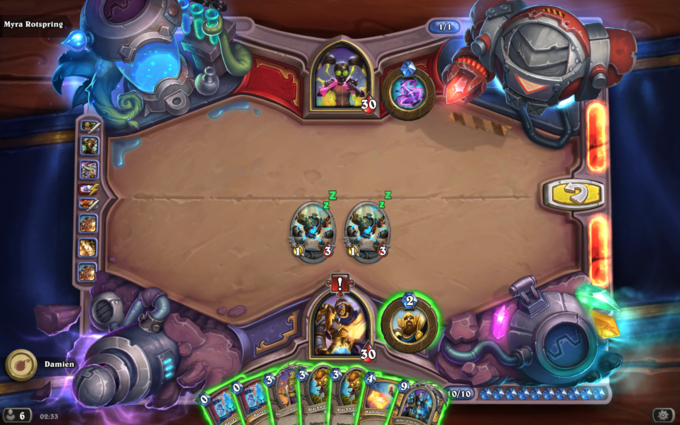
17.1.
Hints
- You have up to 30 Mana to work with thanks to Battery Packs.
- Be careful when sequencing your spells due to Auctionmaster Beardo.
- You do not have enough room on your board for the minions in your hand and the Four Horsemen.
17.2.
Solution
- Play Uther of the Ebon Blade.
- Play Battery Pack.
- Use your Hero Power.
- Play Auctionmaster Beardo.
- Play Blackwald Pixie.
- Use your Hero Power.
- Play Battery Pack.
- Use your Hero Power.
- Use Hammer of Wrath on a Glow-Tron.
- Use your Hero Power.
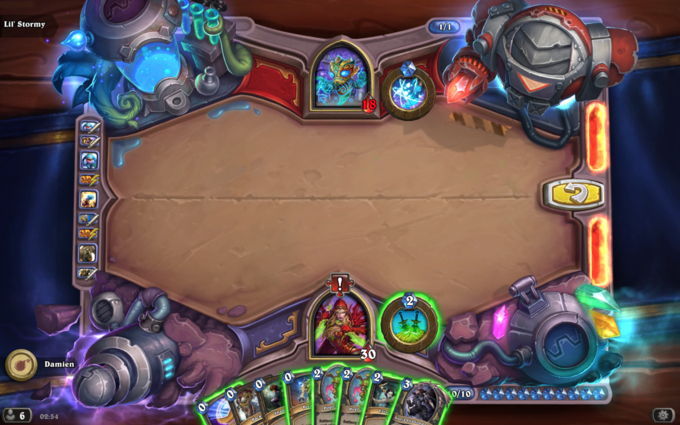
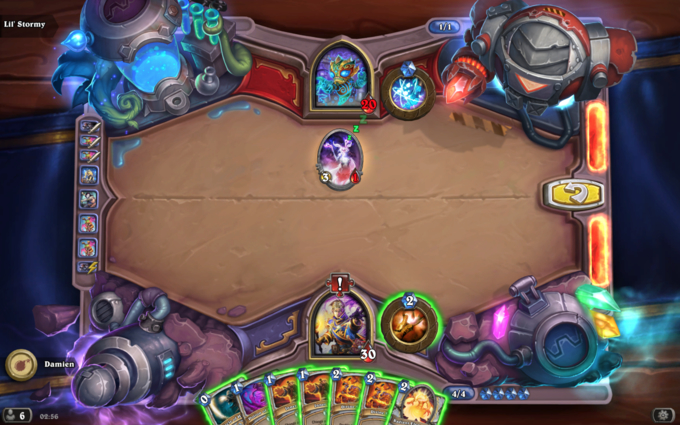
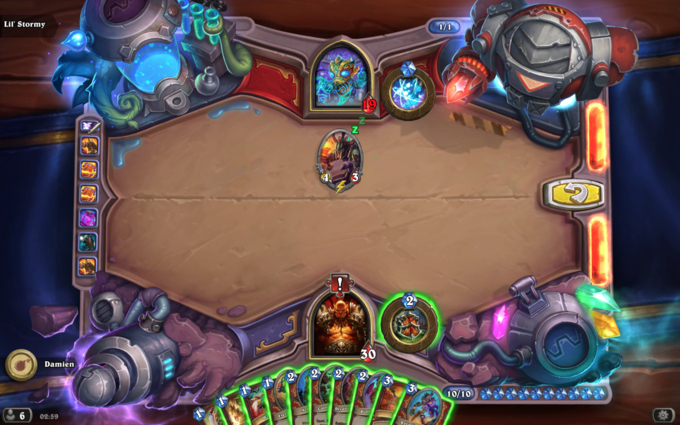
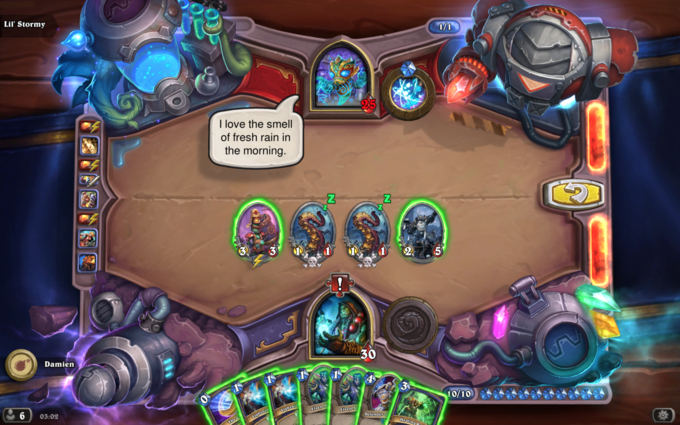
18.
Lil' Stormy's Lethal Puzzle #1
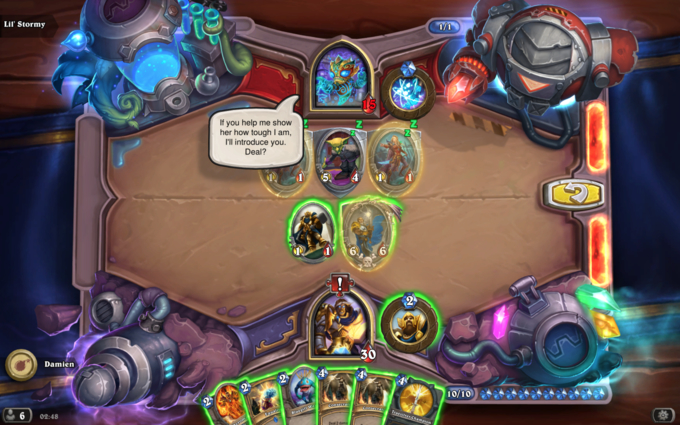
18.1.
Hints
- If you can kill Tirion Fordring, you will gain immediate access to Ashbringer.
- Not only does Wild Pyromancer clear the board with Equality, but it can also boost the damage of Consecration by 1, split across two separate attacks.
18.2.
Solution
- Trade your Silver Hand Recruit into Booty Bay Bodyguard.
- Play Wild Pyromancer.
- Play Consecration.
- Attack the enemy Hero with Tirion Fordring.
- Play Equality to kill off Tirion Fordring.
- Attack the enemy Hero with Ashbringer.
- Play Bluegill Warrior.
- Attack the enemy Hero with your Bluegill Warrior.
19.
Lil' Stormy's Lethal Puzzle #2
19.1.
Hints
- Sonya Shadowdancer can provide you additional copies of Pogo-Hopper.
- Remember to use Backstab while the targets on the board are still weak enough.
- Breakout is a 1-use spell, so ensure you have the maximum damage on board before using it.
19.2.
Solution
- Play Sonya Shadowdancer.
- Play Pogo-Hopper.
- Backstab your Pogohopper to get another copy of it.
- Play another Pogo-Hopper.
- Shadowstep your Pogo-Hopper.
- Play both of your Pogo-Hoppers in hand.
- Play Breakout.
- Attack the enemy Hero with Sonya.
- Attack the enemy Hero with both Pogohoppers.
- Eviscerate the enemy Hero.
20.
Lil' Stormy's Lethal Puzzle #3
20.1.
Hints
- Remember to maximise the Mana-Cost reduction of your spells with Radiant Elemental.
- Inner Fire can lower the Attack of minions as well as raise it.
- Do not play Circle of Healing while you control a Auchenai Soulpriest if you do not wish to clear the board.
20.2.
Solution
- Play Radiant Elemental.
- Play Inner Fire on your opponent's Auchenai Soulpriest.
- Play Circle of Healing.
- Steal your opponents Auchenai Soulpriest with Potion of Madness.
- Play both Divine Spirits on your Auchenai Soulpriest.
- Play Inner Fire on Auchenai Soulpriest again.
- Attack the enemy Hero with your Auchenai Soulpriest.
21.
Lil' Stormy's Lethal Puzzle #4
21.1.
Hints
- Shield Slam can be used on Wrathguard to deal a large amount of damage to the enemy Hero.
- With a large number of cards available, focus on playing the ones the gain your the most Armor for the least Mana.
21.2.
Solution
- Play Cornered Sentry.
- Play Drywhisker Armorer.
- Play Armorsmith.
- Play Eternium Rover.
- Play your copy of Whirlwind.
- Use Charge on your Eternium Rover.
- Trade your Eternium Rover into the Wrathguard.
- Use Shield Slam on the Wrathguard.
22.
Lil' Stormy's Lethal Puzzle #5
22.1.
Hints
- Cure-All can do large amounts of damage when combined with Healing Rain.
- Maximise the damage to your minions to get the most value out of Cure-All.
- Not all minions can survive the AoE damage of Tentacle of N'Zoth
22.2.
Solution
- Play Defender of Argus on either the Cure-All or Stormwind Knight.
- Attack the enemy Hero with the Cure-All and Stormwind Knight.
- Use Elven Archer on a Tentacle of N'Zoth.
- Play Healing Rain
- Use the second Elven Archer on the enemy Hero.
- Play The Coin.
- Use both Lightning Bolts on the enemy Hero.
23.
Lil' Stormy's Lethal Puzzle #6

23.1.
Hints
- Some cards will continue to deal damage to Bittertide Hydra after it has reached 0 Health.
- Wild Pyromancer can do a lot of damage when combined with Commanding Shout.
23.2.
Solution
- Attack the enemy Hero with your weapon.
- Play both copies of Wild Pyromancer.
- Play Commanding Shout.
- Play The Coin.
- Play Whirlwind.
24.
Lil' Stormy's Lethal Puzzle #7
24.1.
Hints
- You do not have enough Mana to play all of your cards.
- Pay careful attention to the effects of Usher of Souls, Hooded Acolyte, and Crazed Worshipper.
- Any minions left on your opponent's board will lower the damage of C'Thun.
24.2.
Solution
- Play Beckoner of Evil.
- Play Spirit Lash.
- Play Shadow Madness on Cult Sorcerer.
- Attack the enemy Hero with Cult Sorcerer.
- Play Circle of Healing.
- Play your second copy of Spirit Lash.
- Play C'Thun.
25.
Electra Stormsurge's Lethal Puzzle #1
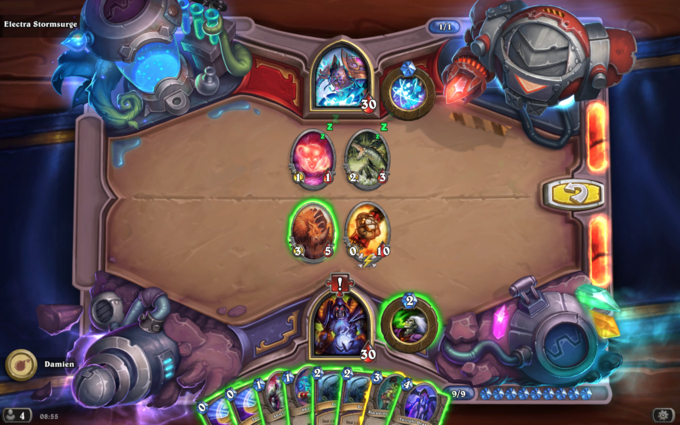
25.1.
Hints
- All damage must be done to the Spud M.E. to kill the enemy Hero.
- Make sure you calculate your attacks carefully as the Spud M.E. will swap sides every time it takes damage.
- Ensure the Spud M.E dies on the correct side of the board when it takes its final point of damage.
- There are multiple solutions available for this puzzle.
25.2.
Solution
- Use the Skaterbot's Magnetic buff to buff Spud M.E..
- Attack the River Crocolisk with the Spud M.E..
- Attack the Spud M.E with your Stampeding Kodo.
- Play Blackwing Technician.
- Play Defile.
- Play Defile a second time.
26.
Electra Stormsurge's Lethal Puzzle #2
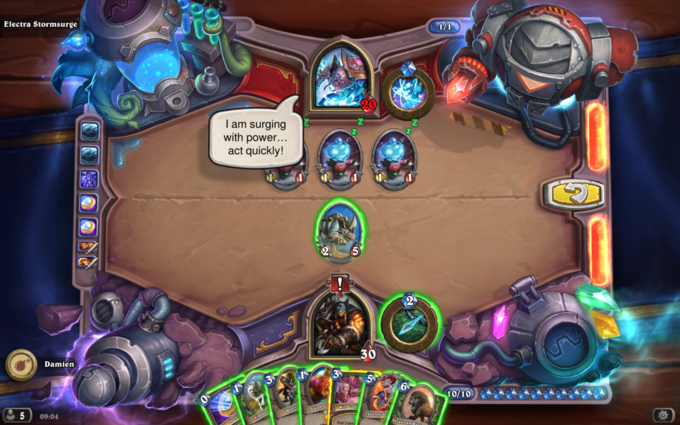
26.1.
Hints
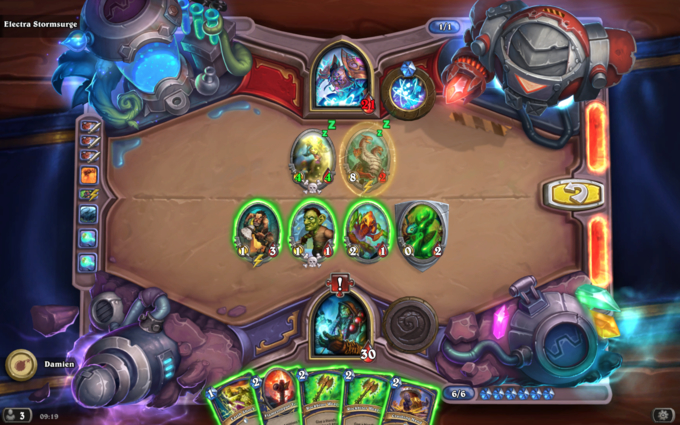
- Timber Wolf is very damage-efficient when multiple Beasts are attacking in the same turn.
- Only your Beasts will benefit from the buffs on the board.
- Hyenas that spawn from Savannah Highmane will receive all board-wide Beast buffs.
26.2.
Solution
- Play Timber Wolf, Swamp Leech, and Savannah Highmane.
- Attack the enemy Hero with your Tundra Rhino, Timber Wolf, Swamp Leech, and Savannah Highmane.
- Play The Coin.
- Use Kill Command on your Savannah Highmane.
- Attack the enemy Hero with the two Hyenas that spawn from your Savannah Highmane.
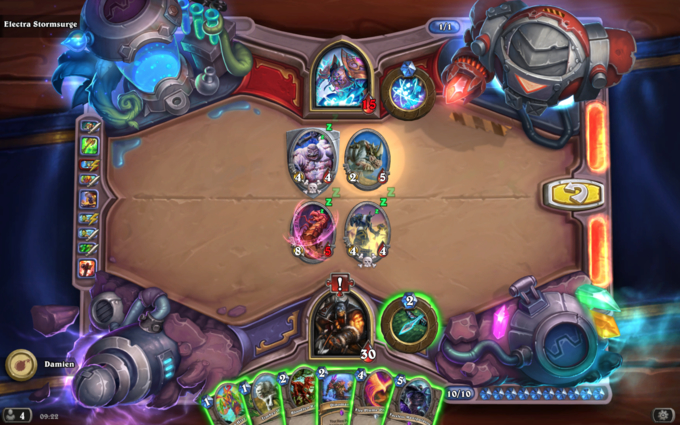
27.
Electra Stormsurge's Lethal Puzzle #3
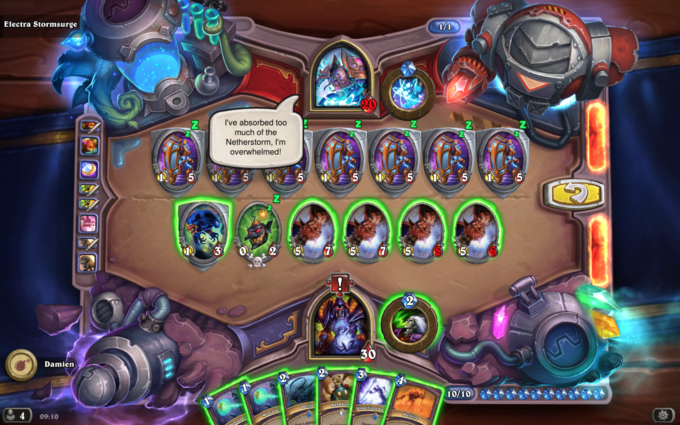
27.1.
Hints
- The staggered Health of your Doomguards prevent you from having a clean Defile board clear.
- Carefully check which cards you have the Mana available to play.
- Defile does not have to be the final stage of a board clear.
27.2.
Solution
- Use Mortal Coil on your Goblin Bomb.
- Play Defile.
- Play Hellfire to clear your opponent's board
- Attack the enemy Hero with your 3 remaining Doomguards.
28.
Electra Stormsurge's Lethal Puzzle #4
28.1.
Hints
- Minions that die next to a Flametongue Totem will allow the next minion alone to get the Attack buff.
- Multiple minions on the board deal damage directly to your opponent under the right conditions.
28.2.
Solution
- Place your Flametongue Totem next to your Emerald Reaver.
- Trade your Emerald Reaver into the Bomb Squad.
- Trade your Leper Gnome into the Bittertide Hydra.
- Use Crushing Hand on the Bittertide Hydra.
- Apply Rockbiter Weapon on your Tunnel Trogg.
- Attack the enemy Hero with your Tunnel Trogg and Stoneclaw Totem.
29.
Electra Stormsurge's Lethal Puzzle #5
29.1.
Hints
- As your Giant Sand Worm is Silenced, you cannot benefit from its passive effect.
- Avoid overkilling the Abomination by too much.
- Think carefully about the best way to use Timber Wolf.
- Take care when you play Emerald Hive Queen.
29.2.
Solution
- Use Faceless Manipulator on the enemy Tundra Rhino.
- Play Timber Wolf and Emerald Hive Queen.
- Trade into the Abomination with your Emerald Hive Queen.
- Trade into the Abomination with your Timber Wolf.
- Play your Bloodfen Raptor.
- Attack the enemy Hero with your Bloodfen Raptor, Giant Sand Worm, and Tundra Rhino.
30.
Electra Stormsurge's Lethal Puzzle #6
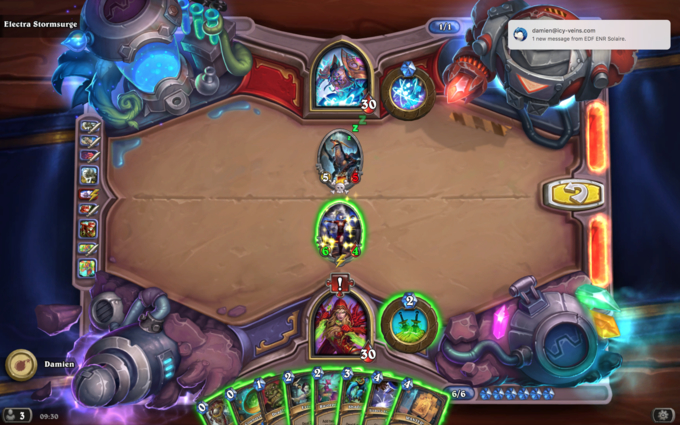
30.1.
Hints
- Think carefully about which spells you wish to use as you only have 6 Mana available.
- Even though WANTED! gives a copy of The Coin in return, the net gain of 3 damage for 3 Mana is not great.
- Unlike Backstab, Shadow Strike also works on Heroes.
30.2.
Solution
- Play Counterfeit Coin.
- Play Razorpetal Volley.
- Kill the Hoarding Dragon with Eviscerate and a Razorpetal.
- Play both copies of The Coin.
- Play Backstab on your Mana Addict.
- Use Shadow Strike on the enemy Hero.
- Use Razorpetal on the enemy Hero.
- Attack the enemy Hero with your Mana Addict.
31.
Dr. Boom's Final Lethal Puzzles
Once you have completed all 29 standard Lethal Puzzles, you will unlock the Lethal section of Dr. Boom's final challenge. Hints and solutions to these puzzles can be found in the Dr. Boom's Puzzles Guide.
32.
Changelog
- 22 Aug. 2018: Guide added
Show more
Show less
This guide is presented to you by Kat, a professional Hearthstone player competing at the highest level since closed beta. She is a consistent legend player in both Wild and Standard with multiple high-rank finishes.
LATEST NEWS
- Hearthstone Brings StarCraft and Major Updates in 2025
- Blizzard at Gamescom 2024
- Icy Veins Seeking Writers for Zenless Zone Zero: Apply Today!
- No BlizzCon in 2024
- Blizzard Games Return to China: New Agreement Signed With NetEase
- Blizzard Reportedly Reuniting with NetEase to Bring Back WoW in China
- Ex-Activision Blizzard CEO Bobby Kotick Shows Interest in Buying TikTok
- Timeline of Blizzard Presidents